Enter keywords or a search phrase below:
Steve, its my understanding that the strips on top of the wings were ordered removed a month after the invasion. This was to prevent them standing out from the air as many were moved to forward bases in France.
The one i will be doing has really grubby looking strips under the fuselage, i think i am going to brush paint them to give the right look.
I am a Norfolk man and i glory in being so
On the bench: Airfix 1/72nd Harrier GR.3/Fujimi 1/72nd Ju 87D-3
Wow Steve thats a great start, not to mention quick! Fit does look very nice. Looking forward to seeing you tackle that paint!
-Andy
Thanks Rooster, the paint is the main reason I chose Gabby's plane. The camo looks so cool.
I believe your right about the upper markings Bish. The Luftwaffe still had quite a presence in July 44.
I filled and sanded the gaps and I must say it didn't take too much. For a quick kit, it is impressive, most impressive.
Steve
Building a kit from your stash is like cutting a head off a Hydra, two more take it's place.
http://www.spamodeler.com/forum/
Hey modelcrazy,
Your Thunderbolt is looking good. I built one of these and thought it was a fun little build. Quick and easy. Maybe I'll build another one. I noticed you haven't added the gun "plugs" yet. Just a heads up if I may. On mine, the fit was not good (read: terrible). It took some serious trimming-filling-sanding-rescribing to get mine to fit. I'm looking forward to seeing how yours turn out. It's very possible that my fit issues were builder's error. Still, just thought I might be able to give you fair warning.
Good luck! I'm looking forward to seeing the paint scheme!
Cheers,
-O
-It's Omar, but they call me "O".
Thanks O.Frankly I forgot about them until I loaded the picture and was looking at it. I was going to say something like "Oops, I forgot the guns" but decided not to.I was wondering about fit. I try tomorrow and see how they fit and try not to break them off going forward.
Very nicely done, looks like you are getting there modelcrazy.
Toshi
On The Bench: Revell 1/48 B-25 Mitchell
Married to the most caring, loving, understanding, and beautiful wife in the world. Mrs. Toshi
Toshi Very nicely done, looks like you are getting there modelcrazy. Toshi
Thanks, it's a pretty fast kit, nothing like your Mossy LOL.O, I installed the guns and I can see what you're talking about. After some trimming and head scratching I found out what the problem was. The outer gun on the port wing would make the part misalign. After some trimming and filing I got it to fit well. The starboard side slid right in no problem.
Port side
Starboard side
I like this kit very much. The guns are engineered level to the ground, which they were. Few kits get this correct. If I were to come up with a con it would be that the tailwheel is molded into an assembly that is installed when the fuse is closed. The tailwheel strut is small and eaisly bent and broken. The other would be the engine. A solid engine mounted to the fuse and the cowling mounted over it wouldn't have made the kit more difficult and made it much easier to paint.
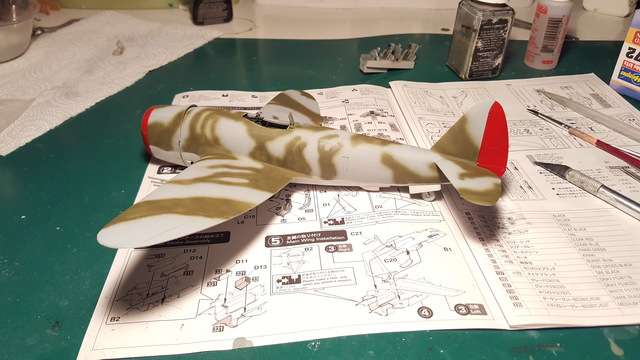
Thanks TJ you got your wish. I got the grey on. Next is the OD stripes.
Now the OD. Pictures show that it was not sprayed on with a whole lot of care, probably found some lying around and sprayed it on.
It looks brown but it's OD green. I need to paint the engine then the red cowl ring and rudder.
Interesting scheme on this one Steve, looking good.
That camo job is very well done Steve!
Well I finished all the little bits on my Tamiya bubbletop. Overall this kit as many of you know is a joy to build. Assembly wise it is pain free. Only real problem I had on this build were the decals not sitting down properly. After several coats of Micor-sol they conformed ok but they do have some wrinkles in them but it isn't noticable unless you get up close. Here are the finish pics...
Thanks for looking and comments/critiques appreciated!
Well done Rooster, I wish more kits gave the option of lowered flaps. That was the 1/48 Tamiya?
Sprayed the red on the cowl ring and tail, now time to get the invasion stripes on.
Thats one nice looking Jug Andy. Great scheme and realy well done.
Great job there Steve.
modelcrazy Well done Rooster, I wish more kits gave the option of lowered flaps. That was the 1/48 Tamiya? Sprayed the red on the cowl ring and tail, now time to get the invasion stripes on.
Yeah it's Tamiya's 1/48 kit. I was lucky enough to pick it up for $15 at a local show late last year.
Looking forward to seeing the invasion stripes go on your build!
Thanks Steve and Bish! I appreciate it!
rooster513Yeah it's Tamiya's 1/48 kit. I was lucky enough to pick it up for $15 at a local show late last year.
Wow, what a great price!!
modelcrazy rooster513 Yeah it's Tamiya's 1/48 kit. I was lucky enough to pick it up for $15 at a local show late last year. Wow, what a great price!!
rooster513 Yeah it's Tamiya's 1/48 kit. I was lucky enough to pick it up for $15 at a local show late last year.
Yeah I couldn't get the money out of pocket fast enough lol! I keep an eye out for another one at every show but so far haven't seen one.
rooster513Yeah I couldn't get the money out of pocket fast enough lol!
That's funny! LOL
Great finish, Rooster.
Awesome paint work on that tricky scheme, Steve.
BK
On the bench:
A lot !! And I mean A LOT!!
2024 Kits on deck / in process / completed
14 / 5 / 2
Thanks BK,
I tried to stick to the painting guide as best I could for Gabby's bird but like most of the kit guides, it get a little vague when it comes to the top where there are not actual photos to duplicate.
modelcrazy rooster513 Yeah I couldn't get the money out of pocket fast enough lol! That's funny! LOL
rooster513 Yeah I couldn't get the money out of pocket fast enough lol!
The best part is the kit was marked $20 (which I was more then willing to pay) and all I did was pick the box up to look at and before I could open my mouth the guys brother, who was watching his table while he was away, says $15? And I said "that's what I was thinking too". Must have been the nice face discount lol.
I sprayed the invasion stripes painted on. Now a gloss coat and decals.
Looks good steve.
You are really flying through that Jug, Steve. It looks super cool.
Why I attempt to power through the Kingfisher overhaul and pull my hair out with that I have been slowing clicking away with my Bubble top -N. I have the pit completed and I built it OOB except I added some PE belts that needed paint. They really made the pit look so much better. I am currently working on the seems for the fuselage but the wings are ready for install when that is done. I will install the pit once I have the seem work done. More to come later. Thanks for looking.
Hi,
The cockpit looks great, and I agree, the seatbelts do really seem to add to it.
Pat
Really nice start BK!
Our community is FREE to join. To participate you must either login or register for an account.