SEARCH FINESCALE.COM

Enter keywords or a search phrase below:

The Official M1 Abrams Group Build 2011

92152 views
233 replies
1 rating 2 rating 3 rating 4 rating 5 rating
  • Member since
    April 2005
Posted by Thunderbolt379 on Tuesday, November 29, 2011 8:10 PM

Hi Chris -- I'm sure it would, it's basic spraywork, brush the rubber areas, overspray again, and pinwash and drybrush to finish off. Check out my tute at http://worldinminiature.blogspot.com and if you can a) unmount the indies safely, and b) get around the curved sections with enough elbow room to get a small brush inside for the pads, it should work fine.

Cheers, M/TB379

PS: Did the shade and fade coats today, this beast is moving along!

http://worldinminiature.blogspot.com/

  • Member since
    April 2005
Posted by Thunderbolt379 on Thursday, December 1, 2011 12:09 AM

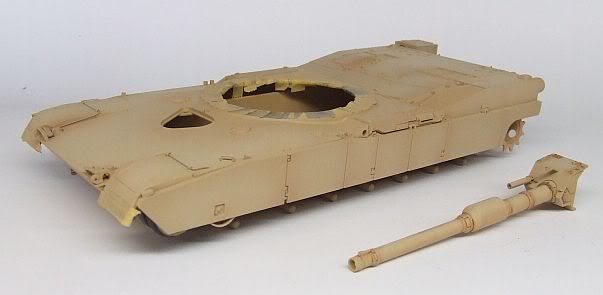
Progress over the last couple of days -- first the main hull with fade and shade coats on, these were mixed using he Acryl base colour and tints of Tamiya Acrylics, XF-2 White and XF-64 German Red-Brown respectively, and thinned way down to mist on. The gun barrel and turret were also treated separately, and the barrell is shown here with the first round oil wash weathering done:

Next, the turret, first round wash done:

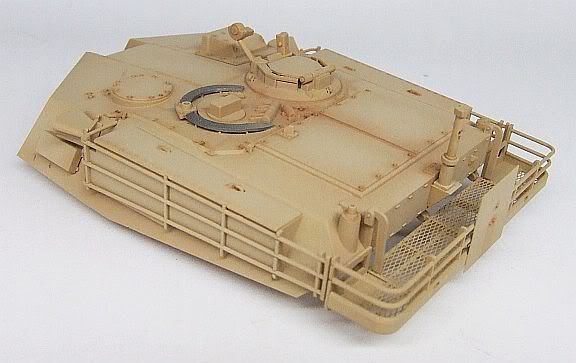
Then I handled the running gear, oil wash to start with, then a few flecks of bright rust and some bare metal, done in enamels (bottom rank done, top rank in basecoat):

And finally, running gear mounted:

The treads are loose so I can unmount them if I decide to do any more to the suspension, though there's precious little to be seen. The tires look pretty stark against the tread blocks, if Mig pigments don't reduce the starkness acceptably I can unmount the wheels and give them a quick spritz with the ultra-thinned Buff.

Plenty to do yet, head and tail lights, periscopes, tow cables, intakes and exhausts, smoke gren orifices, antennas, decals, stowage, dust... Getting there one job at a time.

Cheers, thanks for looking, Mike/TB379

http://worldinminiature.blogspot.com/

  • Member since
    April 2005
Posted by Thunderbolt379 on Friday, December 9, 2011 2:34 AM

I've finally managed some bench time, and done the second round oil wash on everything but the skirts, and manged to forget them!

Now she looks battered and weather-worn, in the worst the Gulf can throw at her! Now, some more muck on the skirts, then I'll mount the cables and look at the MGs, finish the detail painting and start thinking about the periscopes. My stowage accessories pack is in the bottom carton of a stack of five in my stash, so it won't be coming out this side of moving house... Not sure what to do, maybe buy some new stowage!

Cheers, Mike/TB379

http://worldinminiature.blogspot.com/

  • Member since
    September 2006
  • From: Dripping Springs, TX, USA
Posted by RBaer on Friday, December 9, 2011 8:37 AM

Looks the part! What's in the plans for markings, or did I miss that?

Apprentice rivet counter.

  • Member since
    April 2005
Posted by Thunderbolt379 on Friday, December 9, 2011 4:44 PM

Thanks RBaer! I'm using an Echelon sheet, she'll be "Atlas" of Tiger Battalion, tact board # 81. Not far to go and I'll be giving the decals a dip...

M/TB379

http://worldinminiature.blogspot.com/

  • Member since
    April 2005
Posted by Thunderbolt379 on Sunday, December 11, 2011 5:58 AM

Today's progress was to more or less complete the oil weathering by dirtying up and scratching the flank armour, bow and tail, doing the engine grills with black wash, painting the commander's periscopes, and washing the central exhaust grill preparatory to a pigment job to create the heat stain/burning often seen. The head and tail lights are now painted also and I've been fiddling with the MGs.

I managed to get an oily stain on the engine deck that wasn't meant to be there, yet it looks random... I'll decide whether to remove it after I've looked at it a bit more.

Four periscopes to scratch and paint, grenade launcher an towcable to remount after they fell off, MGs and ammo cans to do, then I'll be ready for decals.

M/TB379

http://worldinminiature.blogspot.com/

  • Member since
    September 2006
  • From: Dripping Springs, TX, USA
Posted by RBaer on Sunday, December 11, 2011 8:20 AM

Engine deck looks great.

Apprentice rivet counter.

  • Member since
    April 2005
Posted by Thunderbolt379 on Tuesday, December 20, 2011 7:40 AM

I made some progress today, sprayed the minimal stowage supplied in the Tamiya kit, mounted the Browning and put most of the decals on. The Echelons go on very nicely. The instructions indicate that the battalion numbers go on the topmost inclined surface of the rear plate above the engine grills but all my references suggest they go on the next inclined surface down -- but I can't get a clear look at the rear end of an ODS-era Abrams... Anyone have any ideas about that?

New pics soon. The GB is due to end at the turn of the year but, as always, an overrun is very welcome for those who would like to finish and claim a badge (which reminds me, badges are needed!)

Cheers, Mike/TB379

http://worldinminiature.blogspot.com/

  • Member since
    October 2009
Posted by Kentucky Colonel on Tuesday, December 20, 2011 7:56 AM

Good work guys.  I'm going to get mine out and finish it before the end of the year.

  • Member since
    September 2006
  • From: Dripping Springs, TX, USA
Posted by RBaer on Tuesday, December 20, 2011 7:16 PM

I may have to get mine cranked up again, it's soooo close.....

Apprentice rivet counter.

  • Member since
    October 2011
Posted by GooglyDoogly on Tuesday, December 20, 2011 8:44 PM

Sorry for neglecting this build, but I have finally had some time to work on this kit. :)

Started working on the tracks. This is the thing that made me drop the kit and build something else for a while. It's a very tedious process, with no clear advantage since half of the tracks is gonna be covered with the ballistic skirts.

In fact, I bought the Tamiya kit just to use its tracks and accessories, but decided to persevere and just use Dragon's tracks.

I'll probably just build this Tamiya kit as a Marine OIF gun tank.

Roadwheels and sprockets are all primed and ready for paint.

I foolishly followed Dragon's instruction when assembling the tow hooks (?)  Not only are they positioned incorrectly, but looking at pictures, I don't think these are used often.

Gonna paint this gun tank tonight. Btw, does anyone know if any aftermarket companies sell stowage racks? This kit only comes with one water rack, and I believe a lot of 3ID tanks have at least two of those.

  • Member since
    April 2005
Posted by Thunderbolt379 on Monday, December 26, 2011 1:23 AM

GD -- sorry I didn't reply, my webmail has changed format and blocks me from seeing material low in messages -- GRR! Great progress, looking good. In answer to your question, the only standard rack kit I recall was done by Verlinden as an M1A1 upgrade for early M1 kits and is long OOP. But there is a rack extender kit on the market, for the secondary stowage rack added behind the normal one -- I wish I could remember where from...

Promised pics at last:

This is as the decalling process was getting underway.


More decals on, and some stowage sprayed NATO green to break up the sand a bit (materiel flown in from Europe, perhaps, and not yet repainted...)


And a closeup on the weathering at that point.


As of today she is almost finished. All decals are on, baring the one that flew away when I was cutting the sheet, never to be seen again. I also can't locate my Verlinden rubdown sheet, and I'll need that to replace the missing company ID. The Echelons went on beautifully but are rather shiny, as I've found with them in the past, so I'm holding off doing final dust until I can see about a decent acrylic flat to overcoat those panels.

I mounted the second MG and scratched the antennae today, but the black acrylic is not drying as fast as it might, and I'm not happy with the finish, I might pick up some black enamel and repaint them, though that can be done after they're mounted. Mounting will probably be tomorrow, I can dust the tires, and call this animal finished as far as she's going to be at the moment.

Cheers, Mike/TB379

http://worldinminiature.blogspot.com/

  • Member since
    October 2011
Posted by GooglyDoogly on Monday, December 26, 2011 3:04 AM

Your Abrams looks great. :) Looks like you're gonna be able to meet the year-end deadline. Can't wait to see your tank all finished!

PS: Thanks for the info. I may have to track down that Verlinden set on Ebay. :)

  • Member since
    October 2011
Posted by GooglyDoogly on Monday, December 26, 2011 5:08 AM

Almost finished with the hull. All I need to do is add the front and tail lights.


I finally decided on "Crusader 2", mainly because it was the only Abrams in the Echelon sheet I have that had the turret APU. Although I really would have liked to have chosen a tank that had chevron markings. :(


Tracks and bottom hull. I didn't worry too much about the hull bottom and just gave it some rudimentary shading because well, I'll hardly ever see it.

I'm quite pleased by this Dragon kit. Highly detailed, and it even has a better fit than the Tamiya Abrams!


Up next is the turret.

  • Member since
    April 2005
Posted by Thunderbolt379 on Monday, December 26, 2011 5:43 AM

GD -- absolutely soo-poyb! This is going to be a bad boy you can really be proud of! Looks like we're finishing neck and neck!

I wanted to build the Tumpeter HA as well but I'm out of time... I might do it next year for the hell of it, I have a M981 FISTV waiting for NATO camo, and I wanted the HA in the same scheme so i could do them as companion paint projects. Hmm, I'm also in the market for an M60A1 w/ ERA in ODS sand as a companion to my Abrams -- I need a GB for it! Smile

Cheers, M/TB379

http://worldinminiature.blogspot.com/

  • Member since
    September 2006
  • From: Dripping Springs, TX, USA
Posted by RBaer on Monday, December 26, 2011 9:17 AM


Looking really good, you guys!

Apprentice rivet counter.

  • Member since
    April 2005
Posted by Thunderbolt379 on Tuesday, December 27, 2011 7:05 AM

I'm happy to say this beast has passed the finish line with a few days grace!

She's as done as she's going to be at this time, baring that one decal that needs either finding or replacing, and some reliable clear flat to take the shine of the decals, then some final dust.

Bring on the pics:


Scratching the antennae was easy, tying knots in spandex thread was not... It took three goes to tie down the tall mast, and most of an afternoon of fiddling.

I'm not really happy with the way the periscopes came out, they're better than the bits of clear plastic supplied in the kit, but they don't look terribly convincing. I must find a better method...

Cheers, thanks for looking, and thanks for taking part in the Abrams build this year. If there's interest and folks want to take another shot, I'd be very happy to host another Abrams GM in the future; and of course, those still building are welcome to take all the time they need to finish.

I promise some badges very soon!

Mike/Thunderbolt379

http://worldinminiature.blogspot.com/

  • Member since
    August 2005
  • From: Sydney, Australia
Posted by Phil_H on Tuesday, December 27, 2011 7:45 AM

Looking good Mike, I like the light weathering so far.

Just a couple of little detail points.

The outer hub on the roadwheels and idlers are oil reservoirs and are made of clear plastic so the oil level can be inspected. These appear dark, though they could be covered in dust. This is how it appears when clean http://svsm.org/gallery/m1a1abramsjh2/DSC08861

The little part above the muzzle is the muzzle reference sensor. It's difficult to tell from the camera angles, but it appears that you may have mounted this parallel to the barrel. This is actually slightly offset and is aligned to the gunner's primary sight window. The gun sight computer can use the MRS to compensate for barrel deflection caused by uneven heating (eg. wind cooling the barrel on one side but not the other)

You may consider a darker wash in the bores of the smoke grenade launchers and the co-ax mg to enhance the appearance of depth.

Looking forward to seeing it when you have dusted her up a little and loaded up some stowage. Smile

  • Member since
    October 2011
Posted by GooglyDoogly on Tuesday, December 27, 2011 3:10 PM

Beautiful tank, Mike. :) It's funny because I bought *another* Tamiya Abrams for the sole purpose of building it as a ODS Abrams, because of your build. Your tank reminded me how awed I was as a kid, as I saw Abrams rushing through the Iraq/Kuwaiti desert, like they owned the place. :)

  • Member since
    October 2011
Posted by GooglyDoogly on Tuesday, December 27, 2011 4:27 PM

I'm intent on finishing this tank before Dec. 31st! My biggest hurdle right now is how to arrange all the stowage stuff.

Here is the hull front. I love Echelon decals.They're so thin, and easy to use, but not too thin that they break apart.


Here's pics of the turret. Pardon the shine on some of the parts, I haven't sealed the turret yet with dull coat.

I love the fact that the commander's cupola can rotate 360 degrees. I should do this to my Tamiya Abrams.

Some of the rails on the turret broke, I glued them back, but they looked bent. But oh wells, they're gonna be covered with gear.

Here's the Tamiya crew. They look quite good. Great combat poses, and the faces are very expressive. Wish they came wearing nomex suits though. I also drilled the antenna base mounts and inserted a stiff wire in them, for added strength. Stretched sprues kept breaking. :(

I added a little strip of PE for the handhold for the commander's hatch.

Here's the turret APU. I'm gonna put decals on them later tonight.

CIPs. It's awesome that Dragon would supply stiff stickers as the CIPs.


So politically incorrect, but that just adds to its awesomeness.


Last couple of pics.

Later on tonight, I'm gonna have to add some decals, paint the M240, weather some parts, and paint all the gear.

  • Member since
    October 2009
Posted by Kentucky Colonel on Tuesday, December 27, 2011 4:37 PM

Bad news!!

I just discovered my 7.62 machine gun barrel is broken in half. I have both pieces but I doubt they will ever be straight. What do i do now? All I have is another 50 cal but I don't know if that will work.

This might be the end of my model if I can't make it work.

  • Member since
    April 2005
Posted by Thunderbolt379 on Tuesday, December 27, 2011 4:57 PM

Hi guys --

Phil H -- thanks for the points. On the oil level clear caps, there seemed no way to make them look clear, I considered gloss coating them to look like plastic but with all the dust on the tracks it seemed most straightforward to just let them 'be dusty.' Re the MRS, Tamiya molded it solid with the barrel so there's no opportunity to adjust the fit. And the smoke grenade launchers -- yes, they could do with a wash. I usually paint them black but on checking my refs the throats of the cast aluminum units are the same color as the exterior, but the illusion of depth would certainly be enhanced by a dab of diluted oils.

GD -- awesome! I think you have the best of the build, and I sooo must put a Dragon together one of these days!

KC -- the barrel of my 7.62 snapped on the sprue, I used a spot of gel superglue and added it right back on, (after all painting was done), and luckily I managed to get it completely straight. Give it a go, it might work!

Cheers, Mike/TB379

http://worldinminiature.blogspot.com/

  • Member since
    August 2005
  • From: Sydney, Australia
Posted by Phil_H on Tuesday, December 27, 2011 10:26 PM

Mike,

I hear you about the hubs, I reckon they'd only appear shiny and black straight after washing. Drive cross country for a few minutes and they'd be coated in dust.

It's interesting that the MRS is moulded to the muzzle tip. Granted, it is an older kit though. Every other Abrams kit that I'm familiar with has it as a separate part (including Tamiya's own M1A2 kit). Smile

  • Member since
    October 2009
Posted by Kentucky Colonel on Thursday, December 29, 2011 8:05 PM

I'm almost finished except for the 7.62 machine gun. I can't seem to get the barrel straight. For that one thing I'd be taking pictures tomorrow and posting them, that's all I have left. I've added all the storwage stuff and weathered it for Iraq

What should I do?

  • Member since
    April 2005
Posted by Thunderbolt379 on Thursday, December 29, 2011 8:19 PM

KC -- I reckon you could say the vehicle is seen at a field depot for maintenance, the 7.62 was damaged on her last patrol and has been unmounted for change-out... Pending either getting the barrel straight or sourcing a replacement?

GB badges coming today -- um, better late than never, right?!

Cheers, Mike/TB379

http://worldinminiature.blogspot.com/

  • Member since
    April 2005
Posted by Thunderbolt379 on Friday, December 30, 2011 2:02 AM

Hi all,

Yes! Group Build badges are available -- check out Page 1 for a couple of really cool bages -- with an entire day to spare (in fact two in the US!)

Cheers, Mike

http://worldinminiature.blogspot.com/

  • Member since
    August 2010
  • From: Beaverton, OR
Posted by Ghostrider114 on Friday, December 30, 2011 4:17 PM

cool badges, this GB has definitely been a learning experience for me

  • Member since
    October 2011
Posted by GooglyDoogly on Saturday, December 31, 2011 2:32 AM

Ok, I've been working on the gear and stowage stuff. It's taking me quite a bit because it takes a long time for me to decide whether I want to glue a particular piece in place on a particular spot.


Finished the M240.


I should have taken a picture of the gas can stowage rack, before I glued that CIP in place.

I really enjoy weathering this beast.

Next up, more gear, and paint the crew!

  • Member since
    October 2009
Posted by Kentucky Colonel on Saturday, December 31, 2011 9:11 AM

Here's my USMC M1A1HA (Heavy Common) Arbrams.

Besides the broken 7.62 machine gun earlier in the year I left the model in the room where my dog was and several PE parts got broken and lost. I replaced what I could and I used some of the storage stuff to cover what I could not fix or replace. Besides that I might have gone overboard with the storage and fuel stains.

  • Member since
    August 2010
  • From: Beaverton, OR
Posted by Ghostrider114 on Saturday, December 31, 2011 3:26 PM

it looks like that M1 is ready for the long haul.  It might be a little too much stowage, I'm not sure they'd want to stack so much on the blow-away hatches, or else they might not be blown off if the tank takes a hit.  But I'm no expert, someone who knows a bit more about Abrams might be able to weigh in on that.

JOIN OUR COMMUNITY!

Our community is FREE to join. To participate you must either login or register for an account.

SEARCH FORUMS
FREE NEWSLETTER
By signing up you may also receive reader surveys and occasional special offers. We do not sell, rent or trade our email lists. View our Privacy Policy.