SEARCH FINESCALE.COM

Enter keywords or a search phrase below:

The Official M1 Abrams Group Build 2011

92153 views
233 replies
1 rating 2 rating 3 rating 4 rating 5 rating
  • Member since
    April 2005
Posted by Thunderbolt379 on Monday, January 10, 2011 8:52 PM

Cyeargin -- great link! Lots on info there! And very well timed, I was just about to run out to the LHS and see what they've got...

Cheers, Mike/TB379

http://worldinminiature.blogspot.com/

  • Member since
    August 2005
  • From: Sydney, Australia
Posted by Phil_H on Monday, January 10, 2011 8:56 PM

cyeargin
I could be wrong, but I was of the understanding the MM Sand was a match for the current OIF CARC tan, and that the Desert Storm tan was a tad darker ( the MM Army/Marines Tan?). I believe Heavy Arty (Gino) could clarify if he's following this thread...

You are indeed correct. MM US Army/Marines Gulf Armor Sand (enamel 2136 / acrylic 4812) is the more appropriate colour for a Desert Storm era vehicle. There is no FS number for this colour as it was mixed up ad-hoc in Kuwait from whatever they had on hand.

For post ODS CARC Tan,  FS33531 is more appropriate.
Model Master: Sand FS 33531 (Enamel-1706/Acrylic-4720 )
Humbrol: Light Stone 121
Gunze: (discontinued) Aqueous Hobby Color: Yellow  FS 33531,H-313  / Mr Color:  Yellow  FS 33531, 313
Vallejo Model Air:  Sand 71075

  • Member since
    March 2003
Posted by cyeargin on Monday, January 10, 2011 9:30 PM

Glad I could be of help...I'm itching to get home and work on my TUSK II Abrams, but alas I am deployed on a TDY assignment this week...

  • Member since
    March 2003
Posted by cyeargin on Wednesday, January 12, 2011 8:15 PM

As mentioned, I am away from my modeling bench this week, but I've been doing some "mental modelling" whilst on the road, and would like some input: one of the common complaints ( for that matter, about the only one) I have heard regarding the Legends TUSK II set is the difficulty in cutting the thick clear stock supplied for the various gunner's shields, and getting them the correct shape ( i.e. for the TC's .50 cal shield). Here is the solution I'm pondering: rather than cutting the thick clear plastic stock with a hobby knife, I'm considering cutting 10 or 20 thou clear styrene with scissors, laminating them to the appropriate thickness, with each laminate being joined using Future. While I'm certainly sure this would make getting the right shape window easier, I'm not sure if laminating the clear styrene would degrade the clarity of the individual laminates ( I'm hoping the Future will help with this) Thoughts?

  • Member since
    September 2008
  • From: Minneapolis MN
Posted by BigSmitty on Wednesday, January 12, 2011 8:23 PM

I don't think the Future would degrade the clarity of the laminate.  All my experiences with Future resulted in a clearer canopy/vision block/etc.


Matt - IPMS #46275

"Build what ya love and love what ya build..."

Build Logs, Rants and Humor


  • Member since
    March 2003
Posted by cyeargin on Wednesday, January 12, 2011 8:43 PM

Yeah, that's what I'm hoping....the concern for the loss of clarity was in laminating the sheets together; if I'm lucky the Future will negate that. On the subject of vision blocks, on the commander's cupola on the Dragon M1A2 SEP I tried a tip I learned from Heavy Arty: dip the block in Future, paint the backside of the block Tamiya Clear Red, and paint the inside of the vision block semigloss black; the resulting effect is FANTASTIC, and replicates the anti-laser coating on the Abrams vision blocks very well.

  • Member since
    April 2005
Posted by Thunderbolt379 on Saturday, January 15, 2011 6:08 AM

Made some progress today, not a lot but until the PE sheet shows up and I can track down the match or a good mix for the paints, there's no point rushing (especially as I'm actively working on five models simultaneously... There's always something to turn my hand to!)

Superdetailing of the Tamiya -A1 is continuing. I picked up half-mil rod the other day and used it to create the six missing bolt heads on top of the mantlet:

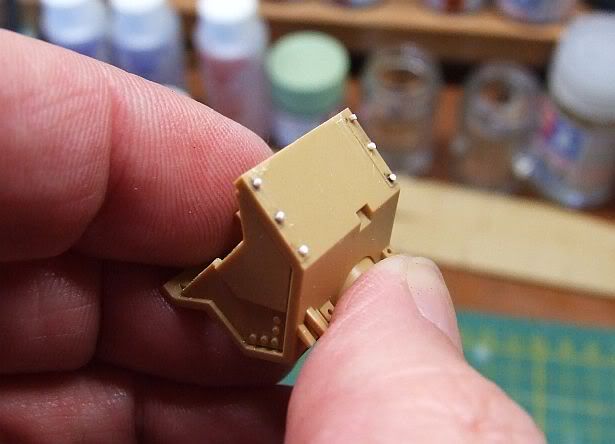
They may be a bit prominent... I have the option of removing them and trying again. Having more or less succeeded with the half-mil, I moved down to quarter-mil for the six missing bolt heads on the small plate just in front of the crosswind sensor:

At that point I really felt I was having an attack of AMS. See my latest blog post (address in the sig line below) for how I manipulated pieces of plastic so small they were vanishing on my cutting mat... Note that I also fitted the side rack rails in this session, and the crosswind sensor went on last.

The last mod for this round was the square lugs at the front of the side skirts. The plastic was trimmed away and replaced with square brass tube. The wall thickness is overscale but it's better than solid:

I relocated the portside grab handle a couple of days ago, I'll photograph that area when I build the missing vent cover just back of there. Then I can make the Z-springs and add all the fore hull detail parts. The lip around the drivers hatch is erroneous but it'll have to stand, there's no way I can remove it and correct the profile without seriously chewing up the plastic around it, and I'm not prepared to go that that length.

The bustle rack will wait until the PE fret arrives and hopefully in the same time frame I'll source the MM Acryl match for the non-FS ODS Army/Marine Sand. Then I'll be pretty much ready to rock. Between now and then there are a few mods left to go, the batch mentioned above plus the hinged flap behind the mantlet, and make a call on how to rebuild the periscopes. Even something simple will look better than the clear film in the kit...

Cheers, Mike/TB379

http://worldinminiature.blogspot.com/

  • Member since
    September 2003
  • From: South Central Wisconsin
Posted by Daywalker on Saturday, January 15, 2011 2:55 PM

Great stuff Mike, wish I had noticed those missing bolt heads on the mantlet and the panel behind the crosswind sensor.  Good eye for the details! Yes

Frank 


  • Member since
    September 2006
  • From: Dripping Springs, TX, USA
Posted by RBaer on Sunday, January 16, 2011 2:47 PM

Glad you guys are moving faster than me, now I have examples of what I need/want to do.......

I have the front of the Acad turret built up to match the Trump turret, and am waiting for the putty (milliput) to set before finalizing the shape. I also did the no-slip coating on the Acad hull top, using textured Rustoleum, but my masking was not great, so I'm a little unsure about it. I'll have pics up shortly, it's a pain on my current setup.

Apprentice rivet counter.

  • Member since
    October 2009
Posted by Kentucky Colonel on Sunday, January 16, 2011 6:22 PM

You ALL will get ahead of me.

I ran into a bunch of problems with my PE, ever some stuff that was already made up and put on the tank. Lets just say it's NOT good to leave a pet dog alone in the same room as your model ever for a few minutes.

Instead of getting another set of PE I'm just trying to save what I can and then use model parts in their place. Oh, well.

The bustle rack extension has not come in yet but the Echelon 1st Marine Div decals and the Legend M1 tank storage set came in.

  • Member since
    April 2005
Posted by Thunderbolt379 on Sunday, January 16, 2011 7:17 PM

KC -- I feel your pain, especially after fiddling with PE in the first place... I've only done a PE suite on one model so far and it was not the easiest build...

M/TB379

http://worldinminiature.blogspot.com/

  • Member since
    October 2009
Posted by Kentucky Colonel on Monday, January 17, 2011 6:46 PM

I've got a question that I need an answer for so I can build the nessary parts.

I'm building a USMC M1A1HA (Heavy Common) OIF 2003.The Echelon decals booket say I need to add a EPLRS antenna and a Infantry Telephone box, which I have already started.

My question is what about the Slave Receptale box below the telephone box in the rear that I see in pictures of some USMC Abrams? Or did they ever have them in 2003?

An update on my damanged PE. Some of the model parts were cut off and the PF guled on, some of the handles got damanged enough where I can't totally rebuild them. I'm not going to get a new PE set so I guess I'll have to put some supplies on or next to them to help. The others are good enough to get by. I did plan to do a little battle damange like running against trees/cars/walls etc so I might do that on the bad side.

  • Member since
    March 2003
Posted by cyeargin on Monday, January 17, 2011 6:55 PM

[View:/themes/fsm/utility/IMAG0009:550:0]


Not the best picture ( new Smartphone camera, wife has good camera, LOL), but wanted to show some progress on mine; got most but not all of the stock turret parts assembled, and have started adding the TUSK II components. The Counter-sniper/Anti-material .50 cal mount went together better than I thought, altough the Legend barrel was pretty awful...I ended up replacing it with the barrel from a Dragon Ma Deuce I had in the spares box. The sharp-eyed will note the side rails on the loader's side are missing the bottom two front rails; I had already added the smoke grenade launchers, and then found out from another modeler that if using the TUSK II package that the stock placement of the launchers is too low, and they have to be raised to clear the Reactive Armor Tile frames per the prototype. In the process of removing the launchers I broke the two rails, which will be replaced with spared I have. The SGL's will be remounted after the RAT frames are mounted, using photos in Tankograd's TUSK book as reference.

  • Member since
    April 2010
  • From: Yuma, AZ
Posted by Ripcord on Monday, January 17, 2011 6:57 PM

I was thinking about trying an armor piece for this build.  As this would be my first armor build, would this be a good buy?

http://www3.towerhobbies.com/cgi-bin/wti0001p?&I=LR1998&P=IR

Its a trumpeter 1/72 abrams for 8 bucks. 

Mike

  • Member since
    April 2005
Posted by Thunderbolt379 on Monday, January 17, 2011 7:37 PM

KC -- the floor is open to your question, Infantry Telephones will call for a knowledgable head!

Cyeaergin -- spectacular! You certainly invested in this build, I checked out the TUSK II conversion and it's one of the pricier items, I found one for Aus$112...

Ripcord -- your link actually goes to a Bradley kit, but a Trumpeter 1:72 Abrams should be a good, sharp lil build and an excellent economy, you're most welcome to join! Shall I update the roll for you with this item,?

Cheers, MIke/TB379

http://worldinminiature.blogspot.com/

  • Member since
    March 2003
Posted by cyeargin on Monday, January 17, 2011 8:57 PM

Thunderbolt379

Cyeaergin -- spectacular! You certainly invested in this build, I checked out the TUSK II conversion and it's one of the pricier items, I found one for Aus$112...

Cheers, MIke/TB379

Thanks, Mike. The TUSK II is indeed a bit pricey, but I got it with free shipping from Lucky Model, so that helped a bit. So far it has been a joy to build; the resin parts are really clean and well molded, and they mesh very well with the Dragon base kit. As far as investing in the build, in addition to the TUSK set, I have in addition acquired the Bronco workable track set to replace the kit tracks. Plan on getting the Legend stowage set too; TUSK tanks are by nature light on stowage, but need the additional ammo boxes and cooler.

Since my last post I have completed repairing the boo-boo with the side rails, have repaired where I removed the Smoke Grenade Launchers from their previous location, have installed the loader's side Reactive Armor Tile brackets, added a coat of clear red to the TC's periscopes, and have punched metallic green and gold circles from confetti and added them to the inside of the GPS/LOS window to represent the optics of the gunner's sight.

  • Member since
    April 2010
  • From: Yuma, AZ
Posted by Ripcord on Monday, January 17, 2011 9:26 PM

O.o  How did I miss that.....   I am going to go find an Abrams. (Before Dec!).

Mike

  • Member since
    September 2008
  • From: Minneapolis MN
Posted by BigSmitty on Monday, January 17, 2011 11:09 PM

Some work done on the "business end" of the Panther II.  I don't know what Dragon/DML did but the quality of the molds for the Mine Clearing Assembly is complete crap.  Soft plastic, HUGE gaps, and sprue attachment points about twice the size of any on the normal M1A1/A2 sprues in the box.  Shame really, as the rest of the kit is a real gem.  Magic Tracks are not that great either, a fair number of them are warped cross-section.  I may spring for some AFV or other AM tracks.  Or I might just steal the link and length tracks from the DML M1A1HA or DML M1A2 that are in the stash.  Anyways, here's some pics...I still have a lot of clean up to do on the front end, gaps to fill, etc.  I found it easier to work with after everything is attached.


Cleaning up the seam on the last photo, the middle of the "dog bone" roller is gonna be a hoot.


Matt - IPMS #46275

"Build what ya love and love what ya build..."

Build Logs, Rants and Humor


  • Member since
    October 2009
Posted by Kentucky Colonel on Saturday, January 22, 2011 4:07 PM

Some new toys came in today.

Here's a picture of the Mig Gulf War Sand pigments and the Pro Modeller Sand pigments and Sand wash. I might use all three. Does anybody think I should use one over the other?


Here's all I've been able to get so far. First I had to remove a lot of the damanged PE and replace them with the model parts. I tried to fix the PE handles on one side as best as I could so I will try to add a little "battle damange" on that side, like the tank running against a wall or sometrhing.

  • Member since
    September 2006
  • From: Dripping Springs, TX, USA
Posted by RBaer on Friday, January 28, 2011 9:36 AM

I have some progress to report, basic hull and turret construction, along with the addition of PE grills to the engine deck of the Acad hull. I'm curoius to see that part in primer, since I had a bit of difficulty there........

Anyway, no-slip on the Acad hull and turret, and front of turret built up. I've also cleaned up the towing lugs on both hulls and added welds, getting time to decide exactly what/when I'm modeling here.

Above is the Acad unit, below is Mr Trump.

Apprentice rivet counter.

  • Member since
    April 2005
Posted by Thunderbolt379 on Friday, January 28, 2011 4:33 PM

Great work, RBaer -- looking good! I love to see an Abrams sans schkurtzen, it always reminds me of the M1's spiritual ancestor, the aborted MBT-70...

Nice antislip on the Academy, I must work out what to use for that on my Tamiya, if the vehicle in question can be traced to having it...

Cheers, M/TB379

http://worldinminiature.blogspot.com/

  • Member since
    March 2009
  • From: Middletown, OH
Posted by Buffirn on Saturday, January 29, 2011 9:00 AM

Add me to the fun!  I will start with an AMT M1A1.  I seem to like these old kits.  After that, I have a 1/72 version to add.  It will look good next to some of that 1/72 Soviet armor I found in the basement.


Jim

Jim Williams


  • Member since
    April 2005
Posted by Thunderbolt379 on Saturday, January 29, 2011 4:46 PM

Hi Jim, welcome to the brigade, page 1 is updated with your build!

I look forward to seeing how you tackle the old AMT -- their molds or a rebox, any idea?

Cheers, M/TB379

http://worldinminiature.blogspot.com/

  • Member since
    March 2009
  • From: Middletown, OH
Posted by Buffirn on Sunday, January 30, 2011 2:01 PM

Thunderbolt379

Hi Jim, welcome to the brigade, page 1 is updated with your build!

I look forward to seeing how you tackle the old AMT -- their molds or a rebox, any idea?

Cheers, M/TB379

The box says 1989, so I would assume it is an original.  I haven't gotten to deep into it yet.  I am looking forward to building it though.

Jim Williams


  • Member since
    September 2006
  • From: Dripping Springs, TX, USA
Posted by RBaer on Sunday, January 30, 2011 3:03 PM

T'anks, Tbolt. AFIK, anyhing in OIF had the anti-slip.......but I could easily be wrong here. It's happened before.

Between the IDF and anti-tank GBs, and all the other stuff I have going on, this one has been a nice diversion, nothing radical (for me) until now, when I need to decide exactly what vehicles I'm doing......hmmmm.

Apprentice rivet counter.

  • Member since
    March 2003
Posted by cyeargin on Monday, January 31, 2011 9:07 PM

RBaer

T'anks, Tbolt. AFIK, anyhing in OIF had the anti-slip.......but I could easily be wrong here. It's happened before.

All the Abrams we have seen coming through the port here definately have anti-slip (I know; I get to crawl around on them, LOL), and I dare say if anything the anti-slip molded on the Dragon models isn't rough enough.

  • Member since
    April 2005
  • From: Australia
Posted by taxtp on Thursday, February 3, 2011 2:44 AM

Hi all,

I was in a hobby shop today, and saw a Dragon 1/72 M1A1 with mineplow. I thought of this GB, which I've been keeping an eye on, and decided to go for it.

Could I join too please ?

Thanks

Tony

I'm just taking it one GB at a time.

  • Member since
    April 2005
Posted by Thunderbolt379 on Thursday, February 3, 2011 4:51 AM

Tony, welcome to the Armoured Brigade -- I've updated page 1. It'll be good to see a Braille-scale kit join the ranks of the bigger guys. That remins me, I think I have a couple of Dragon 72s in the stash someplace...

Update, the paints I ordered arrived at the LHS today, I'll swing by and pick them up tomorrow. The Gulf Army/Marine Sand by MM (Acryl) should be there, along with Eduard PE for the bustle rack, so I can move the M1A1 along again at last.

Cheers, M/TB379

http://worldinminiature.blogspot.com/

  • Member since
    April 2005
  • From: Australia
Posted by taxtp on Thursday, February 3, 2011 6:02 AM

Cheers Mike.

This is the kit, for anyone with a passing interest. I built the Revell Abrams a few years back, this will be an interesting comparison.


I'm just taking it one GB at a time.

  • Member since
    October 2009
Posted by Kentucky Colonel on Wednesday, February 9, 2011 3:32 PM

I guess it's ready to prime and start painting.

JOIN OUR COMMUNITY!

Our community is FREE to join. To participate you must either login or register for an account.

SEARCH FORUMS
FREE NEWSLETTER
By signing up you may also receive reader surveys and occasional special offers. We do not sell, rent or trade our email lists. View our Privacy Policy.