SEARCH FINESCALE.COM

Enter keywords or a search phrase below:

The Official M1 Abrams Group Build 2011

92136 views
233 replies
1 rating 2 rating 3 rating 4 rating 5 rating
  • Member since
    April 2005
The Official M1 Abrams Group Build 2011
Posted by Thunderbolt379 on Saturday, January 1, 2011 12:09 AM

The Official M1 Abrams Group Build 2011

...is GO!

Recapping the rules: all variants of the Abrams from the prototype to current service types, plus specials and derivatives, every last member of the Abrams family no matter how distantly related, are eligible. All markings, all theatres of operation, all kits from all manufacurers, all scales, all aftermarket items or straight from the box: basically, anything goes, if it's an Abrams it's in!

Timeframe: January 1st - December 31st, 2011 -- plenty of time to get to that promised build, plenty of time for enthusiasts to field a number of projects if they like. The roll below shows participants as of the start date, but this build is a year long and participants and projects will hopefully join up as we go, and this page will be modified on an ongoing basis.

Gentlemen, start your 1500hp turbine engines -- this armoured brigade is leaving the start line right now!

December 31st 2011 brings this build officially to an end but all those who would like to complete their projects and collect a badge are still most welcome to do so!


Order of Battle

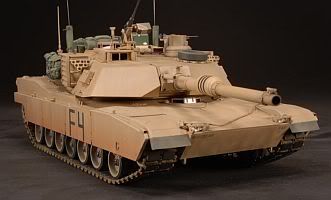
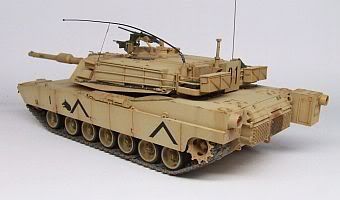
  • Thunderbolt379 (host): Tamiya 1:35 M1A1 (with PE) DONE
  • Scorn: details?
  • Jose_Luis-Lopez: TUSK -- details?
  • Kentucky Colonel: Tamiya 1:35 M1A1HA (USMC, 2003) DONE
  • Camo Junkie: M1A2 -- details?
  • Big Smitty: Dragon 1:35 Panther II
  • RBaer: Academy 1:35 M1A1 (+ Trumpeter parts)
  • Robert 92526: Tamiye 1:35 -- variant?
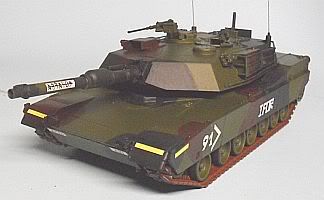
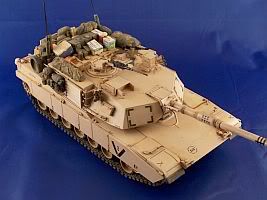
  • Daywalker: Tamiya 1:35 M1A2  (w/ scratchbuilt details + Legends stowage) DONE
  • Cyeargin: Dragon 1:35 M1a2 SEP (+ Legend TUSK II upgrade)
  • RESlusher: Dragon 1:35 M1A2 SEP (OOB, or maybe not!)
  • AgentG: Academy 1:35 M1A1
  • Buffirn: AMT 1:35 M1 DONE
  • Taxtp: Dragon 1/72 M1A1 (w/ mineplow)
  • Jethro: Dragon 1:35 M1A2 SEP
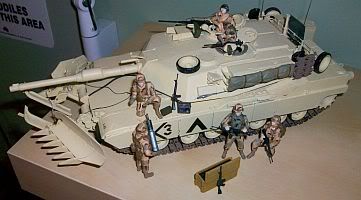
  • Ghostrider114: Tamiya 1:35 M1A1 (w/ mineplow) DONE
  • GooglyDoogly: Dragon M1A1 AIM (w/ Echelon decals)


Badges

Watch this area for badges, an attractive set is forthcoming!


Honour Wall

Watch this area for finished builds!


Aug. 1st 2011  Buffirn


Aug. 3rd 2011  Ghostrider114


Dec. 27th 2011  Thunderbolt379


Dec. 31st 2011  Kentucky Colonel


Early 2012   Daywalker

http://worldinminiature.blogspot.com/

  • Member since
    October 2009
Posted by Kentucky Colonel on Saturday, January 1, 2011 10:21 AM

I'm building a Tamiya M1A2 Abrams with Voyager PE. Echelon decals, aluminum barrel and AFV Club tracks. I hope I don't make a fool of myself since this will be the first time I post pictures of a model I'll build.

  • Member since
    September 2003
  • From: South Central Wisconsin
Posted by Daywalker on Saturday, January 1, 2011 10:24 AM

Mike- My build is the Tamiya 1/35 M1A2, with scratchbuilt details and Legends stowage set.

Frank 


  • Member since
    April 2005
Posted by Thunderbolt379 on Saturday, January 1, 2011 5:48 PM

Order of battle updated, gents! KC, congrats on being first to post a pic!

I'll get a box shot of my Tami M1A1 up later, so it looks like we'll have a Tamiya threesome heading off from the start line together.

Cheers, Mike/TB379

http://worldinminiature.blogspot.com/

  • Member since
    April 2005
Posted by Thunderbolt379 on Saturday, January 1, 2011 7:40 PM

As promised, here's the one I'll lead off with:


Note the sticker in Hebrew, this was an eBay win from far across the world!

This kit has the same lower hull as the 1982 tooling, Cookie Sewell has an article about the Tamiya kits (review of their -A2, actually) at Hyperscale in which he says the lower hull is the biggest let down of the updated editions. Can anyone recommend a data source for what the lower hull detailing should look like? Perhaps it's something that can be scratched onto the stock part with a bit of ingenuity... (Of course, I could take a look under a Dragon or Trumpeter... Whistling

Here's that review:

http://misc.kitreview.com/armourreviews/m1a2tamiyareviewcs_1.htm

Cheers, M/TB379

http://worldinminiature.blogspot.com/

  • Member since
    September 2008
  • From: Minneapolis MN
Posted by BigSmitty on Saturday, January 1, 2011 8:32 PM

Here is what I'm going to be attacking over the next twelve months...


Thunderbolt, if you need any info for your Tamiya lower hull let me know.  According to the PMMS review, this kit is supposedly the most accurate M1A1 kit for it's time.  It looks REALLY REALLY good.  If you need other references, I have the older Dragon M1A1-HA from the mid 90s in the stash as well.  Just let me know what you need, scans of the instructions, macro photos, whatever.


Matt - IPMS #46275

"Build what ya love and love what ya build..."

Build Logs, Rants and Humor


  • Member since
    April 2005
Posted by Thunderbolt379 on Saturday, January 1, 2011 8:42 PM

Matt -- that looks one heck of a kit! Many thanks, I'll take you up on that offer, a look at the lower hull would go a long way to providing the info needed to gussy up the Tamiya part with details that came along long after it was tooled. Hopefully some plasticard and ingenuity and it'll be a bit closer to its real life self!

Mike

http://worldinminiature.blogspot.com/

  • Member since
    October 2009
Posted by Kentucky Colonel on Saturday, January 1, 2011 9:23 PM

Sorry for the long link. I didn't know it would be that long but the site does show some great close up photos of the M1A2.

  • Member since
    April 2005
Posted by Thunderbolt379 on Saturday, January 1, 2011 9:35 PM

KC -- terrific links, that comparison site will take some careful studying to make sure that as many details as possible are up to speed.

Here's a thought -- when did the T-158 track replace the T-156? Before or after ODS? Maybe that shows up in the text, it'll certainly guide whether to settle for the original tracks or if it's worth finding some AMs with the guide horns in the right places.

Cheers, M/TB379

http://worldinminiature.blogspot.com/

  • Member since
    September 2003
  • From: South Central Wisconsin
Posted by Daywalker on Saturday, January 1, 2011 11:57 PM

Alright...

My build for this GB is one I started a couple of years back.  I started with the basic Tamiya 1/35 M1A2 kit, and added some missing details to the turret top, and the front deck.  I also upgraded the small steps on the front skirts with wire.  The square pieces on the top front of the skirts was replaced with some sheet brass folded to shape. 

In these two photos, you can see the added details to the turret:

The added bits to the skirts:

I spent a lot of time masking the turret top and hull for a coat of textured spray paint to replicate the non slip surfaces:

Some other details added here and there.  In this photo, you can also see the brass tow cable brackets and holders I fabricated from brass sheet and wire:

Lightening holes drilled in main sprockets, and road wheels beat up a bit:

Base paint laid on, and decals added:

Stripes on barrel were masked and painted on.  The "F4" on the rear board was cut into it's individual components, and applied one by one to eliminate any silvering from the decals. 

That is where I am at right now!  Next up, to clean up the stowage and begin placing it around the vehicle.  Lots more work to do!


Frank 


  • Member since
    April 2005
Posted by Thunderbolt379 on Sunday, January 2, 2011 12:10 AM

You'll be the first one done by the looks of it, Frank! Bow Down You're busy on an Abrams for my GB, I'll be busy on Fw 190s in the next few weeks for yours!

I better get the badges made... Toast

Cheers, Mike/TB379

http://worldinminiature.blogspot.com/

  • Member since
    September 2003
  • From: South Central Wisconsin
Posted by Daywalker on Sunday, January 2, 2011 12:15 AM

Thunderbolt379

You'll be the first one done by the looks of it, Frank! 

Hahaha... not likely mate!  I just finished the original build for the first RD GB. Embarrassed  I build at glacier speed, so I will most likely be one of the last ones finished here.

I'll be looking forward to seeing that 190!

Frank 


  • Member since
    October 2009
Posted by Kentucky Colonel on Monday, January 3, 2011 8:15 AM

I might have jamed my self up. I found photos of the tanks that are in my Ecelon decals set and the ones in the 1st Cav Div have those extra bustle racks in the back, the model I have does not have one.

Anybody know if there is an after market rack? I'm not that good with scratchbuilding so I either find another rack or I'll get a different set of decales.

Any ideas?

  • Member since
    April 2005
Posted by Thunderbolt379 on Monday, January 3, 2011 5:35 PM

KC -- yes there is! I saw it recently, as in this last week, but can't remember where... Websearch on it! The secondary rack io definitely made ion 1:35...

M/TB379

http://worldinminiature.blogspot.com/

  • Member since
    October 2009
Posted by Kentucky Colonel on Monday, January 3, 2011 8:08 PM

Thunderbolt379

KC -- yes there is! I saw it recently, as in this last week, but can't remember where... Websearch on it! The secondary rack io definitely made ion 1:35...

M/TB379


If you ever come across it please let me know. I thought I had seen one when I searched for the other things but wasn't sure.I know Legend makes a storage set but it didn't have the extra rack.

  • Member since
    October 2009
Posted by Kentucky Colonel on Monday, January 3, 2011 9:11 PM

I think I found it, it was a PE set. I hope that's all I need.

  • Member since
    September 2003
  • From: South Central Wisconsin
Posted by Daywalker on Monday, January 3, 2011 9:28 PM

Eduard makes a bustle rack extension set, seen here.  HTH!

Frank 


  • Member since
    October 2009
Posted by Kentucky Colonel on Monday, January 3, 2011 9:49 PM

Daywalker

Eduard makes a bustle rack extension set, seen here.  HTH!


That's what I just ordered. Thanks.

  • Member since
    September 2008
  • From: Minneapolis MN
Posted by BigSmitty on Monday, January 3, 2011 11:13 PM

Some progress tonight, after having my garage door opener chain break while I was pulling in after work...$335 later...

Lower Hull with everything but the road wheels and drive sprocket added:

The turret plug is about halfway complete.  One thing I found really odd with this kit is the backplate mount for the smoke grenades.  The mold and sprue attachment points were thick and very rough.  I'll have to putty them up just to meet with the base of the turret.  I also broke one of the two antennae (surprise, surprise) but luckily it was the straight antenna to the left of the cupola.  Easy fix down the road, just cut off the remaining piece so I still have the antenna base to drill out and install a new one later.  Why something that small and delicate had six sprue attachment points is beyond me.

Of course here are the obligatory "wheels stuck in styrofoam while drying shots":

That's the update for tonight.  After everything on the turret plug sets up, I'll fill in the gaps.  Oh the top section of the rear bustle snapped on me as well, did my best to get it together as best I could.  Those should definitely be PE addons in this kit, in my opinion.

Matt - IPMS #46275

"Build what ya love and love what ya build..."

Build Logs, Rants and Humor


  • Member since
    August 2005
  • From: Sydney, Australia
Posted by Phil_H on Tuesday, January 4, 2011 1:12 AM

Kentucky Colonel

 Daywalker:

Eduard makes a bustle rack extension set, seen here.  HTH!


That's what I just ordered. Thanks.

Hey guys,

Be aware that there were two distinct types of bustle rack extension used during OIF.

The Eduard set referenced above will provide what's commonly referred to as the "USMC style" bustle rack, used by the USMC and by army units post-OIF. This design is made up of tubular rails and and sheet metal brackets with a mesh base with "outriggers" on either end of the BRE to carry jerrycans. This style of BRE is included in Academy's "M1A1 Iraq 2003" kit and Dragon's M1A2 SEP kit.

The other style is often referred to as the "3ID style" BRE which is essentially a box framed with angled and flat steel stock, with mesh sides and floor. I believe these were manufactured in Kuwait during the build-up. This type was (erroneously) included in Dragon's older USMC M1A1 (Heavy Armour) kit #3531 and (correctly) in the newer M1A1 AIM kit #3535

Note that if you are using the latter type of bustle rack extension, you may wish to scratchbuild one or more three-can jerry can racks in a similar pattern, attached to the turret side rails.  (Note that this is included in Dragon's M1A1 AIM kit #3535). I haven't found many photos of these, but they can be seen in the photos accompanying Echelon's decal set #35014 "US Army's 3rd Infantry Division OPERATION IRAQI FREEDOM"

 EDIT: KC, you should be good to go with the "USMC style" BRE, seeing that it's going on an M1A2. Note that it's also not a permanent fixture amd can be mounted/demounted as required.

  • Member since
    October 2009
Posted by Kentucky Colonel on Tuesday, January 4, 2011 7:43 AM

Phil, Thanks for the heads up. I've got pictures of the real tanks that from the Echelon decals set and I'm going by that as much as possible. I would post a link to the pictures but it will be another long link. Maybe I can post a picture or two instead.

Two of the  tanks in the Echelon set were damanged and were on their way to  the repair yard when they came under attack and were damanged more. Just a few days later the same repair yard was under attack and they used those damanged tanks to fight back.

I've thought about doing one of them damenged or how they looked before they got into the fighting.

  • Member since
    October 2009
Posted by Kentucky Colonel on Tuesday, January 4, 2011 8:20 AM

Here a couple pictures. I'll be doing the C31. The C33 in the last picture had a mine plow which I don't have.

  • Member since
    August 2005
  • From: Sydney, Australia
Posted by Phil_H on Tuesday, January 4, 2011 9:05 AM

Here's a pic of the BRE when empty.

http://svsm.org/gallery/m1a1abramsjh2/DSC08871

(on a USMC M1A1, but it's mounted exactly the same on an M1A2)

Looking at the pics above, you can see the EPLRS antenna left of the spare roadwheel. It's not included in the Tamiya kit and you may wish to consider adding it.

http://svsm.org/gallery/m1a1abramsjh2/DSC08885

Rightmost antenna mount, centre of pic from rear of the right-side corner of the turret looking forward . It projects from the turret side aft of the stowage bin.

Below is a link to a pic of the power connector block (not present in the Tamiya kit) beside the driver's hatch.

http://data3.primeportal.net/tanks/brent_sauer/m1a2/images/m1a2_21_of_33.jpg

Note also that if you are depicting an M1A2 SEP, you may have to add the VCU (Vapor compression Unit) to the bustle rack. The Tamiya kit does not provide this, only having the EAPU (External Auxiliary Power Unit) , as the kit pre-dates the SEP mods.

  • Member since
    October 2009
Posted by Kentucky Colonel on Tuesday, January 4, 2011 9:20 AM

So is the C31 a SEP or not. Those photos were taken in April 2004.

  • Member since
    October 2009
Posted by Kentucky Colonel on Tuesday, January 4, 2011 10:11 AM

Looks like they were SEP tanks. I guess I'll forget the Echelon decals and  go with a straight M1A2 and use the Tamiya decals. Unless I can find a after market VCU.

  • Member since
    August 2005
  • From: Sydney, Australia
Posted by Phil_H on Tuesday, January 4, 2011 10:29 AM

Kentucky Colonel

So is the C31 a SEP or not. Those photos were taken in April 2004.

I would presume so, as there are references indicating that 1st Cav began receiving M1A2 SEP's about mid-2001. Looking at the pics above, it's difficult to see any of the distinguishing features to positively identify it.

EDIT: Re the VCU, you could do it the easy way,  just scratch an approximate shape, then put a "tarp" over it and pile on a load of stowage. then all you'd need to do is add the armour for the VCU plumbing on the underside of the turret bustle. I'm almost sure I've seen diagrams of this. -even better, check Gino's M1A2 build pics here

  • Member since
    October 2009
Posted by Kentucky Colonel on Tuesday, January 4, 2011 10:41 AM

A couple more questions.. Can I use a bustle rack extension on a straight M1A2 or should I leave it off? Or ever build a USMC M1A2?

Update, I might try to do it the way you last posted. I'll try that first and see how it looks then make up my mind.

Thanks!!

  • Member since
    August 2005
  • From: Sydney, Australia
Posted by Phil_H on Tuesday, January 4, 2011 6:44 PM

Hi KC,

The USMC doesn't use M1A2's.

I believe you can put the BRE on a "straight" M1A2. I don't know where this pic was taken but it seems to show a non-SEP M1A2 with the same type of BRE you have ordered.

http://blog.oregonlive.com/oregonatwar/2008/08/m1a2.jpg

Note the EAPU in the bustle rack (not the VCU) and that this tank still has the left rear filler cap. I'm taking these to be indicators of an "early" M1A2, but I'm more than happy to be corrected)


  • Member since
    October 2009
Posted by Kentucky Colonel on Wednesday, January 5, 2011 9:44 PM

Thought I might post this here. While doing some research on some other forums talking to Iraq vets I was offered a private tour of the M1A2 SEP and M1A2 TUSK tanks at Fort Knox. He said I could craw all around inside and out all I wanted. They are in the progress of shipping the entire div to Fort Benning, Ga. They will not have any tanks at Fort Knox any more. I'm going to try my best to get over there soon.

JOIN OUR COMMUNITY!

Our community is FREE to join. To participate you must either login or register for an account.

SEARCH FORUMS
FREE NEWSLETTER
By signing up you may also receive reader surveys and occasional special offers. We do not sell, rent or trade our email lists. View our Privacy Policy.