SEARCH FINESCALE.COM

Enter keywords or a search phrase below:

Hooray for Hollywood 2014 GB extended til July 4th

63426 views
561 replies
1 rating 2 rating 3 rating 4 rating 5 rating
  • Member since
    September 2003
  • From: AandF in the Badger State
Posted by checkmateking02 on Saturday, June 29, 2013 8:01 PM

Silvering is when the clear carrier film (typically around the edges of the image) traps air underneath, and appears as a kind of silvery halo around the decal.  Wetting and setting solutions are supposed to prevent this, along with always applying the decal to a smooth, glossy surface.

Although, personally, I use Floquil's Flat both underneath and on top of the decal.  It has a nice, smooth, waxy like surface.


  • Member since
    April 2006
  • From: Denver, Colorado
Posted by waynec on Saturday, June 29, 2013 8:46 PM

i hadn't thought of that bish.

working on the subs. the ALFA is almost ready to paint, may have a small bit of seam to fix. the 688 is on it's second tape, prime and sand. hopefully it is good this time.

Никто не Забыт    (No one is Forgotten)
Ничто не Забыто  (Nothing is Forgotten)


GAF
  • Member since
    June 2012
  • From: Anniston, AL
Posted by GAF on Saturday, June 29, 2013 9:56 PM

Coming along nicely, Wayne.  Can't wait to see them finished.

BTW, does the ALFA have any markings, or is it bare hull?

Gary

  • Member since
    November 2010
  • From: Florida-West Central
Posted by Eagle90 on Saturday, June 29, 2013 10:07 PM

Hey greentracker, sorry it took so long to get some progress pics, but I have been insanely busy at work.  I just got home from being called in tonight! (it's 1053 P.M. now).  My apologies to everyone else in the GB for the delay too.  Speaking of everyone else....awesome builds everyone!  Very cool subjects and great work on them!

O.K.  Here is where I am on the Batwing.

Here I have the cockpit in the top part of the fuselage and the wings on the bottom.

And a look at the bottom of the Batwing.  I opted for the gear being up and will use the stand that came with the kit for display.  You can also see the shear blade in the front.  Not sure why I did it, I'll probably just glue the doors for it shut....or I guess I could do them open and it look like it is in flight ready to cut the cable!? Huh?

I'm wondering about the painting of the Batwing.  Instructions say Dark Grey.  I thought it was black.  

Also, taxtp...just wondering why you primed the Batmobile with white and then painted it black?  Remember, I'm still learning so don't laugh too hard at my question! Embarrassed  Just would like to know.  Maybe I should do the same.  I sprayed the bottom of the display stand white after I saw your pics just to try it out.  Hopefully I'll have the Batwing finished soon.  

Eagle90


  • Member since
    October 2009
  • From: Oil City, PA
Posted by greentracker98 on Saturday, June 29, 2013 11:21 PM

Eagle, It's not a problem. we all have to relegate our illustrious hobby lower down on the priorty list.Crying

It's looking good. My opinion is go with (the color) how it looked in the movie.

I also have to make a very miner, slight change on the Halftrack. In the movie. there is what looks like a piece of channel iron accross the front for a bumper. That isn't a problem with companies like Evergreen around. I think they put that on because Lee Marvin pushes that armored car off the bridge.

A.K.A. Ken                Making Modeling Great Again

  • Member since
    December 2002
  • From: Bury St Edmunds, Suffolk, England
Posted by Bish on Sunday, June 30, 2013 3:17 AM

Looking good eagle. I think I would go with black and then use dark Grey for weathering.

I am a Norfolk man and i glory in being so


On the bench: Airfix 1/72nd Harrier GR.3/Fujimi 1/72nd Ju 87D-3

  • Member since
    November 2010
  • From: Florida-West Central
Posted by Eagle90 on Sunday, June 30, 2013 6:21 AM

greentracker98

Eagle, It's not a problem. we all have to relegate our illustrious hobby lower down on the priorty list.Crying

It's looking good. My opinion is go with (the color) how it looked in the movie.

I also have to make a very miner, slight change on the Halftrack. In the movie. there is what looks like a piece of channel iron accross the front for a bumper. That isn't a problem with companies like Evergreen around. I think they put that on because Lee Marvin pushes that armored car off the bridge.

Thanks greentracker.  The thing that got me about this kit is how big it really is!  A lot bigger than I though it was going to be.  Thanks again!

Eagle90


  • Member since
    November 2010
  • From: Florida-West Central
Posted by Eagle90 on Sunday, June 30, 2013 6:23 AM

Bish

Looking good eagle. I think I would go with black and then use dark Grey for weathering.

Hey Bish!  Great idea!  I'll stick with the color in the movie and do a little detailing!  It would make perfect accents.  Thanks my friend!

Eagle90


  • Member since
    December 2002
  • From: Bury St Edmunds, Suffolk, England
Posted by Bish on Sunday, June 30, 2013 6:30 AM

I think that's 1/25th scale isn't it, so I can imagine how big it is. There some pics of one here

www.fantastic-plastic.com/BATWING%20BURTON%20PAGE.htm

Unfortunately he doesn't give any details of the build or painting, but its a nice looking build. And it looks like he has done NMF around the rim.

I am a Norfolk man and i glory in being so


On the bench: Airfix 1/72nd Harrier GR.3/Fujimi 1/72nd Ju 87D-3

  • Member since
    October 2009
  • From: Oil City, PA
Posted by greentracker98 on Sunday, June 30, 2013 2:07 PM

checkmateking02

Silvering is when the clear carrier film (typically around the edges of the image) traps air underneath, and appears as a kind of silvery halo around the decal.  Wetting and setting solutions are supposed to prevent this, along with always applying the decal to a smooth, glossy surface.

Although, personally, I use Floquil's Flat both underneath and on top of the decal.  It has a nice, smooth, waxy like surface.

Thanks CMK, I don't remember having this problem before. Maybe I was lucky LOL Guess I better invest in some micro set or sol, which ever is the better, I'llk go back and re read the posts explaining this. no need to re post it all.

A.K.A. Ken                Making Modeling Great Again

  • Member since
    September 2003
  • From: AandF in the Badger State
Posted by checkmateking02 on Sunday, June 30, 2013 2:12 PM

Ken, maybe some of the better, more recent and thinner decals don't have this problem--especially after-market decals.  Older kits probably do, and then there are some kits whose decals can be relied upon to be thick and uncooperative.

Fortunately, the reviews on the web say that the Pfalz's lozenge decals go on pretty well; but we'll see.  The rest of the kit has been, well, provocative.


  • Member since
    September 2003
  • From: AandF in the Badger State
Posted by checkmateking02 on Sunday, June 30, 2013 2:53 PM

So provocative, in fact, I've neglected including any further "Max Facts."  Here's a couple more.

3.  The second and third novels about Stachel are titled The Blood Order (1979) and The Tin Cravat (1981).

4.  George Peppard was 37 years old when he played Stachel.  Stachel in the novel is apparently much younger.  By the end of the book, we find is but 19 years old.

5.  To enhance the film’s believability, George learned to fly, obtained his pilot’s license and is actually at the controls of his aircraft, flying in some of the scenes; but not the scene where he flies under the bridge!

Some further progress photos:

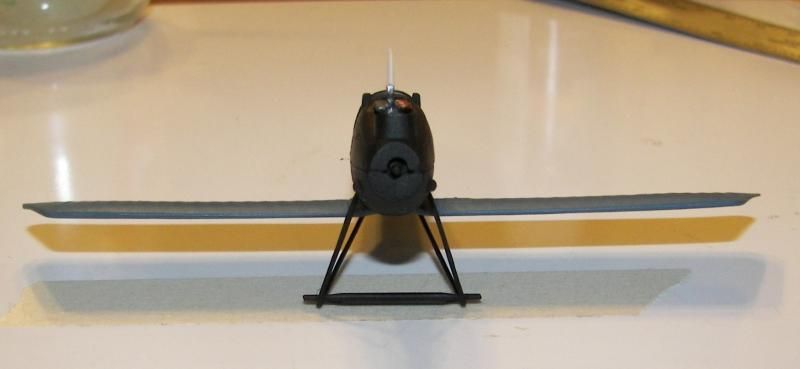
I "eyeballed" the aircraft from the front, to try and get the landing gear to hold everything straight.  Looks pretty good, I guess.  The tail looks perpendicular; the starboard wing maybe a little low.

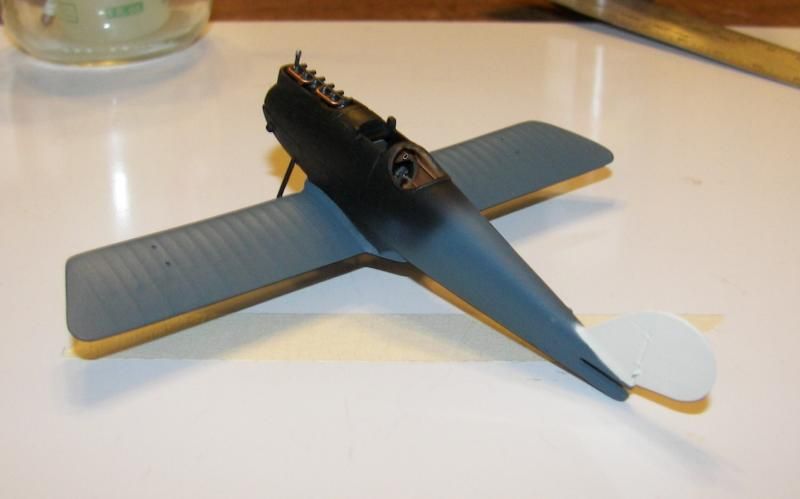
Here's the thing painted up and waiting for it's decals, for which I have to wait for MicroSet.  The undersurfaces are painted in USN's "Intermediate Blue," according to the FS numbers in the kit.  Since I don't know how far down the decals will cover, I painted the whole fuselage blue, aft of the black radiator.

Then these decals, still in their bag, are supposed to cover the plane.

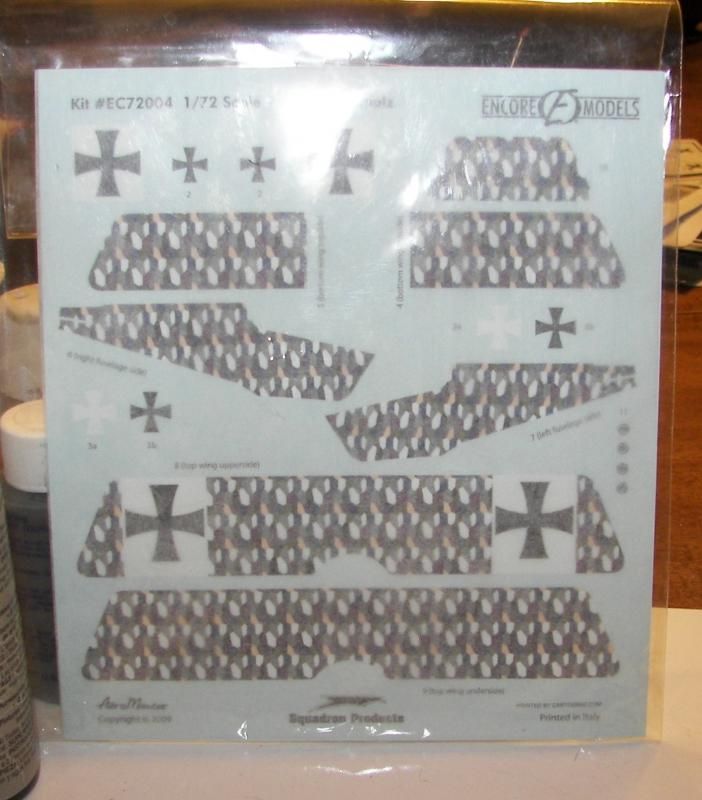
Kind of psychedelic. And groovy.

A final shot of the cockpit.  I added some instruments chopped from an old B-17 IP decal.  I still have to paint the leather cockpit coaming with a brush, but I'll have plenty of time to see to the remaining parts, before I can start decaling.

In the meantime, I'm enjoying looking at the other builds.  Nice-looking sub and BatWing, guys!!


  • Member since
    November 2010
  • From: Florida-West Central
Posted by Eagle90 on Sunday, June 30, 2013 6:21 PM

Bish

I think that's 1/25th scale isn't it, so I can imagine how big it is. There some pics of one here

www.fantastic-plastic.com/BATWING%20BURTON%20PAGE.htm

Unfortunately he doesn't give any details of the build or painting, but its a nice looking build. And it looks like he has done NMF around the rim.

Thank you Bish.  You are correct, it is 1/25 (now just take it easy, sit down, take deep breaths).Wink

Next pics I'll throw a ruler in there so everyone can see the size.  I like seeing the size of kits. 

Thanks again!

Eagle90


  • Member since
    November 2010
  • From: Florida-West Central
Posted by Eagle90 on Sunday, June 30, 2013 6:25 PM

waynec

i hadn't thought of that bish.

working on the subs. the ALFA is almost ready to paint, may have a small bit of seam to fix. the 688 is on it's second tape, prime and sand. hopefully it is good this time.

Great work Wayne.  What type tape do you use when doing the seams?  All I have right now is regular masking tape, but I think it would be too tacky.

Eagle90


  • Member since
    November 2010
  • From: Florida-West Central
Posted by Eagle90 on Sunday, June 30, 2013 6:26 PM

Great work checkmate!  Like the way the cockpit looks!  Great detail work!

Eagle90


  • Member since
    April 2006
  • From: Denver, Colorado
Posted by waynec on Sunday, June 30, 2013 7:01 PM

looks like the second go round with the seams worked. will poy all the pieces to boyth together and prime this week. will be lazy this evening in the study working on VIRGINIA ssn seams and watching tv.

been doing tedious paint work on treasure ship with enamels, priming, and cleaning up putty with acetone in the bunker. need to get away from the fumes tonight.

the yellow tape is some paint store tape that was dicontinued on sale years ago. bought 6 rolls. i also use ace hardware purple paint tape but it isn't sticky at all so doesn't always hold.

Никто не Забыт    (No one is Forgotten)
Ничто не Забыто  (Nothing is Forgotten)


  • Member since
    September 2003
  • From: AandF in the Badger State
Posted by checkmateking02 on Sunday, June 30, 2013 8:37 PM

Thanks, Eagle.


  • Member since
    October 2009
  • From: Oil City, PA
Posted by greentracker98 on Monday, July 1, 2013 3:07 PM

CMK - The Pfalz is looking great. I've never used big decals like that before. Good luck I'm interested in how well they go on.


A.K.A. Ken                Making Modeling Great Again

  • Member since
    September 2003
  • From: AandF in the Badger State
Posted by checkmateking02 on Monday, July 1, 2013 3:13 PM

Ken, I've never used decals like these either.  I had to order the MicroSet from Amazon, of all places, since Sprue Brothers was out.  Supposed to arrive Friday, then I can resume.


  • Member since
    April 2006
  • From: Denver, Colorado
Posted by waynec on Monday, July 1, 2013 4:33 PM

amazon is an over (or world it be under) looked site for model stuff. be careful about the shipping. over $25 is free FROM AMAZON so check and see if the kit is coming from amazon or from a third party like megahooby. nothing sinister just surprising if you are expecting free shipping and it pops up. i picked up the trumpeter LA FRANCE PUMPER from them, no tax, free shipping and availability made it better than anyone else. will probably get the 1/700 deep sea drilling ship by bandai from them.

Никто не Забыт    (No one is Forgotten)
Ничто не Забыто  (Nothing is Forgotten)


  • Member since
    October 2009
  • From: Oil City, PA
Posted by greentracker98 on Monday, July 1, 2013 11:34 PM

I picked up 2 movies at Wal Mart today. Battle of the Bulge and In Harms Way. I'm  in the middle of Battle the Bulge. I'm gettimg tired of guys throwing their arms up in the air when they get shot LOL

Good Luck CMK

A.K.A. Ken                Making Modeling Great Again

  • Member since
    September 2003
  • From: AandF in the Badger State
Posted by checkmateking02 on Tuesday, July 2, 2013 1:02 PM

Thanks, Ken.  I'm looking forward to see how this works.

And, I wonder if Walmart has "Midway?"  My wife is a product rep there at the two local places.  I'll ask her to check, although her usual routine is restocking the gaming cards.

Yup, Wayne, I made sure I had $25 total (my wife got a book out of it) and that Amazon was handling it themselves.  Result was free shipping, although the MicroSet itself was more than $1 higher than I usually pay.


  • Member since
    October 2009
  • From: Oil City, PA
Posted by greentracker98 on Thursday, July 4, 2013 2:18 AM

Hey everyone,

I had to put the halftrack up for a while, The humidity is just too high, I don't do a/c, so if it's high humidity outside, it is inside here too, I tried to spray models before with my airbrush, and got spatters of water with the paint.

Oh well, thats life I guess.Geeked

A.K.A. Ken                Making Modeling Great Again

  • Member since
    September 2003
  • From: AandF in the Badger State
Posted by checkmateking02 on Thursday, July 4, 2013 1:29 PM

Same here, Ken.  Even with air conditioning, eventually the airbrush spits water.  I have a moisture trap, just never installed it, so in the summer I paint in short sessions.

But I can decal.  I used the last of my MicroSet to put the underwing and tail crosses on the Pfalz.  Turned out well; the decals were manufactured by AeroMaster, so they were good quality.

Hope the large size ones go on easily.


  • Member since
    December 2002
  • From: Bury St Edmunds, Suffolk, England
Posted by Bish on Thursday, July 4, 2013 1:32 PM

I have never thought about Amazon for model stuff either. Over here, all items from Amazon are free postage, no matter the cost. So I think I might have to check them out.

I am a Norfolk man and i glory in being so


On the bench: Airfix 1/72nd Harrier GR.3/Fujimi 1/72nd Ju 87D-3

  • Member since
    September 2003
  • From: AandF in the Badger State
Posted by checkmateking02 on Thursday, July 4, 2013 4:09 PM

Sometimes through Amazon's other vendors, you can even find older stuff the regular online dealers don't have anymore.


  • Member since
    October 2009
  • From: Oil City, PA
Posted by greentracker98 on Thursday, July 4, 2013 6:19 PM

checkmateking02

Same here, Ken.  Even with air conditioning, eventually the airbrush spits water.  I have a moisture trap, just never installed it, so in the summer I paint in short sessions.

But I can decal.  I used the last of my MicroSet to put the underwing and tail crosses on the Pfalz.  Turned out well; the decals were manufactured by AeroMaster, so they were good quality.

Hope the large size ones go on easily.

I bought a campbell hausefeld moisture trap (the air compressor is CH too). it didn't seem to make any difference. I don't know if I'm doing something wrong with it or not. I thought you install it on the compressor and thats all. am I right???? or not????

A.K.A. Ken                Making Modeling Great Again

  • Member since
    September 2003
  • From: AandF in the Badger State
Posted by checkmateking02 on Thursday, July 4, 2013 8:17 PM

Ken, the moisture trap I bought is supposed to be installed in the air hose, between the compressor and the airbrush.  Since I'd have to cut the hose to do this, then splice in the trap, I haven't installed it.  It was designed for the Paashe H airbrush.


  • Member since
    October 2009
  • From: Oil City, PA
Posted by greentracker98 on Sunday, July 7, 2013 7:52 AM

checkmateking02

Ken, the moisture trap I bought is supposed to be installed in the air hose, between the compressor and the airbrush.  Since I'd have to cut the hose to do this, then splice in the trap, I haven't installed it.  It was designed for the Paashe H airbrush.

I was readig up on the moisture traps. one website said the trap has to  be 38 feet from the air compressor, because the air is heated up and turned to vapor. You need that 38 feet to let it cool down.so  when it reaches the trap, it will drain into the trap

A.K.A. Ken                Making Modeling Great Again

  • Member since
    December 2002
  • From: Bury St Edmunds, Suffolk, England
Posted by Bish on Sunday, July 7, 2013 7:55 AM

greentracker98

checkmateking02

Ken, the moisture trap I bought is supposed to be installed in the air hose, between the compressor and the airbrush.  Since I'd have to cut the hose to do this, then splice in the trap, I haven't installed it.  It was designed for the Paashe H airbrush.

I was readig up on the moisture traps. one website said the trap has to  be 38 feet from the air compressor, because the air is heated up and turned to vapor. You need that 38 feet to let it cool down.so  when it reaches the trap, it will drain into the trap

I hadn't read that. I do have a compressor with a moisture trap fitted, but I have never had any moisture come out of it when I have released the pressure. But who is going to have a 38 foot air hose.

I am a Norfolk man and i glory in being so


On the bench: Airfix 1/72nd Harrier GR.3/Fujimi 1/72nd Ju 87D-3

JOIN OUR COMMUNITY!

Our community is FREE to join. To participate you must either login or register for an account.

SEARCH FORUMS
FREE NEWSLETTER
By signing up you may also receive reader surveys and occasional special offers. We do not sell, rent or trade our email lists. View our Privacy Policy.