SEARCH FINESCALE.COM

Enter keywords or a search phrase below:

OFFICAL NATURAL METAL FINISH GB V (2013-2014)

71265 views
662 replies
1 rating 2 rating 3 rating 4 rating 5 rating
  • Member since
    January 2012
  • From: Hatfield
Posted by Misty on Saturday, January 4, 2014 8:35 AM

hope the alclad stays on for you, certainly looks ok.

  • Member since
    April 2010
Posted by Theuns on Saturday, January 4, 2014 1:18 PM

I got the decals on, and although I was worried they might silver due to the "rough spots" in the alclad where it ate the plastic they went on very well indeed. These new airfix decals are very cool.

Theuns

  • Member since
    April 2013
Posted by SchattenSpartan on Saturday, January 4, 2014 2:40 PM

Tug: That's some marvellous work on the seat and engine!

IS: You are doing a hell of a job on your Sabre!

Theuns: She's looking awesome! You mentioned the Alclad paint "eating" the plastic. I usually don't spray Alclad paint on bare plastic, but I never noticed the paint damaging the plastic in any way.

TUG
  • Member since
    December 2013
Posted by TUG on Saturday, January 4, 2014 2:59 PM

Thanks SS - I hope to get back onto it tomorrow

Theuns - I've never been unfortunate to experience paint lifting as masking was removed per se  except in two specific incidences - both occurred in exactly the same spot on both aircraft and near enough the same spot on yours. I put it down to finger grease from picking the model up at that point so now make sure that I have gloves on or hold it in a jig - just a thought but it hasn't happened since I've done that Smile

Tug

  • Member since
    October 2013
Posted by Big Blue on Saturday, January 4, 2014 3:13 PM

Setbacks!

Well, a bit of a bumpy start to the new year in modeling for me.  Where to begin...

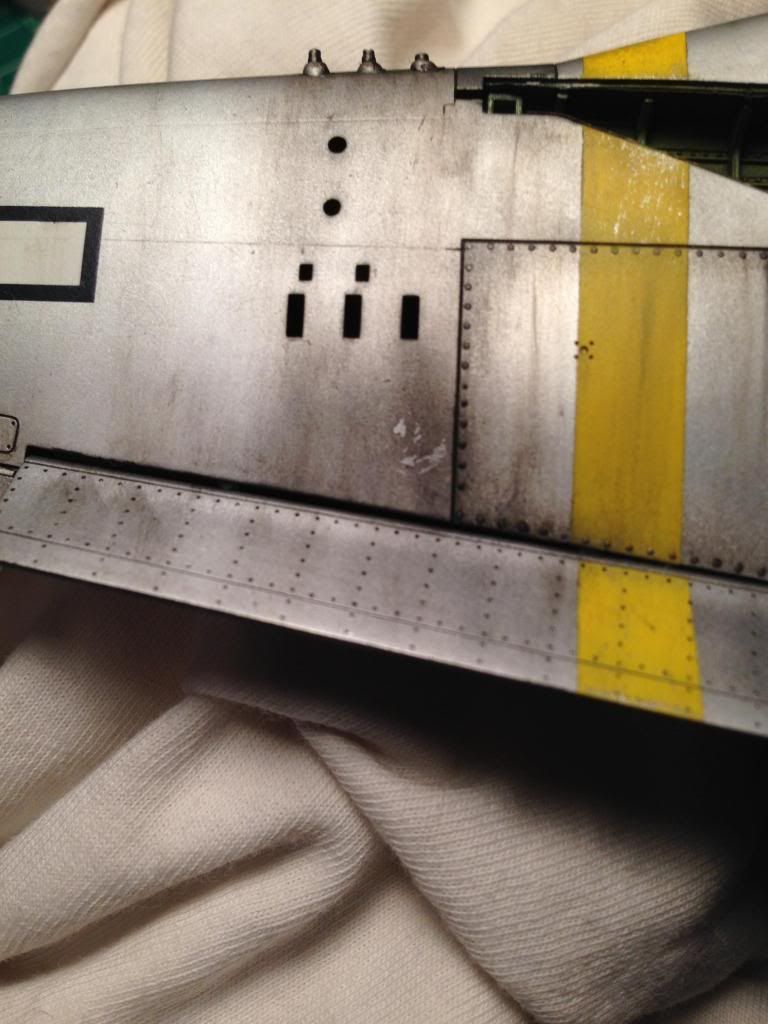
I had made enough progress on weathering that I decided I was finished, and it was time to apply the final matte /semi-gloss Alclad varnishes to my build.  For some reason that I have not quite determined, my usually reliable airbrush not once, but twice decided to deposit a large blob of varnish on my finish when I pulled back the trigger to spray.  Both times, I decided to try to gently wipe the blob away before it dried into something I would need to sand down with some finesse, and both times, I removed small patches of my weathering layers:

Way to learn from the first time it didn't work!  Well, both of those pictures were taken after my initial attempt to add some pigments and oils to the area, resulting in darker weathering than I wanted, but still visible scars.  But wait.. there's more.

While I was thinking about how I wanted to handle the clean up involved with those mistakes, something dawned on me:

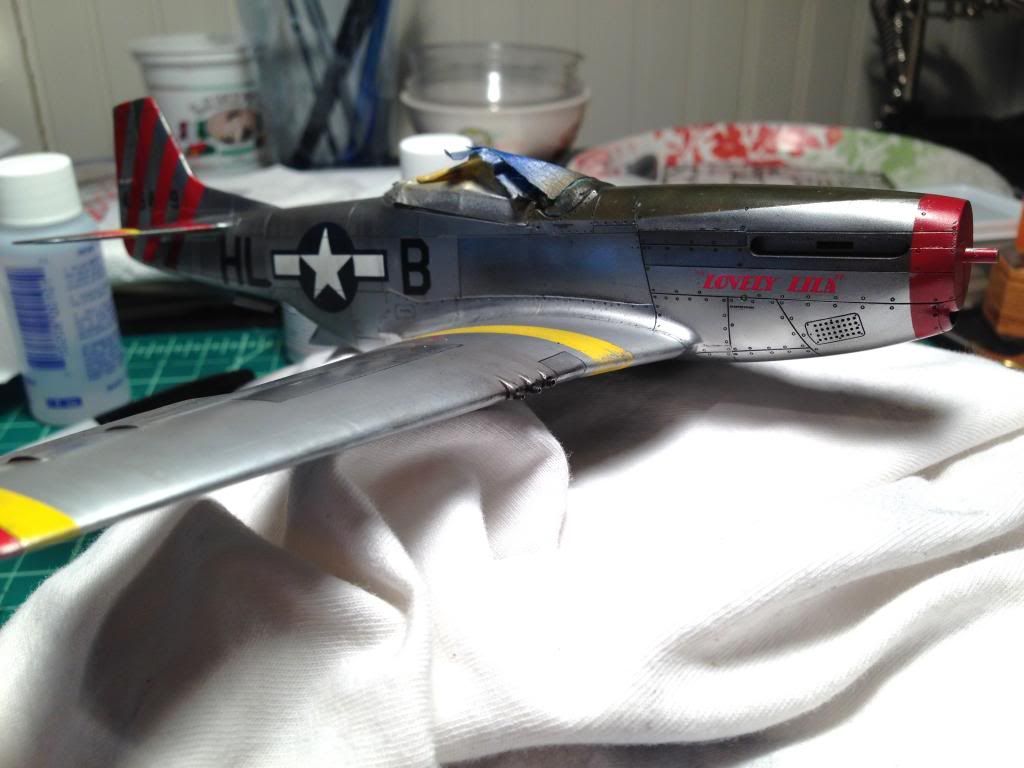
I PLACED THE STARBOARD SIDE ID LETTERS ON IN REVERSED ORDER!!!  /facepalm.

Wow, not only am I not sure how I made the mistake in the first place, but I can't begin to understand how I looked at it for a week or two while I added successive layers of weathering without noticing.  Guess the rookie mistakes I avoided on my P-47 were waiting for me here instead.  

Eagle Strike provides ID markings for three different planes on their decal sheet, and all of them use the "HL", so that one is easy to deal with.  Fortunately, I have been scanning every decal sheet I have before cutting them up, and so I was able to print out a new "B" on some laser decal paper I had bought to experiment with.  The old decals came off pretty easily with tape, and the new "B" went on without too much trouble.  The area left under the old "HL" decal is certainly cleaner than the surrounding area, but since the decal was essentially a square, I am not too worried about blending it in.  The area under the "B" on the other hand...

I decided to repaint that panel, and masked it off to spray Alclad aluminum.   All good?  Sadly no:

The outline of the "B" is still visible due to the additional layers of clear acrylic varnish that were on top of the decal, AND, my making removed a layer of finish on the adjacent panel.  

I plan to cut a "B" mask, and spray a coating or two of Aqua Gloss over the indentation in an attempt to even out the surface before applying the "HL" decal over it.  I am hoping that will be enough to look ok after a wash or two.  I'm still deciding what to do about the (now) 3 small abrasions (and am open to suggestions).  I may wind up re-painting that side panel as well.  Boy... I feel like I am in one of those board games where I am about to move my piece to the final square, but I roll the wrong number and get sent back 20 steps!  I thought I was so close to the finish line!  Oh well, new challenges and opportunities to learn from my mistakes.

To wrap this up on a slightly positive note, I finished weathering the Ultracast prop and assembled it:

Other than that, I'm glad to see things are going better for the rest of you.  Everyone's pictures look great.  Glad to hear you are feeling better Starfighter.  

  • Member since
    April 2013
Posted by SchattenSpartan on Saturday, January 4, 2014 3:21 PM

That's some tough luck there. I'm sorry to hear about your mishaps... I don't know what to do about the decal problem, but I'd leave the "scars" in the weathering as they are right now (at least those on the wing and tailplane). I don't think they stand out too much and they add even a bit more interest to the model IMO. Just my 2 cents...

  • Member since
    January 2012
  • From: Hatfield
Posted by Misty on Saturday, January 4, 2014 7:34 PM

i agree, leave those two "scars" as they are, they add to the weathered look. you may have to dirty up the side one a bit though. i built an as90 and didnt realise untill i was looking over the pics i posted of the final model that i had put different licence plate numbers on the front and back. i could have put it right but couldnt be a"*ed :-)

  • Member since
    April 2010
Posted by Theuns on Sunday, January 5, 2014 12:21 AM

Maybe the finggermarks could explain the lifting, that is where one usually holds the plane.

As for eating the plastic, it is more of a slight discoloration of the alclad, asiff it made the plastic "rough" like when one's sanding was not good although you can't feel it.

I might have sprayed a tad to close or heavy there.

It doesn't really matter to me to much, I mainly built this plane as an experiment, with the semi failures I still think it looks more "metal" than silver paint.

I am also not to worried about the "patchy" look of the metal, I think that the russian planes in the harsh climate might have taken a beating.

On my other NMF builds I will use a primer. I will find a nice gloss primer, not the alclad one- it needs sanding :-(

I was surprized that the level of "shine" on the bare plastic model was not way different than on my gloss black base Sabre.

Theuns

  • Member since
    January 2012
  • From: Hatfield
Posted by Misty on Sunday, January 5, 2014 2:51 AM

All alclad needs is a very smooth glossy surface and shiny plastic qualifies. Gloos black gives that lovely  depth to the high shine finishes , they say on the web site a gloss clearcoat can be used tho ive never triedit. I assume the primer is there to protect the plastic and give the slclad something to grip to, and enamel seems more grippy than acrylic.

Your plane qualifies as more than a "trial", its very very good indeed snd i would be proud of it.

  • Member since
    April 2010
Posted by Theuns on Monday, January 6, 2014 6:47 AM
  • Member since
    January 2012
  • From: Hatfield
Posted by Misty on Monday, January 6, 2014 9:01 AM

absolutely ace!

  • Member since
    April 2010
Posted by Theuns on Monday, January 6, 2014 10:55 AM

The one thing that is concerning my is that it looks like I got "corosion" in the sabre's allu where I handled it a few months ago. Don't think I will be able to buff it out .....ah well, lesson learned - when painted don't handle it again

Maybe the metal in the paint reacts with finger marks??

Theuns

  • Member since
    April 2010
Posted by Theuns on Monday, January 6, 2014 10:59 AM

What is the "concencus"  of the alclad to be used on the P-51d?

I am building the Tam 1/32 F-51 Korean era soon.

I understand by this time the puttied wings with silver lacure had been reverted back to the bare allu wings?

Would airframe allu be OK or is Duraluminium the best color? All of this over grey primer I assume?

Thanx

Theuns

  • Member since
    October 2013
Posted by Big Blue on Monday, January 6, 2014 6:28 PM

Theuns,

First, nice looking MiG, congratulations.  Second, while I am by no means an expert, I used a combination of Airframe Aluminum and Aluminum for panel variation for non-wing surfaces of my P-51.  The Airframe Aluminum is one of the "special" Alclad coats, and can give a fairly shiny finish, but is very dependent on the base coat for its final appearance.  Typically, people use a gloss black undercoat to get a high shine aluminum finish, so using a gray primer (presumably matt) would likely tone that down a fair amount.  The regular Aluminum covers the undercoat, so you can spray it over whatever primer you want. 

On the P-47 I built, I put down a gloss black coat, followed by a thin layer of Airframe Aluminum.  This gave a shiny but dark metallic appearance to the finish.  I then sprayed my panel centers with Aluminum which both toned down the shine, and lightened the panel centers, leaving a darker shading to the panel lines.  I finished it with another light coat of Airframe Aluminum to tie it together a bit more.  Since I was going for a more weathered look, I used Alclad's light sheen after decals to knock back the shine.

Personally, I think you can use any number of Alclad shades and get a realistic P-51, it all depends on the effect you are going for.  If you are going the Airframe Aluminum route, I'd test it over the grey primer (as well as black) to see what the effect looks like.  Pick a glossy or matt primer, and throw in an additional clear coat layer, and you really can get a number of different finishes out of the same bottle.

  • Member since
    April 2005
  • From: Australia
Posted by taxtp on Monday, January 6, 2014 8:54 PM

I would like to add my compliments on both the Mig, Sabre and P-47. All look really excellent. There is so much useful information shared during this GB, thanks.

I'm just taking it one GB at a time.

  • Member since
    April 2010
Posted by Theuns on Tuesday, January 7, 2014 5:50 AM

Interestingly the same airframe allu in on both planes. The sabre over black looks darker and the Mig over grey that appears lighter.

Theuns

TUG
  • Member since
    December 2013
Posted by TUG on Tuesday, January 7, 2014 6:57 AM

There's some good looking NMF coming along here guys. YesYes

That's a very convincing paint recovery on the Mig Theuns and the Jug really cuts the cake BB. What scale is that. I have the Tamiya 1/48 to do at some stage.

Not much to say about the current build - still painting the cockpit but I have put some pics of my previous NMF builds on the aircraft section. Hope they are of interest.

Back soon with some update on the Hun

Regards - Tug

  • Member since
    June 2013
Posted by bvallot on Tuesday, January 7, 2014 9:30 AM

Theuns, I think that's a great side by side example of what you're putting underneath alclads that'll affect it's outcome.  Certainly either is fine, it's just a matter if what you're hoping to achieve.  I'm glad we got to see them together and in the same light. =]. I feel like I say this all the time but I'm so eager to throw a jet or two in the mix of all these WW2 planes. I desperately want to do two rivals next to each. =D

On the bench:  

Tamiya F4U-1  Kenneth Walsh


  • Member since
    June 2013
Posted by bvallot on Tuesday, January 7, 2014 9:47 AM

Oh! I just remembered. Tug, I wanted to ask you how you went about weathering that F-86 you did. You mentioned metal powders too. Can you elaborate on when and how these are used?

On the bench:  

Tamiya F4U-1  Kenneth Walsh


TUG
  • Member since
    December 2013
Posted by TUG on Tuesday, January 7, 2014 12:43 PM

Hi BV - it's quite sometime since I did the Sabre but the chipped paintwork on the wing was done using the 'salt technique' but not using salt. I found salt will dissolve and form a 'paste' which is not consistent. I happened to be in a large store that had a craft department and found what is called 'embossing powder' . I thought this might make a suitable substitute so bought some to try. I found it does not disolve and indeed once brushed off the model can be re-used. I have found the best way to apply it is to spread water in the areas required then sprinkle the powder into it. It absorbs the water and stays on the surface quite well. I found it best then to leave it to dry completely before flicking off gently that which is not required. It's adhesion to the surface is minimal so that first coat has to be applied at very low pressure and very thinly so as to bind it thereto without blowing it off. Once that first coat is on then it can be painted (sprayed) as usual. Once dry it's just brushed off the model to leave a reasonable representation of chipped paint. 

The post shading was done with Alclad Jet Exhaust - I use that a lot for changing tones of the base silvers and for shadows. The markings were done with Tamiya paint. Once totally dry they can be difficult to chip but if a water wash is applied in the area and left for a minute or two then the paint can be chipped much easier. Another thing with Tamiya is if it's lightly sprayed then instantly rubbed off using Micro mesh 6000 it will leave lovely 'stains' in the pores of the paint.

I was given my first silver powders which were for lifting finger prints. I have added to that with Mig pigments etc and a very intense chrome powder (bottom left) which unfortunately I have no idea where I got it from. This is what I have along with a graphite stick which gets 'powdered' by rubbing on 800 grit abrasive paper.

In use I apply it - extremely finely, it goes an awful long way and once on if overdone has to be sprayed over - using small - 4mm or so flat brushes - to highlight areas always working from the middle out if on panels. I first used it on the fronts of those intakes on the Mirage.

Hope that helps 'bv' anything else just say

Regards - Tug

  • Member since
    June 2013
Posted by bvallot on Tuesday, January 7, 2014 3:45 PM

Well maybe just one thing. You mentioned spraying the tamiya tape with something. Water? Alcohol?

On the bench:  

Tamiya F4U-1  Kenneth Walsh


  • Member since
    October 2013
Posted by Big Blue on Tuesday, January 7, 2014 4:29 PM

Tug - Thanks for the explanation.  I've been tempted by the MIG metallic powders, but wasn't sure how I would use them.

The P-47 is the very same Tamiya 1:48 it sounds like you have.  Great kit, and probably my favorite aircraft.  I have their Razorback Jug waiting for me to finish the P-51, and I am eager to start. Get working on yours... I am looking forward to seeing what you put together.

Theuns - As bv said, you have already proved that you can get a number of realistic looking finishes from that Airframe Aluminum.   They both look great.

This has been a very enjoyable and informative group build to be part of.

TUG
  • Member since
    December 2013
Posted by TUG on Wednesday, January 8, 2014 7:43 AM

Hi 'bv'  

Glad that's of use. If you are referring to this - "The markings were done with Tamiya paint. Once totally dry they can be difficult to chip but if a water wash is applied in the area and left for a minute or two then the paint can be chipped much easier" then the tape/mask has been removed. I have found that applying a small amount of  water over an area to be chipped for a few minutes softens the paint slightly to enable gentle chipping without affecting the painted surface below.

'BB' I have that version too. I have an aviation print hanging in my hallway called 'Return to Halesworth' It's by Gil Cohen and pictures Bud Mahurin being congratulated having just returned from a mission where he downed three enemy aircraft. A great picture and one of local interest - I live about 12 miles from Halesworth - there is a museum there for this group (google halesworth aviation museum) along with many others in the area. The aircraft featured in the decals in the kit I have - 'Spirit of Atlantic City NJ'  - is the same aircraft portrayed in the print. These kits are high on the must do list but then again so are 'several' more Wink

Regards - Tug

 It would appear the URL Link facility is not working on here - the sign is faded out. Is this the norm or have I got something switched off?

  • Member since
    June 2013
Posted by bvallot on Thursday, January 9, 2014 12:41 AM

Here's an update on the P-38J cockpit.  I've cut and pasted this from the WIP I have going on the "Aircraft" section.  It's late here and I was feeling lazy about doing it all over again.  =P

Here's a few photos of the cockpit that's mostly completed.  I've read that early variants sometimes had an OD green seat as these parts came from all over and the distributors often had delays in delivering, but by the time the J's rolled out everything was kept in the typical Interior Green.  This time I tried a play out of Lawdog's handbook and painted everything Flat Black, then came back with my interior green.  So far I like it!!


image by brittvallot, on Flickr


image by brittvallot, on Flickr

I returned to my latest way of painting the various equipment inside by mixing my Flat Black with a little Medium Blue.  I paint it thinned out onto everything...radio equipment, etc. and used a Light Grey to dry brush the corners of things.  A little Flat Aluminum dry brush over certain items that get stepped on and worn...and some dabs of red and white to display the placards that go over this and that.


image by brittvallot, on Flickr


image by brittvallot, on Flickr


image by brittvallot, on Flickr

I didn't feel so safe about the way Aires decided to construct this piece so i reinforced it with some brass rod.  I recommend it.  =]


image by brittvallot, on Flickr

Here's a test fit:


image by brittvallot, on Flickr


image by brittvallot, on Flickr

In order to fit the cockpit, I had to file down the two round female tabs that receive the dash/IP.  I filed them smaller from underneath and closer in to fit the cockpit tub. I also just went ahead and cut one side off for now to allow it to squeeze in.  I'll put it back on later.

Also, my head rest was painted the same as my wildcat and mustang.  It's a mix of Tamiya's Red, Flat Red Brown and some Flat Black.  None of this is mixed evenly.  It's thinned and painted quite spontaneously.  Nothing too fixed and planned.

On the bench:  

Tamiya F4U-1  Kenneth Walsh


  • Member since
    April 2010
Posted by Theuns on Thursday, January 9, 2014 12:56 AM

Man there is some serious talent here WOW!

Theuns

  • Member since
    January 2012
  • From: Hatfield
Posted by Misty on Thursday, January 9, 2014 4:40 AM

i like the effect of the green over flat black, i think ill give it a go too, i imagine it will work with a grey pit?

TUG
  • Member since
    December 2013
Posted by TUG on Thursday, January 9, 2014 3:30 PM

Britt - that cockpit is looking great and looks to have gone in the kit parts like a hand in a glove. Aires are usually very good in that direction so apart from filing those couple of lugs did you have any other fit problems?

Re 'doing the black first' - would I be right in assuming you are covering everything with black (like the idea of toning down with blue by the way) then brush painting the green or are you spraying those areas too.

I've been working mine from the base colour up - spraying the grey surround first then brush painting the panels. Tamiya sky grey and various Vallejo paints for the brush painting.

I found something out today. I usually paint the dials on the back of the negative covering any color with white. What I noticed was when I turned this over I happened to lay it on a black surface as opposed to the white of this painting block. It was instantly noticeable that  the dials were far more brighter. I painted the panel background black and got the same improvement

They all need a light spray of Kleer and it's all ready to begin assembly but I'll probably leave that until the last minute before final fitting - next up are the two U/C bays.

I've semi scratch built the speed brake bay and have just seen that Aires do one for the 1/48 version. What's the betting the 1/32 version comes out just after the fuse sides go together Sad

Regards  for now - Tug

  • Member since
    June 2013
Posted by bvallot on Thursday, January 9, 2014 4:15 PM

TUG

... did you have any other fit problems?

Re 'doing the black first' - would I be right in assuming you are covering everything with black (like the idea of toning down with blue by the way) then brush painting the green or are you spraying those areas too.

Well Tug, you were right about the cockpit squeezing in quite nicely.  I took my time making sure everything was glued together appropriately on the cockpit and lined up where it would fit and so far no problems.  Tonight I'll be checking the canopy before I glue anything into place.  But it did make a clean, firm fit before any CA went down.  I give it two thumbs up.  This is by far the easiest cockpit I've ever had the pleasure of building.

As for the Flat Black painting...Lawdog is a guy on here who has quite a few posts up.  All of them are great and he's been at it for a while it seems and has plenty of tricks for tackling this and that in the modeling world.  One trick he has for painting cockpits is to put a coat of Flat Black on first after a primer. This allows you to add the illusion of shadows to some degree within the cockpit and help move the eye around all these tight, narrow spaces.  Whatever interior color is called for gets painted on top.  The trick is not to undo all of the darker color.  You're to leave the spaces between equipment somewhat darker.  Again, this is to help the eye make better sense of distance at such a small scale.  =]  At least, that's how it's supposed to work. This will work for whatever color and assists any wash you happen to put down after sealing it. 

Hope that's what you're looking for. =]

On the bench:  

Tamiya F4U-1  Kenneth Walsh


  • Member since
    January 2012
  • From: Hatfield
Posted by Misty on Friday, January 10, 2014 5:19 AM

that pit is looking lovely, Tug. i will try the black paint behind the white on mine to see if it works, nice tip,!

TUG
  • Member since
    December 2013
Posted by TUG on Friday, January 10, 2014 11:20 AM

Thanks for explaining that Britt - taking a look at your images again it makes it very clear - A bit like pre shading but 'all over' - the third pic down really shows the effect well. Just one thing - you didn't say whether it was spray or brush or combination of both. Looking at it, it appears to be all spray (apart from the details of course) - are you masking the black areas or just going up close if so.

Glad to pass something on 'T'Less' - sharing (both ways that is) is what being on here is all about for me. To think we can do this on a daily basis rather than once a month at a club meet has to be a bonus for everyone - just wish I'd done it years ago

Regards - Tug

JOIN OUR COMMUNITY!

Our community is FREE to join. To participate you must either login or register for an account.

SEARCH FORUMS
FREE NEWSLETTER
By signing up you may also receive reader surveys and occasional special offers. We do not sell, rent or trade our email lists. View our Privacy Policy.