SEARCH FINESCALE.COM

Enter keywords or a search phrase below:

OFFICAL NATURAL METAL FINISH GB V (2013-2014)

71265 views
662 replies
1 rating 2 rating 3 rating 4 rating 5 rating
  • Member since
    April 2013
Posted by SchattenSpartan on Friday, January 10, 2014 12:48 PM

BV: That's one fantastic looking cockpit! The Aires set itself is great already, but your awesome detail painting really makes things pop!

Theuns: Your MiG is looking great as well! Those side-by-side pics really show how important the paint below the Alclad colors is in defining how the model looks like!

TUG: You are doing one heck of a job on painting the 'pit of your F-100! Tamiya's P-47 is a lovely kit. probably the best 1/48th kit out there...

Blue: Now that's what I call a great looking Thunderbolt! I hope my big Jug turns out half as good as yours. I think the finish is perfect and really fits that plane (not too shiny, but also not too dirty). Just one question: Did you use those powders on your Thunderbolt as well? It's great of you to explain all of that to us BTW!

  • Member since
    June 2013
Posted by bvallot on Friday, January 10, 2014 2:37 PM

TUG

Just one thing - you didn't say whether it was spray or brush or combination of both. Looking at it, it appears to be all spray (apart from the details of course) - are you masking the black areas or just going up close if so.

I'm sorry I forgot to mention it.  I airbrush everything with the flat black of course and follow up with the interior green. The rest I pick out with a thin, fine brush.  No matter if you mix your paint or not, the color you're painting with should be thinned enough so that it goes on smooth like warm butter. You're not looking to put a thick layer on top of everything so keep it thin.  Simple as that! =]

On the bench:  

Tamiya F4U-1  Kenneth Walsh


  • Member since
    October 2013
Posted by Big Blue on Monday, January 13, 2014 11:29 PM

Complete!  (Well almost...*)

Before I get to that, BV & Tug: those are 2 very nice looking cockpits you guys have going.  I have enjoyed seeing the work you both have been contributing, and learned a lot from your posts and comments.  That goes for a number of others here as well, but BV and Tug are the 2 that have posted work since my last post. Smile

Clemens: thanks again for the nice comments about the P-47... coming from a Jug man like you it means something!  I apologize if an earlier post of mine was confusing, but I have not yet tried the MIG metallic pigments for weathering.  I have thought about picking some up in the past with the idea of rubbing them into a shiny Alclad finish to simulate oxidized aluminum in a controllable fashion, but have not yet given it a go.  I was learning from Tug about his technique.

Ok, so with the exception of the landing light, American Beauty is finished.  I have painted the backside of the light with Alclad aluminum for the reflective back of the bulb, but now either need to figure out a way to mask off the clear bulb lens, or bite the bullet and hand paint the front and back of the housing green.  Short of buying a punch and die set (which I am sure I'd find use for), I don't know of any way to cut a circle of tape to cover the clear lens.  Bah.

When I last posted, I was dealing with a few setbacks, the largest of which was caused by my own stupidity.  I had reversed the ID letters on the starboard side of the aircraft, and while the decals came off easily, they left me both with the letter outlines in the clear coats I had applied, as well as an area where tape lifted some Alclad off of a neighboring panel.  I dealt with the issue by carefully sanding the affected areas, using Alclad Aqua Gloss as a sort of self-levelling filler, and re-spraying Alclad over the gloss.  Time consuming, but effective enough.

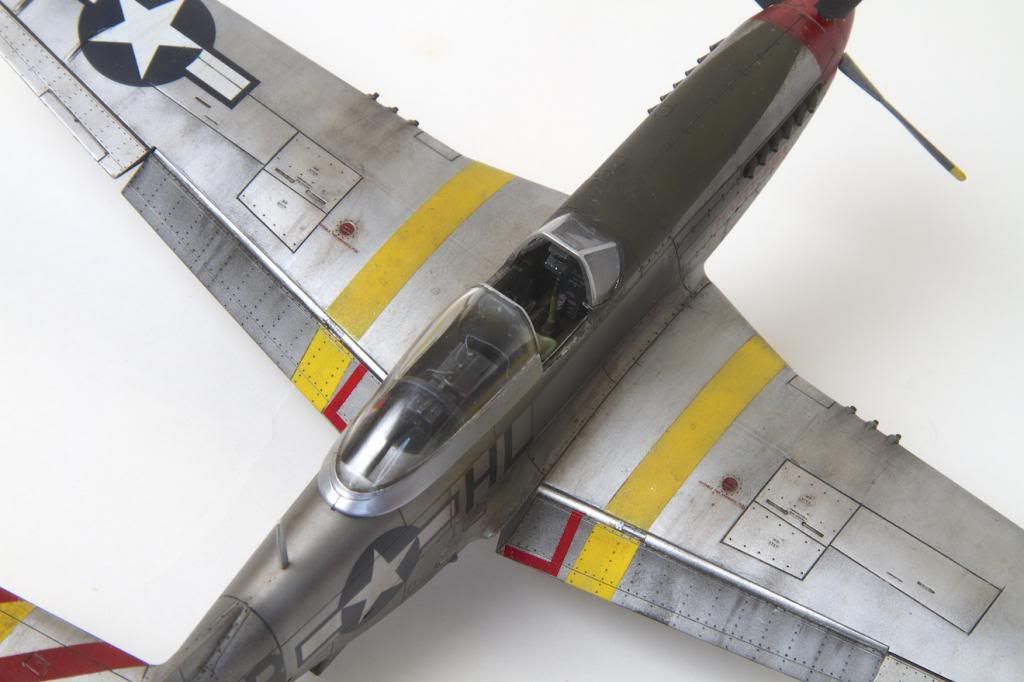
Once the repairs were done, it was time to add the small bits.  I made wires for the radio using some fine tinsel from my fly tying kit, and I drilled holes in the canopy support brace using the p.e. piece as a template.  I painted my lights using Future colored with food coloring over silver paint (I like the effect, see below).  

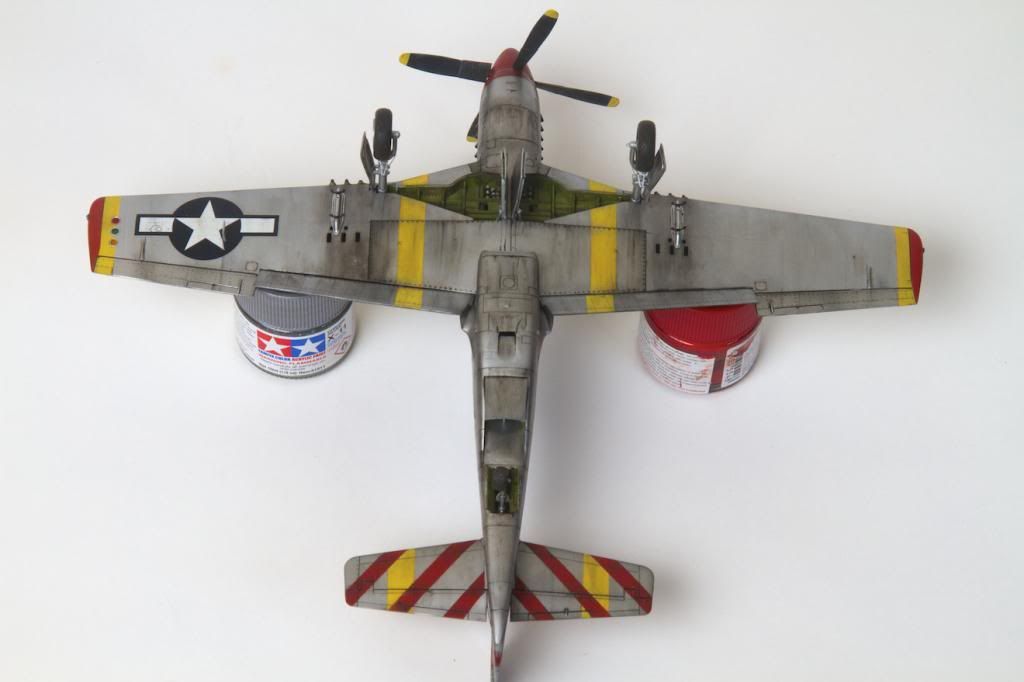
Here is the end result (minus landing light):

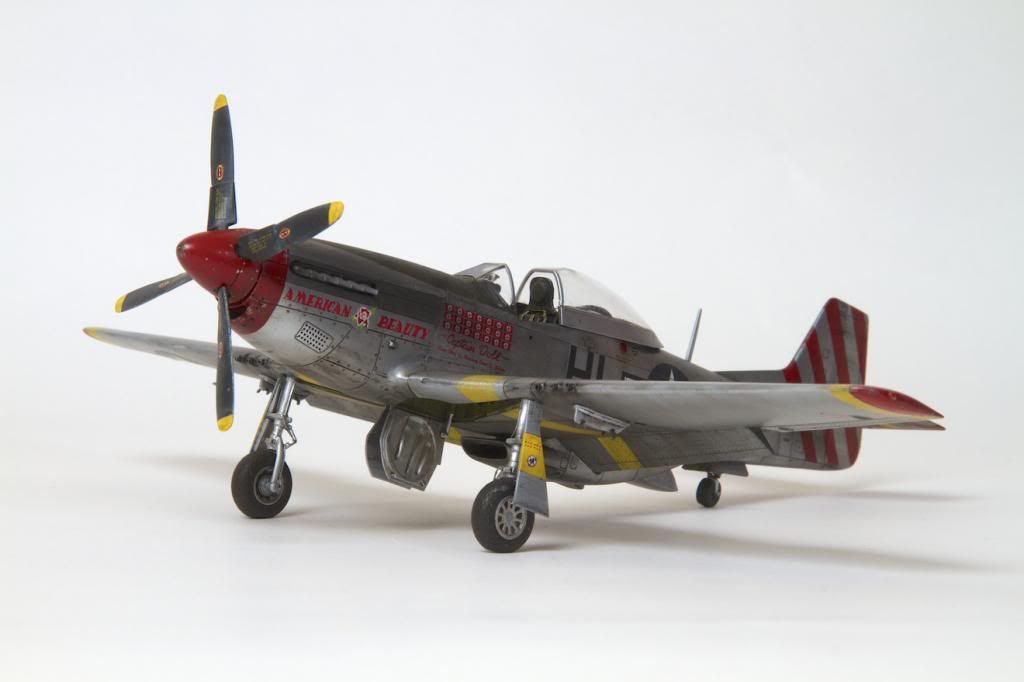
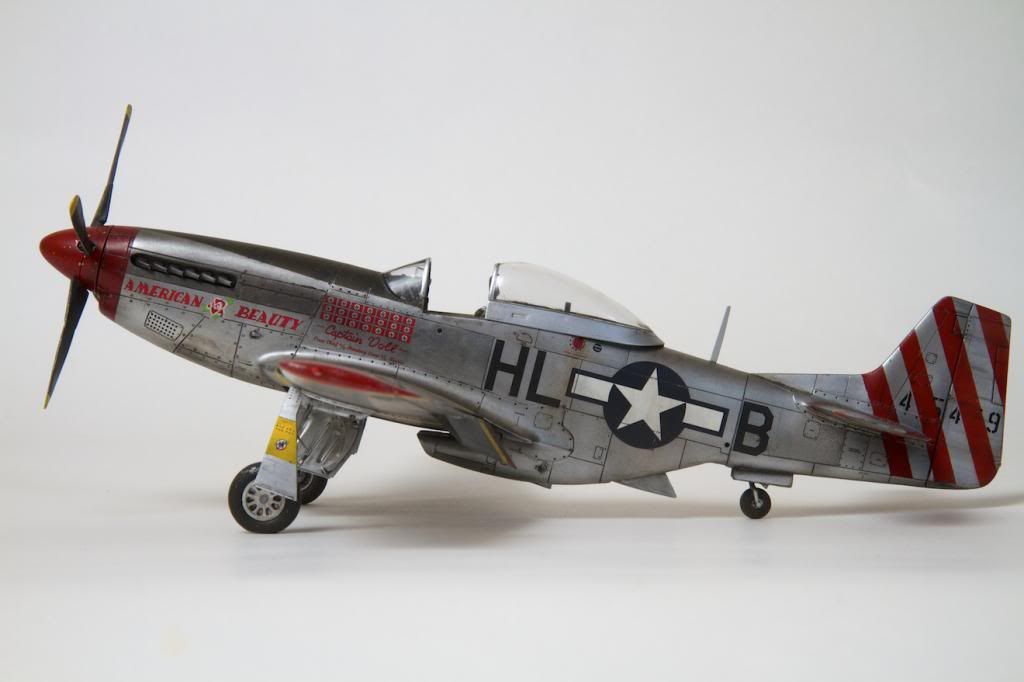
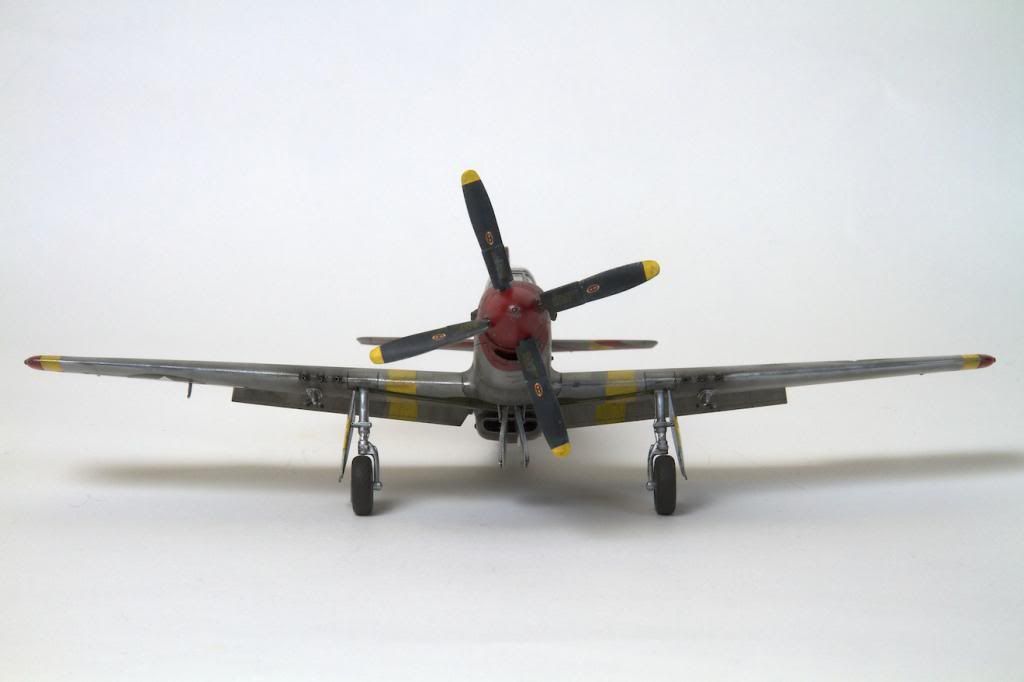
Looking at the pictures, I can see one of my prop blades needs to be set into the spinner a bit farther, and I see all the little (and bigger) flaws that I never got corrected.  All in all, it came out better than I expected it would as I was pulling off decals a week or two ago.  It teaches me that with patience, even some relatively large mistakes can be dealt with.

As always, feedback is welcome.  I have really enjoyed being a part of this, my first, group build and will certainly do this again.  I even have an idea for another NMF build, but next I want to paint something drab, or camouflage!  I will certainly be watching this thread to enjoy the great work being shown, and learn from the thoughtful posts.  Many thanks to Clemens to organizing this, and to all my fellow participants.

Clemens, please feel free to pick an image for the completed builds post up front.  Let me know if you need a different resolution.  How do I get myself a badge?

Blue

  • Member since
    June 2013
Posted by bvallot on Tuesday, January 14, 2014 12:06 AM

Blue!  This has really come along.  The weathering you've pulled off here has without a doubt made this build. =]  I really like how you've addressed the wings.  Too often people are painting every other panel a different color, but here you've just plain nailed it.  The painted stripes are well done also.  Would you mind going over how you went about painting them?  Also, what kind of wash are you using here?

Solid build!

On the bench:  

Tamiya F4U-1  Kenneth Walsh


  • Member since
    April 2013
Posted by SchattenSpartan on Tuesday, January 14, 2014 2:18 AM

Awesome work, Blue!

Great fix on that damaged Alclad paint as well. I'll update the front page as soon as i get home.

Regarding the badge: You can either take one of the standard badges I made for this one, or you can wait a bit untill I finish your personal badge. Simply add it to your signature (in community settings). I'd suggest you save the badge on your own computer in case something happens to my Photobucket account just to make sure.

  • Member since
    January 2012
  • From: Hatfield
Posted by Misty on Tuesday, January 14, 2014 2:49 AM

big blue -  Bow Down that looks awesome indeed!!

  • Member since
    April 2011
  • From: Caput Mundi (Rome,Italy)
Posted by Italian Starfighter on Tuesday, January 14, 2014 1:51 PM

Hi all.....finally ended!!!

http://img.photobucket.com/albums/v381/tigerman12/ThatsAmoreGBBadge.jpg


  • Member since
    June 2013
Posted by bvallot on Tuesday, January 14, 2014 2:04 PM

A WELL polished bird there ITA Starfighter!!  and quite well photographed.  I'm eagerly awaiting to build my light box... =]

On the bench:  

Tamiya F4U-1  Kenneth Walsh


  • Member since
    October 2013
Posted by Big Blue on Tuesday, January 14, 2014 7:28 PM

She's a beauty Starfighter.  Congratulations on a really nice build.

Clemens: thanks, and no rush.

Talent(less): thanks for the kind words.  I was just re-admiring your beautiful MiG 21 yesterday.

BV: thanks also for the nice comments!  I am looking forward to watching your progress on the Lightning.

The short answer to answer your question about painting the stripes (I assume the "peppermint tail" red stripes), is that I cut appropriate width strips from Tamiya tape, and used them to construct a mask for airbrushing. 

The longer answer is that I am in the habit now of scanning my decal sheets when I start working on a new model.  The Eagle Strike decal sheet I purchased for this build provided the stripes as a set of decals (one for each side of the vertical and horizontal stabilizers).  All 4 of the possible liveries share the same set of tail decals.  In the case of the horizontal stabilizers, the decal was for 4 stripes, but archival photos I saw of Captain Voll's ship showed only 3.  To deal with this, I measured the stripe widths and the amount of space I wanted to cover, did some math, and repositioned the stripes in Photoshop so that they would be evenly spaced.  I then strips of tape in 2 different widths, one matching the red stripes, and one matching the masked off NMF sections.  I used a print out of the new design to position the first strip of tape, and then alternated the 2 sets of strips from there.  When finished, I removed the strips covering the areas to be painted red.

The tricky part about painting the vertical stabilizer is that the ID numbers on the 308th FS airplanes were partially covered by those distinctive red stripes, and the decal only shows the exposed sections of the digits.  Making sure that the painted stripes matched the decal was critical or the ID number would not work:

In this case, I taped a print out of the ID number in place on the tail, and then used the tail stripe pattern to guide tape placement, repeating the same process as the horizontal stabilizers.  I secured the top half of a few strips, removed the ID number, and fully settled the tape strips into place.

Well, that was a long winded way of saying "I put down tape and sprayed red paint."  Hope it was helpful.

Blue

  • Member since
    June 2013
Posted by bvallot on Tuesday, January 14, 2014 11:24 PM

Blue: I think I see just what you're talking about. And where as I can certainly appreciate the math I don't want you to feel bad cause I'm picked on as being long-winded my own self ...but I was actually referring to the yellow stripes on the wings. =P

Still, I appreciate the care to detail. I think we're all here for the same thing . I can only imagine how much you stressed over that considering the ID markings. If it were me...I'D HAVE DIED!! Lol  

I suppose it seems a stupid question but when I look at them, they feel different. Did you put something over or under them that was unique? Treat them in some different way...?

On the bench:  

Tamiya F4U-1  Kenneth Walsh


  • Member since
    October 2013
Posted by Big Blue on Tuesday, January 14, 2014 11:41 PM

LOL

So.. that was a long-winded way of saying "I'm answering the wrong question"!

The yellow stripes were masked and painted with Gunze Mr. Color (#4 Yellow with a small amount of #58 Orange Yellow) because I don't love the way Tamiya acrylic yellow sprays for me.  After they had time to dry, I hit them very lightly with micro-mesh to wear them down slightly.  I also dry brushed some silver (mostly on the leading edges), and then they got treated to various oil washes along with the rest of the exterior.  Figuring they probably got some heavy foot traffic, I left the oil washes a bit spotty to show dirt.

That's pretty much it; hope THAT explanation helps.  

Embarrassed

  • Member since
    April 2011
  • From: Caput Mundi (Rome,Italy)
Posted by Italian Starfighter on Wednesday, January 15, 2014 3:35 AM

Thanks guys.....I want to add few words:thanks for yours comments and.....even if I don't speak  a lot on the forum for my bad english language,I follow yours works....and I see passion,skill,very good models,great wethering......Compliments to all....and see you the next GB!!!!!!!!!!Ciao from Italy,Enrico.

http://img.photobucket.com/albums/v381/tigerman12/ThatsAmoreGBBadge.jpg


  • Member since
    October 2013
Posted by Big Blue on Wednesday, January 15, 2014 7:43 AM

And to you as well Enrico,  grazie!

  • Member since
    March 2010
  • From: MN
Posted by Nathan T on Wednesday, January 15, 2014 8:25 AM

Very nice Enrico! Excellent painting. How did your friend's Ki-100 turn out?


  • Member since
    April 2011
  • From: Caput Mundi (Rome,Italy)
Posted by Italian Starfighter on Wednesday, January 15, 2014 8:31 AM

Hi Nathan....he stopped the Ki-100 same time ago.......lost in mission!!!!Ciao,Enrico

http://img.photobucket.com/albums/v381/tigerman12/ThatsAmoreGBBadge.jpg


  • Member since
    June 2013
Posted by bvallot on Wednesday, January 15, 2014 9:28 AM

Thank you for sharing Enrico. =]  and don't worry. You're bad English is way better than my bad Italian! Lol

Blue: that's exactly what I was looking for. =P that orange-yellow does indeed help it out a bit. I agree with you on the Tamiya yellow, but if you paint with a higher alcohol thinner (e.g. 91%) it will help it dry faster. So with thin coats you can still use it effectively if you're wanting something out of that color. Nice idea with the micro mesh. I'm always interested in how others approach tackling something like that.  Happy to hear yours.  I've never considered the dry brushing on a spot like that but here it seems to work beautifully.

*two thumbs way up

On the bench:  

Tamiya F4U-1  Kenneth Walsh


  • Member since
    January 2014
Posted by Silver on Thursday, January 16, 2014 7:02 PM
Very interesting.
TUG
  • Member since
    December 2013
Posted by TUG on Friday, January 17, 2014 2:51 PM

Hi Guys - sorry for the delay in responding to some great posts but have been a bit sidetracked - nothing done since the last posting Sad.

'Blue' - what a stunning Mustang - you must be very pleased with that indeed. Super weathering, it looks terrific. Great work in reclaiming that slight set back as well.

'Starfighter' -  Enrico you must be just as pleased with your result, that Sabre Dog really is beautifully finished - I've never taken much notice of this aircraft before but have now added that to my (definitely) must do list Yes.

Thanks for the kind comments on my efforts too - I think I said I share this hobby with another which can cause conflict at times which is exactly what has happened the last few days but I hope, no, intend, to get back onto painting that wheel bay next week.Wink

Have a great weekend everyone

Regards - Tug

  • Member since
    June 2013
Posted by bvallot on Saturday, January 18, 2014 2:50 PM

I'm putting the P-38 Lightning aside for a moment to think about how best to proceed and figured I would take this opportunity to wrap up the weathering and miscellaneous items on this mustang.  

Instead of making two different rods, I went with one strip of brass rod that I've filed down at the end so there is a step.  This rod is what opens the radiator door.  On the real thing there's a rod that fits into a sleeve for it, but here the scales would be too small to place a tube here.  I'm sure it may be possible to find a hypodermic needle close to scale, but I'm making due with this.


image by brittvallot, on Flickr

The difference can be seen where the shine is.  It's less obvious here, but there is a slight step where the distal end is smaller in diameter. 


image by brittvallot, on Flickr

It's barely visible in this picture, but there's a cable responsible for some operating the door I believe.  It's there in the back.  =]


image by brittvallot, on Flickr

And here it is installed.  If other's have attempted something like this for the 1:48 scale and come up with something different, I'd be happy to hear about it.  This is my first time around with a mustang and since I knew I wouldn't be building up the engine this time around on this kit I really wanted to detail the radiator.  On the bottom pic, you'll see the hole I set up at the beginning of this build.  In the past, I've done this last as it never presented a problem.  But here, I knew I'd have to place the brass rod to mount it in flight underneath and more aft (where the tail gear is).

On the bench:  

Tamiya F4U-1  Kenneth Walsh


  • Member since
    June 2013
Posted by bvallot on Saturday, January 18, 2014 3:03 PM

Here!  I figured I'd include a picture of what I'm referring to for those who may be unfamiliar.  =]


p-51d_47_of_51 by brittvallot, on Flickr

...more to come.

On the bench:  

Tamiya F4U-1  Kenneth Walsh


  • Member since
    October 2013
Posted by Big Blue on Saturday, January 18, 2014 3:51 PM

Tug: Thanks very much; given where my expectations were after that series of screw-ups and mishaps, I am happy with how it came out.  I'm just trying to keep up with all the great work people are putting up here.

Glad to hear your back in action... I have been wanting to see some WIP shots!  I have started working on that Tamiya Razorback over in the 1944 Group Build Clemens is co-hosting.*  

BV: I built mine out of a pair of Albion Alloy aluminum tubes (because I had some on hand).  The sizes are designed so that the outer diameter fits just inside the inner diameter of the next size up:

I took that shot prior to cleaning up and dulling down the glue attachment point.  You can kind of see it in place in one or two of the final pictures I put up. I'm glad I put it in there, but I wouldn't sweat the small details too much based on what is visible in the finished model.  

Nice to see some progress photos from you as well.  

  • Member since
    June 2013
Posted by bvallot on Saturday, January 18, 2014 4:45 PM

Now you see, that's something close to what I was looking for.  Locally, it seems it isn't around where I live.  Perhaps I'm just not looking in the right places.  Where'd you get yours?

On the bench:  

Tamiya F4U-1  Kenneth Walsh


  • Member since
    October 2013
Posted by Big Blue on Saturday, January 18, 2014 6:33 PM

BV:

I ordered mine online from Sprue Brothers here in the States, but I see that Hannants (and I'm sure others) carries them in the UK.  This is the set:

Albion Alloys Tube Slide Fit Tube Selection Pack (0.4mm, 0.6mm, 0.8mm & 1.0mm Aluminium)

I also used them to replace the molded gun barrels on the P-51.

Blue

  • Member since
    April 2013
Posted by SchattenSpartan on Saturday, January 18, 2014 7:30 PM

I finally managed to update the front page with all the finished builds.

Blue: Your 'stang looks absolutely fantastic! You did one heck of a job on that one! Thanks for explaining everything to us as well! I can't wait to see some pics of your Tamiya Jug (did I mention I love P-47s?)

Enrico: That's some marvellous work as well! Your NMF looks great as does all the detailing work you did on your Sabre Dog! Could you post one of the pictures (the one you like best) without any text so I can create a personal badge for you?

Those Albion Alloys brass tubes are great stuff! I picked up one of their slide fit sets at my LHS today.

  • Member since
    April 2011
  • From: Caput Mundi (Rome,Italy)
Posted by Italian Starfighter on Sunday, January 19, 2014 5:20 AM

Hi....here you are...!!!!!!!

http://img.photobucket.com/albums/v381/tigerman12/ThatsAmoreGBBadge.jpg


  • Member since
    April 2011
  • From: Caput Mundi (Rome,Italy)
Posted by Italian Starfighter on Sunday, January 19, 2014 5:41 AM

Hi...I can't add another badge in my signature......a red warnig says that my signature is too long :512 charatters.....Who can help me???Propeller

http://img.photobucket.com/albums/v381/tigerman12/ThatsAmoreGBBadge.jpg


  • Member since
    April 2013
Posted by SchattenSpartan on Sunday, January 19, 2014 6:23 AM

Save all the badges on your computer and then use an image editing software to combine them in one picture. The character warning is caused by all the picture URLs having too many characters. Another trick is to right-click on the picture and select "unlink". That removes the link that leads to your picture sharing website and shortens the URL (it's actually the only way I am able to add a single picture to my sig. There's too much text in there already)

  • Member since
    April 2011
  • From: Caput Mundi (Rome,Italy)
Posted by Italian Starfighter on Sunday, January 19, 2014 7:54 AM

Thank you.....I haven't thinked to that!!

http://img.photobucket.com/albums/v381/tigerman12/ThatsAmoreGBBadge.jpg


  • Member since
    April 2010
Posted by Theuns on Sunday, January 26, 2014 8:44 AM

Have you ever been so surprized you were lefft  almost speachless?

We had our IPMS model of the year comp yesterday.

I built a 1/72 Diorama I thought might atleast place in the top 3 (yea right,not even close!) and on my way out to the meeting I grabbed my 1/72 Airfix MiG 15 in alclad I posted a few pages back, just as a table filler.

Then it won the jets 1/49 to 1/72 class! I could not believe it for such a simple out the box build, i never built it as a comp project. In my view there were other way better models in the same class there..................who'd a thunk it!

Just goes to show that even small models can win.

The MOY was taken by a 1/72 JU-88 although there were 1/32 B-17, 1/18 Dauntless ,1/32 Lightnings and other super stunning builds present.

Theuns

TUG
  • Member since
    December 2013
Posted by TUG on Sunday, January 26, 2014 2:44 PM

Congratulations Theuns - it's a good feeling I'll bet Big Smile

Well after a few days of constant obstacles getting in the way I  managed to have a quiet days painting and finally got the wheel bays finished (more or less - just one or two little things to add like rams etc)

I began by spraying them an olive drab - the light in my place does not help here! -

And after some concentrated effort they emerged like this tonight 

This is it on the reference (Squadron Signal Walk Round) used

Yes I know that green looks wrong but in the daylight it  does look the right tone if a little dark. I'll have to live with it now eh?

Next up is the speed brake bay - I hung on to doing this until last just in case Aires released one in 1/32 - that'll no doubt come just after this is fixed in place. Nothing really elaborate just removed the moulded on detail and replaced it with some copper wire. The 'connectors' are from Albion Alloys ali tubing. The pipes will get fitted after priming and the colour coat.

Not much progress I'm afraid but it is a little closer to closing that front fuselage - I'll keep you posted

Regards - Ramon

JOIN OUR COMMUNITY!

Our community is FREE to join. To participate you must either login or register for an account.

SEARCH FORUMS
FREE NEWSLETTER
By signing up you may also receive reader surveys and occasional special offers. We do not sell, rent or trade our email lists. View our Privacy Policy.