SEARCH FINESCALE.COM

Enter keywords or a search phrase below:

OFFICAL NATURAL METAL FINISH GB V (2013-2014)

71239 views
662 replies
1 rating 2 rating 3 rating 4 rating 5 rating
  • Member since
    April 2013
Posted by SchattenSpartan on Wednesday, March 19, 2014 9:16 AM

Great work, Tug!

I really like the custom paint atand you made for her. I still have to figure out a way on how to hold prop planes while painting. They don't have that nice hole for the engine nozzle in the back and no air intake at the front either. Any suggestions?

  • Member since
    January 2014
Posted by Seabe on Wednesday, March 19, 2014 11:00 AM

Thanks guys, appreciate the kind words. We're our own worst enemies when it comes to critic, I just see loads of improvements to be made.

Hey Tony, never realised there was a pic to be nominated - only now saw the "completed" section! Don't know whether the Lotus counts, since it was started last year. But if it does - just take the side view of it, very first pic.  For the Audi... aaag, just take the full side view also - 2nd to last one.

Haha, Brawn it will be then! My second to least favourite colour - white! I only hate yellow more... To apply as paint, that is.

The R8 was a Le Mans Miniatures kit. Really really awesome kit. Super easy build, I can recommend them any day. I also have their Bentley Speed 8 car, the doors which can be opened. Will get to it some day.

Had a quick look at both sets of instructions for the Lotus 25 and made some notes. Does not look like brain surgery... but I have been proven wrong many a time before!

  • Member since
    January 2014
Posted by Seabe on Wednesday, March 19, 2014 11:01 AM

Oh bugger... I answered on the wrong thread, sorry guys! Don't know how to remove the post!

  • Member since
    June 2008
Posted by jugjunkie on Friday, March 28, 2014 12:01 PM

Got some done over the last few days...

  • Member since
    April 2013
Posted by SchattenSpartan on Friday, March 28, 2014 1:06 PM

Looking great there, JJ!

I think I don't have to tell you that the Jug is my all time favorite (and I guess your screenname relates to it as well?) so I'll be following along with great interest!

Just out of curiosity: What color did you use for the 'pit? It looks kinda light in the pictures, Is it Interior Green? (aka Tinted Zinc Chromate)

  • Member since
    April 2010
Posted by Theuns on Tuesday, April 1, 2014 11:25 AM

Hi guys, here is my latest NMF entry for our IPMS MOY in July.

Trumpeter 1/72 F-100c

Paint will be alclads and I really hope I don't screw up the heat stains on the back!

Sofar the detail looks really good.

Theuns

  • Member since
    January 2012
  • From: Hatfield
Posted by Misty on Tuesday, April 1, 2014 11:34 AM

I would love to see some good tips on doing that heat stain, so plz can i haz some :-)

  • Member since
    June 2013
Posted by bvallot on Tuesday, April 1, 2014 11:36 AM

Already picking another one up I see.... =]

On the bench:  

Tamiya F4U-1  Kenneth Walsh


  • Member since
    April 2010
Posted by Theuns on Tuesday, April 1, 2014 1:23 PM

I am a total amature at heat staining, but I think of using steel on the reaf fuse section and to put the "brown/gold" and blue streaks on with something like tamiya transparent to look like that.

I have the basic cockpit done and the decals used for the side consoles and instrument pannel look very nice and react well to microsol,

I hope this is a sign of things to come with the rest of the many decals!

Theuns

TUG
  • Member since
    December 2013
Posted by TUG on Tuesday, April 1, 2014 4:16 PM

Hi Guy's - the last week or two has been most distracting hence the poor response!

Despite the intrusions into modelling time I have managed to get a couple of sessions in and seeing as the subject of heat stains has been raised I thought you might like to see my attempts so far on this very difficut area. I say difficult because it is very easy to get just that effect you like on one bay only to over do it on the next. I have been over this area about three times now and am really looking forward to a couple of days continuity to get the job cracked. Anyway heres the start....

Aaargh!!!!!

Guys - I have been having trouble with my computer - I cannot access any website from the desktop icons. I've just found out I can't load any pics from my Picasa album on to here either. Tried several ways but it's not having it so somethings afoot!! 'Oh dear me ' I said or something rather bloody similar!

Sorry - I will get back as soon as I can get this fixed

Tug

TUG
  • Member since
    December 2013
Posted by TUG on Tuesday, April 1, 2014 5:06 PM

It's amazing how the penny can suddenly drop! Because of another aberration I recently uninstalled 'Snap Do' which apparently was linked to Chrome. Whatever a re-install of Chrome has got the album back up so lets have another try Smile

First off was to do the fin. This is a French subject and apparently these were coated on lower surfaces with a moisture resistant coating that gave a blue hue to the ally. On the very few pics I have this appears to have been applied to parts of the fin too so this will be my interpretation.

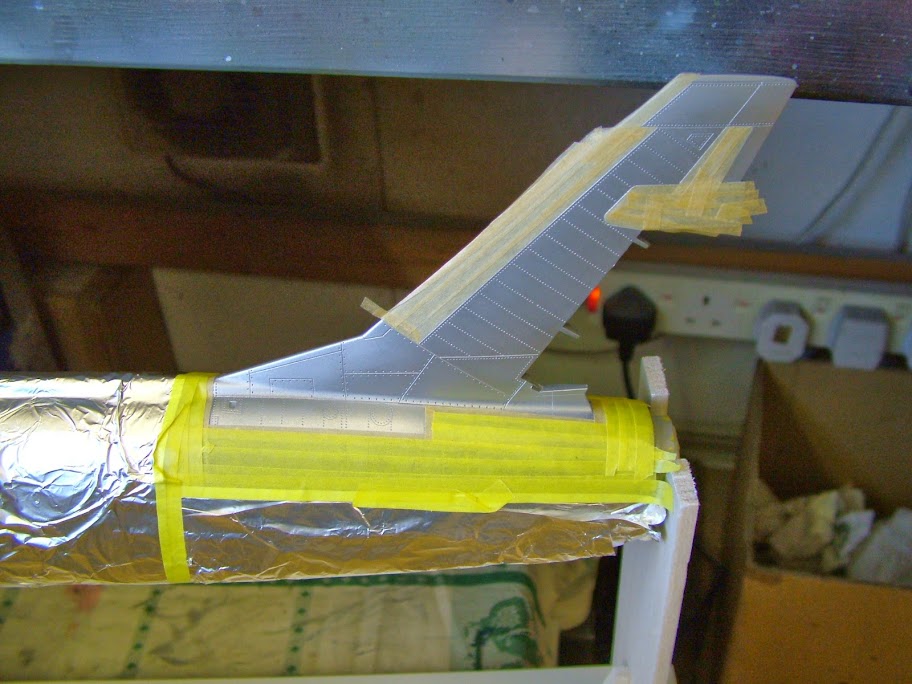
I prefer to cut 6-8mm wide strips from the 40mm wide Tamiya masking tape as this lessens the pull on the paint on removal. Kitchen foil makes an excellent, easily wrapped around mask too. The brown tape (name escapes me) is no longer available but is the best used so far - fortunately I purchased a few rolls sometime back. Unless its a small area as above it's usually reserved for edge marking only.

Next up after masking was to apply a coat of Dark Aluminium as a base. Incidentally, every coat gets a smoothing with 6000 Micromesh and water, wiping off with a Kleenex tissue. The difference is readily apparent as soon as you run a finger over the surface

The areas were highlighted with White Aluminium, then Polished Ali and Chrome to accentuate and the edges darkened with Jet exhaust and Hot Metal Violet.  The initial staining was carried out with some of the new Alclad 'Candy Colour' dyes - yellow and orange

The blues and browns where then added but it was after this I 'lost it' somewhat so had to re-coat again. By that I mean just lightly over spraying with Highly Polished and starting back on the colours again.

The last stage, frustratingly having to be left over a week ago was a decision to mask each rivet line with a rough edged mask to give the differing tones at that point. The other side has yet to be done but I'm hoping that now I shall be able to have the continuity to finish this area

There's a lot more work to do to get this right as yet!

Incidentally - the 'rough edge' to the mask was made by laying down a stretched out straight cotton thread  over a piece of glass then a strip of masking tape over the top smoothed down each side of the thread. A gentle rub with a sanding stick over the high point  to create a weak point allows the cotton to tear the tape in a straight line but in a rough manner.

Hopefully  that's of interest . With luck I'll have something more to show in a day or two

Regards for now - Tug

  • Member since
    January 2012
  • From: Hatfield
Posted by Misty on Wednesday, April 2, 2014 4:29 AM

that looks great, i dont have the dyes you mentioned only the hot metal ones. more stuff to buy, oh goody !

TUG
  • Member since
    December 2013
Posted by TUG on Wednesday, April 2, 2014 9:35 AM

Hi Misty,

The yellows, including the orange, in the 'Candy' range are particularly good as are the blues. They go on just as easy as the hot metal ones too.

It can all get a bit expensive if you do it all at once but by buying a couple here and there  the 'arsenal' soon builds up. FYI - I use the transparent medium to dilute the colour - this keeps the consistency the same but with a much lighter colour hue.

Regards - Tug

  • Member since
    January 2012
  • From: Hatfield
Posted by Misty on Wednesday, April 2, 2014 1:20 PM

can you give the number (ie AL703) of the colors you used including the transparent medium please

TUG
  • Member since
    December 2013
Posted by TUG on Wednesday, April 2, 2014 4:49 PM

Without going out to my workshop to check looking at the Alclad site its definitely 704,5 and 6 in the 'yellow range' and 711 in the 'blue' plus possibly 710.

I cannot see a reference to the 'Transparent Medium' but I definitely have some - perhaps it's been discontinued but you could try an email to them

Tug

  • Member since
    January 2012
  • From: Hatfield
Posted by Misty on Wednesday, April 2, 2014 5:50 PM

Cheers Tug.

  • Member since
    April 2010
Posted by Theuns on Thursday, April 3, 2014 11:17 AM

Here is the Trump 1/72 F-100's cockpit. It has a rather nice bangseat for such small scale, I just added the 2 sets of harnasses from painted tape.

Theuns

TUG
  • Member since
    December 2013
Posted by TUG on Thursday, April 3, 2014 12:47 PM

Nice detail work Theuns - but my! if they are tweezers then that does look small !

Misty - I checked the bottle - Transparent Medium is ALC 400. Instructions state 'For use in thinning 'Transparent' colours to lighten tone' - Seems to work with the 'Hot Metal' and the 'Candy' colours too.

Tug

  • Member since
    April 2013
Posted by SchattenSpartan on Thursday, April 3, 2014 2:58 PM

Tug: That heat staining looks perfect! Major kudos to you!

Theuns: Damn, that's one tiny cockpit! Great work all around!

  • Member since
    April 2010
Posted by Theuns on Friday, April 4, 2014 10:52 AM

LOL, tweezers indeed.

From the bangseat to the panel is 1/2" long.

I got the wing halves joined aswell as the fuse with everything inside sealed up, the fit is not bad atall, there will be some filling and sanding needed on the bottom of the fuse seam, but that was due to my poor sprue cutting.


The wingroot fit will take some carefull fitting before gluing, they basically just but up against the fuse and there is very little if any room to fair in the fillet.


I am also going to cut off the tabs on the stabs and replace with thin rod. Then I will fill the slot in the rear fuse to be able to droop the stabs like in almost all pix of real Huns I have seen


This build has me invested less than 90 minutes to date and already major components are ready for sanding, it is going very fast.I guess the prep for alclad will take the time though.


WHat do you lads recon the best "shade" of alclad would be for this Hun? Maybe airframe allu over gloss black?? I will "tone" some panels a little darker. They were quite as highly pollished as the F-104's ?


The only thing that bugs me with this kit is that they give a really cool decal sheet but none of the thin red "compressor stage" stripes that go on the rear fuse! I will have to try and cut these from the spares box


Theuns

  • Member since
    April 2010
Posted by Theuns on Tuesday, April 15, 2014 10:15 AM

Been a little quiet lately but managed to get some building done.

The wingroot fairing took a little work to get sorted, I guess only the primer will reveal if it is good. I also filled the slot in the fear fuse for the stabs and removed the stab's tabs and replaced with a needle so they can be put in the down position.

Theuns

TUG
  • Member since
    December 2013
Posted by TUG on Thursday, April 17, 2014 3:28 PM

Hi Guys, Inspired by Theuns enthusiasm to get on I've managed a couple of sessions myself over the last day or so.

The back end finished up like this..

It looks a s if all that masking of the rivet lines was in vain but in fact you can see the lighter effect shining through as the model viewpoint moves. I'm still not totally happy with it but have spent so much time I thought it better to move on. I'll probably tweak it a bit at a later stage with a fresh approach.

The fuselage was done using a combination of Airframe Aluminium, light Aluminium and Semi Matt Aluminium using Jet exhaust to accentuate here and there. It's surprising how dark that can look through the paint in one view and disappear the next.

The under surfaces of these French Huns were coated with a laquer that gave it a very slight blue tinge. I don't know whether that was a clear laquer or a silver one but going from the few images I have at best it's a guess to try to capture the look. White Aluminium was used tinted with Transparent Blue and sprayed quite densely to give a flat uniform appearance.

There's been a lot of masking and it's been very much two steps forward three back at times but it is progressing albeit slowly. Splitting it with other matters does not bode well for consistency but it is a bit further on.

As Theuns remarks, it's all been a bit quiet lately - what are you all up to?

Regards for now - Tug

  • Member since
    April 2013
Posted by SchattenSpartan on Thursday, April 17, 2014 3:30 PM

Looking good there, Theuns!

  • Member since
    June 2013
Posted by bvallot on Thursday, April 17, 2014 11:19 PM

Looking good so far.  =]  I know I've been away, but it's been quite busy at work and with all the fun with moving and planning a wedding...but  promise I'll have some fun things to show soon.

All that burnt metal is making me itch to start my phantom! =D  Keep it coming!!

On the bench:  

Tamiya F4U-1  Kenneth Walsh


  • Member since
    April 2010
Posted by Theuns on Friday, April 18, 2014 11:35 AM

Damn that exhaust panel looks cool!  I am highly doubdfull I will have the same success in 1/72 , but I will give it a go.

I have yesterday just completed my homebuilt fridge AB compressor, so hopefully things will progress a little faster now as I can paint in the evenings aswell without getting into hassles with the body corporate !

Theuns

  • Member since
    April 2013
Posted by SchattenSpartan on Friday, April 18, 2014 12:44 PM

Now that's one gorgeous finish! The exhaust area just looks awesome!

  • Member since
    June 2013
Posted by bvallot on Monday, April 21, 2014 10:55 PM

Well, the "Governor" called and granted a "stay of execution," so I have a few more days before things start to get more interesting.  That said, I tested a tough bonding agent to get the dash/IP on my P-38 Lightning to sit down better...and after seeing the results...there just might be life in the ol' gal after all!!   Still have some gaps on the sides, but it's considerably better.  It doesn't seem to throw anything off yet.  I'm sure I'll find out later. =]

But now that I've got the droop snoot on...things can start happening for her now.  So I'll be back and forth on here and the P-40 GB.  I think I finally bit off more than I can chew. lol  

On the bench:  

Tamiya F4U-1  Kenneth Walsh


  • Member since
    April 2010
Posted by Theuns on Monday, April 21, 2014 11:52 PM

I played around with the heat stains on my 1/72 F100 over the weekend, It is no where near what it is supose to look like with indevidual areas between the formers that is coloured, but in this small scale I just wanted to try and create the ilusion by spraying some metalic blue and brass over a steel basce with same silver streaks.

I am close to putting on the black basecoat for alclad.

Pix to follow

Theuns

  • Member since
    June 2013
Posted by bvallot on Wednesday, April 23, 2014 2:15 PM

Looking forward to seeing what you've got Theuns.  =]  Still don't understand how everybody here produces the number of scale aircraft like I've been seeing on here.

So here's what is new with the P-38:

Fixed up the gap that was plaguing my build.  Here's the left side.

 image by brittvallot, on Flickr

There's a line that is left over from the joint that needed to be filled.  The line from the door to the gun bay needs to remain.  There's also another gap from the two wing halves that has been filled with CA.  There is a line just above it that needs to be scribed in however.

 image by brittvallot, on Flickr

The view of the other side was originally worse.  This side calmed down a bit better after seating the IP/dash more properly.  It was filled with plasitcard and CA and filed down.  The correct lines were re-worked and kept and I'm still "ironing" out the some of the rough spots.

 image by brittvallot, on Flickr

Now that I've got those gaps fixed, I can bring myself out of this screeching halt...as soon as I get moved. =[


On the bench:  

Tamiya F4U-1  Kenneth Walsh


  • Member since
    January 2012
  • From: Hatfield
Posted by Misty on Wednesday, April 23, 2014 3:53 PM

omg thats a scary bad fit Tongue Tied . the sirt of thing that would make me think twice about finishing it. im sure you csn sort it though, 

JOIN OUR COMMUNITY!

Our community is FREE to join. To participate you must either login or register for an account.

SEARCH FORUMS
FREE NEWSLETTER
By signing up you may also receive reader surveys and occasional special offers. We do not sell, rent or trade our email lists. View our Privacy Policy.