SEARCH FINESCALE.COM

Enter keywords or a search phrase below:

FineScale Modeler Heroes & Villains Group Build 2014

80856 views
849 replies
1 rating 2 rating 3 rating 4 rating 5 rating
  • Member since
    March 2003
  • From: Towson MD
Posted by gregbale on Monday, March 10, 2014 9:06 AM

Gamera - Great work on Captain Picard! The skin tones are wonderful, and the uniform colors/shades look spot-on. Stoked to see the Romulan beaming in as well.

Marc - White glue also lends itself well to replacing texture like your sanded-off detail. Dabbing on the bumps with a toothpick should make short work of it. (Plus, it's removable if there's something you don't like. I'm far too chicken to attempt such a thing with CA--that's a lot of grief if a glitch develops along the way.)

Greg

George Lewis:

"Every time you correct me on my grammar I love you a little fewer."
 
Moderator
  • Member since
    April 2006
  • From: my keyboard dreaming of being at the workbench
Posted by Aaron Skinner on Monday, March 10, 2014 9:39 AM

gregbale

Aaron -- Hizonner appears to be shaping up nicely. What is the blue color, by the way? (It looks like a great shade for a pending automotive project.)

Greg,

I used Tamiya royal blue as a base, then added Tamiya Blue to it to add lighter shaded. White added to blue provided highlights, then I misted over a 50:50 mix of blue and royal blue to tone down contrast and blend the shades.

Cheers, Aaron

Aaron Skinner

Editor

FineScale Modeler

Moderator
  • Member since
    April 2006
  • From: my keyboard dreaming of being at the workbench
Posted by Aaron Skinner on Monday, March 10, 2014 9:42 AM

gregbale

Marc - White glue also lends itself well to replacing texture like your sanded-off detail. Dabbing on the bumps with a toothpick should make short work of it. (Plus, it's removable if there's something you don't like. I'm far too chicken to attempt such a thing with CA--that's a lot of grief if a glitch develops along the way.)

Marc,
I built Revell's gillman a couple of years back and I had the mase issue with disappearubg detail on the seams. I borrowed an idea from an author and punched out a lot of tiny discs of sheet styrene that I glued on to replace lost scales. Time consuming, but they look great under paint.
Cheers, Aaron

Aaron Skinner

Editor

FineScale Modeler

  • Member since
    April 2005
  • From: Piscataway, NJ!
Posted by wing_nut on Tuesday, March 11, 2014 8:18 AM

Thanks for all the tips fellas.  I ended up using gap filling CA.  The problem at first was on 1 “bump” per dip in the glue.  That would have taken forever.  So I heated and stretched the end of a plastic pipette and just kept tapping little dots out.


Not perfect but once painted at least it won’t be a bare strip running down the sides.


Gamera...speaking of zippers, check out the back of the calves.  This is not a model of the creature. Surprise Technically, it’s a model of Ben Chapman who played the role of “The Gill Man”, on land, in an un-credited role. Ricou Browning played the creature for the “in water” shots.  Also un-credited.


Marc  

  • Member since
    December 2002
  • From: Bury St Edmunds, Suffolk, England
Posted by Bish on Tuesday, March 11, 2014 9:24 AM

Marc, that's a nice job adding those missing lumps, looks good. The zip's are a nice touch, are you planning on leaving those in.

I am a Norfolk man and i glory in being so


On the bench: Airfix 1/72nd Harrier GR.3/Fujimi 1/72nd Ju 87D-3

  • Member since
    November 2009
  • From: SW Virginia
Posted by Gamera on Tuesday, March 11, 2014 11:39 AM

Hey Marc, the added detail looks good enough for me esp with his arm position they shouldn't be too visible in any case.

That's funny with the calf zippers there, amazing that they put that level of detail into the kit!

I also think it was kinda funny that many of the gillman suits in later movies 'inspired' by CFtBL had a weird hunchbacked look. Strange that the hunch was about the same shape, size, and position as a SCUBA tank...

Pretty awesome that Browning could hold his breath so long he didn't need an stinkin' air tank!

"I dream in fire but work in clay." -Arthur Machen


  • Member since
    April 2005
  • From: Piscataway, NJ!
Posted by wing_nut on Tuesday, March 11, 2014 2:50 PM

Thanks Bish. I have already filled them.  i made some impressions of the other "fins" below the zippers in some Silly Putty and will cast some extra to further hide the repair.

Oh gamera, that is just an amazing coincidence the the hump back is the same size and location of a SCUBA tankWhistling  I've only ever seen that original movie and plan on watching it in the next couple of days for some painting inspriation.  And I'll bet the underwater scenes are all short take with lots of shot changes for how long he could hold his breathWink  Kind of like the weightless shots in "Apollo 13"  Can only have short takes on the Vomit Comet.

Marc  

  • Member since
    April 2005
  • From: Piscataway, NJ!
Posted by wing_nut on Tuesday, March 11, 2014 6:26 PM

After filling and sanding the zippers I pressed the fins into some silly putty for a mold and made some resin casts to cover the repairs.  Did a little more bump work on the "leggings"

Marc  

  • Member since
    November 2009
  • From: SW Virginia
Posted by Gamera on Tuesday, March 11, 2014 7:03 PM

Marc: Looks great, painted they look like they were originally there.

"I dream in fire but work in clay." -Arthur Machen


  • Member since
    November 2003
  • From: Nashville, TN area
Posted by bobbaily on Tuesday, March 11, 2014 7:07 PM

Gamera-very nice work on Picard-reminds me of a plant manager I used to work for-bald, British and expecting everyone to 'make it so'

Greg-good tip on the white glue for adding texture-I'm gonna need some on the Green Goblin due to the seam work.

Marc-the Creature is looking good-and a great tip on the pipette on the super glue-I'll have to remember that one (once I'm brave enough)

Bob


  • Member since
    December 2002
  • From: Northern California
Posted by jeaton01 on Tuesday, March 11, 2014 8:30 PM

Someday when I grow up I wanna do figure work like this!

John

To see build logs for my models:  http://goldeneramodel.com/mymodels/mymodels.html


  • Member since
    December 2002
  • From: Bury St Edmunds, Suffolk, England
Posted by Bish on Wednesday, March 12, 2014 1:41 AM

And then they were gone. Nice fix Marc.

I am a Norfolk man and i glory in being so


On the bench: Airfix 1/72nd Harrier GR.3/Fujimi 1/72nd Ju 87D-3

  • Member since
    April 2003
Posted by shivinigh on Wednesday, March 12, 2014 8:29 PM

Gamera-nice job with Captain Picard. The colours for the uniform look great.

Wingnut-good job with the bumps and the fill in on the zippers. You hid everything up nicely and they are very hard to see even with knowing where to look.

starting to feel the pinch with spidey. So close to being finished that I started to rush a bit and mussed up the last bit of webbing. So had to redo the one leg, and have the webbing all lined up nicely now. I should know better than to get too anxious about trying to finish. a couple more pieces of web to place than paint.

Nice job everyone on your builds, and cya at the finish line.


Moderator
  • Member since
    September 2011
Posted by Tim Kidwell on Thursday, March 13, 2014 9:53 AM

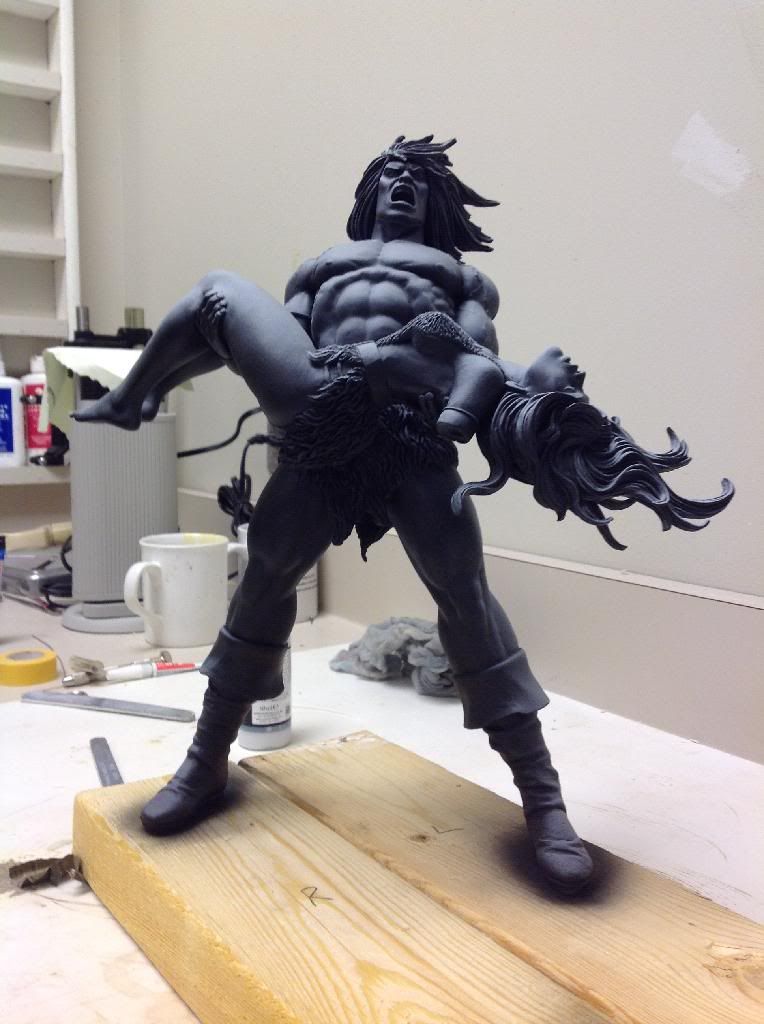
Last Friday, I added the gray primer to Conan and Belit. 

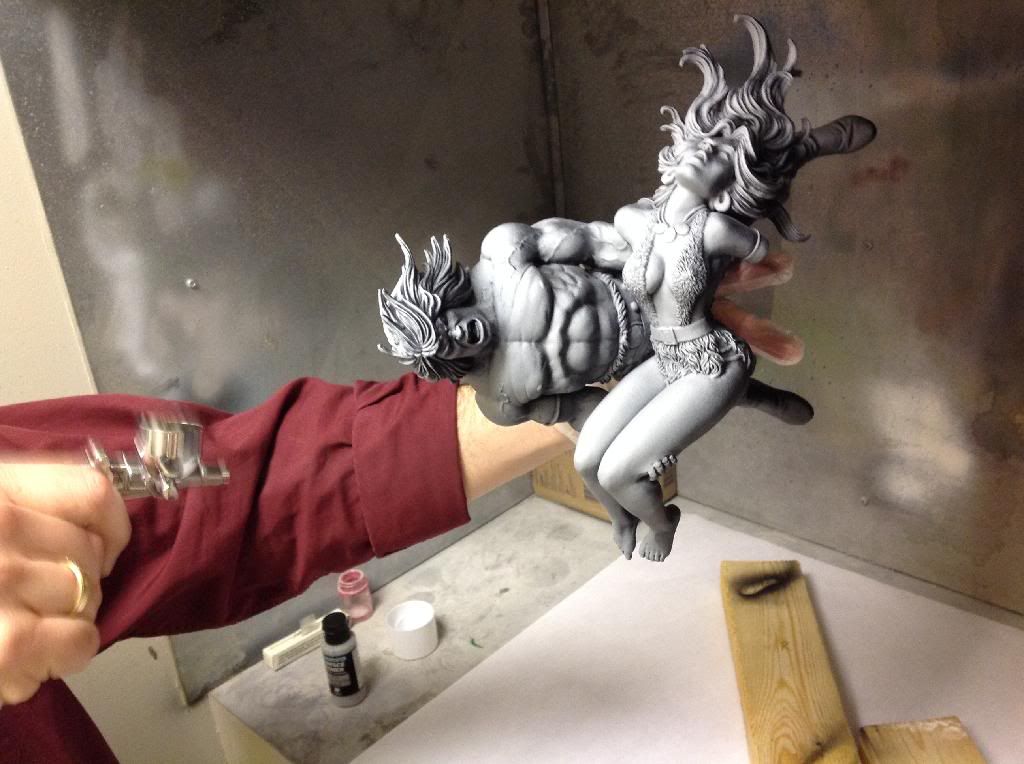
I sprayed this from directly over Conan's head to give me a visual guide where the strongest light would fall as if beneath a noonday sun.

Some of you were wondering about the effect: Here it is! 

For me, the gray helps me block in the base flesh and first shadowed flesh colors. I suppose it also acts a little like pre-shading. Now, I have to get painting.

OK, time for an admission: I've never airbrushed a figure before. All of my figure painting experience is with a brush. I'm breaking new ground here! I mixed my own base flesh tone using Vallejo red, white, deep yellow, and deep green -- ratio 5:9:6:2. While Conan hails from Cimmeria, essentially Northern Europe, I thought he'd be darker complected right now because of all the time he's spent sailing around in the tropics without a shirt on. Thus, I went with a darker base flesh.

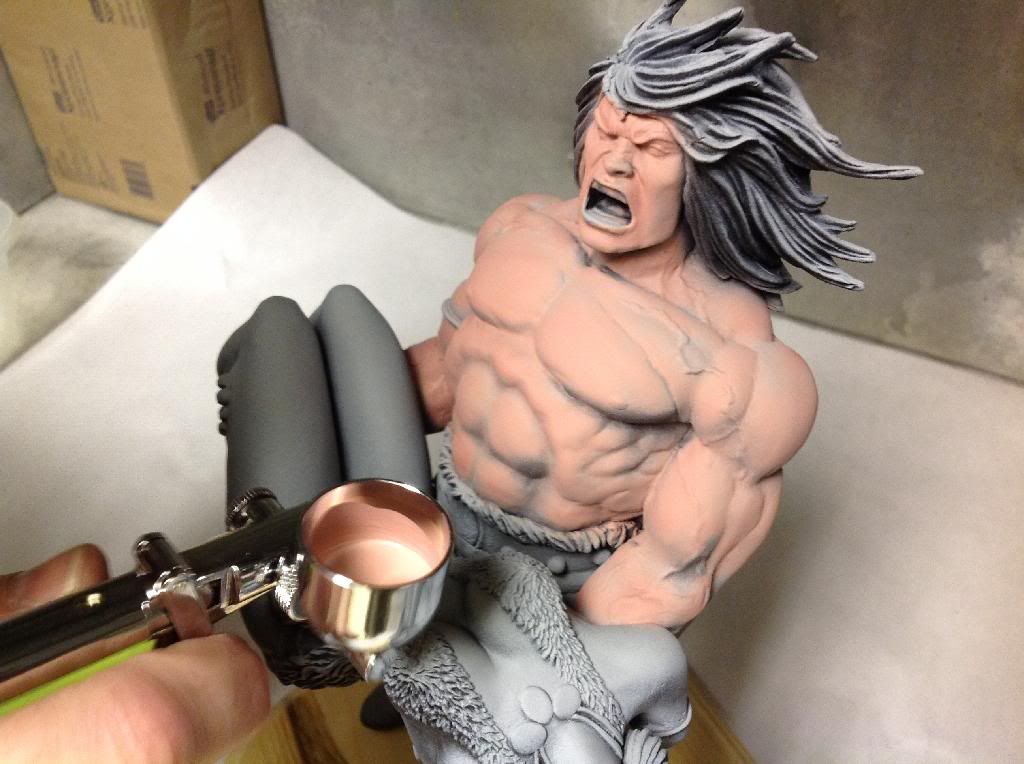
I'm blocking in the base flesh tone on those places that were almost purely gray and fading the edges into the places that remained black. My plan is to complete Conan's skin, mask him off, paint Belit's skin, then work the clothing.

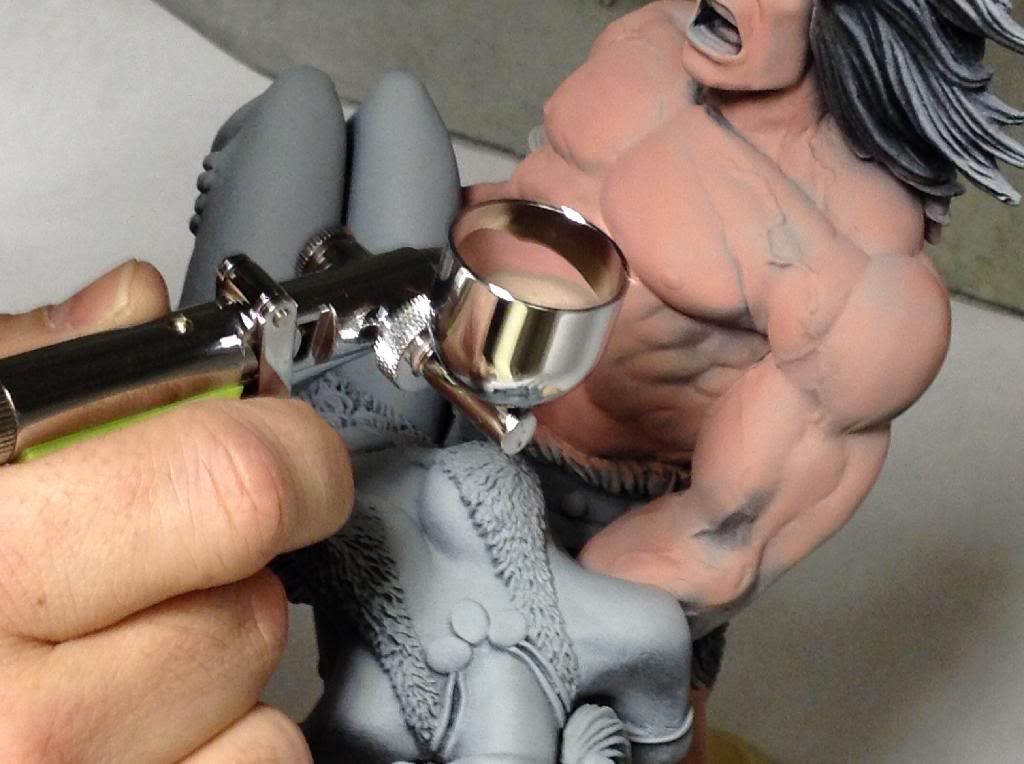
I made the basic shadow color by adding a bit of green to the base flesh mix. You can see it in the cup.

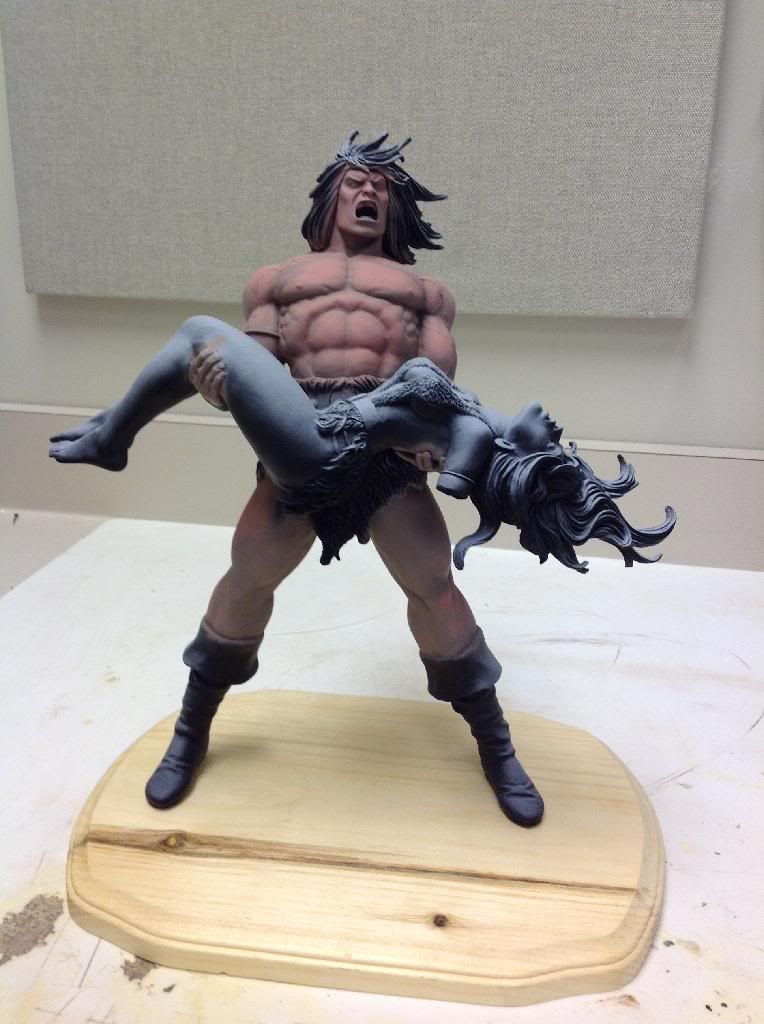
Here's Conan with the basic shadow flesh color blocked in. It looks a little stark right now, but I'll work in a deepest shadow color and then highlights, and it'll look even worse. Then I'll start blending everything together. I'll resort to brush work on the face, and probably for some of the more subtle blending on the rest of his body.

The base shadow color will serve as the base flesh color in the shadowed areas. Then I'll add subtle highlights and shadows there--nothing too stark. Because of the nature of the figures pose and the amount of shadow cast by Belit, I'm forcing the light thing a bit, both for realism (hopefully) and dramatic effect.

Again, I'm revamping what I would normally do while using a brush and transferring that over to the airbrush. We'll see how he turns out!

--

Timothy Kidwell
Editor
Scale Model Brands
Kalmbach Media


  • Member since
    December 2002
  • From: Bury St Edmunds, Suffolk, England
Posted by Bish on Thursday, March 13, 2014 10:16 AM

That's looking really nice there Tim, some really interesting technics being used there, I am watching closely.

I am a Norfolk man and i glory in being so


On the bench: Airfix 1/72nd Harrier GR.3/Fujimi 1/72nd Ju 87D-3

  • Member since
    November 2009
  • From: SW Virginia
Posted by Gamera on Thursday, March 13, 2014 11:43 AM

Shiv: Thanks, and I'm looking forward to seeing the wallcrawler with all the webbing done.

Tim: Very nice work there! Picard was my first attempt to do a figure with an airbrush but I chickened out and did most of the detail painting with a brush. Learning a lot from what you're doing there. To be honest I prefer something with the hyper-definition like Conan there, to me it's easier to paint than just broad flat areas.

"I dream in fire but work in clay." -Arthur Machen


  • Member since
    April 2005
  • From: Piscataway, NJ!
Posted by wing_nut on Thursday, March 13, 2014 2:53 PM

Tim....SWEEEEEEEEEEEEEEEET!

Marc  

Moderator
  • Member since
    September 2011
Posted by Tim Kidwell on Thursday, March 13, 2014 3:16 PM

Today I concentrated on getting Conan's face close to done.

His eye brows aren't finished, but everything else is pretty close. The fig just has solid walls for Conan's teeth, so I painted individual chompers. I might go back and define them a bit better, but I'll wait for final detailing.

Right side.

Left side.

--

Timothy Kidwell
Editor
Scale Model Brands
Kalmbach Media


  • Member since
    April 2006
  • From: ON, Canada
Posted by jgeratic on Thursday, March 13, 2014 5:25 PM

Marc - the gillman is looking great!  Looks like you've  solved the missing detail problem, and super glue is likely the method I would of used too.

---------------------------------------

Tim - looks awesome so far!  I usually steer away from using black in shadow areas (something imbedded into my brain from art instructors), but some people can pull it off, which is exactly what you seem to be doing here.

Regarding the teeth, if you have the time and are inclined to do so, here is a little toot I put together.  I took a crop of one of your in progress images, and used the upper set of teeth to illustrate the process.  It basically is how I would approach this detail when painting on canvas, but is useful here too;

1.)-  fill in the teeth area with a suitable gum colour.  I'd suggest  a bit lighter than his upper lip, somewhere in the pinkish brown range.

1.a) - optional, but to give more contrast, darken the lower area where the bottoms of the teeth will be.

2.)  - fill in the shapes of the teeth (might want to do some photo research on this).  Use an off colour white in the ochre to slightly blue range mix (guess depends on how much black coffee the individual drinks- ha!).  Again optional, (not illustrated) you can make the last few visible teeth in the back of the mouth a bit darker than the front ones.

3.) Add highlights, reserving straight white for maybe just the front two teeth, and less so on the remainder.

-------------------------------

regards,

Jack

  • Member since
    December 2002
  • From: Bury St Edmunds, Suffolk, England
Posted by Bish on Thursday, March 13, 2014 5:31 PM

Looking really good Tim.

Ok, finally, here he is in all his glory.

As you can see, I re painted those 3 white buttons a light grey and did those inlays a mix of gunmetal light grey. I am really glad I did those, so thanks for raising that Tim. And Trabi, thank you for those links, they were really helpful not just for this but for the Stormtrooper I just finished. I will be saving that site.

As I mentioned before, I took some tips for the base from an article in FSM from last year. And the Imperial badges was made from 6mm MDF, and that was a real chore cutting that out. That's was an idea I got from plasticjunkie.

The lightsabre blade is a piece of clear acrylic rod painted clear red and I got the chain from a local jewellery store and decided to leave that silver. Gives Darth a bit of bling.

Now for the pics.

And finally, the now traditional mug shot.

Tim, Aaron, thanks again for a great GB and the chance once again to do something different. And thanks to everyone for all the help and the great builds, and a big thank you to jack for the advice on painting the cape. It made a real difference. 

I am a Norfolk man and i glory in being so


On the bench: Airfix 1/72nd Harrier GR.3/Fujimi 1/72nd Ju 87D-3

  • Member since
    October 2008
  • From: England
Posted by P mitch on Thursday, March 13, 2014 5:59 PM

Bish

Great work. I know how hard it can be to get a good shine on a kit and you hit it right on.

Phil

"If anybody ever tells you anything about an aeroplane which is so bloody complicated you can't understand it, take it from me: it's all balls." R J Mitchell


  • Member since
    March 2003
  • From: Towson MD
Posted by gregbale on Thursday, March 13, 2014 6:17 PM

Tim - Excellent work on Conan! He's beginning to look properly terrifying. I'll have to try completely airbrushing fleshtones one of these days, since you're providing this excellent tutorial.

Bish - Most excellent Lord Vader, and the base with the Imperial emblem is the icing on the cake. Can't look at your photos without hearing the electric sizzle of the light sabre. Truly epic!

Marc - Great seam restoration work on the GillMan!

Greg

George Lewis:

"Every time you correct me on my grammar I love you a little fewer."
 
Moderator
  • Member since
    September 2011
Posted by Tim Kidwell on Thursday, March 13, 2014 8:30 PM

jgeratic

1.)-  fill in the teeth area with a suitable gum colour.  I'd suggest  a bit lighter than his upper lip, somewhere in the pinkish brown range.

1.a) - optional, but to give more contrast, darken the lower area where the bottoms of the teeth will be.

Jack,

Thanks! I appreciate the support. You know, that's exactly what I did, up until step 2. I mixed up a bone color and left but a very thin strip of pink. Then, I compounded my folly using a just-off white to paint in the teeth. If you look carefully, you can see them in the pics. But, at your suggestion, I'll repaint them tomorrow morning before beginning on his hair and finishing up those eye brows.

--

Timothy Kidwell
Editor
Scale Model Brands
Kalmbach Media


Moderator
  • Member since
    September 2011
Posted by Tim Kidwell on Thursday, March 13, 2014 8:35 PM

Bish - Excellent job on Darth Vader! You nailed it, and the base is stellar. I'm glad Mike Muzyka's article was helpful. I'll add Darth to the Hall of Fame in the morning.

Bish
Tim, Aaron, thanks again for a great GB and the chance once again to do something different. And thanks to everyone for all the help and the great builds, and a big thank you to jack for the advice on painting the cape. It made a real difference. 

You're very welcome! Thank you for joining us. Stick around for the rest of the build. Some of us stragglers are starting to pour on the gas. Plus, we'll announce the next FSM Group Build here first.

Marc, Gamera, and Greg - Thanks! It took me forever to get to that point today. Lots of blending, mixing colors, throwing mixes out, and remixing colors. Aaron at one point asked what was taking me so long. I flipped him a long, solitary bird in response. Tomorrow, hair, eyebrows, and then on to the rest of the his body.

--

Timothy Kidwell
Editor
Scale Model Brands
Kalmbach Media


  • Member since
    April 2006
  • From: ON, Canada
Posted by jgeratic on Friday, March 14, 2014 1:59 AM

Bish - most excellent work for this embodiment of the dark side. Yes 

From the various finished sheens, to the details on his chest, simply great stuff.  From here, that imperial symbol looks like it it was cut from a tool and die machine, nicely done.

regards,

Jack

  • Member since
    December 2002
  • From: Bury St Edmunds, Suffolk, England
Posted by Bish on Friday, March 14, 2014 3:05 AM

Thanks a lot guys, its been a real pleasure.

Don't worry Tim, I will defiantly be sticking around, to much great work here to miss Mike's article was very useful and I will defiantly be using that for inspiration when I start doing large scale aircraft..And I also routed the edge of the base, its the first time I have used one of those and it a real nice toy I will be making the best of.

Jack, the badge was cut out with a copping saw, the holes around the edge were the trickiest.  

Phil, thanks. Getting the shin on the armour, especially the helmet, is something I really wanted to achieve, and I am really glad its come off.

I am a Norfolk man and i glory in being so


On the bench: Airfix 1/72nd Harrier GR.3/Fujimi 1/72nd Ju 87D-3

  • Member since
    September 2012
Posted by GMorrison on Friday, March 14, 2014 4:10 AM

So Nemo finally got his boots on, although they need buckles for the straps.

 Modeling is an excuse to buy books.


  • Member since
    December 2002
  • From: Bury St Edmunds, Suffolk, England
Posted by Bish on Friday, March 14, 2014 4:50 AM

Looking good GM. That's a novel solution for masking, nice idea.

I am a Norfolk man and i glory in being so


On the bench: Airfix 1/72nd Harrier GR.3/Fujimi 1/72nd Ju 87D-3

  • Member since
    April 2005
  • From: Piscataway, NJ!
Posted by wing_nut on Friday, March 14, 2014 6:04 AM

So when vader was done, and looking so real, did he say, "Bish, I am your father"

GM, that looked like some kinda weird silver cape. neat mask.

Marc  

  • Member since
    November 2009
  • From: SW Virginia
Posted by Gamera on Friday, March 14, 2014 8:53 AM

Bish: Impressive!!! You're wielding that paint brush like the saber of a Sith Lord!

GM: The brass looks fantastic, love how he's turning out. I must admit though foil mask made me think of those cone things they put on dogs to keep them from scratching their ears though!

"I dream in fire but work in clay." -Arthur Machen


JOIN OUR COMMUNITY!

Our community is FREE to join. To participate you must either login or register for an account.

SEARCH FORUMS
FREE NEWSLETTER
By signing up you may also receive reader surveys and occasional special offers. We do not sell, rent or trade our email lists. View our Privacy Policy.