SEARCH FINESCALE.COM

Enter keywords or a search phrase below:

Rommel vs Monty (North African GB 1941-43) Jan. 1 - Aug. 31 2014

137144 views
1455 replies
1 rating 2 rating 3 rating 4 rating 5 rating
  • Member since
    November 2009
  • From: SW Virginia
Posted by Gamera on Sunday, March 23, 2014 6:33 PM

Thanks guys! I think go with your advice Clemons and add a dark wash to the tyres, should help without a lot of work.

"I dream in fire but work in clay." -Arthur Machen


  • Member since
    January 2011
  • From: The Great North Woods, Maine
Posted by Chazzer on Sunday, March 23, 2014 6:42 PM

I've got a great set of 75mm ammo and crates by Jaguar in my stash. Its got 23 rounds, 10 empty shells, 8 closed crates, and 4 open crates with the lids.They are a resin offering with crisp detail throughout, no warping,and no air bubbles. They are yours. Get me your address and I will mail them to you tomorrow.

Scott

ChazzerBlack Eye

  • Member since
    January 2011
  • From: The Great North Woods, Maine
Posted by Chazzer on Sunday, March 23, 2014 6:45 PM

Sorry no racks though.

ChazzerBlack Eye

  • Member since
    July 2006
  • From: San Francisco Bay Area
Posted by bufflehead on Sunday, March 23, 2014 10:40 PM

Wow!  Check out all the recent activity!!  Yeah!

Alan - Beautiful work on the 222!  I was eyeing that kit recently and it looks to be a beaut!! I love what you're doing with it!!

Chazzer - your Tiger is certainly coming along!  I'm waaay behind in catching up on the GB....which kit is this?   Oh, and to answer your earlier question....yes, the Italeri Kommando kit was just $8!   Its an old kit and has been reboxed several times by different companies. 

Clemons - WHOA!!  NICE AM build up there!!  I think I have that Voyager fender set and I'm itchin' to see how you get it together!  I've got a couple of tips for homemade lenses and tow cables.  I'll try to include those on my Pz. I build logs.

Gamera - VERY NICE Crusader!!  I love the desert paint job and dusty look!  Personally I like the heavy wash, it makes all the details "pop"!  For the tires, perhaps just applying some black pigments or pastels, but just to the contact surfaces to represent where the dust has rubbed off due to contact with the tracks.

Ernest

Last Armor Build - 1/35 Dragon M-26A1, 1/35 Emhar Mk.IV Female


Last Aircraft Builds - Hobby Boss 1/72 F4F Wildcat & FW-190A8


  • Member since
    May 2011
  • From: Illinois
Posted by armor86 on Monday, March 24, 2014 12:11 AM

Nice work everyone, great looking spitfire Mike.

Alan - just picked up the same kit last month, when I get around to building it, note leaving the crew doors opened.

Chazzer - build the same Tiger DAK vehicle last year, (142) with a two tone camo. Used the Voyager Detail Upgrade set and Fruit Tracks.

Bufflehead - Nice work on the Pz I B - watching how it going along - have same kit with Voyager Upgrade detail set and rear ider replacement - have Dragon's Kommando version (265)

Gamera - Great finish on the British Crusader

Hoping to finish up the 232 RAD 8 soon so I can get started on the Dragon Panzer IV Ausf. D DAK kit. photos enclosed 232 - decals and painted details and gear. Armor86


Dan

  • Member since
    April 2006
  • From: ON, Canada
Posted by jgeratic on Monday, March 24, 2014 12:45 AM

It really has been a busy and productive weekend, all great stuff happening here.

Clemons  -  you can always cover up the lights with the typical slit opening, but if you want the whole lens viewable, it could be something as simple as dipping them in future acrylic to clear them up.  If that fails, thin them up a bit from the backside, followed with future.

Gamera - I like the Crusader too.  Good idea to look at the road wheels as suggested.  Also,  I would add more prominent dust to the lowers, that should lend more variation to the overall finish.

regards,

Jack

  • Member since
    November 2009
  • From: SW Virginia
Posted by Gamera on Monday, March 24, 2014 7:42 AM

Dan: Love what you've got there, she looks like she's really been in action.

And thanks guys, good idea with the pigments Ernest and Jack, I'll see what I can do this week.

"I dream in fire but work in clay." -Arthur Machen


  • Member since
    April 2013
Posted by SchattenSpartan on Monday, March 24, 2014 12:12 PM

Dan: She's looking great! I love the beaten-up look you achieved on her!

Jack: I don't have access to future (only a bad replacement that tends to get a lot of cracks after some time). Would Alclad Aqua Gloss work as well?

Ernest: I'd be very interested in those tips!

Scott: I sent you a PM. Thank you for the kind offer!

  • Member since
    April 2013
Posted by SchattenSpartan on Monday, March 24, 2014 12:43 PM

After having a long chat with the owner of my LHS today I came to the conclusion that the Verlinden set is neither worth my time nor my money.

So here's the new full list of AM goodies:

CMk driver's compartment:

CMK engine compartment:

It's designed for the Tamiya kit, but I should be able to get it to fit into the hull of Dragon's Pz.IV without much trouble. The set itself looks way better than Verlinden's attempt. 

CMK interior set:

This set is for the Tamiya kit as well and includes the whole fighting compartment for the Pz.IV. You might notice that it depicts a later version with the KwK 40. That means I can't use some of the resin bits. The fighting compartment floor, turret floor, bulkhead and ammo rack appear to be exactly the same though, so I'll use those parts. The gun breech and the kit's turret interior will eventually find their way into a Dragon Ausf.J I have in my stash. I'll simply use the breech from the kit as it looks really nice and in combination with some of the CMK bits it should actually look better than the Verlinden breech. I won't be able to use the resin and Pe bits for the turret hatches either because the set is designed for a Ausf. J or H afaik. The E had completely different hatches though. The kit parts look really good as well though, o I'll use them with a bit of extra attention.


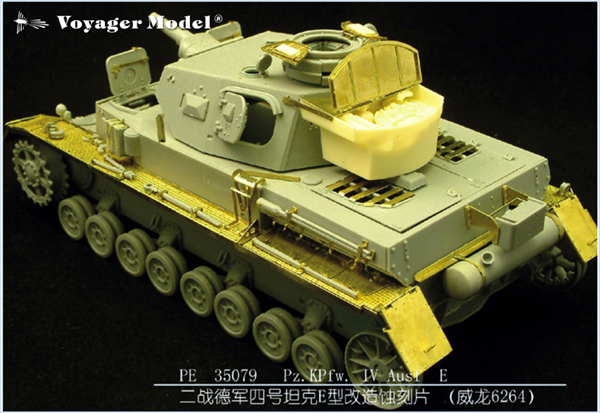
Here's the "extra attention" for the kit parts: Another Voyager set!

It includes all the toolclamps (I can use either them or the kit clamps for another project) as well as a bunch of PE bits for the hull, turret and hatches. Even some parts to spice up the turret interior a bit more. The resin stowage bin is a nice touch but I'll use it for another Pz.IV because the kit one has pretty nice interior detail already shoul I choose to open it up.

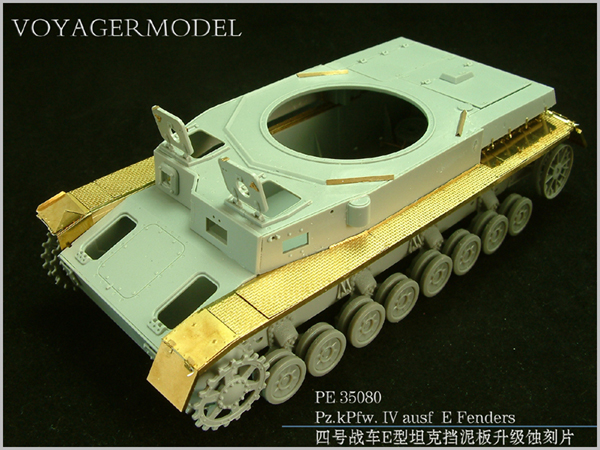
The Voyager Fender set I mentioned already:

The CMK sets as well as an RB gun barrel are already ordered at my LHS and should arrive in 1-2 weeks. I'm still looking for a place where I can get both voyager sets for a reasonable price without having to pay something like 30 bucks for shipping (I'm looking at you, SprueBros). I'll probably have to give evilbay a try.The friuls, an antenna and a single set of RB brass ammo (12 shells, 9 projectiles) are already in my goodie box.

I also found this little Voyager set while looking around for AM bits and bobs:

It looks like it replaces the kit's closed smoke discharger box with an opened one and the picture definitely speaks for itself. I'm not sure if I should get thia one as well. I'm already going all in on that build so those 4-5 bucks won't really make a difference and it's going to be one hell of a long project anyway, but I'm not too sure about it. Does anyone of you know anything about this particular set?

It's hard to imagine that I got the actual kit for only 30 bucks while it was on sale at my LHS... I'd post the price list for all the AM stuff but I guess you can do the math yourself (one CMK set is 25 bucks on average and the voyager stuff costs 15 bucks each)

This project is going to be damn expensive and if I'm not insane already, I will most certainly be when I'm done with it, but I think it's worth it.

Scott, you beat me to it! Wink

  • Member since
    April 2006
  • From: ON, Canada
Posted by jgeratic on Monday, March 24, 2014 2:53 PM

Clemons - there must be money burning a hole in your pocket - should be a great show watching this one come together. 

Try also HobbyEasy or LuckyModel for the Voyager sets.

As for not having future, I'd suggest applying your product on a section of clear sprue and see how it reacts.

regards,

Jack

  • Member since
    November 2009
  • From: SW Virginia
Posted by Gamera on Monday, March 24, 2014 3:02 PM

Clemons: That's like... wow...

I'd like to do something like that but I don't think I have the coordination or the patience.

"I dream in fire but work in clay." -Arthur Machen


  • Member since
    April 2013
Posted by SchattenSpartan on Monday, March 24, 2014 3:38 PM

Jack: I don't have that much money, but I try to buy my modelling stuff as cheap as possible. HLJ for example wants only 30% of the money I'd have to pay here for all the Japanese kits. My LHS has a lot of great sales. All of their Dragon kits are 20% off ATM to name one of them. Wink

I just found a great deal on those Voyager sets on evil bay. It took quite some time to find it, but I stumbled across a shop called "white cat models". They sell a lot of Voyager and Aber sets at pretty decent prices. The 3 sets I posted (Pz.IV basic set, fenders and smoke dischargers were 51 bucks (the 10€ for shipping already included) together with one surprise item (I won't tell ya now, but it's for this GB Wink) with that surprise item being the most expensive set by far. (The Pz.IV sets were 11, 8 and 4 bucks).

This adds up to a total amount of 53€ spent on this Pz.IV so far (I didn't coutnt the CMK sets in because I pay for them when they arrive) with the normal kit price being slightly higher than 50€ on it's own. I think that's actually quite a decent price for such a project when you think of the more recnet Dragon releases being in the 70€+ price range! Big Smile

  • Member since
    April 2013
Posted by SchattenSpartan on Monday, March 24, 2014 3:42 PM

Cliff: This is the first build I go full AMS on (like Scott and his Tiger) so I hope everything goes as planned. I asked the owner of my LHS for some help and he agreed to teach me some basic soldering techniques - Internet tutorials are nice, but there's nothing like getting taught by a real guy sitting in front of you and correcting your mistakes as you go. The thing I'm most worried about is that I'm not able to do that blinged-out Panzer justice when it comes to actually painting the damn thing!(provided I pull this off without too many problems) Indifferent

  • Member since
    April 2013
Posted by SchattenSpartan on Monday, March 24, 2014 3:48 PM

I got myself an issue of "Art of Modelling" a few days ago and the stuff in there is really insane. One of the articles is aprogress report of a Diorama with a StuG III Ausf. E. The guy who built the dio used 2(!) Dragon StuGs (the old Ausf.F and the new Ausf.G) as well as a total of 18 (!!!) AM sets for the vehicle. And I thought my Pz.IV had an insanely high overkill-factor...

  • Member since
    January 2011
  • From: The Great North Woods, Maine
Posted by Chazzer on Monday, March 24, 2014 4:47 PM

Hey Guys, I thought I would include a bit of history on my tank number 142.

Tiger tank 142 (chassis number 250015) was loaded onto an MFP (marinefahiprahm) along with the crew. The tank and crew departed from Reggio, Italy on November 1942. They landed at La Goulette, just outside of Tunisia on Nov. 27,1942 142 was the fourth Tiger to land in Africa and the only tank of the 501 to debark in Tunis.From there it traveled 15 km. for a propaganda shoot. Tiger Tank Tac number 142 was assigned to the 4th Platoon, first Kompany. It along with the 501 they were credited with destroying over 150 allied tanks and vehicles. 142 participated in many operations including Operation Ochsenkopf ,and Operation Eilbote near Sibha. On Feb. 26 1943 142 along with the 4th platoon and other tanks of the 501 engaged the British in the battle of Hunts Gap. 142 was knocked out in the Beja assault of the same battle. 142 was hit by an excellent shot by a British anti-tank gun. The crew survived but the tank was severely damaged. It was destroyed by the crew using high explosives. The blast blew off the turret and the upper hull.  

The tank was painted tropical brown then over- painted in tropical green which is more suitable to northern Tunisia.

It's fantastic to have the history tied to the tank I am building!

Hope you enjoyed

Scott

ChazzerBlack Eye

  • Member since
    January 2011
  • From: The Great North Woods, Maine
Posted by Chazzer on Monday, March 24, 2014 4:51 PM

Clem, lots of work to do indeed! I think we can "feed" off each other!

Also, the package will be mailed out tomorrow morning. The set is described as a Stug III ammo set. It is kit number 63508 by Jaguar.

Scott

ChazzerBlack Eye

  • Member since
    December 2002
  • From: Bury St Edmunds, Suffolk, England
Posted by Bish on Monday, March 24, 2014 5:18 PM

WOW SS, a lot of Am there. Good luck with the Voyager, your gonna need it.

I am a Norfolk man and i glory in being so


On the bench: Airfix 1/72nd Harrier GR.3/Fujimi 1/72nd Ju 87D-3

  • Member since
    July 2004
  • From: Sonora Desert
Posted by stikpusher on Monday, March 24, 2014 9:21 PM

Chazzer, that is great! I will enjoy watching your work here.

A86, your 8-rad looks great! I love the look of those things!

SS, Yikes! You have some serious work ahead of you there with all that stuff!

Well today I went an airbrushed on a topcoat of the Pollyscale Italian Yellow. I mixed at a ratio of 12 parts Future, 12 parts MM Acryl Universal Thinner, 48 parts paint. Worked perfect, no clogging, tip drying, or any other problems.

I also did the same for the AS-42- as well as a coat of Tamiya Khaki on the canvas parts

and together...

more to come in the next couple of days...


F is for FIRE, That burns down the whole town!

U is for URANIUM... BOMBS!

N is for NO SURVIVORS...

       - Plankton

LSM


  • Member since
    April 2006
  • From: ON, Canada
Posted by jgeratic on Monday, March 24, 2014 10:36 PM

Stik - looking good, and interesting choice of an the Italian airforce colour. 

regards,

Jack

  • Member since
    July 2004
  • From: Sonora Desert
Posted by stikpusher on Monday, March 24, 2014 11:00 PM

That's what I read in a book about Italian armor that was the color they used.


F is for FIRE, That burns down the whole town!

U is for URANIUM... BOMBS!

N is for NO SURVIVORS...

       - Plankton

LSM


  • Member since
    November 2009
  • From: SW Virginia
Posted by Gamera on Tuesday, March 25, 2014 7:42 AM

Clemons and Scott: Will definitely be watching you two- I really need any help with PE I can absorb.

SP: Have you been sleeping lately my friend? You're on a modeling rampage! Nice to see some Italian stuff here too.

"I dream in fire but work in clay." -Arthur Machen


  • Member since
    March 2003
  • From: Rain USA, Vancouver WA
Posted by tigerman on Tuesday, March 25, 2014 11:00 AM

Cliff, love the Crusader bud. I love how the wash popped all the details.

   http://i7.photobucket.com/albums/y269/wing_nut_5o/PANZERJAGERGB.jpg

 Eric 

  • Member since
    November 2009
  • From: SW Virginia
Posted by Gamera on Tuesday, March 25, 2014 11:46 AM

Eric: Thanks!!!

Since everyone seems to like the wash I'll leave it the way it is and work on the wheels.  

"I dream in fire but work in clay." -Arthur Machen


  • Member since
    July 2004
  • From: Sonora Desert
Posted by stikpusher on Tuesday, March 25, 2014 12:05 PM

It was my day off and nothing got in the way yesterday...


F is for FIRE, That burns down the whole town!

U is for URANIUM... BOMBS!

N is for NO SURVIVORS...

       - Plankton

LSM


  • Member since
    July 2004
  • From: Sonora Desert
Posted by stikpusher on Tuesday, March 25, 2014 9:55 PM

Today it felt like I did more than my photos indicate. I concentrated on these two beasties, and mixed up quite a few custom colors along the way. All colors used today, except one, are Humbrol.

First I did some basic flat black on the Sahariana's MG and some of the interior components such as the shift lever handles, steering wheel, gas, brake & clutch pedals, cannon sight eyepiece... I also used Testors steel on the gun breechblock and Khaki on the cloth portions of the seats and the headlight covers. those could use another coat...

then I mixed up a custom shade of dark burnished steel for the tools using Humbrol Gunmetal and Chocolate... I also mixed up a custom shade of wood using Wood and Hemp for the wood handles

Then I added some Rust to the Burnished color mix for heat discolored  oxidized steel for the exhausts

Then I used Testors Steel for bared wear areas on the sprocket and idler wheels on the Commando Carro. I also  painted the muzzle areas for the twin ball mount MG with Humbrol Gunmetal

And finally I mixed up a custom shade for the roadwheel tires using Flat Black and Tank Gray... all those roadwheels and return rollers (plus the spares on the back deck) were a LOT of work...Indifferent

and finally I was able to test fit all the rubber tires on the Sahairana to get an idea of she will finally look...


and a shot of them together as of so far...

more to come soon...


F is for FIRE, That burns down the whole town!

U is for URANIUM... BOMBS!

N is for NO SURVIVORS...

       - Plankton

LSM


  • Member since
    March 2003
  • From: Rain USA, Vancouver WA
Posted by tigerman on Wednesday, March 26, 2014 1:46 AM

Stellar work as always Carlos.

   http://i7.photobucket.com/albums/y269/wing_nut_5o/PANZERJAGERGB.jpg

 Eric 

  • Member since
    July 2004
  • From: Sonora Desert
Posted by stikpusher on Wednesday, March 26, 2014 2:38 AM

Thank you sir, and I am most flattered. I have never considered any of my work steller, just good. These two beauties are tempting me to finsh them up ASAP...


F is for FIRE, That burns down the whole town!

U is for URANIUM... BOMBS!

N is for NO SURVIVORS...

       - Plankton

LSM


  • Member since
    January 2013
Posted by jibber on Wednesday, March 26, 2014 8:33 AM

Stik they're looking fantastic, I think every part of the build looks great. nice choice of base color, guns, tires, and the exhaust is awesome. I'm sorry I missed the beginning of the build, what company are these? They look great together, very cool.

  • Member since
    July 2004
  • From: Sonora Desert
Posted by stikpusher on Wednesday, March 26, 2014 12:25 PM

Thank you Jibber. The tank is the old Tamiya M13-40 kit, modified with parts from the Italeri M13-40, and the scout car is the Italeri kit.


F is for FIRE, That burns down the whole town!

U is for URANIUM... BOMBS!

N is for NO SURVIVORS...

       - Plankton

LSM


  • Member since
    January 2013
Posted by jibber on Wednesday, March 26, 2014 1:06 PM

Two more to add to my list, I have to quit looking at these builds. So many models, so little time (and money).

JOIN OUR COMMUNITY!

Our community is FREE to join. To participate you must either login or register for an account.

SEARCH FORUMS
FREE NEWSLETTER
By signing up you may also receive reader surveys and occasional special offers. We do not sell, rent or trade our email lists. View our Privacy Policy.