SEARCH FINESCALE.COM

Enter keywords or a search phrase below:

Rommel vs Monty (North African GB 1941-43) Jan. 1 - Aug. 31 2014

137127 views
1455 replies
1 rating 2 rating 3 rating 4 rating 5 rating
  • Member since
    November 2009
  • From: SW Virginia
Posted by Gamera on Wednesday, March 26, 2014 2:50 PM

They're coming together nicely SP, I've built the Tamiya M13-40 and remember it being a pretty good kit, seems the armoured car goes together without much fuss too?

"I dream in fire but work in clay." -Arthur Machen


  • Member since
    January 2011
  • From: The Great North Woods, Maine
Posted by Chazzer on Wednesday, March 26, 2014 3:20 PM

Carl, Inspiring work indeed! I can't wait to see more. Thanks man.

Scott

ChazzerBlack Eye

  • Member since
    July 2004
  • From: Sonora Desert
Posted by stikpusher on Wednesday, March 26, 2014 4:45 PM

The only real fuss in the car is the PE and a bit of the fit in the front end interior framing.


F is for FIRE, That burns down the whole town!

U is for URANIUM... BOMBS!

N is for NO SURVIVORS...

       - Plankton

LSM


  • Member since
    July 2004
  • From: Sonora Desert
Posted by stikpusher on Wednesday, March 26, 2014 10:09 PM

Well today I went and had a look at my references... low and behold there are a few features on the Carro Commando that are not on my kit. So I spent lots of time rummaging thru the spares bin and a bit of time building stuff up. They are not precise, but look the part.
First up I was curious about jerry cans for this beast. I found a photo of one M13/40 with a jerry can rack on the rear between the spare road wheels, so I made up a rack from some I had from the Italeri Jerry Cans set in my spares bin. Very handy item that they have in theirs. Then on the top front of the superstructure I saw that a 1m optical rangefinder and a goniometer (whatever in Hades that is?) mounted. So I found a rangefinder in my spares bin and scratched up a mount, and cobbled together a bunch of small items for an approximation of the goniometer.
the items themselves

and where they will be on the model after painting and instalation


I still need to scratch up a secong antenna base pot apparently as well...
more to come later in the week. Tomorrow is my Monday and back to work.Crying


F is for FIRE, That burns down the whole town!

U is for URANIUM... BOMBS!

N is for NO SURVIVORS...

       - Plankton

LSM


  • Member since
    November 2009
  • From: SW Virginia
Posted by Gamera on Thursday, March 27, 2014 9:19 AM

Hey SP the additions look good.

Did a websearch:

A goniometer is an instrument that either measures an angle or allows an object to be rotated to a precise angular position. The term goniometry is derived from two Greek words, gōnia, meaning angle, and metron, meaning measure.

Not sure what use it is on top of an armoured car though. Seems like some sort of surveying tool though I guess it could be used to find your location or set up artillery fire- darned if I know I'm not an engineer or a surveyor.

Not to be confused with a Gonzometer...

"I dream in fire but work in clay." -Arthur Machen


  • Member since
    October 2007
  • From: Louisville, KY
Posted by pordoi on Thursday, March 27, 2014 10:51 AM

stikpusher

... and a goniometer (whatever in Hades that is?) ...

Here is a description of a more modern instrument;

Goniometers for target acquisition
Thor The Thor is a high performance digital goniometer designed to provide high accuracy angle measurement for multifunction applications up to 12kg. When used in conjunction with a suitable tripod such as one from Instro’s TriLite range, Thor provides accurate angle data and a stable mounting platform to the connected multifunction sensor significantly improving the overall target acquisition capability for the user.

Don

  • Member since
    April 2006
  • From: ON, Canada
Posted by jgeratic on Thursday, March 27, 2014 1:27 PM

Stik, continuing to look good, and am impressed to the extra lengths you're taking to add details from the spares bin.

Asking, for myself and anyone else that is interested, but can you share the book that indicates use of Italian aircraft paints?  The notion is not new to me, but I've never seen it in actual print, so it may be a book that needs to be added to the library.  My shelf reference isn't vast, but pictured below is what I have:

The Squadron publication that contains a variety of Italian armour, does make a brief mention of Regia Aeronautica.  The author, Nicola Picola, indicates the air force in 1939 NAfrica was already using a sand coloured paint on their vehicles - for me the interpretation here is unclear.  Are vehicles only the wheeled and tracked type as employed by the Royal Italian Air Force, or does this include  aircraft too?  Anyhow, there is no mention of aircraft paints by their direct name.

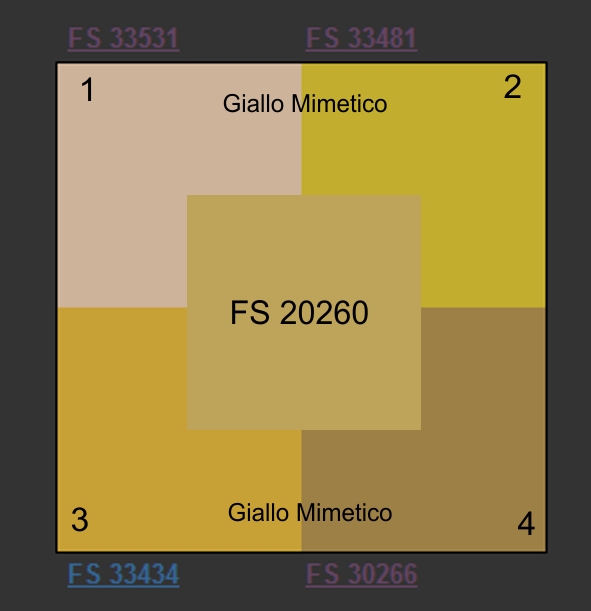
Here is something fun, I've taken the FS approximations of the four types of Yellow Camou (Giallo Mimetico), from the Stormo site, and superimposed FS20260 on top for comparison.  This central swatch is suppose to be the official colour arrived in March 1941, though another source states February.  Osprey's recent publication on Italian light tanks further states the colour was only made available to factories in November of that year.  The no.3 shade is pretty interesting, looks to be the same intensity of the official sand colour, but more golden in hue.

regards,

Jack

  • Member since
    July 2004
  • From: Sonora Desert
Posted by stikpusher on Thursday, March 27, 2014 3:15 PM

Jack, that Squadron book on Italian Tanks you have there (bottom row, center) is my prime print reference. It mentions Giallo Mimetico 2 as the color of Italian armor a few times. On my older Italian AFV builds I used a different shade, but I really like that central color that you have super imposed. it looks like a Humbrol color that I have, Yellow Brown. I may have to use that on some Jerry cans fora bit of variety. Thanks for the compliments on the spares/scratch work. I had a lot of fun rummafing and creating that stuff.

In that Squadron book it mentions that the goniometer is used to show the difference between magnetic and true north. Coupled with the optical range finder that sounds like something involved in artillery fire plotting and observation, which I barely recall how to do from my Army days. I am quite familiar with map reading and magnetic/grid north differences from those days as well. But how the device works is outside my experience, not to mention the name alone...

Gamera's Gonzometer.... now there is a tongue twister ;-)


F is for FIRE, That burns down the whole town!

U is for URANIUM... BOMBS!

N is for NO SURVIVORS...

       - Plankton

LSM


  • Member since
    April 2006
  • From: ON, Canada
Posted by jgeratic on Thursday, March 27, 2014 3:33 PM

Stik, thanks for responding.  I'm surprised I missed that in the book, but also a bit shocked that no.2 was the choice out of the four.  Yes,  FS20260 was arrived at by the author, Pignato.  Another interesting coincidence about this official colour, it came about at the same time as the DAK was given their first tropen scheme - wonder if one influenced the other?  No doubt, Italian paints of all kinds were 'lent' out to their axis partners, particularly early in the campaign.

regards,

Jack

  • Member since
    March 2003
  • From: Western North Carolina
Posted by Tojo72 on Thursday, March 27, 2014 5:11 PM
Just about ready to jump in with this one,looks to be a simple,straight-forward build

  • Member since
    July 2004
  • From: Sonora Desert
Posted by stikpusher on Thursday, March 27, 2014 5:24 PM

You can be done by Monday Tojo. It is a very simple build. Although the new link and length tracks and crew figures adds a bit to that.


F is for FIRE, That burns down the whole town!

U is for URANIUM... BOMBS!

N is for NO SURVIVORS...

       - Plankton

LSM


  • Member since
    November 2009
  • From: SW Virginia
Posted by Gamera on Friday, March 28, 2014 8:56 AM

Tojo: Looks pretty cool! I remember the Tamiya 13/40 tank when together without any major fit issues- good kit.

And thanks SP and Jack for the Italian colours there- I have no idea what I painted my tank way back when- it looks sorta like those!  

"I dream in fire but work in clay." -Arthur Machen


  • Member since
    March 2003
  • From: Western North Carolina
Posted by Tojo72 on Friday, March 28, 2014 6:10 PM

Hey guys,I know I'm way behind with everyone's builds,just breezing thru a few pages of outstanding work.

Gamera.............great Crusader

Alan.......love those details on your 222

Thunderbolt,......I love the Spit in the tropical scheme,I have an Eduard I got to get to

Armor86...........chipping looks great

Chazzer.......should be great Tiger

Stik..........two nice builds

Stik,one question about the Tamiya Semovente,how did you handle the painting of the rubber rims on the road wheels

  • Member since
    July 2004
  • From: Sonora Desert
Posted by stikpusher on Friday, March 28, 2014 8:08 PM

Oh that was time consuming... I mixed up my faded black color, used a small paint brush, put the vehicle on its side and painted the facing side of those  road wheels while rotating them slowly. All four rows of them. Then I flipped the vehicle over and repeated the process.....


F is for FIRE, That burns down the whole town!

U is for URANIUM... BOMBS!

N is for NO SURVIVORS...

       - Plankton

LSM


  • Member since
    March 2003
  • From: Western North Carolina
Posted by Tojo72 on Saturday, March 29, 2014 6:24 AM
stikpusher

Oh that was time consuming... I mixed up my faded black color, used a small paint brush, put the vehicle on its side and painted the facing side of those  road wheels while rotating them slowly. All four rows of them. Then I flipped the vehicle over and repeated the process.....

That sounds tedious,I was thinking of trying what Tony Lee does with Sherman bogies,removing the rod that holds the wheels in,just leaving a little nub enough to hold the wheel,allowing me to just snap it into place after painting it seperatly and fixing it with just a little glue.

  • Member since
    July 2004
  • From: Sonora Desert
Posted by stikpusher on Saturday, March 29, 2014 11:27 AM

That would be a good idea. The fit of the bogies is a little loose and would easily allow that. Putting the wheels seperately on toothpicks for painting after clean up, then snapping them in place sounds great!


F is for FIRE, That burns down the whole town!

U is for URANIUM... BOMBS!

N is for NO SURVIVORS...

       - Plankton

LSM


  • Member since
    April 2006
  • From: ON, Canada
Posted by jgeratic on Saturday, March 29, 2014 3:22 PM

Speaking of road wheels, has anyone ever tried the QuickWheel brand of masks?

They are like templates, but the product actually holds the  wheels in place.  They are made to specific vehicles, so you can paint up a whole bunch in one shot, and looks like it includes return rollers too.  Seems to be a very extensive line:

http://www.quickwheel.eu/List_of_QW_35.html

The Semovente set was found on ebay for $7.99

regards,

Jack

  • Member since
    November 2009
  • From: SW Virginia
Posted by Gamera on Saturday, March 29, 2014 7:45 PM

Hmmm I've been just spraying them dark grey and using a hole template from the local arts store to mask off the rubber tires and spray the wheel hull. Seems to work ok for me.

"I dream in fire but work in clay." -Arthur Machen


  • Member since
    July 2004
  • From: Sonora Desert
Posted by stikpusher on Saturday, March 29, 2014 8:04 PM

Sounds a LOT more cost effective than a different mask set for each different vehicle type


F is for FIRE, That burns down the whole town!

U is for URANIUM... BOMBS!

N is for NO SURVIVORS...

       - Plankton

LSM


  • Member since
    October 2007
  • From: Louisville, KY
Posted by pordoi on Saturday, March 29, 2014 9:00 PM

Gamera

Hmmm I've been just spraying them dark grey and using a hole template from the local arts store to mask off the rubber tires and spray the wheel hull. Seems to work ok for me.

Ditto

Yep!,  I use the Large and Small Circles Template from the C-Thru Ruler Company (Bloomfield, CT) to mask road wheels after an inital coat of black (gray).  It has templates ranging from 0.0025" (1/16") to 1.875" (1/78") that will accommodate road wheels from almost all Pz vehicles.  Can post a pic if you want....

Don

  • Member since
    July 2004
  • From: Sonora Desert
Posted by stikpusher on Saturday, March 29, 2014 9:29 PM

I need to look into one of those things... What do you do, tape off the adjoining circles to fight overspray?


F is for FIRE, That burns down the whole town!

U is for URANIUM... BOMBS!

N is for NO SURVIVORS...

       - Plankton

LSM


  • Member since
    May 2011
  • From: Illinois
Posted by armor86 on Saturday, March 29, 2014 9:59 PM

Yea, I've used the same circle template, mask off adjacent circles.  Getting close to finishing up the 232 RAD 8, few more items to install, filter and washes then final dust wash and pigments. Armor86


Dan

  • Member since
    July 2004
  • From: Sonora Desert
Posted by stikpusher on Saturday, March 29, 2014 11:05 PM

That looks great A86!


F is for FIRE, That burns down the whole town!

U is for URANIUM... BOMBS!

N is for NO SURVIVORS...

       - Plankton

LSM


  • Member since
    November 2009
  • From: SW Virginia
Posted by Gamera on Sunday, March 30, 2014 12:52 AM

Hey A86- niiiccceeeee ride, looks like she's been out roaming the desert!

My circle template is a cheap one, figured if I'm going to spray paint on it I didn't need a nice one like Don's though I guess paint thinner should take it off without a problem. And yes I just tape over the adjacent circles so I don't get overspray there.

"I dream in fire but work in clay." -Arthur Machen


  • Member since
    December 2002
  • From: Bury St Edmunds, Suffolk, England
Posted by Bish on Sunday, March 30, 2014 3:05 AM

Jack, I got a set of their 251 wheels a little while back which comes with a set of those mask's. I have not used masks for wheels, I normally spray the colour and then brush paint the rubber, but these masks look nice and after painting my Panther wheels, I think a mask might be a nice idea. But those ones do seem rather pricey. If your doing lots of a certain type your guess they would make sense.

Armour, sweet work on the RAD, looking very nice.

I am a Norfolk man and i glory in being so


On the bench: Airfix 1/72nd Harrier GR.3/Fujimi 1/72nd Ju 87D-3

  • Member since
    March 2003
  • From: Rain USA, Vancouver WA
Posted by tigerman on Sunday, March 30, 2014 1:22 PM

Dan, that 232 looks great bud. Love the chipping.

   http://i7.photobucket.com/albums/y269/wing_nut_5o/PANZERJAGERGB.jpg

 Eric 

  • Member since
    March 2003
  • From: Rain USA, Vancouver WA
Posted by tigerman on Sunday, March 30, 2014 1:27 PM

Yeah Anthony, that M13/40 goes together well. I had to spring for some Resin AM tracks and they were a mess to clean up, but went together very well. If you can find an AM headlight, that would be a major upgrade.

   http://i7.photobucket.com/albums/y269/wing_nut_5o/PANZERJAGERGB.jpg

 Eric 

  • Member since
    April 2013
Posted by SchattenSpartan on Sunday, March 30, 2014 1:32 PM

Dan: Awesome looking work on that 8-Rad! Looks like she saw quite some action.

Stik: Your Italians look really nice! I like that flashy yellow.

Tojo: It's always nice to have some more Italian builds in here.

  • Member since
    July 2006
  • From: San Francisco Bay Area
Posted by bufflehead on Sunday, March 30, 2014 2:02 PM

I've got an update on the two Pz. Is coming, but first I want to recognize some great work here!

Dan - the 232 RAD is coming along great!  I love the weathering, chipping etc! The stowage and extra gear is really making thisbuild stand out!

Clemens - Whoa!  You're going all out on your Pv. IV!!  Can't wait to see it all come together!

Stik - fine work on the M13 and the AS-42!  I like how you're painting all the details!  Luv the scratchwork too!  As for replacment headlights, this is how I do mine (if I have the time!): 

http://cs.finescale.com/fsm/modeling_subjects/f/29/t/143751.aspx?sort=ASC&pi240=55

Jack - you've got more books on Italian armor than I have books on any one armor subject!!vSurprise  I'd love to see your personal reference library!!

Tojo - glad to see you've joined in!  Looking forward to the Semovente!  And thanks for the tip on how Tony Lee does his Sherman VVSS bogies....I keep forgetting that and will have to try it soon!

Ernest

Last Armor Build - 1/35 Dragon M-26A1, 1/35 Emhar Mk.IV Female


Last Aircraft Builds - Hobby Boss 1/72 F4F Wildcat & FW-190A8


  • Member since
    January 2013
Posted by jibber on Sunday, March 30, 2014 2:09 PM

Dan very nice job on the 8 RAD, you did a great job on the chipping and weathering. Nice build, I think it's going to look very nice on our front page.  

JOIN OUR COMMUNITY!

Our community is FREE to join. To participate you must either login or register for an account.

SEARCH FORUMS
FREE NEWSLETTER
By signing up you may also receive reader surveys and occasional special offers. We do not sell, rent or trade our email lists. View our Privacy Policy.