SEARCH FINESCALE.COM

Enter keywords or a search phrase below:

Monogram Mafia III

106583 views
1369 replies
1 rating 2 rating 3 rating 4 rating 5 rating
  • Member since
    September 2005
  • From: Central Nebraska
Posted by freem on Wednesday, April 29, 2015 1:44 PM

Thank You Don Stick!!  I will get clean shots of the Razorback tonight.

Chris Christenson


  • Member since
    September 2005
  • From: Central Nebraska
Posted by freem on Wednesday, April 29, 2015 11:09 PM

Chris Christenson


  • Member since
    July 2004
  • From: Sonora Desert
Posted by stikpusher on Thursday, April 30, 2015 12:52 AM

Sweet! Thank you sir! I will get your Jugs posted to the front page family portraits as soon as I can access my desktop at home to do so. I am not tech savvy enough to do it from my phone ;)...


F is for FIRE, That burns down the whole town!

U is for URANIUM... BOMBS!

N is for NO SURVIVORS...

       - Plankton

LSM


  • Member since
    May 2004
  • From: Land of Lakes
Posted by cbaltrin on Thursday, April 30, 2015 7:06 AM

Nice work Freem, I like the left side views so we can see the kill markings...

On the Bench: Too Much

  • Member since
    May 2004
  • From: Land of Lakes
Posted by cbaltrin on Thursday, April 30, 2015 7:11 AM

Ok, it's April 30th... Last chance to throw in your hat for the November deadline  boys.  

Stik, make sure you have me down for the fw190 and F-8E!   Also, I think June 14th is the deadline for my P-51 and P-47 Razorback. Can you confirm?

On the Bench: Too Much

  • Member since
    July 2004
  • From: Sonora Desert
Posted by stikpusher on Thursday, April 30, 2015 3:26 PM

CB, I have not been keeping track of hard dates here. I have too much other stuff going on to get that nitpicky here. That part is being done on the honor system, but if it looks like it's being abused, I will say something.

Freem, your Jugs are now on the front page. Thank you for joining the Family.


F is for FIRE, That burns down the whole town!

U is for URANIUM... BOMBS!

N is for NO SURVIVORS...

       - Plankton

LSM


  • Member since
    May 2004
  • From: Land of Lakes
Posted by cbaltrin on Thursday, April 30, 2015 5:15 PM

So, in other words, there is no "Leave the gun, bring the cannoli" action going on here for violators? Stick out tongue

stikpusher

CB, I have not been keeping track of hard dates here. I have too much other stuff going on to get that nitpicky here. That part is being done on the honor system, but if it looks like it's being abused, I will say something.

Freem, your Jugs are now on the front page. Thank you for joining the Family.

On the Bench: Too Much

  • Member since
    July 2004
  • From: Sonora Desert
Posted by stikpusher on Thursday, April 30, 2015 5:46 PM

We'll make you an offer you can't refuse ;)


F is for FIRE, That burns down the whole town!

U is for URANIUM... BOMBS!

N is for NO SURVIVORS...

       - Plankton

LSM


  • Member since
    June 2008
Posted by lewbud on Friday, May 1, 2015 1:00 AM

Begging the Don's indulgence, I apologize for being away so long. I did get started on the P-6.  I drilled out the radiator grill to accept the photo etched part from the Starfighter Decal upgrade kit (finally).  A couple years ago, a friend gave me some decals from the Accurate Miniatures repop, so I don't have to use 40+ year old decals.

Buddy- Those who say there are no stupid questions have never worked in customer service.

  • Member since
    May 2004
  • From: Land of Lakes
Posted by cbaltrin on Tuesday, May 5, 2015 7:32 AM

Going old school. Painting the metallic areas last. Tired of messing up my NMF with too much handling/masking after paint goes down. Used testors yellow (square bottles) so now the waiting begins. Hopefully 24 hours in the dehydrator will have it cured..

On the Bench: Too Much

  • Member since
    May 2004
  • From: Land of Lakes
Posted by cbaltrin on Friday, May 22, 2015 6:53 AM

Not getting much time at the bench of late. Have to work on small things consequently. Here I have attempted to improve the main wheels. I added a styrene disk to each hub to cover the hole and wrapped the wheel hub inserts in a strip of .005 styrene for a more snug fit. Next I have applied mr surface to cover the seam created by the styrene strip--hopefully only one coat will be needed.  On the opposite side (sorry, no photo) I have inserted 3/32 aluminum tubing for a more snug fit of the wheel axel.

On the Bench: Too Much

  • Member since
    July 2004
  • From: Sonora Desert
Posted by stikpusher on Friday, May 22, 2015 11:41 AM

Those wheels look just fine! I understand about your recent limited work time at the bench. I intend to get some good time in today before my overtime shift this afternoon.


F is for FIRE, That burns down the whole town!

U is for URANIUM... BOMBS!

N is for NO SURVIVORS...

       - Plankton

LSM


  • Member since
    May 2004
  • From: Land of Lakes
Posted by cbaltrin on Monday, June 1, 2015 5:43 PM

Well I have the whole kit primed with Mr Surfacer and buffed out with a micro mesh cloth. Unfortunately, won't be able to work on it again for about 2 weeks...

On the Bench: Too Much

  • Member since
    July 2004
  • From: Sonora Desert
Posted by stikpusher on Monday, June 1, 2015 6:19 PM

Two weeks usually pass very quickly in my world... Where did May go already? ;)


F is for FIRE, That burns down the whole town!

U is for URANIUM... BOMBS!

N is for NO SURVIVORS...

       - Plankton

LSM


  • Member since
    May 2004
  • From: Land of Lakes
Posted by cbaltrin on Monday, June 1, 2015 8:02 PM

Yea, the leaves will be falling before you know it

stikpusher

Two weeks usually pass very quickly in my world... Where did May go already? ;)


On the Bench: Too Much

  • Member since
    July 2004
  • From: Sonora Desert
Posted by stikpusher on Monday, June 1, 2015 8:36 PM

Oh I hope not... My shade tree just is filling out now...


F is for FIRE, That burns down the whole town!

U is for URANIUM... BOMBS!

N is for NO SURVIVORS...

       - Plankton

LSM


  • Member since
    March 2005
  • From: Lancaster, South Carolina
Posted by Devil Dawg on Wednesday, June 17, 2015 11:55 PM

Darn!! It was 08 March since my last post with progress of my F-100D. Sorry about that, folks! 

I finally got some paint on her yesterday. Sprayed a couple of coats of Alclad Gloss Coat on her today, waited a few hours for that to dry, then applied decals tonight. Let me say this about the Monogram decals that came with this kit - POS!!!!!! I have NEVER, in my modeling life, had this many problems with a set of decals. I wanted to set my F-100D up as a wing commander's plane (lots of colors), but none of those decals wanted to lay down correctly (many, many wrap-around decals on the intake and noses of the drop tanks). Ok, no biggie there. It was good that I started with those "wrap-arounds" first instead of last - that made it easy to change decal schemes early in decaling session. I decided to go with the other scheme on the kit decal sheet. Not as colorful (mainly yellow lightning bolts), but no wrap-around decals, either. But those didn't want to perform well at all - many of them broke apart while attempting to slide them from the backing paper. Some broke apart so badly that they were unusable, so I left them off. A good example of those were the wing-walk outlines - they broke into multiple pieces that went in the garbage. IF (and that's a BIG if) I ever build another of these models, I will definitely buy an aftermarket set of decals for it.

Anyways, below are some pictures of the almost-completed project, with commentary........

.

.

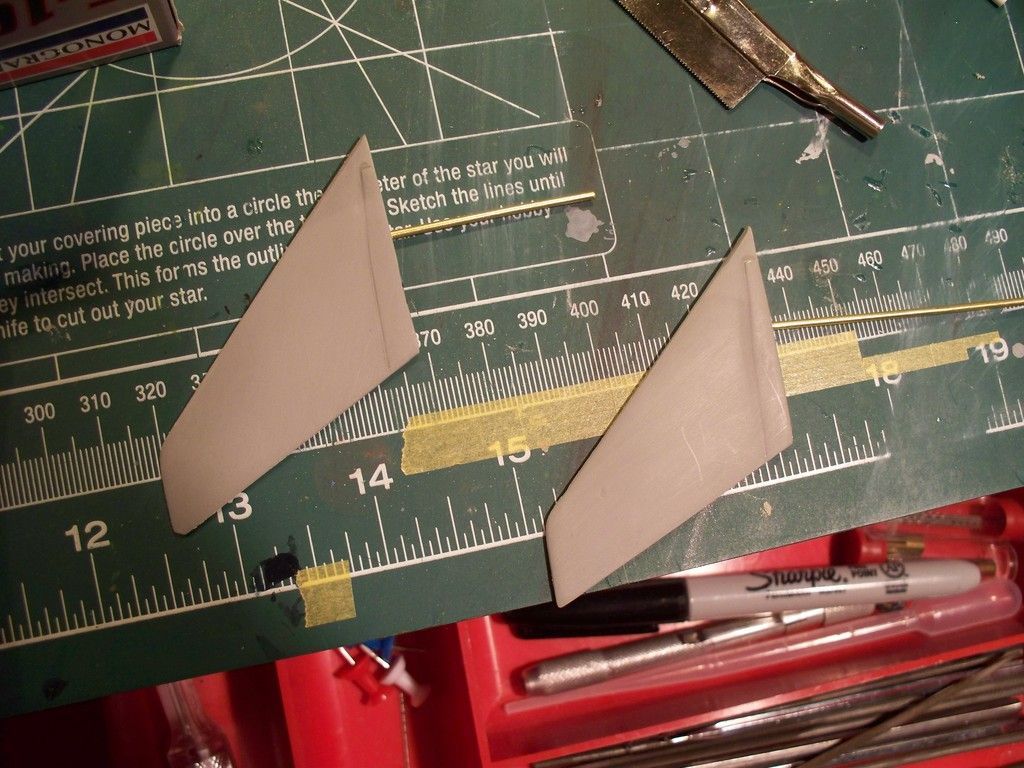
I decided to insert some brass rod in the horizontal stabilizers to remount them once I'm done with the painting and decaling. The short rod will be used to go all the way through the fuselage to the other stabilizer so that they will both move together when mounted. It's already super-glued in to the right stabilizer. The left stabilizer has a long piece of rod just to hold it while I was spraying paint.

.

.

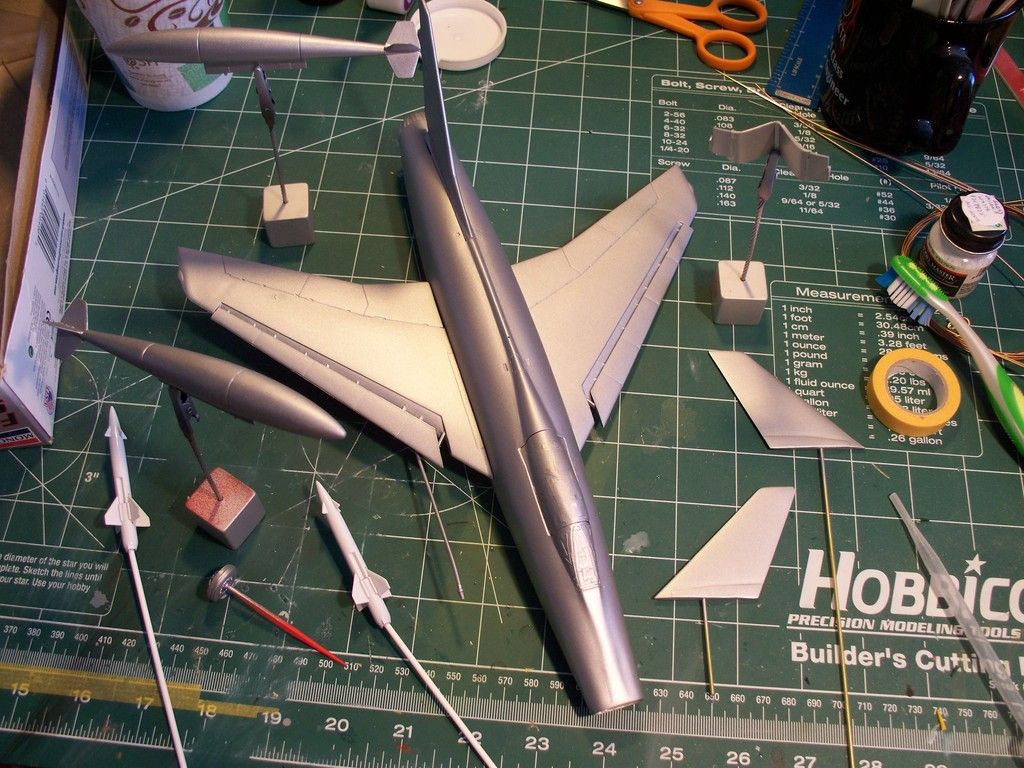
Here she is with paint. It's just good old monotone Model Master Aluminum. Some reference pictures show the multi-shaded bare metal panels on the Super Sabre, and there are some pictures showing them painted in a monotone silver lacquer finish. Guess which scheme I chose...... I didn't paint the burnt afterburner area of the rear fuselage in the burnt metal colors that are commonly seen on the F-100. I just wanted to get this sucker finished. Not sure if I'll use the Bullpups. No decals whatsoever in the decal set for them. All the pictures that I've seen of the Bullpups show them with lots of stenciling. I'll have to see what I can find in my spare decals. If I can find something worthy, the Bullpups might get mounted on the pylons.

.

.

Here she is with decals applied. I applied a coat of Micro Sol to each and every one of 'em. Letting her sit overnight, then she'll get a couple of coats of Alclad Gloss Coat again tomorrow. After that dries, all the landing gear, gear doors, pylons, drop tanks, and pitot tube get mounted. The drop tanks show the lightning bolts that were for the other scheme I tried first. They went on too well and laid down too well to remove them, soooo, even though they aren't historically correct, they sure look good with the yellow lightning bolts on the fuselage and tail. Showed all of this to my wife after the decals were applied, but before the Micro Sol. She was impressed. But, then again, she ain't a modeler, so she doesn't see all the imperfections that I do. Maybe I'll build only for her from now on.....

.

.

Well, folks, let me know whatcha think. I hope to have the finished product up here by tomorrow night. I'm on vacation until 22 June, so I just be able to accomplish that small goal. 

Devil Dawg

On The Bench: Tamiya 1/32nd Mitsubishi A6M5 Model 52 Zeke For Japanese Group Build

Build one at a time? Hah! That'll be the day!!

  • Member since
    July 2004
  • From: Sonora Desert
Posted by stikpusher on Thursday, June 18, 2015 12:30 AM

DD, it's coming together nicely. I'm sorry to hear about the decals though. That command bird is quite colorful. I still have the decals from my kit in my stash. I'll never use them, as I prefer combat birds. But you already went around that speed bump.  I'll have a better look at this on a full size screen tomorrow.


F is for FIRE, That burns down the whole town!

U is for URANIUM... BOMBS!

N is for NO SURVIVORS...

       - Plankton

LSM


  • Member since
    March 2005
  • From: Lancaster, South Carolina
Posted by Devil Dawg on Thursday, June 18, 2015 2:16 AM

Thanks for the kind comments, Stik. If I hadn't already had so much trouble from this kit, I might have showed a bit more patience and ordered another set of decals for her. But, heck, I'm already three months late in getting her finished, and I still have another kit to start and finish to complete my Group Build obligation, so I decided to just press on and use what I had. I sure hope that OA-4M ain't the pig this Super Sabre turned out to be!

Devil Dawg

On The Bench: Tamiya 1/32nd Mitsubishi A6M5 Model 52 Zeke For Japanese Group Build

Build one at a time? Hah! That'll be the day!!

  • Member since
    July 2004
  • From: Sonora Desert
Posted by stikpusher on Thursday, June 18, 2015 3:19 PM

I think that the OA-4M 's quality all depends upon the age of the boxing. The Hun kit you are building (same one I did in '12) is a later re issue. Thus the molds have been around and used many more times & years. As far as I know, the OA-4M was only issued once by Monogram, albeit for a long production run, but the molds should be in better shape. But the decals from that time... best replaced by AM due to the quality of the printing. The only real fit problems that i had with my Hun build were on the fuselage top and bottom join seam. Nothing a little filler and sanding did not fix.


F is for FIRE, That burns down the whole town!

U is for URANIUM... BOMBS!

N is for NO SURVIVORS...

       - Plankton

LSM


  • Member since
    February 2014
  • From: Michigan
Posted by silentbob33 on Thursday, June 18, 2015 6:55 PM

DD it's looking pretty good to me, especially considering all the problems you've had with this kit.  I agree with you though, the red lightning bolts look good with the yellow ones.

On my bench: Academy 1/35 UH-60L Black Hawk

  • Member since
    November 2003
  • From: State of Mississippi. State motto: Virtute et armis (By valor and arms)
Posted by mississippivol on Thursday, June 18, 2015 8:02 PM

Good to see her almost complete, Double D. I don't think you'll have any issues with the Skyhawk apart from the decals; I'd like to convert mine to a "J" and put some Hi-Vis markings on it.

  • Member since
    January 2011
  • From: Commonwealth of Virginia
Posted by Tal Afar Dave on Thursday, June 18, 2015 8:19 PM

Devil Dawg,

You're Hun looks pretty darn good; and the mixed lightning bolts are pretty cool.  Like Stik says, that Skyhawk is a solid kit and shouldn't be too much of an issue.  Good luck with it!

TAD

2022 New Year's Resolution:  Enter 1 group build and COMPLETE a build this year!!  Why Photobucket did you rob me of my one Group Build Badge???  Must be part of the strong anti-Monogram cartel!!!

 ]

  • Member since
    March 2005
  • From: Lancaster, South Carolina
Posted by Devil Dawg on Thursday, June 18, 2015 10:03 PM

stikpusher

I think that the OA-4M 's quality all depends upon the age of the boxing. The Hun kit you are building (same one I did in '12) is a later re issue. Thus the molds have been around and used many more times & years. As far as I know, the OA-4M was only issued once by Monogram, albeit for a long production run, but the molds should be in better shape. But the decals from that time... best replaced by AM due to the quality of the printing. The only real fit problems that i had with my Hun build were on the fuselage top and bottom join seam. Nothing a little filler and sanding did not fix.

Definitely gonna use aftermarket decals on that one. It's the 1985 issue, so the decals are at least 30 years old! I'm hoping to find some decals of my old squadron back at Cherry Point - H&MS-32. If I can't find any for H&MS-32 (Headquarters & Maintenance Squadron 32), I'll go for anything based at Cherry Point at the time. The kit decals are for H&MS-12, which was based at Iwakuni, Japan. I'm just hoping that the Skyhawk isn't the pig the Hun turned out to be.

Devil Dawg

On The Bench: Tamiya 1/32nd Mitsubishi A6M5 Model 52 Zeke For Japanese Group Build

Build one at a time? Hah! That'll be the day!!

  • Member since
    March 2005
  • From: Lancaster, South Carolina
Posted by Devil Dawg on Thursday, June 18, 2015 10:04 PM

silentbob33

DD it's looking pretty good to me, especially considering all the problems you've had with this kit.  I agree with you though, the red lightning bolts look good with the yellow ones.

Thanks a bunch, Silent Bob! You're my new best friend!! 

Devil Dawg

On The Bench: Tamiya 1/32nd Mitsubishi A6M5 Model 52 Zeke For Japanese Group Build

Build one at a time? Hah! That'll be the day!!

  • Member since
    March 2005
  • From: Lancaster, South Carolina
Posted by Devil Dawg on Thursday, June 18, 2015 10:07 PM

mississippivol

Good to see her almost complete, Double D. I don't think you'll have any issues with the Skyhawk apart from the decals; I'd like to convert mine to a "J" and put some Hi-Vis markings on it.

Thanks for the kind words, Mississippi. Yeah, those Skyhawks always looked great with the high-vis stuff on 'em. All the combat squadrons in MAG-32 at Cherry Point had the A-4Ms when I first arrived there in 1984. They were all converted to AV-8Bs by 1987. Miss those planes. Just loved the way they looked.

Devil Dawg

On The Bench: Tamiya 1/32nd Mitsubishi A6M5 Model 52 Zeke For Japanese Group Build

Build one at a time? Hah! That'll be the day!!

  • Member since
    March 2005
  • From: Lancaster, South Carolina
Posted by Devil Dawg on Thursday, June 18, 2015 10:08 PM

Tal Afar Dave

Devil Dawg,

You're Hun looks pretty darn good; and the mixed lightning bolts are pretty cool.  Like Stik says, that Skyhawk is a solid kit and shouldn't be too much of an issue.  Good luck with it!

TAD

Thanks, Dave. You should be seeing pictures of the final product pretty soon.

Devil Dawg

On The Bench: Tamiya 1/32nd Mitsubishi A6M5 Model 52 Zeke For Japanese Group Build

Build one at a time? Hah! That'll be the day!!

  • Member since
    March 2005
  • From: Lancaster, South Carolina
Posted by Devil Dawg on Thursday, June 18, 2015 10:25 PM

And now, without further ado, here she is - my F-100D is finally complete (well, as complete as I'm ever gonna make it). I'm am SO GLAD I'm done with this build. Can't say that I enjoyed it. Never had a kit frustrate me like this one did. One thing you'll notice in the pictures is that the horizontal stabilizers are movable. BUT, when I made them that way, I made the holes that they fit into just a tad bit bigger than they needed to be, so now the stabilizers want to sag severely in the "nose down" position. Oh well. Some of my reference photos show them that way, too............

A few things that went wrong since last night after the decaling: On the top of the right wing, near the fuselage, a HUGE blemish that looks as though I had spilled something on it, and them tried to seal it with Alclad Gloss Coat. I didn't even notice until after I had let my final sealing coat dry today. I was just too far along and too frustrated to even try to fix it. Not sure why it doesn't show in the photos, but it sticks out like a swollen sore thumb from any angle that you look at it, except from the bottom; the pitot tube has a slight bend in it near the tip. This was a result of a pour stub being there, and I nearly broke the pitot tube in removing it from the sprue. As it sits now is the straightest I could get it; the little black square that should be on the upper intake lip (the radar gunsight) is missing. I couldn't find a decal that would work, and I didn't try to paint it on.

Hope you folks enjoy the pictures. Any comments are greatly appreciated. 

Devil Dawg

On The Bench: Tamiya 1/32nd Mitsubishi A6M5 Model 52 Zeke For Japanese Group Build

Build one at a time? Hah! That'll be the day!!

  • Member since
    March 2005
  • From: Lancaster, South Carolina
Posted by Devil Dawg on Saturday, June 20, 2015 2:27 AM

Now that the above Super Sabre is finished, I will now begin my second project for this Group Build: the Monogram 1/48th McDonnell-Douglas OA-4M Skyhawk II. I guess adding the Monogram part was a bit redundant, wasn't it?

.

The box art. I don't remember when I acquired this kit. I do know that I didn't buy it new. The box is in worse shape than it looks in this picture, but the sprues all came out ok. It's a 1985 kit, so it's as old as my oldest son.

.

.

All the parts that I'll be working with/on. I was happy to see that the mounts for the leading edge slats were still intact. Those are usually the first things to break on a kit that has them. The decals have faded with age, so I'll do my best to find an aftermarket set. I've got a couple of aftermarket decal sets for A-4Ms, but those won't do here, unfortunately. The clear stuff looks good, too, with no scratches. They'll still get a good polishing, though, then a coat of Alclad Clear Gloss. Instruction sheet is faded and yellowed on the top half, which is what was exposed when they were correctly folded and still in the box. Not sure if I'll do a weapons load-out on this one. Most of the H&MS/MALS OA-4Ms weren't used in a combat scenario, but more so as a squadron hack aircraft (most H&MS/MALS usually had only one or two birds assigned). So, it'll probably have the drop tanks and that's all. If any of you modelers have built this kit before, what can I expect?

I just hope that this one doesn't turn into the pig the Hun became.....

Devil Dawg

On The Bench: Tamiya 1/32nd Mitsubishi A6M5 Model 52 Zeke For Japanese Group Build

Build one at a time? Hah! That'll be the day!!

  • Member since
    July 2004
  • From: Sonora Desert
Posted by stikpusher on Saturday, June 20, 2015 2:45 AM

My roommate in the Army in '86 built this one. Once upon a time. I have the same kit in my stash. I will enjoy watching you build this one my friend. When I build mine I plan on putting a couple Zuni pods with the drop tanks and not much else for the loadout. After all, the OA-4M was supposed to be a fast FAC.


F is for FIRE, That burns down the whole town!

U is for URANIUM... BOMBS!

N is for NO SURVIVORS...

       - Plankton

LSM


JOIN OUR COMMUNITY!

Our community is FREE to join. To participate you must either login or register for an account.

SEARCH FORUMS
FREE NEWSLETTER
By signing up you may also receive reader surveys and occasional special offers. We do not sell, rent or trade our email lists. View our Privacy Policy.