SEARCH FINESCALE.COM

Enter keywords or a search phrase below:

2015 Messerschmitt Bf 109 Group Build

180624 views
2798 replies
1 rating 2 rating 3 rating 4 rating 5 rating
  • Member since
    March 2012
  • From: Corpus Christi, Tx
Posted by mustang1989 on Tuesday, April 14, 2015 3:15 PM

Jay: I like the paintwork that you're doing! Really convincing. One day I hope to be able to apply paint like that!

Kevin: Oh man!! This is the coolest part of the build for me. The transition from molded plastic to body filler to paintwork. Then there's decaling.......and for some reason I like that too.Indifferent


 Forum | Modelers Social Club Forum (proboards.com) 

  • Member since
    October 2004
  • From: NE Oklahoma
Posted by Allen109 on Tuesday, April 14, 2015 5:23 PM

Nathan T- are you sure? I've had friends of mine use regular lacquer thinner with no success,and alcohol did nothing.

  • Member since
    March 2010
  • From: MN
Posted by Nathan T on Tuesday, April 14, 2015 7:35 PM

Allen109

Nathan T- are you sure? I've had friends of mine use regular lacquer thinner with no success,and alcohol did nothing.

Yes I'm sure. Use only Gunzes Mr. Color thinner


  • Member since
    January 2015
Posted by Radial9 on Wednesday, April 15, 2015 7:03 AM

Thanks Gentlemen! Appreciate the kind words. Joe, there is no "glamour" here. Please use the pic in the post. I'm hopeful I can get away with it as a newbie!!

Cheers!

Bob

  • Member since
    December 2009
  • From: Laurel, MD
Posted by Tucohoward on Wednesday, April 15, 2015 7:17 AM

Nathan T
es I'm sure. Use only Gunzes Mr. Color thinner

I agree totally with Nathan. Why risk problems when you can just use the thinner made for that paint, just to save a couple bucks. We all invest a lot of time, money and energy on our models. I will find somewhere else to cut costs if need be.

Jay

The Mighty Mo says no.

  • Member since
    December 2009
  • From: Laurel, MD
Posted by Tucohoward on Wednesday, April 15, 2015 8:34 AM

More painting. It's coming along reasonably well. The markings and weathering should help tie it all together. I still have some questions about this scheme that I haven't quite decided on yet.

Jay    

The Mighty Mo says no.

  • Member since
    June 2014
Posted by BrandonK on Wednesday, April 15, 2015 2:45 PM

Alas, it's finally time for another update. I've been very busy and can't dedicate very much time on this kit at the moment. So, with a few minutes a few times a week I am making slow progress.

I began the cockpit with factory kit bits and removed them all and added a CMK resin cockpit along with thier PE bits and some from Eduard as well. I also added some cockpit plaques using Airscale decals to bring it more to life.

I painted it with Mr Color 116 RLM 66 over all and washed it with Flory black wash. I hand painted most of the wiring and tubing and gave it a light dry brushing with Mr Metal Color Aluminum. The resin cockpit is very nicely detailed and really doesn't need any thing else but I felt like pimping this one out so I just went nuts with the PE and details. Now that I have this much done here I can close the cockpit up and attach the shoulder belts. I can't install them until I close it due to how this kit assembles. 

I know some have complained that this kit is a PITA to build, but I find it to be no problem. I move slow and make sure I have a perfect fit before I glue parts and I also plan my attack on how to attach and glue and hold them before I do so and I have not had any problems thus far. This kit is not a shake and bake kit and will require patience, but the fit is excellent and the parts are very nicely detailed. If you like detail, then this kit will appeal to you. If you don't like messing with A LOT of little fiddly bits during assembly, then this kit may give you a stroke. 

On the bench:

A lot !! And I mean A LOT!!

2024 Kits on deck / in process / completed   

                         14 / 5 / 2  

                              Tongue Tied

  • Member since
    February 2012
  • From: Olmsted Township, Ohio
Posted by lawdog114 on Wednesday, April 15, 2015 7:10 PM

Nathan:  Indeed...I use the Aqueous line.  Maybe I should switch to the Mr. Color Lacquers. What do I thin this with? Can I use the Mr. Color 400 thinner or Tamiya Lacquer thinner?      

Roadrunner:  Welcome,  That scheme should be interesting.  You are coming along nicely.

Johnny:  Your still in my thoughts. 

Bob:  That looks great.  I needed to do a desert 109 one of these days...

Jay:  Your airbrush skills are very impressive. 

Brandon:  Lovin" the CMK pit.  Reference it being a PITA, don't jinx yourself, its still early bro.....Hmm


 "Can you fly this plane and land it?...Surely you can't be serious....I am serious, and don't call me Shirley"


  • Member since
    February 2012
  • From: Olmsted Township, Ohio
Posted by lawdog114 on Wednesday, April 15, 2015 7:56 PM

Well I'm finally in for an update.  My fat cat decided to take a nap on top of the Tamiya box that stored the plane on my bench.  I opened it to discover that the top fuselage seam split and the rear stabs and lower braces snapped off.  After I took a few of his nine lives away (kidding animal lovers), I spent several hours fixing it. 

I then decided to change schemes.  I'm going with Gerhard Schopfel's JG 26 kite from August of 1940.  Schofel was a very successful pilot during the Battle of Britain and shot down 4 Hurricane's in one mission.  These markings were done by Superscale, but I have plenty in the stash to piece this guy together. 

This was a matter of adding yellow wing tips and stab tips then raising the fuselage demarcation lin.  Fairly painless.  I added more postshading too....


......and that beefcake is banished from the model room....

Joe

 "Can you fly this plane and land it?...Surely you can't be serious....I am serious, and don't call me Shirley"


  • Member since
    December 2003
  • From: Charleston, SC
Posted by sanderson_91 on Wednesday, April 15, 2015 8:34 PM

Love the paint work Joe!!


  • Member since
    June 2014
Posted by BrandonK on Wednesday, April 15, 2015 9:33 PM

Joe, on the Mr Color, it's pretty thick stuff and must be thinned a bunch. I usually add Mr Color thinner directly to the bottle to aid in getting it mixed better. I then use only Mr Leveling Thinner in my brush when I spray it thinning it even further. I thin it until I get a real nice clean spray that doesn't make any spitting sounds. Then I know I have hit the magic mixture. But mixing it to 75% thinner is not uncommon. I personally have tried the Tamiya lacquer thinner and didn't get good results. The Leveling thinner is the bomb with that stuff. What's nice about using the Leveling thinner is it allows for the paint to settle down really nice. I have even had runs that I just left alone and they flattened and disappeared completely. It's a really forgiving paint and it is ready for decals without clearing it.

On the bench:

A lot !! And I mean A LOT!!

2024 Kits on deck / in process / completed   

                         14 / 5 / 2  

                              Tongue Tied

  • Member since
    February 2012
  • From: Olmsted Township, Ohio
Posted by lawdog114 on Thursday, April 16, 2015 12:11 AM

Thanks Steve.  

Brandon, sounds like their lacquer will go further and perhaps may last longer.  I do love Gunze's RLM colors...they look right on to me.  So your saying I can use the same thinner for the lacquers as I do with the Aqueous line?  To be honest, the whole Gunze/ Mr. Color stuff confuses the crap out of me....Mr. Leveling this 100....400.......ugh!

Joe

 "Can you fly this plane and land it?...Surely you can't be serious....I am serious, and don't call me Shirley"


  • Member since
    April 2005
Posted by Thunderbolt379 on Thursday, April 16, 2015 3:35 AM

Looking great, Jay, BrandonK and Joe!

After weeks of frustration as I look after two classes of students who seem to be able to make 3-4 hours of paperwork per day for me, I have finally had a couple of hours to fire up the AB. I did the 02 over the canopy frames of the three birds in play, plus the exposed internal areas of the flaps and the wheelwells, then reloaded with off-black for the tires and preshaded the airframes. I now have three stripy birds of prey:

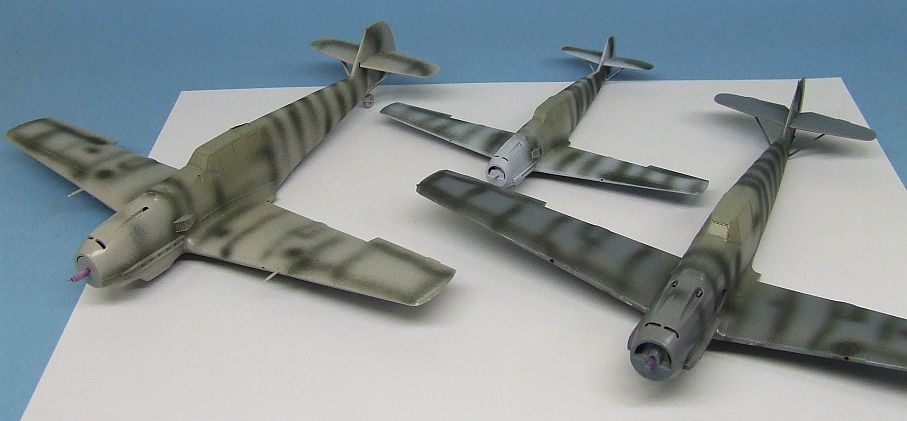
I forgot I had some canopy gaps to work with white glue, that'll get done in the next round of work, then I'll be masking wheelwells and the next colour on will be 65 for the undersides of two of the three, 78 for the other.

I've been collecting 109s again, I picked up a couple more of the Tammy E-7s, and just yesterday I grabbed Revell Germany's new 1:32 G-10 Erla, the reviews say it's a great kit which goes a long way to addressing the shortcomings of the G-6 they did not long ago. It won't be for this GB, but it'll be out there in the future! I also have a friend in the US trying to run down a new clear sprue for the G-2 I started earlier in the year for this GB, as the local distributor is clearly not going to even reply to the letter I sent them a month ago.

That's a quick roundup of where I am, and I hope to get some bench time over the next few days.

Cheers, M/TB379

PS: BrandonK -- the Airfix 109 F-4 you're working on, is that the old kit from the 70s or a new tool? I like the look of their new stuff and it would give me an option for an F-4, as I've been looking in vain for another Hasegawa that wouldn't set me back a fortune...

http://worldinminiature.blogspot.com/

  • Member since
    December 2009
  • From: Laurel, MD
Posted by Tucohoward on Thursday, April 16, 2015 8:25 AM

Brandon, very nice work so far on the cockpit. Looks great!

Joe, I love the paint job on your Emil. If you switch to Mr. Color, just use their leveling thinner. End of story, as others have said. Get the largest size and get some generic lacquer thinner for cleaning the airbrush. Fantastic paint.

T'bolt, that's quite a lineup. Looking forward to seeing some color on them.

Jay

The Mighty Mo says no.

  • Member since
    December 2009
  • From: Laurel, MD
Posted by Tucohoward on Thursday, April 16, 2015 9:02 AM

Starting to come together. Did some decaling last night. Eduard crosses and EagleCals 16's.

Jay

The Mighty Mo says no.

  • Member since
    June 2014
Posted by BrandonK on Thursday, April 16, 2015 9:11 AM

TBolt, that Airfix F4 is the old kit that has both raised and recessed panel lines and little extra detail. It is a simple little kit and will look good closed up, but it's not up to par for a nice open display model. I will set mine in flight and hang it. It is not worth much else. The Zvezda F4 is the one to doll up and display.

Joe, I don't think the Mr Color paints are lacquer, but rather a weird mix of their own and won't work with anything but their thinners. I've tried to thin it with various things and always end up using the Leveling thinner. FYI, SB has plenty of the paints and thinners for MR Color.

On the bench:

A lot !! And I mean A LOT!!

2024 Kits on deck / in process / completed   

                         14 / 5 / 2  

                              Tongue Tied

  • Member since
    March 2010
  • From: MN
Posted by Nathan T on Thursday, April 16, 2015 10:06 AM

lawdog114

Thanks Steve.  

Brandon, sounds like their lacquer will go further and perhaps may last longer.  I do love Gunze's RLM colors...they look right on to me.  So your saying I can use the same thinner for the lacquers as I do with the Aqueous line?  To be honest, the whole Gunze/ Mr. Color stuff confuses the crap out of me....Mr. Leveling this 100....400.......ugh!

Joe

Joe, This is the proper thinner for the Aqueous:

http://store.spruebrothers.com/product_p/gunt111xxx.htm

There is also a 400ml option. You can use Mr. leveling thinner with Gunze Aqueous, sort of the same way you can use tamiya Lacquer thinner to thin tamiya acrylics. But then you deal with the stink.


  • Member since
    December 2009
  • From: Laurel, MD
Posted by Tucohoward on Thursday, April 16, 2015 2:13 PM

Nathan T
But then you deal with the stink.

Nathan, surely you can't be talking about the sweet aroma of lacquer thinner.Big Smile

Jay

The Mighty Mo says no.

  • Member since
    March 2012
  • From: Corpus Christi, Tx
Posted by mustang1989 on Thursday, April 16, 2015 7:41 PM

Brandon: Looking forward to what you're gonna do with this kit. I move every bit as  slow as you do man and I can tell you that I've avoided a lot of pitfalls as a result of careful / safe speed building. That CMK pit is looking great man.

Jay: He's bustin' out the Cals man!!!! Looks like they are layin' down fine. I've always seemed to have really good luck with EagleCals stuff.

Nathan: Man you guys are way over my head with the paint talk.  I just use acrylics and call it good. lol

Joe(lawdog): Oh man not another animal crisis!!! I step in stuff, your cat sleeps on kits.....where does it end???? Great recovery and marvelous paint work as always Joe. You sure know how to build 'em great looking and in a short amount of time.

Mike: Preshaded and ready to go. Lookin' good man. Maybe one of these days coming up really soon I'll get this far along. Great work so far my friend.


 Forum | Modelers Social Club Forum (proboards.com) 

  • Member since
    January 2015
Posted by Radial9 on Saturday, April 18, 2015 7:56 AM
Brandon: Thanks for taking that extra bit of time to discuss your build in such detail along with GREAT pics. It greatly helps this newbie to learn. Comments like taking the time to dry fit EVERY piece, thinking about were to hold the pieces to glue and “plan my attack” really help this old dog slow down and really think about what I’m doing at the bench. Lawdog: Great choice of schemes. Will be following this build closely! P.S. Cats don’t care. Jay: Beautiful work! You can sure tell your airbrushes have spent considerable time in your hands. It shows. TB379: Great looking production line there! I spent the day yesterday at the 8th Air Force Museum just outside Savannah Georgia. Cannot put into words the experience. Spend a day there if you can. HIGHLY recommended. Took dozens of great pics. I had requests from the Mustang GB members to get some specific pics as a P51D is my next GB. The P51 in the museum is hanging from the ceiling, so wasn’t able to get what was asked. I did get a great shot of a nearly new Bf109 instrument panel that is in a glass case on the museum floor. Will get it posted in the next few days when I dump my camera. They also have a Bf109 hanging from the ceiling along with a newly restored B17 in the room, The City of Savannah, that is just beyond beautiful. VERY enjoyable day. Spent some time talking with the veteran pilots who were there giving first person accounts of their experiences. They did this museum right. Unbelievable experience. Pleasew excuse the formatting. Doing this from my Surface on the road and the rich text formatting simply won't work. Cheers, Bob
  • Member since
    December 2002
  • From: Bury St Edmunds, Suffolk, England
Posted by Bish on Sunday, April 19, 2015 1:06 PM

Its been a while since I posted an update. But I have been plugging away slowly. I got the wiring done for the spark plugs, I used a small piece of brass wire for the top of the plugs. Also added the PE ends for the exhaust outlets. I have also attached it to the metal support for the stand, this helps cut down on handling the model itself.

I also got the guns painted.

The guns were then fitted as well as the tanks on the side of the engine, which were painted with Alclad Aluminium.

Now to get on with the rest of the wiring. I am hoping to take this and my Jagdpanther to the next model club meeting, and that's a week on Tues, so better get a move on. 

I am a Norfolk man and i glory in being so


On the bench: Airfix 1/72nd Harrier GR.3/Fujimi 1/72nd Ju 87D-3

  • Member since
    December 2002
  • From: Bury St Edmunds, Suffolk, England
Posted by Bish on Sunday, April 19, 2015 1:37 PM

And seeing as we are all building 109's, I think its only right to mention that today is the birthday of the worlds highest scoring fighter ace. Eric Hartmann was born on this day in 1922. And the more observant amongst you may notice that the serial on my engine reads 1904352.

I am a Norfolk man and i glory in being so


On the bench: Airfix 1/72nd Harrier GR.3/Fujimi 1/72nd Ju 87D-3

  • Member since
    December 2009
  • From: Laurel, MD
Posted by Tucohoward on Sunday, April 19, 2015 2:18 PM

Bish, that engine is looking very nice indeed. I really like it.


Jay

The Mighty Mo says no.

  • Member since
    December 2009
  • From: Laurel, MD
Posted by Tucohoward on Sunday, April 19, 2015 2:24 PM

I was never happy with how dark the tail was so I resprayed and decaled. much happier now. Much more contrast between the green and the gray. Raw Umber oil wash on now over Mr. Color flat clear. I will give it an hour or so before wiping it off.

Jay

The Mighty Mo says no.

  • Member since
    October 2004
  • From: NE Oklahoma
Posted by Allen109 on Sunday, April 19, 2015 3:06 PM

Nathan T - Thanks.

  • Member since
    December 2002
  • From: Bury St Edmunds, Suffolk, England
Posted by Bish on Sunday, April 19, 2015 3:12 PM

Thanks jay. Really like the look of that, the tail does look good in those colour.

I am a Norfolk man and i glory in being so


On the bench: Airfix 1/72nd Harrier GR.3/Fujimi 1/72nd Ju 87D-3

  • Member since
    April 2005
Posted by Thunderbolt379 on Sunday, April 19, 2015 5:23 PM

Bish -- Ha! That's brilliant! Inside joke!

Jay -- also brilliant! Looking great!

I got some painting done over the weekend but not as much as I would have liked, I got as far as the trim colours, white and yellow, on my three birds. Masking up next...

M/TB379

http://worldinminiature.blogspot.com/

  • Member since
    September 2005
  • From: Central Nebraska
Posted by freem on Sunday, April 19, 2015 8:50 PM

Bish---to heck with the rest of the plane!  The engine alone is a winner!

Jay--I concur with the other guys-outstanding!

Chris Christenson


  • Member since
    April 2005
Posted by Thunderbolt379 on Monday, April 20, 2015 8:41 AM

I made a little progres today, I firmed up the white trim on the Tammy E-7 (I infuriatingly missed a bit, just a few millimetres worth of width on the fuselage band) and painted the spinner cones for it and the Airfix E-4, then used satin clear to protect the trim on all three models (to avoid the desurfacing effect that I encountered last year). Finally I masked up all trim on the E-4. Tomorrow I'll continue masking the other two, and be ready for underside colours in the near future. Pics to come...

M/TB379

http://worldinminiature.blogspot.com/

  • Member since
    June 2014
Posted by BrandonK on Monday, April 20, 2015 9:04 AM

Bish, that engine is coming along nicely.

Tuco, That is gonna be one sweet bird. It looks really good thus far.

On the bench:

A lot !! And I mean A LOT!!

2024 Kits on deck / in process / completed   

                         14 / 5 / 2  

                              Tongue Tied

JOIN OUR COMMUNITY!

Our community is FREE to join. To participate you must either login or register for an account.

SEARCH FORUMS
FREE NEWSLETTER
By signing up you may also receive reader surveys and occasional special offers. We do not sell, rent or trade our email lists. View our Privacy Policy.