SEARCH FINESCALE.COM

Enter keywords or a search phrase below:

2015 Messerschmitt Bf 109 Group Build

180564 views
2798 replies
1 rating 2 rating 3 rating 4 rating 5 rating
  • Member since
    November 2003
  • From: Naples, FL
Posted by tempestjohnny on Sunday, November 22, 2015 5:40 PM

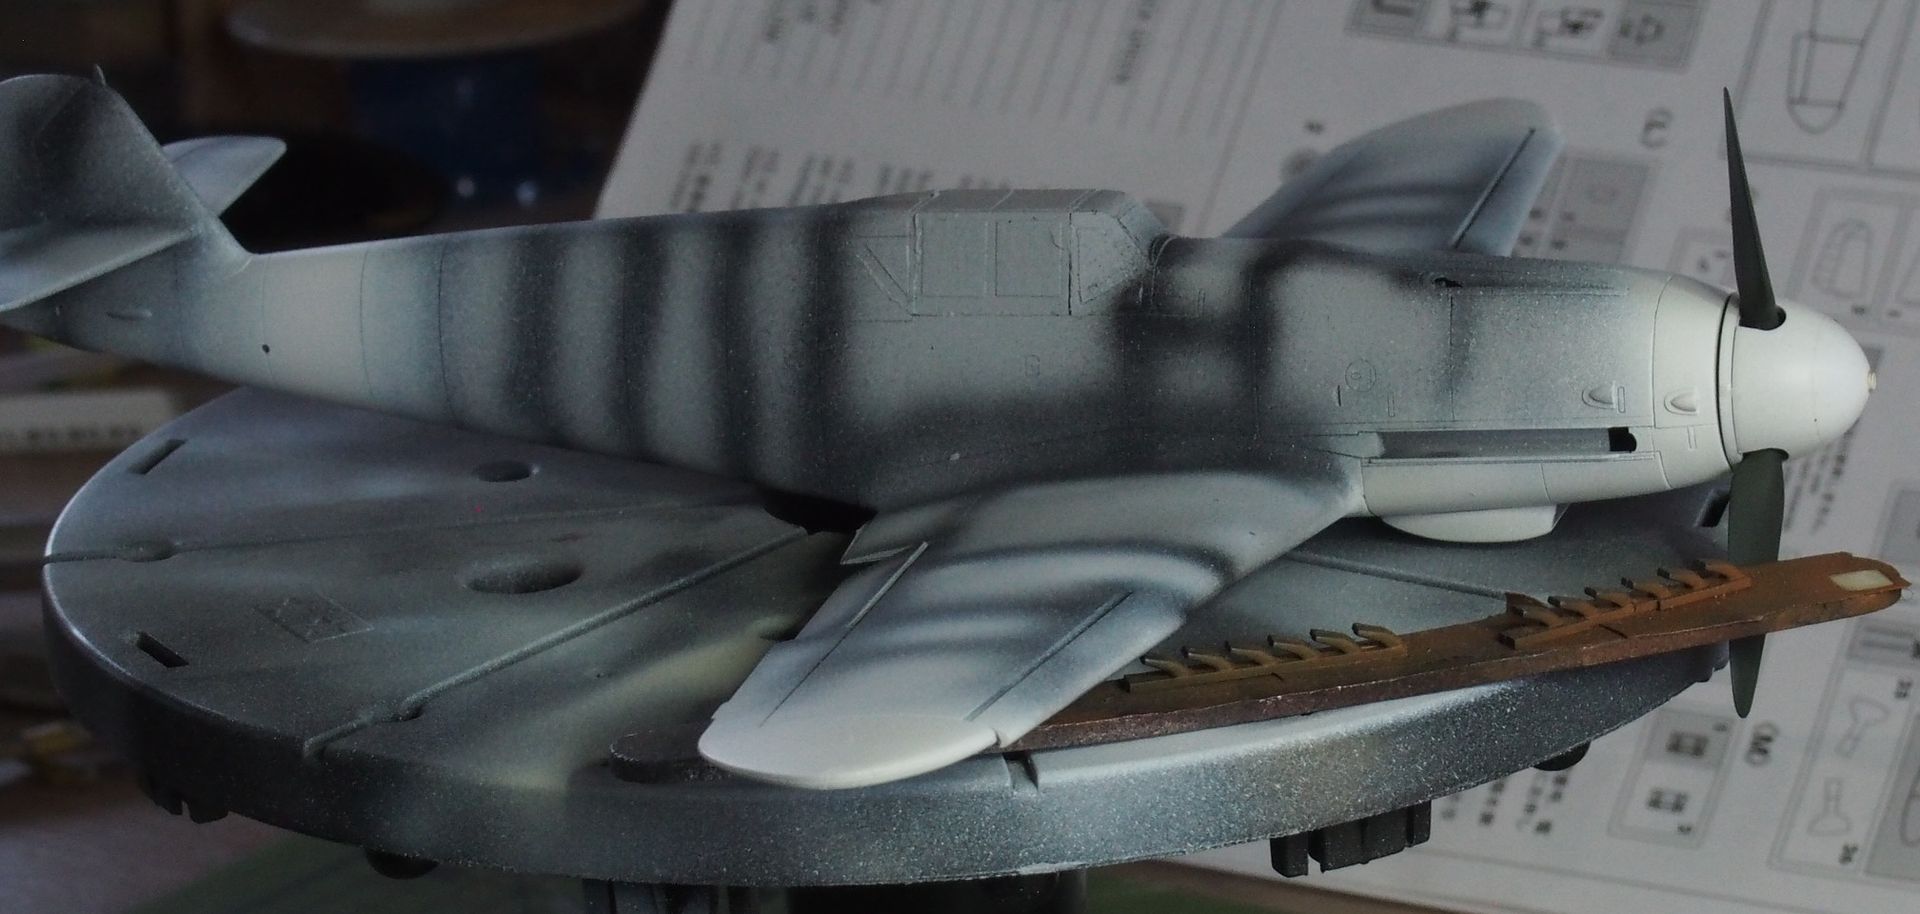
Looks like we're all getting some work done. Got the preshading on the F & G done


  • Member since
    April 2014
  • From: Australia
Posted by lostagain on Sunday, November 22, 2015 1:16 AM

Had a short work week, so I could get the colour on the Gustav.

For the first time I have used bluetack sausages to get a scaleish spray line. Happy with how it came out.

Lost the preshading in the areas where I painted blue over brown; post shading white didn't really bring it back.

The preshading underneath was  better, but could have been more subtle. Gloss coat next weekend.


  • Member since
    December 2002
  • From: Bury St Edmunds, Suffolk, England
Posted by Bish on Thursday, November 19, 2015 2:27 PM

lostagain

WowJack and Tucho, showing some fine attention to detail.

Brandon, love that camo scheme, one of these days I will get brave and attempt some mottling. The end result is great.

PJ, your G-6 looks a treat. funny how just a few patches of bright colours can lift the camouflage - not like the modern grey on grey schemes...

Bish, so are you a convert to1/32 scale or are you returning back to us in tiny town? H-J's plane is looking very good there. The weathering is nicely restrained, and the presentation great.

I have come back to my has 1/48 G 2 trop now I have finally finished my airliner build. Got some solid time at it, all the control surfaces are on, belts, gunsight and canopy on and masked.

I have primed, done some way too heavy preshading and done the white theatre markings.

The exhausts have been done in browns and rusts, and then given a bit of black around the tips:


Don't worry lst, 32nd will just get the occasonal visit from me. I have about 10 more in the stash and have no plans to grow it much bigger. My heart lays with the OTS Big Smile

I am a Norfolk man and i glory in being so


On the bench: Airfix 1/72nd Harrier GR.3/Fujimi 1/72nd Ju 87D-3

  • Member since
    April 2014
  • From: Australia
Posted by lostagain on Thursday, November 19, 2015 2:23 PM

WowJack and Tucho, showing some fine attention to detail.

Brandon, love that camo scheme, one of these days I will get brave and attempt some mottling. The end result is great.

PJ, your G-6 looks a treat. funny how just a few patches of bright colours can lift the camouflage - not like the modern grey on grey schemes...

Bish, so are you a convert to1/32 scale or are you returning back to us in tiny town? H-J's plane is looking very good there. The weathering is nicely restrained, and the presentation great.

I have come back to my has 1/48 G 2 trop now I have finally finished my airliner build. Got some solid time at it, all the control surfaces are on, belts, gunsight and canopy on and masked.

I have primed, done some way too heavy preshading and done the white theatre markings.

The exhausts have been done in browns and rusts, and then given a bit of black around the tips:


  • Member since
    March 2010
  • From: MN
Posted by Nathan T on Thursday, November 19, 2015 9:15 AM

Nice Tuco. You're making all the right modifications to make it look like a K. 


  • Member since
    December 2009
  • From: Laurel, MD
Posted by Tucohoward on Thursday, November 19, 2015 9:00 AM

Thanks Joe. Got the fuselage closed up last night. I always feel good when I get to that point. Cleaned up seams and reriveted areas where they were lost from sanding. Rear cockpit area blended in so I can work on detailing there. Starting to look like a 109!

Jay

The Mighty Mo says no.

  • Member since
    March 2012
  • From: Corpus Christi, Tx
Posted by mustang1989 on Thursday, November 19, 2015 6:23 AM

Interior work is pretty tricked out! Looks great Jay.

Hear you on supercharger seams!!! Arrrgh!!


 Forum | Modelers Social Club Forum (proboards.com) 

  • Member since
    December 2009
  • From: Laurel, MD
Posted by Tucohoward on Wednesday, November 18, 2015 9:03 AM

Moving along. I rescribed the top of the oddly shaped radio access panel. Got the radius on the corner wrong, but I will live with it. The Hasegawa IP fits fine. I will try to dig up an AM gunsight. Trumpeter does give you K tailwheel doors, but you have to modify the fuselage to install them. The rear cockpit bulkhead needs to be corrected as there is no battery box on a K. I do like the way Trumpeter does the supercharger intake. It mounts flush with the cowling, thus eliminating that annoying seam you have to deal with on Hasegawa kits.

Jay

The Mighty Mo says no.

  • Member since
    December 2009
  • From: Laurel, MD
Posted by Tucohoward on Monday, November 16, 2015 5:48 PM

Good to be back building something, Joe. Had a few issues to deal with and a little loss of *** but it's nice to be back at the bench. I have been watching everyone's excellent work.

Jay

The Mighty Mo says no.

  • Member since
    March 2012
  • From: Corpus Christi, Tx
Posted by mustang1989 on Monday, November 16, 2015 4:08 PM

Jay: Man first off it's great to have you back on board. Secondly you just gave me a great idea for those hard to replicate harnesses in the pit. It's gotta be the mechanic in us!! Don't we have the neatest resources????

Panzerpilot: I'm glad to see you back in here too bud.Yes


 Forum | Modelers Social Club Forum (proboards.com) 

  • Member since
    December 2009
  • From: Laurel, MD
Posted by Tucohoward on Monday, November 16, 2015 4:05 PM

Thanks Tom. Pretty nice kit for the most part. I have enjoyed the other Trumpy 109's I have built.

Jay

The Mighty Mo says no.

  • Member since
    December 2004
  • From: Houston, Texas
Posted by panzerpilot on Monday, November 16, 2015 2:11 PM

Nice to see you do another one, Jay! You do excellent work.
I have that K-4 and will be watching this one come together.

-Tom

  • Member since
    December 2009
  • From: Laurel, MD
Posted by Tucohoward on Monday, November 16, 2015 1:49 PM

The Hasegawa K cockpit parts don't have a lot of detail but at least what they have looks like a K. The left side is from the kit as it's about the same as a G. Relly just the right side that's totally different. Did decide to add a little wiring as well.

Jay

The Mighty Mo says no.

  • Member since
    December 2009
  • From: Laurel, MD
Posted by Tucohoward on Monday, November 16, 2015 1:42 PM

Hi guys! Been away from the bench for a bit, but finally have some time to build and decided to bang out a quick 109 before I get back into my other stuff. Picked up the fairly recent Trumpeter K-4. Pretty much the same kit as their G-10 with just a couple changes. Unfortunately one of them is not the cockpit so I ended up using right side parts from a Hasegawa kit. I will alse be using an IP and IP decal from Hasegawa as well. Tried the kit parts but didn't like the kit decal with it's white instrument bezels. Not trying to do too much with this build. Haven't decided how much AM to use, but at least will use RB Productions belts. Wouldn't build anything without them if at all possible. Haven't decided on a scheme yet, but I have lots of info and decals so I will figure something out.

Jay

The Mighty Mo says no.

  • Member since
    March 2012
  • From: Corpus Christi, Tx
Posted by mustang1989 on Wednesday, November 11, 2015 3:44 AM

That'll work great!! Lookin' forward to the progress updates.


 Forum | Modelers Social Club Forum (proboards.com) 

  • Member since
    October 2013
Posted by ajd3530 on Tuesday, November 10, 2015 11:42 PM

mustang1989

Great to see you adj!!! Lookin' forward to the progress and pics.Yes


Well its great to be kind of back in the swing of things. So I decided to go ahead and start on the Hasegawa as well, which will be an E-3, so to compare step by step to the Airfix. So I'm doing of everything right now. Should be pushing out two Emil interiors in the next few days.


  • Member since
    March 2012
  • From: Corpus Christi, Tx
Posted by mustang1989 on Monday, November 9, 2015 11:33 AM

Great to see you adj!!! Lookin' forward to the progress and pics.Yes


 Forum | Modelers Social Club Forum (proboards.com) 

  • Member since
    October 2013
Posted by ajd3530 on Sunday, November 8, 2015 12:39 AM

I have been here and there the past few months; haven't really been able to get all in to any particular project. Modelers' blues maybe? Anyways, I started tinkering with my 1/48 Airfix Emil today. This one is going to be an E-1. Should have some pictures by the end of the weekend. (My weekend is Sun-Mon.)

It will actually be the start of a rather large project for me. I plan on building all 4 of the major Emil models (Airfix, Hasegawa, Tamiya, Eduard) and comparing them from an average modeler's viewpoint.

  • Member since
    April 2006
  • From: ON, Canada
Posted by jgeratic on Saturday, November 7, 2015 10:35 AM

Guys, thanks for the continued interest. Beer

Have to say 1/48 has been for the longest time my go to scale when building aircraft.  Recently though, I've switched over to 1/72, having completed three plus two more currently on the bench.   I guess it's just something you get used to.  When I went looking at the panel lines in my 1/48 stash, I was surprised at how huge they looked to me now after staring at the smaller scale for the past few years.

mustang1989

What's the idea behind the white Jack? I know when you tell me I'm gonna feel like an idiot for asking.


It could be considered a form of post shading?  Usually the white or lighter shade is airbrushed in the center of panels, and then the original colour is reintroduced to tone things down.  I choose the method I did because of the scale, as well as to get a bit more random look to it (less mechanical).  If you do try it, make sure the paint is watered down somewhat so you don't end up with a rough surface.

regards,
Jack

  • Member since
    March 2012
  • From: Corpus Christi, Tx
Posted by mustang1989 on Saturday, November 7, 2015 4:19 AM

What's the idea behind the white Jack? I know when you tell me I'm gonna feel like an idiot for asking.


 Forum | Modelers Social Club Forum (proboards.com) 

  • Member since
    April 2005
Posted by Thunderbolt379 on Friday, November 6, 2015 11:21 PM

Jack -- some fascinating techniques in use here! I missed the business with the panel lines, but I'll catch that in future on all Airfix 109s. The radiator actuator rods are a detail I always add in 1:48, but I skipped it on this one. I think I was just bemused working on something this small!

M/TB379

http://worldinminiature.blogspot.com/

  • Member since
    April 2006
  • From: ON, Canada
Posted by jgeratic on Friday, November 6, 2015 12:22 PM

Thanks lads ...

Trying something different for myself regarding the weathering.  Now I've seen this done elsewhere, using a multitude of colours both dark and light, but I just used some flat white and applied it somewhat randomely over the 02 surfaces.   Once dry, resprayed the 02 lightly building it up, going for a very subltle result.

A couple panels, as indicated, could use a few more passes of the airbrush, but really is up to one's personal taste as to how far to go here.  Once I get the camou masks made and placed, I'll redo the brush applied white in the appropriate areas and then spray 71.

regards,

Jack

  • Member since
    December 2002
  • From: Bury St Edmunds, Suffolk, England
Posted by Bish on Thursday, November 5, 2015 2:23 PM
Good to see some paint on, not bad for such old paint.

I am a Norfolk man and i glory in being so


On the bench: Airfix 1/72nd Harrier GR.3/Fujimi 1/72nd Ju 87D-3

  • Member since
    March 2012
  • From: Corpus Christi, Tx
Posted by mustang1989 on Thursday, November 5, 2015 6:15 AM

20 year old paint that lays down like that? Wow!Yes


 Forum | Modelers Social Club Forum (proboards.com) 

  • Member since
    April 2006
  • From: ON, Canada
Posted by jgeratic on Wednesday, November 4, 2015 10:52 PM

Thanks mustang and bish.  Yeah, if it weren't for that lone panel line not lining up, I wouldn't of gone snooping around at the particulars and arrive at the incorporated changes. 

Good news is, it's done and I got a coat of 65 on the underside.  This is some old paint, close two decades - not sure when it was bought.  For spraying, it was cut down to almost 50% with acrylic future.

regards,

Jack

  • Member since
    December 2002
  • From: Bury St Edmunds, Suffolk, England
Posted by Bish on Wednesday, November 4, 2015 1:57 PM
Some great attention to detail Jack. Sounds like Airfix were being a bit lazy there just running those lines right to the end. I don't think rivets would be visible in 32nd let alone 72nd, so would have been best just to leave those areas as you have filled them. As for your black dotted line, I think I would leave it but only because I secure mine to a base anyway.

I am a Norfolk man and i glory in being so


On the bench: Airfix 1/72nd Harrier GR.3/Fujimi 1/72nd Ju 87D-3

  • Member since
    March 2012
  • From: Corpus Christi, Tx
Posted by mustang1989 on Wednesday, November 4, 2015 1:23 PM

Man you're really pullin' out all the stops on this build Jack. Nice work on the aerial insulator and filling in the panel lines. The casual passer by would never notice the issue with the panel lines.


 Forum | Modelers Social Club Forum (proboards.com) 

  • Member since
    April 2006
  • From: ON, Canada
Posted by jgeratic on Wednesday, November 4, 2015 1:19 PM

Thanks Mike, Bish, tempestjohnny and mustang1989.

Was doing a few rounds of primer and sanding, when I noticed there was an engraved panel line (top and bottom on both wings) that didn't line up on the leading edge.  When I further scrutinized references and other kits in my stash, found the problem was the underside panel line running along the near most edge of the wheel bay is too far out. It should be more closer to where the black dotted line is illustrated in the photo.  I just might fudge it and leave as is.

There were several lines that should not be present (circled red in photo).  I'm not sure why Airfix did this (their 1/48 boxing has the same questionable detail).    The eronous lines should actually be rivets, but I just opted to fill them in.

Some other details added since last update was an insert detail (insulator?) for the aerial wire attachment point on the fuselage, and a central located support brace on each underwing rad.  I also will add the trim tabs to the ailerons - funny though Airfix did mold the ones on the elevators, but can't really tell if the rudder one is present.  It's understandable that 1/72 does have it's limits.

regards,

Jack

  • Member since
    March 2012
  • From: Corpus Christi, Tx
Posted by mustang1989 on Tuesday, November 3, 2015 11:18 AM

Will be looking forward to the paint on this bad boy Jack!! Yes


 Forum | Modelers Social Club Forum (proboards.com) 

  • Member since
    November 2003
  • From: Naples, FL
Posted by tempestjohnny on Sunday, November 1, 2015 5:43 AM
Jack very nice. Would have never guessed 72nd. John


JOIN OUR COMMUNITY!

Our community is FREE to join. To participate you must either login or register for an account.

SEARCH FORUMS
FREE NEWSLETTER
By signing up you may also receive reader surveys and occasional special offers. We do not sell, rent or trade our email lists. View our Privacy Policy.