SEARCH FINESCALE.COM

Enter keywords or a search phrase below:

2015 Messerschmitt Bf 109 Group Build

180561 views
2798 replies
1 rating 2 rating 3 rating 4 rating 5 rating
  • Member since
    March 2012
  • From: Corpus Christi, Tx
Posted by mustang1989 on Monday, October 12, 2015 10:01 AM

It's really great to see you there Doug!! Yes


 Forum | Modelers Social Club Forum (proboards.com) 

  • Member since
    October 2008
  • From: Georgia
Posted by Rigidrider on Monday, October 12, 2015 5:55 AM

Bish... Excellent finish! I figured that with what you were able to do with a 72nd that you could really shine with this one (32nd) . Really a super build!  Hope you will consider more large scales.

Doug

When Life Hands You A Bucket Of Lemons...

Make Lemonade!

Then Sell It Back At $2 Bucks A Glass...

  • Member since
    March 2012
  • From: Corpus Christi, Tx
Posted by mustang1989 on Monday, October 5, 2015 12:42 PM

Good news Ernie! I was wonderin' what the hek was going on.


 Forum | Modelers Social Club Forum (proboards.com) 

  • Member since
    November 2008
  • From: Central Florida
Posted by plasticjunkie on Wednesday, September 30, 2015 8:07 PM

I finally got around to adding the 109 GB badge to my signature this morning when I saw I could not access Imageshack. Customer service finally contacted me and they had problems with their sytem and should be up and running within 78 hours. All my 109 GB and WIP pictures are gone for the moment but should be restored soon.

EDIT: all back up again

 GIFMaker.org_jy_Ayj_O


Too many models to build, not enough time in a lifetime!!

  • Member since
    March 2012
  • From: Corpus Christi, Tx
Posted by mustang1989 on Tuesday, September 29, 2015 9:26 PM

Brandon: You've got it bud! Yes I'll get 'er posted up soon!

TB: Wait a minute. I think I've got that one too!


 Forum | Modelers Social Club Forum (proboards.com) 

  • Member since
    November 2007
  • From: Wisconsin Rapids, WI
Posted by moose421 on Tuesday, September 29, 2015 7:44 PM

Toast

Brandon,

Excellent work! You nailed the mottling of your desert bird.


Keep it up.

Kim

  • Member since
    April 2006
  • From: ON, Canada
Posted by jgeratic on Tuesday, September 29, 2015 12:49 AM

Brandon, splendid build on this desert based Emil. Yes 

Many shy away from Luftwaffe subjects with fuselage mottling, but you took it head on and tackled a scheme that included the wing surfaces as well - nicely done!

regards,

Jack

  • Member since
    December 2002
  • From: Bury St Edmunds, Suffolk, England
Posted by Bish on Tuesday, September 29, 2015 12:38 AM

BD, love it. that's an awesome job on that scheme, you have really pulled that off nicely.

Ye, I did ad a drop of that to my Flory and it did help. Will have to try mixing it better in future.


MMM, a Luftwaffe GB. I think i might have a kit or two for that Whistling

I am a Norfolk man and i glory in being so


On the bench: Airfix 1/72nd Harrier GR.3/Fujimi 1/72nd Ju 87D-3

  • Member since
    January 2015
Posted by BrandonD on Monday, September 28, 2015 11:50 PM

TB - thank you very much! I can't wait to see yours come along.

Mustang - thank you as well. I appreciate all your work putting this on. As for photos, I guess the first one is my favorite for an overall pic.

-BD-

  • Member since
    April 2005
Posted by Thunderbolt379 on Monday, September 28, 2015 11:27 PM
Yup, it's a B-1a/U1 for the Nachtjaegers GB, Dragon ex-Trimaster... M/TB379

http://worldinminiature.blogspot.com/

  • Member since
    March 2012
  • From: Corpus Christi, Tx
Posted by mustang1989 on Monday, September 28, 2015 9:31 PM

Man you've done a great job with the camo and the colors on this one Brandon! I really enjoy looking at a build with open panels as well. Bravo on all counts!!! :shoutout:

Thank you for being a great part of this build Brandon and I look forward to seeing your work here on this forum and abroad. Lemme know which one you want in the intro and it'll be there.

TB: A 262??? Hmmm......:hmm:


 Forum | Modelers Social Club Forum (proboards.com) 

  • Member since
    April 2005
Posted by Thunderbolt379 on Monday, September 28, 2015 8:45 PM
Brandon, a truly beautiful build! You got the finish just right, it's convincing, attractive, and has the feel of an aircraft in action. You inspire me to finish mine -- I have a Spit and a 262 to get out of the way, but hopefully I'll come back to this subject before the end of the year! Cheers, m/TB379

http://worldinminiature.blogspot.com/

  • Member since
    November 2008
  • From: Central Florida
Posted by plasticjunkie on Monday, September 28, 2015 8:31 PM

Looks great BD! Love the scheme.

 GIFMaker.org_jy_Ayj_O


Too many models to build, not enough time in a lifetime!!

  • Member since
    January 2015
Posted by BrandonD on Monday, September 28, 2015 8:03 PM

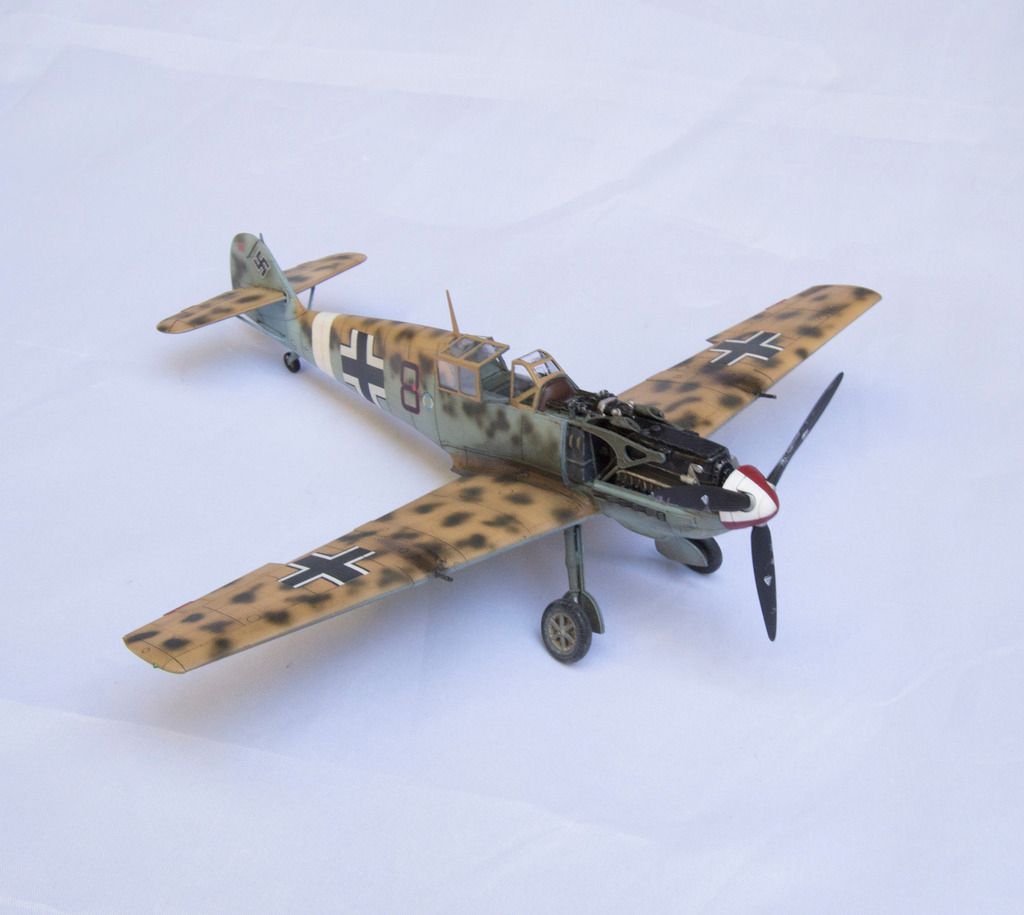
So I was going to post finish pics last night, but when I set it down to photograph it, the rear wheel collapsed (I broke it several times during construction). So I drilled out both ends and super-glued in a piece of steel wire for support. It now holds, and I'm done messing with it, so hopefully it stays that way now!

Ok, on to the real reason you're reading this, the pics:

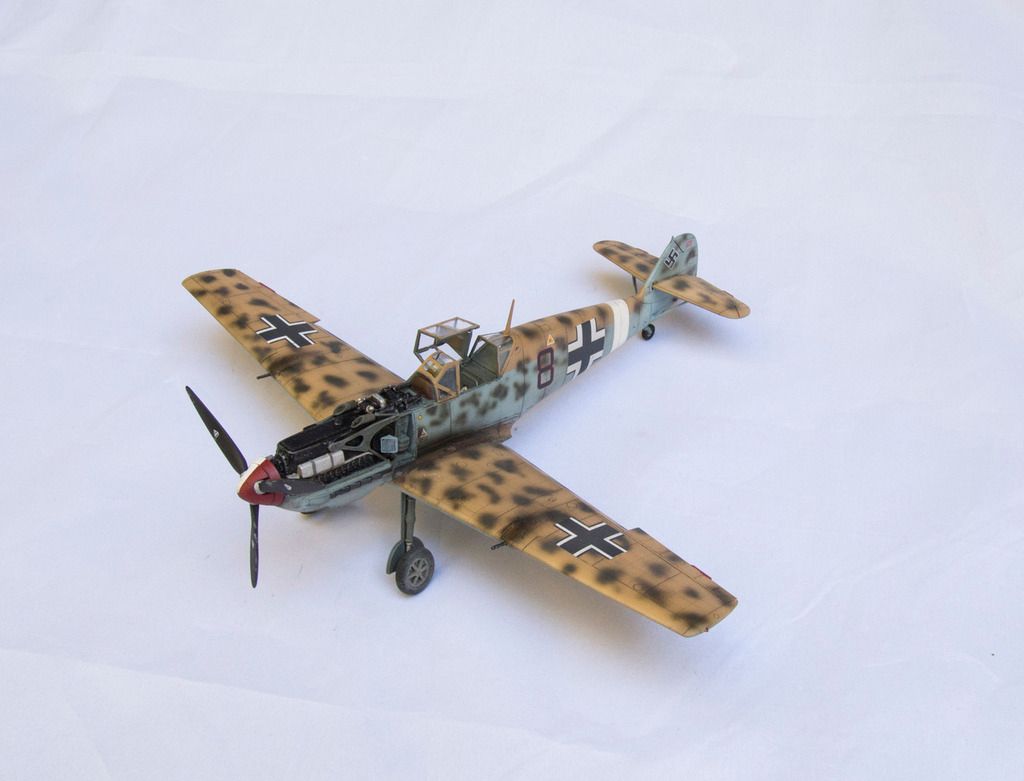
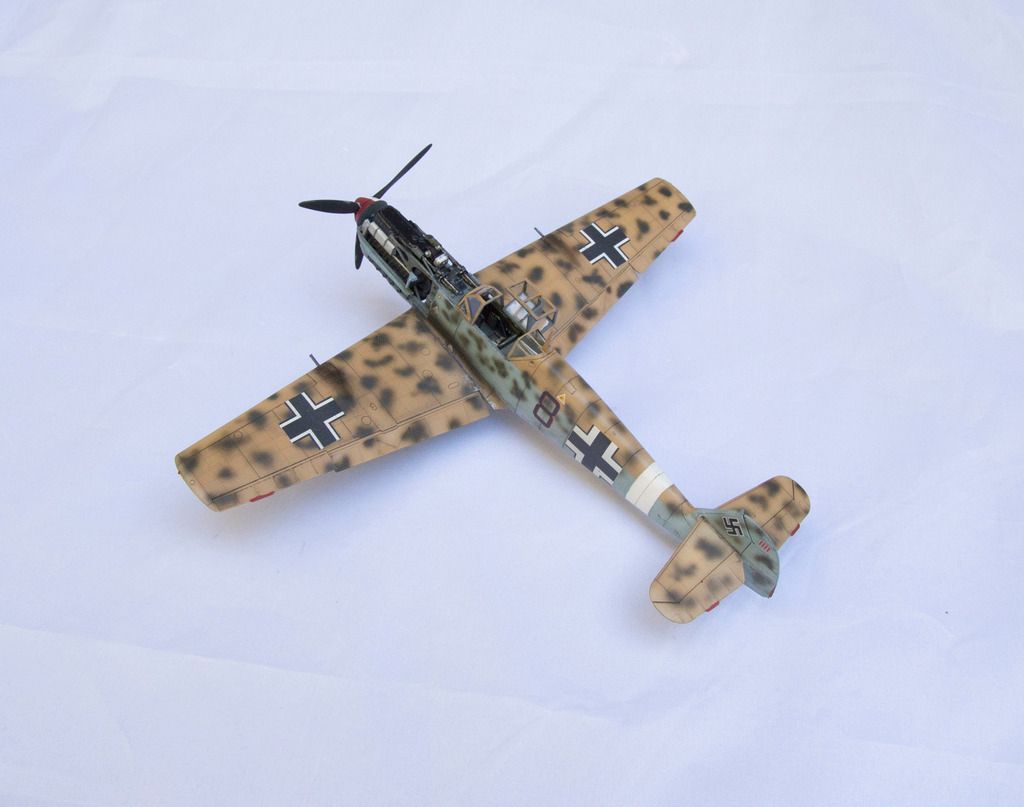
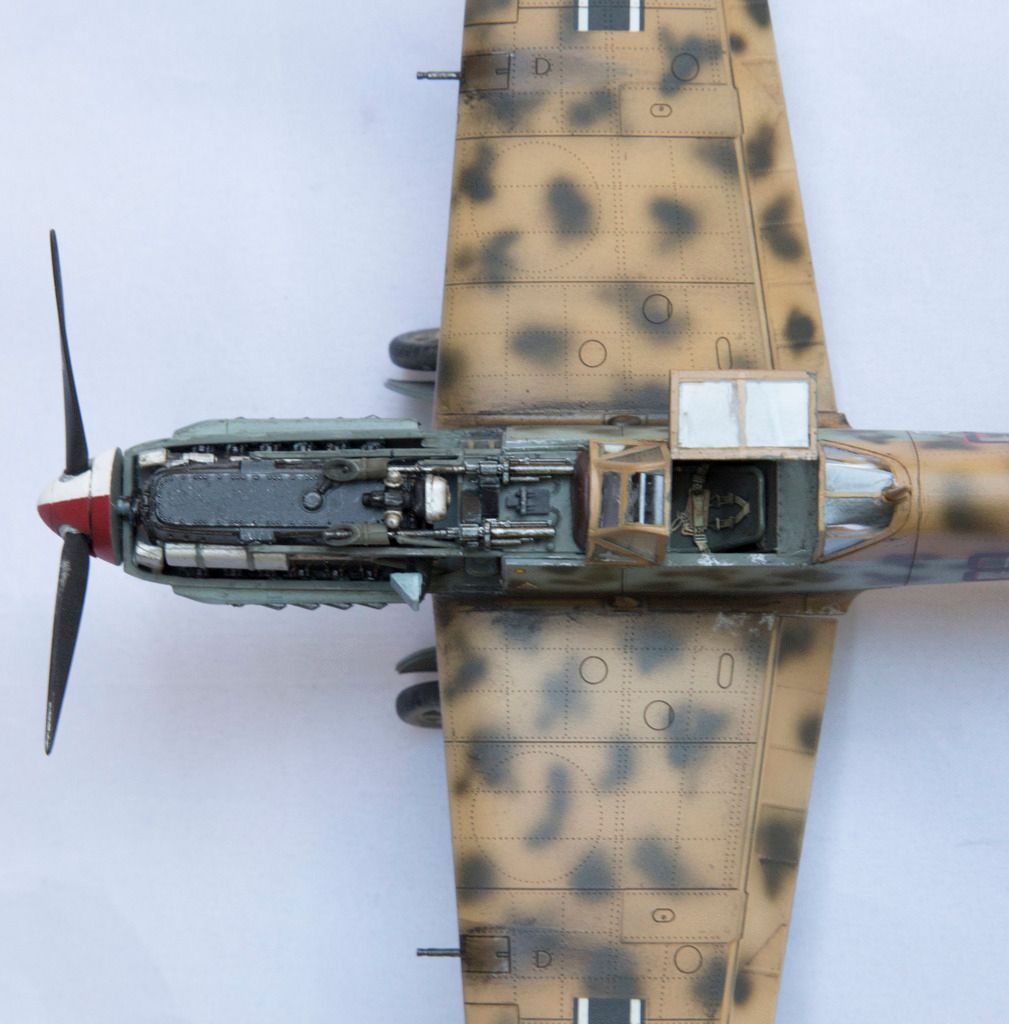
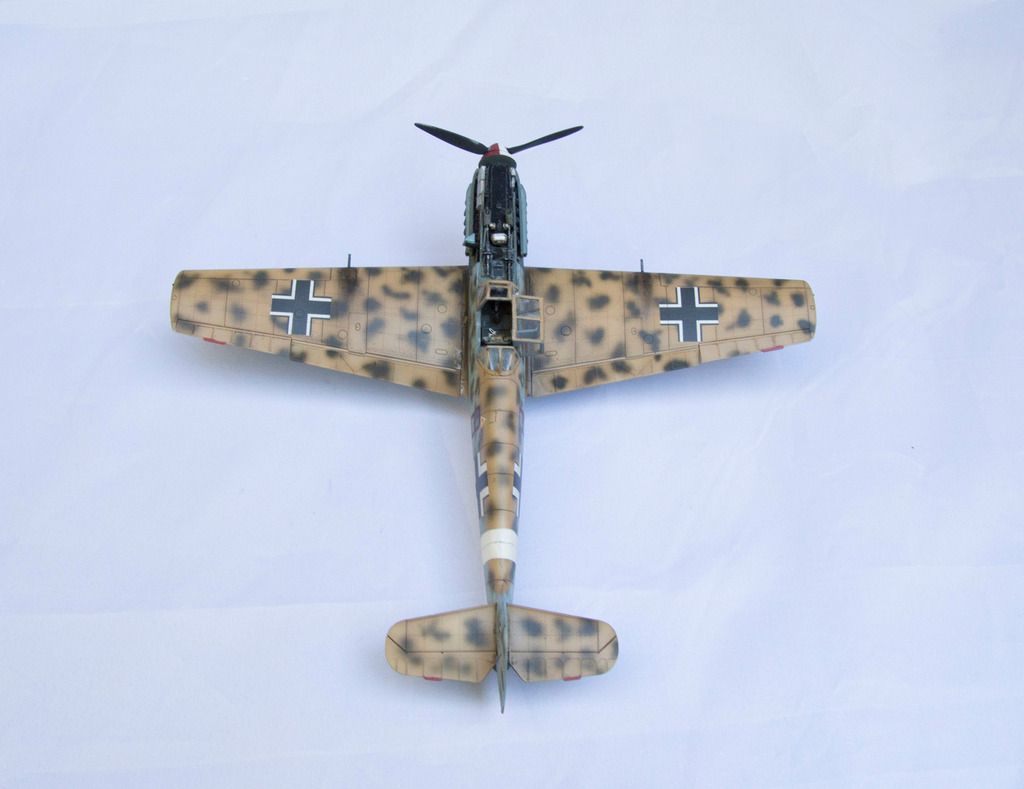
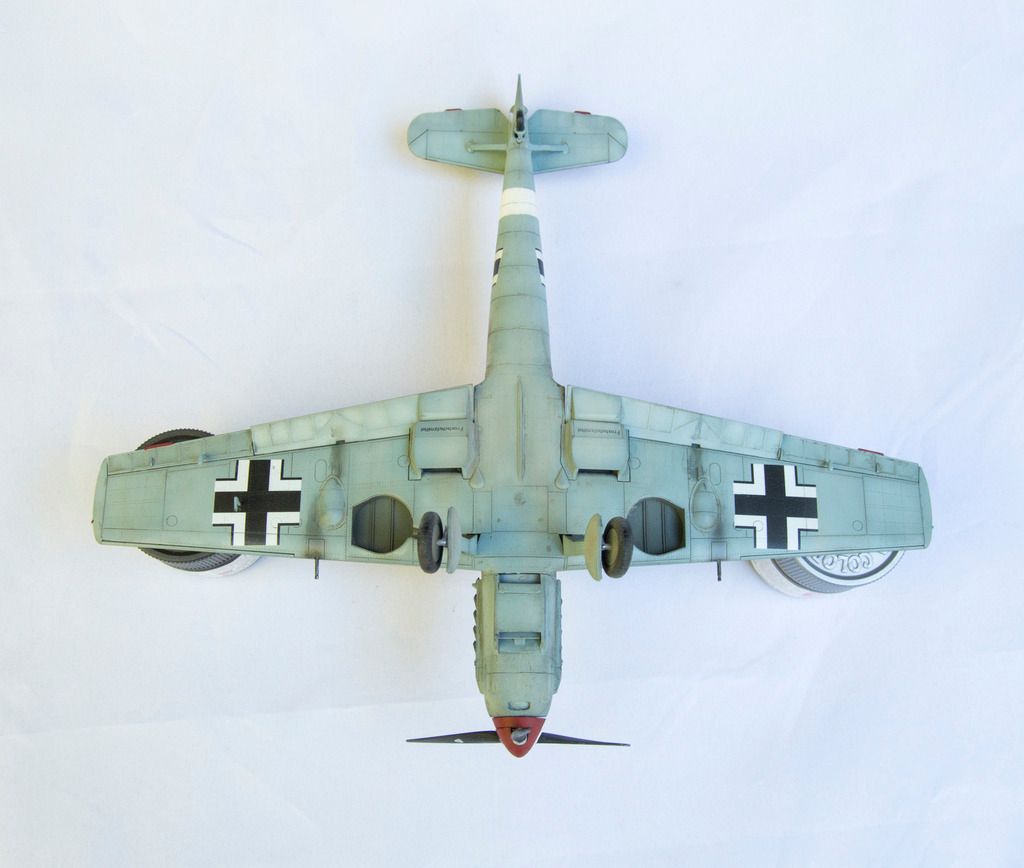
I finished it in largely Model Master colors, but I did paint the fuselage band with Tamiya, and I used a really thin misting coat of Tamiya Buff after it was painted and decaled to tone down the starkness. The interior colors and engine colors are Tamiya as well. The gunpowder streaks and exhaust staining are Tamiya smoke, and then I used some ground up pastels to accentuate them and blend them a bit. The underside weathering is a little bit of streaking with Tamiya Buff and pastels.

I didn't rust the exhaust stacks because a color reference photo of this one shows no rusting, and the desert air likely helped with that.

I really enjoyed this kit. For $25 plus $5 or $8 (I can't remember) for the PE set, it finished up nicely. I really like the surface detail with the rivets. My only gripes are with the tailwheel needing to be inserted when uselage halves are closed (hence my breaking it repeatedly) and the same thing for the wing guns (which I installed at the end to make it easier to sand the leading edges, mask and not break them off).

Thanks for looking. I still have some work to do when it comes to rescribing panel lines, and I need to pay more attention to the little bits like gear legs and wheels.

Thank you all for having me in this group build. It was my first one, and I feel like everything I've learned from you all has really brought me a long way from my Hobbycraft Buchon to my Tamiya E-4 to this Eduard E-7. I have four more 109s in the stash, but don't think I'll be able to get to them this year. Perhaps a Luftwaffe group build next year?

Anyway, thanks again for all the great work you've shown and making this group build so much fun!

-BD-

  • Member since
    January 2015
Posted by BrandonD on Sunday, September 27, 2015 4:04 PM

Thanks, guys! I finished her up earlier today (unless I add some tubing to the engine - toying with that idea now), and hope to get some pics today.

Bish - as for the Flory wash over Alclad clear, I haven't had trouble with it beading up. I realized I needed to throw a small screw into the bottle as an agitator, which helps mix it to be dirty enough to stick around, I think. If you're running into trouble with beading, I'd suggest a drop of dish soap or windex to break the surface tension of the water and see if that helps. I find that it can also work well when applied sparingly to a matte surface, since it leaves it much dirtier, but I wipe it with a wet paper towel almost instantly after applying if I'm doing that.

Here's the actual aircraft. I'm not up to the level of recreating this yet. I actually added more exhaust staining than this because I felt like it, and I accidentally had the Sandgelb go too far up the wing root for this. Also, I painted the canopy frame slightly off. I may go back and fix that, and I might not:

-BD-

  • Member since
    December 2002
  • From: Bury St Edmunds, Suffolk, England
Posted by Bish on Sunday, September 27, 2015 11:01 AM
Greg, thanks, much appreciated. And good to se you back.

I am a Norfolk man and i glory in being so


On the bench: Airfix 1/72nd Harrier GR.3/Fujimi 1/72nd Ju 87D-3

  • Member since
    May 2013
  • From: Indiana, USA
Posted by Greg on Sunday, September 27, 2015 9:47 AM

Bish, what a great job you did, mate. It's just been great fun watching you build that 1/32nd bird. You should be proud, she looks great. And I tip my hat to you regarding that canopy. It looks great and I wish I could see it in person.

Ernie, I gotta say, wow. Your attention to detail never ceases to amaze and entertain. Just a spectacular model. PS, I'm so glad you liked the Flory after all.

Brandon, that camo scheme is really something. Bravo for trying it, let alone pulling it off. Very nice model indeed.

  • Member since
    December 2002
  • From: Bury St Edmunds, Suffolk, England
Posted by Bish on Sunday, September 27, 2015 9:22 AM
Looking great there BD, you have really pulled that schemeoff. How did you find using the Flory on the Alclad klear. I have tried it but found the wash did not want to settle but just beaded up.

I am a Norfolk man and i glory in being so


On the bench: Airfix 1/72nd Harrier GR.3/Fujimi 1/72nd Ju 87D-3

  • Member since
    November 2008
  • From: Central Florida
Posted by plasticjunkie on Sunday, September 27, 2015 8:35 AM

BD

that Flory dark dirt wash is great and so easy to apply and remove. I love the product!

Your Emil is looking great and the  camo is really eye catching. Great touch with the Sprue cables.

 GIFMaker.org_jy_Ayj_O


Too many models to build, not enough time in a lifetime!!

  • Member since
    March 2012
  • From: Corpus Christi, Tx
Posted by mustang1989 on Sunday, September 27, 2015 5:52 AM

Nice work Brandon! Yes It's this stage of my builds that I dislike the most meaning all the little finishing touches that you literally have to make a list of to keep straight and not forget. Nice touch on the cables.


 Forum | Modelers Social Club Forum (proboards.com) 

  • Member since
    January 2015
Posted by BrandonD on Sunday, September 27, 2015 1:35 AM

Thanks, Mustang! I appreciate the kind words.

I have lagged with the WIP photos here lately, but am hoping for completion tomorrow (Sunday). I would finish it right now, but can't fire up the air compressor for the flat clear, as it's nearing midnight.

Here are a few in-progress shots to show where it's headed.

Decals on on the underside, clear-coated with AlcladII Klear Kote and a Flory dark dirt panel line wash applied:

And here is the topside with decals applied, but pre-wash:

And finally, since Eduard went ahead and molded grooves in the fuselage and nubs on the rudder, I stretched some sprue and made the rudder cables. Sorry the pic is out of focus - my phone was fighting me:

So, hopefully I can finish it tomorrow morning and get the completion shots up. Otherwise, I'll shoot it Monday after work.

Thanks again!

-BD-

  • Member since
    December 2002
  • From: Bury St Edmunds, Suffolk, England
Posted by Bish on Monday, September 21, 2015 11:38 AM
Thanks BD, might have to give that a try. Love the work on the scheme, I was woundering if that's the one you were planning on doing.

I am a Norfolk man and i glory in being so


On the bench: Airfix 1/72nd Harrier GR.3/Fujimi 1/72nd Ju 87D-3

  • Member since
    March 2012
  • From: Corpus Christi, Tx
Posted by mustang1989 on Monday, September 21, 2015 6:29 AM

Freekin' WOW Brandon!!!!!! Now THAT is some cool camo work right there!! One of deez days I'm going to be able to do that!! Mayan!!!!! Surprise


 Forum | Modelers Social Club Forum (proboards.com) 

  • Member since
    January 2015
Posted by BrandonD on Monday, September 21, 2015 1:06 AM

Bish - the three-layer technique involves spraying a base coat of the color, then mixing up a batch of 50% base coat and 50% white and spraying the insides of the panel lines like a really ugly post-shading. Then you mix a really thin coat of the base color (I used 60 drops of thinner and 15 drops of paint) and spray it until it blends to what you see in the photos above.

Plasticjunkie - thank you. I'm confused as to whether that is just the sides that you'd see, or the parts that show up top when they rotate down. I haven't found a good authoritative reference like I was able to with the P-51 Shangri-La.

Thunderbolt - thanks! I'm looking forward to seeing yours!

I got the mottling done tonight. This is Tamiya Dark Green (not the RAF one). I freehanded it with the SOTAR 20/20 at 22 psi with a 1:1 ratio of paint and Tamiya Lacquer Thinner. It worked well. Only a little tip dry.

And look how that tonal crush totally nullified the shading work I spent so much time doing :/

Next up is masking for the white fuselage band. After that, I'll gloss it, decal it, gloss it, panel line wash, then probably spray a mist coat of Tamiya Buff to tone down the contrast and lighten the whole thing for that sun-bleached desert look.

I have a new technique I want to try on the decals, too. We will see if I can work up the nerve, haha.

-BD-

  • Member since
    April 2005
Posted by Thunderbolt379 on Saturday, September 19, 2015 10:10 PM
Brandon -- sweet! Looks great! I'll be following closely as this scheme us my next one up, hopefully it'll be done before this GB comes to a close... M/TB379

http://worldinminiature.blogspot.com/

  • Member since
    November 2008
  • From: Central Florida
Posted by plasticjunkie on Saturday, September 19, 2015 6:52 PM

Great scheme BD, I love it! As described in Messerschmitt "O-Nine" Gallery by Thomas H. Hitchcock, besides exterior mottling, RLM02 was also used as a interior fusegale color so the flap interior skin would be in RLM02.


 GIFMaker.org_jy_Ayj_O


Too many models to build, not enough time in a lifetime!!

  • Member since
    December 2002
  • From: Bury St Edmunds, Suffolk, England
Posted by Bish on Saturday, September 19, 2015 6:01 PM
Nice work there BD. What's the 3 layer technique you mention. I am pretty certain the inside of the flaps are 02, that's what I went for.

I am a Norfolk man and i glory in being so


On the bench: Airfix 1/72nd Harrier GR.3/Fujimi 1/72nd Ju 87D-3

  • Member since
    January 2015
Posted by BrandonD on Saturday, September 19, 2015 5:05 PM

Ok, I got this thing together, minus the parts I didn't want to put on before paint.

I sprayed the underside with Model Master RLM 80. I used my standard three-layer technique, but I didn't bother priming or painting it black first because I was lazy.

That was last night. Today, I masked the hellblau and sprayed the Model Master RLM 79 sandgelb in the same three-layer technique. I used tohate Model Master paints, but once I realized the thinning ratio of 2:1 thinner:paint with Tamiya Lacquer Thinner, I can honestly say I kind of love them. I only prefer the acrylics because they dry faster.

Anyway, it looks like this now. I will have the flaps dropped to some degree, and I will get around to painting the struts for the horizontal stabilizers soon. Next up is the dark green mottling, which I guess I'll freehand and hope for the best. I'm a little nervous.

I do have a question - what color are the innards of the flaps? Are they RLM 02 or are they the same color as the top? I would guess RLM 02, but I sprayed them sand yellow for now just in case.

Thank you.

-BD-

  • Member since
    December 2002
  • From: Bury St Edmunds, Suffolk, England
Posted by Bish on Friday, September 18, 2015 3:26 PM

plasticjunkie
 
BrandonK

Bish and PJ, not sure why I haven't said anything in here but what a great pair of builds. Both your birds look just crazy nice. Steller work by you both!! YesYes


BK

No worries buddy. You are probably still in shock after witnessing Bish building in 1/32 scale!Wink


How'd ur think i feel.

I am a Norfolk man and i glory in being so


On the bench: Airfix 1/72nd Harrier GR.3/Fujimi 1/72nd Ju 87D-3

  • Member since
    November 2008
  • From: Central Florida
Posted by plasticjunkie on Friday, September 18, 2015 3:08 PM

BrandonK

Bish and PJ, not sure why I haven't said anything in here but what a great pair of builds. Both your birds look just crazy nice. Steller work by you both!! YesYes


BK

No worries buddy. You are probably still in shock after witnessing Bish building in 1/32 scale!Wink

 GIFMaker.org_jy_Ayj_O


Too many models to build, not enough time in a lifetime!!

JOIN OUR COMMUNITY!

Our community is FREE to join. To participate you must either login or register for an account.

SEARCH FORUMS
FREE NEWSLETTER
By signing up you may also receive reader surveys and occasional special offers. We do not sell, rent or trade our email lists. View our Privacy Policy.