SEARCH FINESCALE.COM

Enter keywords or a search phrase below:

1946 What If GB

55230 views
1775 replies
1 rating 2 rating 3 rating 4 rating 5 rating
  • Member since
    December 2002
  • From: Bury St Edmunds, Suffolk, England
Posted by Bish on Monday, October 31, 2016 7:26 AM

Matt, i dolike that scheme, i am rather keen on Ge3rman schemes with a light base. I did a 335 acouple of years and the 555 this year, both 3colour with an RLM 77 base, i took the idea from the pre war 3 colour scheme but with late war colous, soft edge and more flowinglines. But i really like the look of what you did there. You could almost pass that off as a winter scheme.

I am a Norfolk man and i glory in being so


On the bench: Airfix 1/72nd Harrier GR.3/Fujimi 1/72nd Ju 87D-3

  • Member since
    April 2014
  • From: Australia
Posted by lostagain on Monday, October 31, 2016 10:53 PM

Matt,

Coming along nicely there. Good work with the preshading, are you just putting on very thin coats of the colours?

So the other day I managed to get some good time on the MB5. Some of that involved soldering brass and salty language.

First up was getting structure into the wheel well. The u/c was in as a sanity check that nothing was way out of whack:

Next the brass socket that the u/c will sit in. The long arm will help me get the forward rake right before it is locked in position with epoxy.

And the combination tacked in place:

And with the lower wing resting on top:

NOt finished yet, still need to do detailing inside, get the socket properly positioned and add a spar of some kind. Of course I have to do the other side as well, I am counting on it being easier to do both at the same time.

  • Member since
    September 2003
  • From: Northern hemisphere - most of the time-
Posted by blkhwkmatt on Tuesday, November 1, 2016 12:17 AM

Lost, thanks for the compliment.  I must say that your vacuform kit is coming along nicely.  I don't think I would have the patience to work all that scratch built details, really looks great!  

thanks for sharing!

Quidquid latine dictum sit, altum videtur!!! - Anything said in Latin sounds profound!


  • Member since
    April 2014
  • From: Australia
Posted by lostagain on Tuesday, November 1, 2016 2:24 AM

Thanks Matt, the slow progress of the build and having to measure, cut, check, cut, check, file, check, drill, cut, check, file then glue each piece does take some of the excitement out of build. But then I see a completed cockpit or tail wheel well and there is satisfaction in that small completion.

But it will be a while before I do another vacform. I do have three more in the stash.

And I am going in the Weekend Madness GB to get this out of my system for 48 hours...

  • Member since
    September 2003
  • From: Northern hemisphere - most of the time-
Posted by blkhwkmatt on Tuesday, November 1, 2016 2:38 AM

I understand the feeling.  All this resin, super small bits and vague instructions. I have almost shelved this one several times just to build something easy OOB.  Keep up the great work.  Maybe one of these days I'll learn how to work with brass like to did on the landing gear, that impresses me.


Quidquid latine dictum sit, altum videtur!!! - Anything said in Latin sounds profound!


  • Member since
    March 2012
  • From: Corpus Christi, Tx
Posted by mustang1989 on Tuesday, November 1, 2016 5:02 AM

Lostagain: I really like that landing gear. Nice!!

Matt: Man I hear you on that!!! That feeling doesn't really happen with alot of my aircraft builds but with my automotive builds it does. I started building custom autos last year after building a couple "OOB" and it's just one thing after another. I plan a direction with a build and soon it's taking off in about 5 different ones. I have thoughts of shelving any given build at that point but then I say to myself, "Naaaaaaaaah!" and keep building.  lol

Everybody: Still plugging away at the Arado. I tried to re-rivet the panel behind the wing after sanding all of the rivets flush during body work and it didn't turn out good. I stretched a section of sprue this morning and filled each one of the rivet holes and bought a dang rivet tool for cryin' out loud. I moved on to the starboard engine nacelle in the interim so I'm still moving on this one.


 Forum | Modelers Social Club Forum (proboards.com) 

  • Member since
    November 2003
  • From: Naples, FL
Posted by tempestjohnny on Tuesday, November 1, 2016 6:48 AM
Lostagain great progress on the MB5


  • Member since
    December 2002
  • From: Bury St Edmunds, Suffolk, England
Posted by Bish on Tuesday, November 1, 2016 7:08 AM

That is some stunning detailing there lost. Can't wait to see more, this is impressive work.

I am a Norfolk man and i glory in being so


On the bench: Airfix 1/72nd Harrier GR.3/Fujimi 1/72nd Ju 87D-3

  • Member since
    September 2003
  • From: Northern hemisphere - most of the time-
Posted by blkhwkmatt on Wednesday, November 2, 2016 2:01 AM

Lost, 

The preshading is done with very thin paint,inside each panel with several thin coats.  Then a thin coat over everything to tone it down and blend in.  I then went back with a slightly thicker mix and hit the panels again to bring out the color.  I try to stop just short of where it looks good as I have found that to have gone too far.  You also have to keep in mind that with each added layer or color you cover more of the preshading.  I have also read where you can use different colors of preshading on the panels themselves to add more depth once you paint.  Will probably try that on my modern aircraft in the future.

Hope that helps some.

Quidquid latine dictum sit, altum videtur!!! - Anything said in Latin sounds profound!


  • Member since
    November 2009
  • From: SW Virginia
Posted by Gamera on Wednesday, November 2, 2016 11:16 AM

Matt: Fantastic job pre-shading there, both times! Yeah simple technique but it's a lot of work. 

LA: Great set of legs on that baby!   Heart  Nice work. 

"I dream in fire but work in clay." -Arthur Machen


  • Member since
    September 2003
  • From: Northern hemisphere - most of the time-
Posted by blkhwkmatt on Saturday, November 5, 2016 1:32 AM

So I have gotten the camo scheme sorted out, quite nicely I think and was all set to post...

and PB is down for maintenance.

In the mean time I am going to get some of the detail work done (landing gear, etc.) and will push the pictures when I can.

<matt

Quidquid latine dictum sit, altum videtur!!! - Anything said in Latin sounds profound!


  • Member since
    September 2003
  • From: Northern hemisphere - most of the time-
Posted by blkhwkmatt on Saturday, November 5, 2016 2:33 AM

PB is back up so here are the pictures:

Added a third color

Added several bare metal panels on the wings and the main landing gear bays.

Added a fourth color

My basic thoughts were that some of the panels on this aircraft have come from other scrapped aircraft in an effort to keep this one flying.  That is why there is one panel with the green and gray violet on it as well as the front engine cowlings are still aluminium.

Right now I am working on the landing gear, then on to gloss coat and decals and weathering.

Thanks for looking.

<Matt

Quidquid latine dictum sit, altum videtur!!! - Anything said in Latin sounds profound!


  • Member since
    December 2002
  • From: Bury St Edmunds, Suffolk, England
Posted by Bish on Saturday, November 5, 2016 2:44 AM

I do like that matt. Whats did you use for the 3rd colour. I like what you have done with the colour on top of the fuselage. Looking really nice.

I am a Norfolk man and i glory in being so


On the bench: Airfix 1/72nd Harrier GR.3/Fujimi 1/72nd Ju 87D-3

  • Member since
    November 2009
  • From: SW Virginia
Posted by Gamera on Saturday, November 5, 2016 7:28 AM

Yeah, she looks fantastic Matt. And I love the patchwork look of the savaged panels. Yes

"I dream in fire but work in clay." -Arthur Machen


  • Member since
    February 2006
  • From: Cincinnati Ohio
Posted by DantheMan85 on Saturday, November 5, 2016 10:26 AM

Thanks Johnny.

Thanks Gamera.

Thanks Bish.

Matt: Great work on your Do-335, lots of detail. Nice color scheme you've gone with.

Thanks Mustang.

Thanks Lostagain: Some good detail work, yeah hopefully some of it can be seen when the fuselage is closed up. Those wheel wells look great. Remember trying to build wheel wells for a Monogram RB-36 in 1/72, ended up having to give up.

The Mustang is going together quick and easy, after CA gluing the cockpit in along with the rest of the parts that go inside I glued the two half's up with testors cement.  First the top then let the glue dry, then the bottom.

There was some very small gaps that showed, easily filled in with squardon putty and sanded down. As you can see in the photo there were some gaps that needed to be filled in with .020 styrene strips.

Next up was attaching the wing, I dry fitted the two together many times and used shims to get the tops of the wing's to match up flush with the fuselage. It's not a perfect match but it's close.

Yesterday I attached the elevators, using a jig set up to hold the aircraft level while the glue dried. Then I attached the antenna behind the cockpit.


On my Work Bench: Tamiya Ford GT 1/24

Up Coming: ?


  • Member since
    September 2007
  • From: Finland funland
Posted by Trabi on Saturday, November 5, 2016 4:21 PM

Gee, been a while I have posted here!

Bish: I noticed that in roster scale of my Ta-154 is wrong. It should be 1:48.


Well I have built this very slowly. I have taken pictures during process, but haven´t had time to update those here.

I glued that strenghtening beam in place with epoxy:


Still the wings are bit warped Blind Fold


And as you see fittings are not the best ones:


And this is how it´s atm:


Next thing is base coat. Also I have landing gears and propellers done.

I have to add more weight to nacelles. I already glued two M10 nuts to BOTH! I didn´t belive, that 50 grams weight to EACH is right as said in instructions. That´s way more than whole kit weights.

"Space may be the final frontier, but it´s made in Hollywood basement." RHCP, Californication

  • Member since
    December 2002
  • From: Bury St Edmunds, Suffolk, England
Posted by Bish on Saturday, November 5, 2016 4:40 PM

Thanks Trabi, got it corrected. Looks like your have some challengers with this one. Nice to see you plugging away.

I am a Norfolk man and i glory in being so


On the bench: Airfix 1/72nd Harrier GR.3/Fujimi 1/72nd Ju 87D-3

  • Member since
    December 2002
  • From: Bury St Edmunds, Suffolk, England
Posted by Bish on Saturday, November 5, 2016 4:41 PM

Thanks Dan. Some nice work there, i like that jig.

I am a Norfolk man and i glory in being so


On the bench: Airfix 1/72nd Harrier GR.3/Fujimi 1/72nd Ju 87D-3

  • Member since
    February 2006
  • From: Cincinnati Ohio
Posted by DantheMan85 on Saturday, November 5, 2016 6:58 PM

Trabi: Looks like a hand full there, surprised that the beam didn't get the wrap out. I had similar seems on my Bf-110. Looking forward to the base coat going on. Lookin' good.

Thanks Bish: Not as complex as the one's I made for the Bf-110 but they worked out great.

Just a few parts left and the Mustang will be ready for some Vallejo primer, I've dry fitted the bubble canopy to the fuselage and it fits great. Here's the scheme I'm going with.


The color's I'll be using are, Model Master Insigina Yellow #1708, Model Master Olive Drab #2050, Model Master Chrome Silver #2734 and Testors Flat Aluminum #1181.  They call out for the FS Chrome Silver (flat) but I have the automotive color which is a gloss. Cool


On my Work Bench: Tamiya Ford GT 1/24

Up Coming: ?


  • Member since
    March 2012
  • From: Corpus Christi, Tx
Posted by mustang1989 on Saturday, November 5, 2016 10:11 PM

Matt: That paint work is da bomb man!! This thing is gonna look so freekin' cool when its finished!!

Dan: Great and fast work on that Mustang!

Trabi: I don't know much about the Ta-154 but I like the lines of it that's for sure.

Everybody: Ok folks I've just about got the repairs completed and will be commencing the riveting process on Monday with the riveting tool I just received:

Image


 Forum | Modelers Social Club Forum (proboards.com) 

  • Member since
    November 2009
  • From: SW Virginia
Posted by Gamera on Sunday, November 6, 2016 8:04 AM

Dan: She's coming right along. I too like that jig, better than my propping the model up with paint bottles and stuff! And very cool looking scheme. 

Trabi: Wow, not sure I even own that many clamps! You're making great progress, good luck with whats left there. And gee, seems like 100 grams would be enough to hold down anything!

Mustang: Very cool! I have a cheap riveter from Trumpeter but haven't used it much. This looks like it would work much better. 

"I dream in fire but work in clay." -Arthur Machen


  • Member since
    September 2003
  • From: Northern hemisphere - most of the time-
Posted by blkhwkmatt on Monday, November 7, 2016 11:10 AM

Bish

I do like that matt. Whats did you use for the 3rd colour. I like what you have done with the colour on top of the fuselage. Looking really nice.


Bish,

believe its Color of Eagles RLM 81, not at the bench at the moment but I'll check again later.

Quidquid latine dictum sit, altum videtur!!! - Anything said in Latin sounds profound!


  • Member since
    January 2015
Posted by Moff on Tuesday, November 8, 2016 6:41 AM

@blkhwkmatt: 

That's really a Do-335? When I first saw it, I was certain it was a SBD Dauntless. I obviously don't know as much about aircraft as I like to think I do. Big Smile

Looks awesome with your camouflage choice, BTW! 

"Gaiety is the most outstanding feature of the Soviet Union." - Josef Stalin 

  • Member since
    April 2014
  • From: Australia
Posted by lostagain on Wednesday, November 9, 2016 7:41 AM

Dan, you are racing along there, good to see the Mustang going so well. You should have 3 or 4 done by year's end!

Trabi, looks like you have a bit of wrangling to get the 154 into shape, but the results are good so far.

Matt, Like the scheme, and especially the touch with salvaged panels.

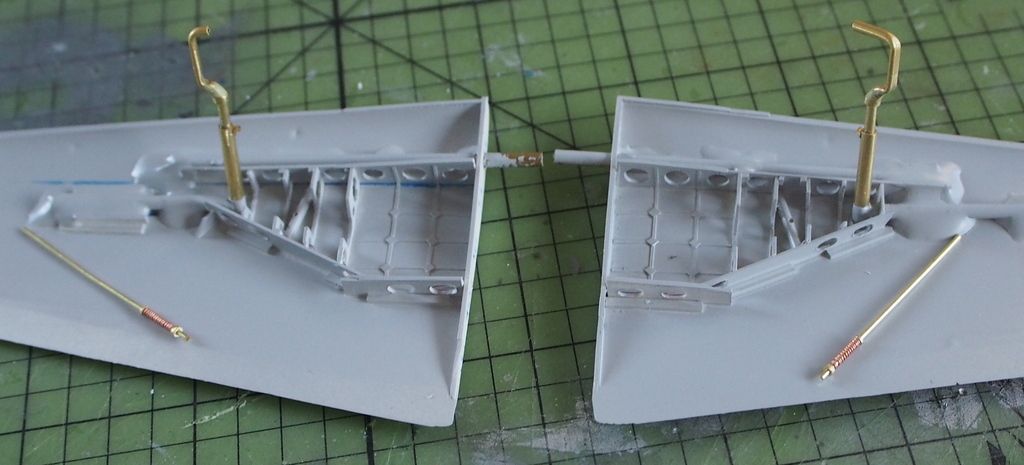
On the MB5 the wheel wells have now been completed, here with the undercarriage sat (not fixed) in place. Managed to break one of the sockets during the fitout, so had to make another one. This time it was much better as I used jeweller's silver solder, should be stronger too. Both sockets were epoxied in place:

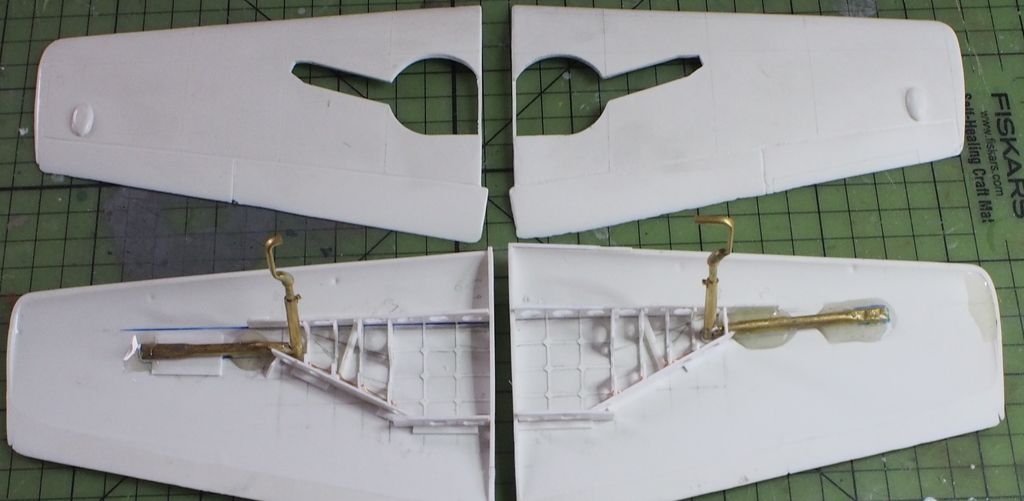
Next the spars were put in to stiffen the wing and give a good attachment. The wings were then primed. Now I have noticed I have not put in the spar details on the wing root internals, have to fix that up. Also in here is the early stage of the retraction mechanism. Last details, painting and then it can be closed up:

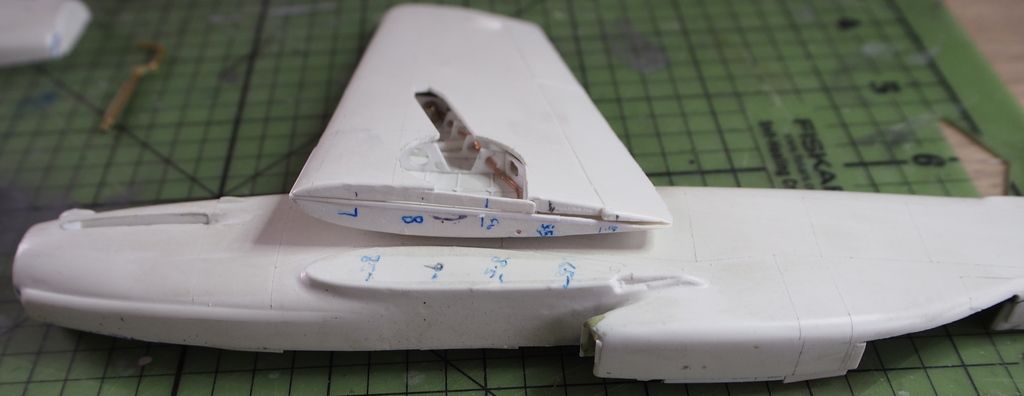
BUT a BIG shout out to Dan and the photo of his work to get the Mustang wings to fit. I thought - that's poor moulding - that could never happen on a vacform...

So I immediately went and measured the wing root and the mating part on the fuselage, and yes they are well out and different on each side. So some shimming has solved the worst of it and the rest willl be dealt with in construction, but thanks Dan, it could have been real ugly.

Also thanks Mustang, that rivet tool is exactly what I need to get all the prominent fastener heads (not rivets) on the MB5 - there are a lot of them. My order is in.

  • Member since
    November 2009
  • From: SW Virginia
Posted by Gamera on Wednesday, November 9, 2016 7:47 AM

Hey LA, those landing gear legs and bays look amazing! I think you said earlier that you scratchbuilt most of the detail??? Yes

"I dream in fire but work in clay." -Arthur Machen


  • Member since
    December 2002
  • From: Bury St Edmunds, Suffolk, England
Posted by Bish on Wednesday, November 9, 2016 7:59 AM

Indeed, that is some stunning detail there lost.

I am a Norfolk man and i glory in being so


On the bench: Airfix 1/72nd Harrier GR.3/Fujimi 1/72nd Ju 87D-3

  • Member since
    April 2006
  • From: ON, Canada
Posted by jgeratic on Saturday, November 12, 2016 7:04 PM

I'm still thinking of what to do here ... so far I seem to be sticking with naval airpower, but keep switching the actual aircraft.  First was the Seafire, then a Hellcat in RCN markings, now I'm entertaining the idea of a Kriesgmarine 262:


Probably not exactly how I'd paint mine, but does give inspiration.  I do have an old 1/48 Monogram kit of the Me262, so at least it would cull the stash. 

regards,

Jack

  • Member since
    December 2002
  • From: Bury St Edmunds, Suffolk, England
Posted by Bish on Sunday, November 13, 2016 2:05 AM

jack, i do like that idea, never come across that before. I take it this is not a carrier based aircraft.

I am a Norfolk man and i glory in being so


On the bench: Airfix 1/72nd Harrier GR.3/Fujimi 1/72nd Ju 87D-3

  • Member since
    April 2006
  • From: ON, Canada
Posted by jgeratic on Sunday, November 13, 2016 11:50 AM

Hi Bish...

yeah, I thought about maybe carrier based, but looking at some stats this jet needed a minimum 900 yards runway length to take off.  Historically it could use rocket assists for this, but not sure if that could be combined, (or necessary?) for catapult equipped carrier.

So keeping it simple if I go with this, just  be a land based squadron.

regards,

Jack

  • Member since
    December 2002
  • From: Bury St Edmunds, Suffolk, England
Posted by Bish on Sunday, November 13, 2016 1:20 PM

Would probably need some other mods to the aircraft as well. As i understand it, the front undercarrage was not very strong, that would probably have needed strengthening. Land based would make more sense, maybe for the navy to protect its own bases.

I am a Norfolk man and i glory in being so


On the bench: Airfix 1/72nd Harrier GR.3/Fujimi 1/72nd Ju 87D-3

JOIN OUR COMMUNITY!

Our community is FREE to join. To participate you must either login or register for an account.

SEARCH FORUMS
FREE NEWSLETTER
By signing up you may also receive reader surveys and occasional special offers. We do not sell, rent or trade our email lists. View our Privacy Policy.