SEARCH FINESCALE.COM

Enter keywords or a search phrase below:

75th Anniversary of 1941 Group Build (World at War)

36949 views
712 replies
1 rating 2 rating 3 rating 4 rating 5 rating
  • Member since
    January 2015
Posted by BrandonD on Wednesday, June 15, 2016 3:22 PM

Well, I went home at lunch and got the black done on the cowling. I've read that it either faded quickly or may have had green paint in it or been painted really thin over the green, so I mottled the bare aluminum with Tamiya Flat Black and then used a heavily thinned coat of Tamiya Black Green. I needed some touching up around the base, but that was easily done, and I also repainted the bays for the flaps on the underside since there was heavy overspray from the blue, and touched up the root of the port horizontal stabilizer. It'll get a coat of clear after work and decals (all 8 of them!) tonight.

Thanks for looking.

-BD-

  • Member since
    September 2003
  • From: AandF in the Badger State
Posted by checkmateking02 on Wednesday, June 15, 2016 5:12 PM
Great looking work, Brandon.


  • Member since
    January 2015
Posted by BrandonD on Thursday, June 16, 2016 1:18 PM

Thanks, Checkmateking!

-BD-

  • Member since
    January 2015
Posted by BrandonD on Thursday, June 16, 2016 1:19 PM

And now the decals are on. I thought there were 8, but Trumpeter actually split the "17" into two individual decals for each side, which is nice since it prevents excess carrier film having to sink into the rudder gap, but it would have been nice if they weren't shown as a single decal on theinstructions. I thought I'd torn it at first!

The decals were very nice and thin, and they snugged down into the surface detail on the tail very well. One thing I like about this kit is all markings for all aircraft are provided, so there are plenty of spares.

-BD-

  • Member since
    September 2014
Posted by rooster513 on Thursday, June 16, 2016 1:44 PM

Looks really nice BD! I like how they give the numbers as seperate decals. After the fiasco on my Tamiya Corsair I had putting the "167" on the side, I think I'll cut them out as seperate from now on. That 7 went down beautifully!

-Andy

  • Member since
    September 2003
  • From: AandF in the Badger State
Posted by checkmateking02 on Thursday, June 16, 2016 7:03 PM
That is an extremely appealing and attractive aircraft, Brandon. Nice work!


  • Member since
    September 2014
Posted by rooster513 on Tuesday, June 28, 2016 9:23 AM

Small update here. Main construction is done and canopy masked. Sprayed the interior color on the canopy and the wheel wells this morning but wasn't able to get any pics done.

-Andy

  • Member since
    September 2003
  • From: AandF in the Badger State
Posted by checkmateking02 on Tuesday, June 28, 2016 7:46 PM

That looks just like an Me-109E, rooster!  Nicely built.  Looking forward to seeing more!


  • Member since
    April 2006
  • From: ON, Canada
Posted by jgeratic on Friday, July 1, 2016 4:47 PM

Should be my last update before final photos.   Firstly the decals, ICM never did get back to me.   I only waited a few days, before going ahead and ordering some from Hannants, and they arrived this past Tuesday - good thing too, as Canada Post has strike plans after this weekend.

An unfamiliar brand, KV Decals - but looks like they are affiliated with Begemot?


KVD72008.jpg


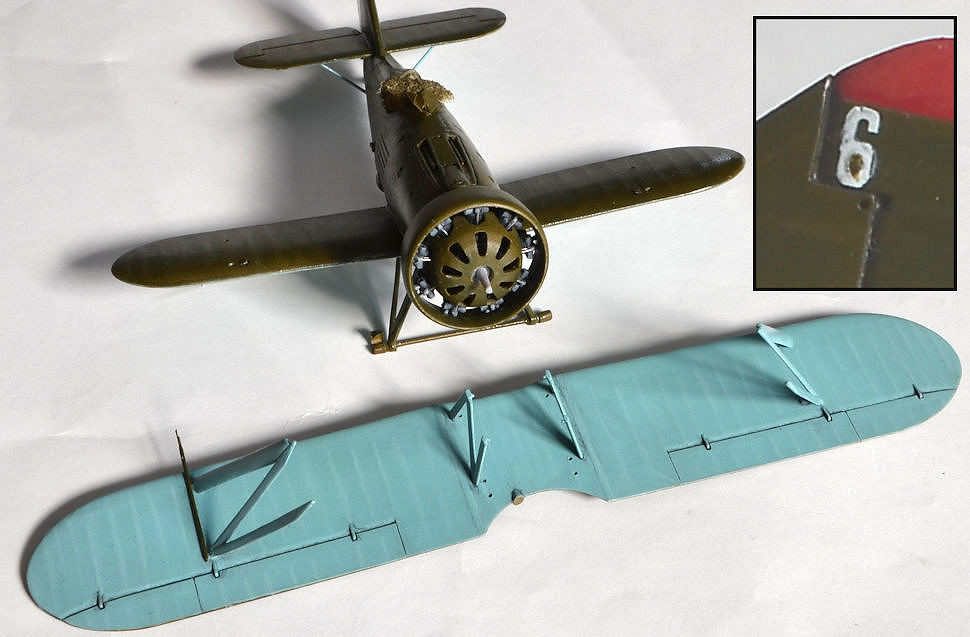
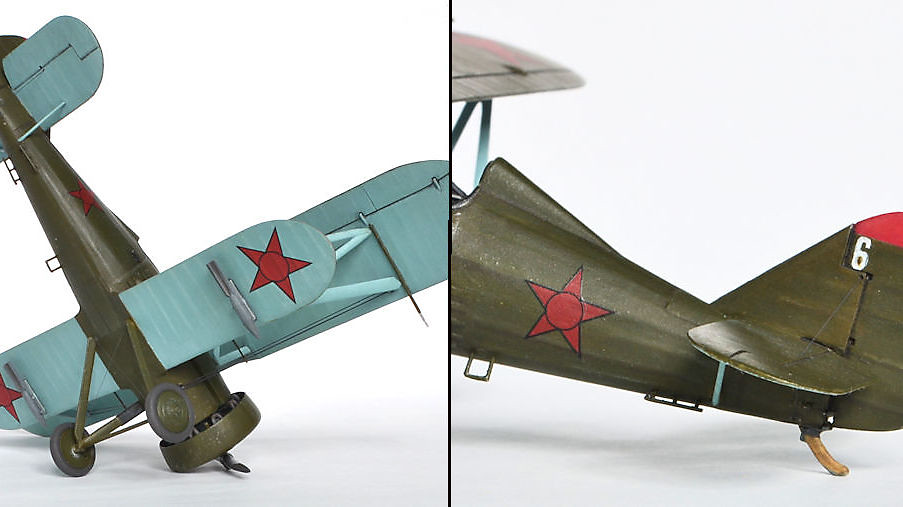
I have covered ICM's decal sheet with Tamiya clear, since I do need a pair of white 6's for the tail.  Again the quality is not there, and the white ink is translucent in many areas.  I have touched up with some white paint, but could do with some more - unless this is suppose to represent hastily applied markings?

27234002183_09b9cc21c9_b.jpg


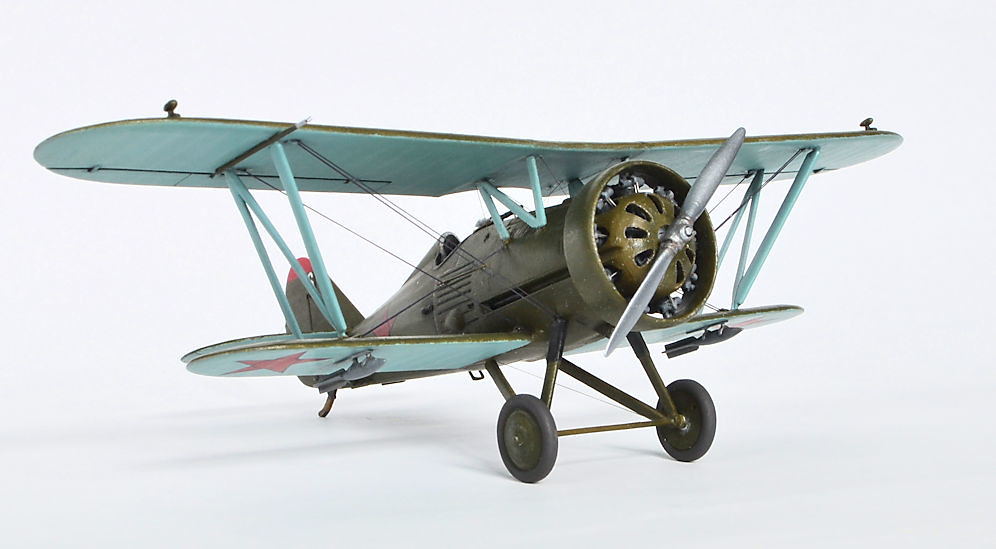
The engine is now mounted, along with the nose plate armour and ring.  Have also applied some Flory wash to pick out details, and applied lightened base colours to the ribs and a few other raised areas.

While waiting for the new decals, The exterior surfaces were sprayed with Vallejo's satin coat, and the following day joined the main wing to the fuselage.  I figured I could work on the rigging, since they would not impede the location of insignia once they arrive.


27668436140_ab962c80de_o.jpg


Above is just a close up of the starboard faring and rigging attachment point, as seen from the rear.


27947622085_fdf1eff032_b.jpg


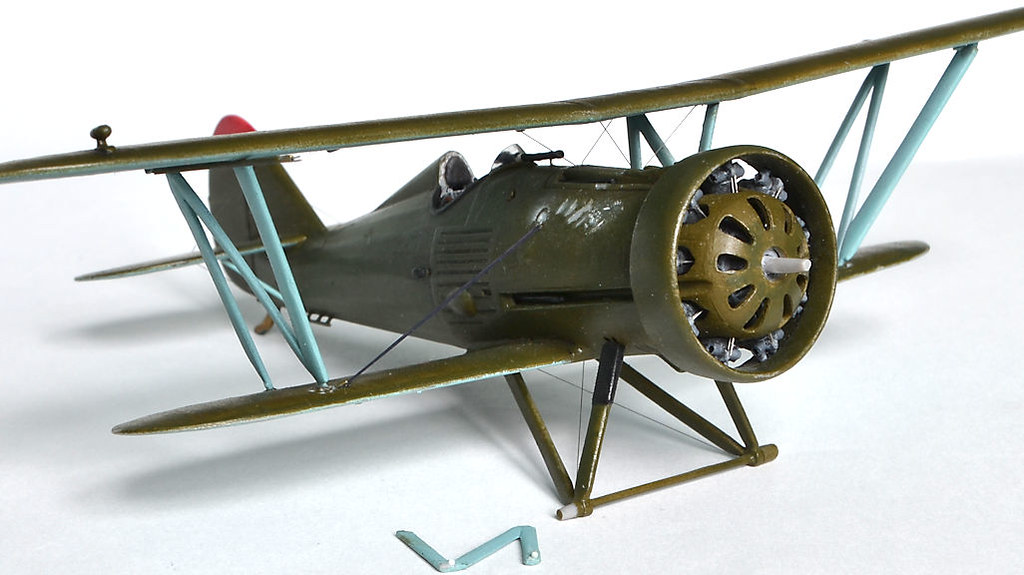
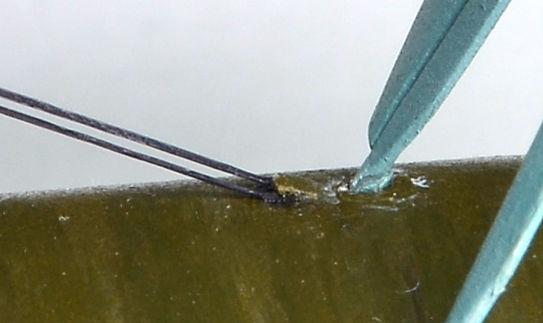
There are four rigging wires above the fuselage where the machine guns are located.  It was impossible to see what I was doing in there, so ended up ripping the top wing off and attaching the bottom end of the wires before putting the wing back on.  It did result in breaking a cabane strut, (seen lying in the foreground), but at least it was a clean break.  

 Another oopsie moment, scraping off left over dried superglue, ended up taking some paint too.  No big deal, at least through it all, the wings remained relatively square to one another.

27356091374_dbfc6e90af_b.jpg

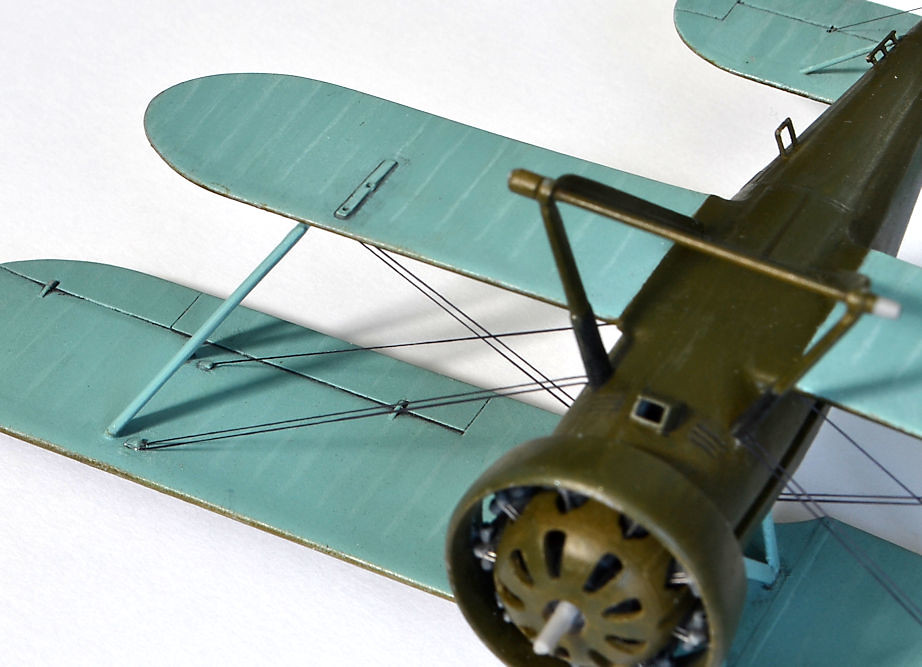
 About the stretchy thread, I used two types.  EZ line fine size for the wings, as these are actually flat wires.   The rest of the rigging was much smaller, but still labeled fine size from Uschi at about 0.08mm.

27410811554_dc8a03b6c2_b.jpg

 Bombs and wheels attached - some of the super glue frosted at the wheel/axle - so needs touching up. 

There was slightly out of registration on the new decals, but became a non-issue.  Was able to trim the overlap of the red, while inside of the black outline, the darkness of the aircraft colour fills in the missing red.


28024672485_22137f7242_b.jpg


All that remains are the navigation lights, some oil stains, and possibly some dusting with powder pigments.

regards,

Jack


  • Member since
    September 2003
  • From: AandF in the Badger State
Posted by checkmateking02 on Friday, July 1, 2016 8:47 PM
Looking very fine, Jack. Your attention to detail is outstanding.


  • Member since
    April 2006
  • From: ON, Canada
Posted by jgeratic on Saturday, July 2, 2016 2:36 PM

Thanks Checkmate, and thank you for hosting this one.  Here are the finished photos of ICM's 1/72 scale Polikarpov I-5:

regards,

Jack

  • Member since
    September 2003
  • From: AandF in the Badger State
Posted by checkmateking02 on Saturday, July 2, 2016 6:34 PM
Absolutely great, Jack. Exquisite rigging and all-around finishing! Thanks for being part of the GB. Always enjoy seeing your craftsmanship. Do you have a preferred photo for the front page?


  • Member since
    April 2006
  • From: ON, Canada
Posted by jgeratic on Sunday, July 3, 2016 9:59 AM

checkmateking02
Absolutely great, Jack. Exquisite rigging and all-around finishing! Thanks for being part of the GB. Always enjoy seeing your craftsmanship. Do you have a preferred photo for the front page?
 

Thanks very much!

For the front page, I like the fourth image.

regards,

Jack

  • Member since
    September 2003
  • From: AandF in the Badger State
Posted by checkmateking02 on Sunday, July 3, 2016 2:27 PM
Front page updated! Thanks for your participation, Jack. Always a pleasure to see your work!


  • Member since
    December 2002
  • From: Bury St Edmunds, Suffolk, England
Posted by Bish on Sunday, July 3, 2016 2:45 PM

Looks really nice there Jack.

I am a Norfolk man and i glory in being so


On the bench: Airfix 1/72nd Harrier GR.3/Fujimi 1/72nd Ju 87D-3

  • Member since
    April 2006
  • From: ON, Canada
Posted by jgeratic on Monday, July 4, 2016 9:28 PM

Thank you, Bish.

-----------------------------

checkmateking02
Front page updated! Thanks for your participation, Jack. Always a pleasure to see your work!
 

Just one small amendment to the front page gallery, the kit description should just be the I-5.  The I-153 was my oringinal plan, but that changed.  Thanks again.

regards,
Jack

  • Member since
    September 2014
Posted by rooster513 on Tuesday, July 5, 2016 7:09 AM

Jack that turned out beautiful!!

I have an update on the 109. Got the paint on her. This was my first attempt at any kind of German camo and I'm ok with the way it turned out. The "tiger stripes" are a little thick on the right side but I like how they turned out on the left. Based on the instructions, the green on the cowling should have been covering the light blue underneath but I must have gotten carried awayWink Based on a picture of the plane I saw online the colors called out in the instructions are not correct but I was looking at this one as more pratice at a different camo style then complete accuracy. Enough talk though...

Gloss coat is on for decaling which will happen in the next day or so I hope. The white on the German crosses are quite yellowed (from age?) so I'll have to mask and paint white over them. Thanks for looking. Comments and critiques always welcome!


-Andy

  • Member since
    April 2006
  • From: ON, Canada
Posted by jgeratic on Tuesday, July 5, 2016 9:52 AM

Thank you rooster 513.

--------------------------

I admire your choice of scheme for a desert Emil.  About the yellowed decals, you can tape them to a window facing the sun.  After 24 hours, it will have bleached out the yellow and should be good as new.

regards,

Jack

  • Member since
    September 2003
  • From: AandF in the Badger State
Posted by checkmateking02 on Tuesday, July 5, 2016 3:31 PM

Very nice work, rooster.  Great looking paint application!

Jack:  I corrected the front-page.  Thanks for letting me know.


  • Member since
    January 2015
Posted by BrandonD on Wednesday, July 20, 2016 6:50 PM

Jack - once again, STUNNING build on that one! It looks fantastic, and the recovery from the decals was really nice.

-BD-

  • Member since
    January 2015
Posted by BrandonD on Wednesday, July 20, 2016 6:51 PM

Well, I finished my 1/48 Trumpeter MiG-3 (unless I pop the canopy off to get that speck of dust out).

I finished this one in Mr. Paint AMT-4 and Gray Blue (or maybe Blue Gray, I can't remember). The nose is Tamiya, and the silver part of the prop is Alclad Polished Aluminum sprayed over a flat black primer so they don't shine toomuch. Chipping is Tamiya Chrome Silver applied with a small brush. It has a Flory Dark Dirt wash overall, which is probably too dark for theunderside. Oh well.

Exhaust pipes were sprayd Mr. Paint Pale Burnt Metal, then the middle parts sprayed Alclad Burnt Iron, with the tips misted with Alclad Jet Exhaust. I've been trying for two years to get an exhaust pipe finish I like, and I think this is pretty close to where I want to be.

If you can use the fourth pic for the completion page, I'd apprecite it.

Thanks for following along!

-BD-

  • Member since
    September 2003
  • From: AandF in the Badger State
Posted by checkmateking02 on Wednesday, July 20, 2016 9:14 PM

Fourth photo it is, Brandon.  It's an exquisite looking plane.  Nice work with it.  Very effective weathering.  The tonal variations on the exhaust stacks are particularly well done, I think.  

Thanks for being part of the GB!


  • Member since
    September 2003
  • From: AandF in the Badger State
Posted by checkmateking02 on Wednesday, July 20, 2016 9:32 PM
Front page updated. I'm sure we're all looking forward to your next one, Brandon--the 1/48 Tamiya Dewoitine D.520.


  • Member since
    April 2006
  • From: ON, Canada
Posted by jgeratic on Wednesday, July 20, 2016 11:02 PM

Brandon, great looking MiG, and I like your approach to the weathering - looks used but not abused. Yes 

Thanks too about my I-5 build.  Our two Soviet fighters make an interesting comparison of the old and new.

regards,

Jack

  • Member since
    January 2015
Posted by BrandonD on Tuesday, July 26, 2016 5:29 PM

Thanks, CheckmateKing and Jack. I appreciate it.

I may swap the D.520 to somthing else, as I ended up with 1944 FFI markings forthe bird and don't actually have what I need for a Vichy scheme on it. But we will see. I do like those Vichy stripes.

-BD-

  • Member since
    January 2015
Posted by BrandonD on Tuesday, July 26, 2016 5:31 PM

Hmm, looking at the builds so far it appears we have four Allied aircraft and one target Big Smile

Maybe I should find a suitable Axis plane to round out my Sovet bird.

-BD-

  • Member since
    September 2003
  • From: AandF in the Badger State
Posted by checkmateking02 on Tuesday, July 26, 2016 9:51 PM

Brandon, whichever side you choose will be fine!


  • Member since
    December 2002
  • From: Bury St Edmunds, Suffolk, England
Posted by Bish on Wednesday, July 27, 2016 1:09 AM

Greta job on the MiG BD. I do like those exhausts. I have struggled to get decent exhausts, i might have to try that.

I am a Norfolk man and i glory in being so


On the bench: Airfix 1/72nd Harrier GR.3/Fujimi 1/72nd Ju 87D-3

  • Member since
    February 2006
  • From: Cincinnati Ohio
Posted by DantheMan85 on Thursday, July 28, 2016 10:15 AM

Excellent work everyone, after finishing up my first sports car deiced to start my StuG. III Ausf. A from Cyber Hobby. Some of the reviews of this older kit I've read are negative, but so far I've had no problems. Very surprised at how well the figures went together, only used a very small amount of putty. This time I used CA glue on the figures to help speed up things, the working time is about ten to fifteen seconds. Learning from my past models with figures I glued there weapons in place, instead of waiting until later. After the putty was dry and sanded, I washed them with soap and water on a Q tip, then I brushed painted on Model Master Gloss Black #1747, as a reshade. Nothing really to note about the upper and lower hull's, no problems with them.


The paint call outs have the StuG commander painted RLM 02, this is the right grey color?


On my Work Bench: Tamiya Ford GT 1/24

Up Coming: ?


  • Member since
    April 2006
  • From: ON, Canada
Posted by jgeratic on Thursday, July 28, 2016 11:08 AM

Dan, looking very good.

Right, have to ammend my post about the uniform colour of the tank commander.  After thorough reading, it was May 1940 that field grey version of the panzer uniform was issued to sturm equipped units.

So the suggestion of RLM02 may not be totally wrong, but I see it more plausible for a late war setting when cloth became more varied in colour and quality.

regards,

Jack


JOIN OUR COMMUNITY!

Our community is FREE to join. To participate you must either login or register for an account.

SEARCH FORUMS
FREE NEWSLETTER
By signing up you may also receive reader surveys and occasional special offers. We do not sell, rent or trade our email lists. View our Privacy Policy.