SEARCH FINESCALE.COM

Enter keywords or a search phrase below:

Floats and Boats: Amphibious Aircraft Group Build

28668 views
865 replies
1 rating 2 rating 3 rating 4 rating 5 rating
  • Member since
    May 2011
  • From: Honolulu, Hawaii
Posted by Real G on Thursday, June 2, 2016 3:34 PM

BrandonD

RealG - Wow, that kit looks like a dog, but you're doing nice work with it, and I can't wait to see it come together. I never even knew there was a jet seaplane before this, which is one of the things I like about this forum.

BrandonD, I hope you get to free up some time to jump back in the pool!

Reality is sometimes stranger than fiction:

https://en.wikipedia.org/wiki/Beriev_Be-10

The Russians actually got their "Seamaster-ski" into service albeit in limited numbers and for a short period of time.  This was a surprise to me as well, as I had never heard of this plane until this year:

http://www.britmodeller.com/forums/index.php?/topic/234997212-172-beriev-be-10-mallow-by-amodel-release-in-2016/?hl=beriev

Uh-oh, another limited run kit!  I'm sure it will be more buildable than the Seamaster though.


“Ya ya ya, unicorn papoi!”

  • Member since
    December 2003
  • From: 37deg 40.13' N 95deg 29.10'W
Posted by scottrc on Thursday, June 2, 2016 5:25 PM

Hey Brandon, there with you buddy, I hoped to start the final finish on my goose, but what started out as planting a few flowers with my wife a few weeks ago soon morphed into a full fledge landsaping project that has taken a lot of time.

Scott

  • Member since
    May 2011
  • From: Honolulu, Hawaii
Posted by Real G on Friday, June 3, 2016 9:48 PM

I really love the globby cockpit Mach 2 provides for the Seamaster!  Makes me think of a Salvador Dali painting.

https://flic.kr/p/HEwhkb] [/url]Seamaster-14 by N.T. Izumi, on Flickr

Some 0.040" sheet plastic to the rescue.  I used a contour gauge to lay out bulkheads (very badly I might add) to allow the cockpit to be more accurately positioned within the fuselage halves.  There is no molded locator for the floor on the right fuselage, so it's anyone's guess where it would end up.

https://flic.kr/p/HoRmQE] [/url]Seamaster-16 by N.T. Izumi, on Flickr

Some bits of styrene help keep the assembly from shifting and rotating.

https://flic.kr/p/HEwfs3] [/url]Seamaster-17 by N.T. Izumi, on Flickr

I am still thinking about how to represent the control panels (decals or built-up).  I plan on sourcing ESCAPAC resin seats to replace the kit "approximations".  The instrument shroud will probably need to be cut away and rebuilt too.

“Ya ya ya, unicorn papoi!”

  • Member since
    May 2011
  • From: Honolulu, Hawaii
Posted by Real G on Friday, June 3, 2016 10:38 PM

I think the beaching gear will end up mostly scratchbuilt, as it looks to be too much work to clean things up and straighten them out.  I glued the fore & aft connecting pieces and they do not look pretty.

https://flic.kr/p/HEwepb] [/url]Seamaster-18 by N.T. Izumi, on Flickr

https://flic.kr/p/HGXa9p] [/url]Seamaster-19 by N.T. Izumi, on Flickr

Anyway, work will continue with the cockpit so that the fuselage halves can be closed up.  Things will go faster after that.

“Ya ya ya, unicorn papoi!”

  • Member since
    June 2014
Posted by BrandonK on Friday, June 3, 2016 11:41 PM

RG, you certainly have some challenges there, but it looks like you are making really good progress on it and it will certainly be one of the best Seamasters out there. Nice work.

BK

On the bench:

A lot !! And I mean A LOT!!

2024 Kits on deck / in process / completed   

                         14 / 5 / 2  

                              Tongue Tied

  • Member since
    April 2005
  • From: Australia
Posted by taxtp on Saturday, June 4, 2016 2:04 AM

I was looking through my stash for the Wildcatfish kit last night, but didn't find it. Perplexing. I'll keep looking for now. If I don't find it, I'll swap it out for something else.

I'm really glad I called in here, I didn't know anything about the Seamaster until a few moments ago. Fascinating aircraft, great project. I'll follow it with interest.

Cheers

Tony

I'm just taking it one GB at a time.

  • Member since
    March 2006
Posted by simpilot34 on Monday, June 6, 2016 12:55 AM

Hey RG, hope this suggestion isn't too late?! Was thinking maybe you could cut off the instrument panel and dress it up a little and use it with your better looking office? The detail thats there isn't too bad actually.2 cents

Cheers, Lt. Cmdr. Richie "To be prepared for war, is one of the most effectual means of preserving the peace."-George Washington
  • Member since
    April 2005
  • From: Australia
Posted by taxtp on Monday, June 6, 2016 1:39 AM

Found the Wildcatfish kit, so looking forward to making a start.

Cheers

Tony

I'm just taking it one GB at a time.

  • Member since
    March 2006
Posted by simpilot34 on Monday, June 6, 2016 8:35 AM

RG!!! Don't know if you've seen this or not but here is a link to scale plans for the Seamaster! lol Sorry got a bit excited. Some excellent drawings for floaters on the site.

http://www.seawings.co.uk/seamasterplangal.htm

Tony I saw a pic or two of that rare bird. Look forward to seeing yours come together!

Cheers, Lt. Cmdr. Richie "To be prepared for war, is one of the most effectual means of preserving the peace."-George Washington
  • Member since
    December 2002
  • From: Bury St Edmunds, Suffolk, England
Posted by Bish on Monday, June 6, 2016 4:10 PM

G, that kit pit looks fine to me Big Smile.

Lok like you have your work cut out there but your getting to grips with it.

I am a Norfolk man and i glory in being so


On the bench: Airfix 1/72nd Harrier GR.3/Fujimi 1/72nd Ju 87D-3

  • Member since
    May 2011
  • From: Honolulu, Hawaii
Posted by Real G on Monday, June 6, 2016 7:00 PM

Guys,

Thanks for the support!  Simpilot34, thanks for the link!  Now I have a baseline to compare the model to.  The kit cockpit is a total write-off, as I am finding more things that are wrong.  BTW, this is how the kit instrument panel looks:

https://flic.kr/p/CH88WD] 
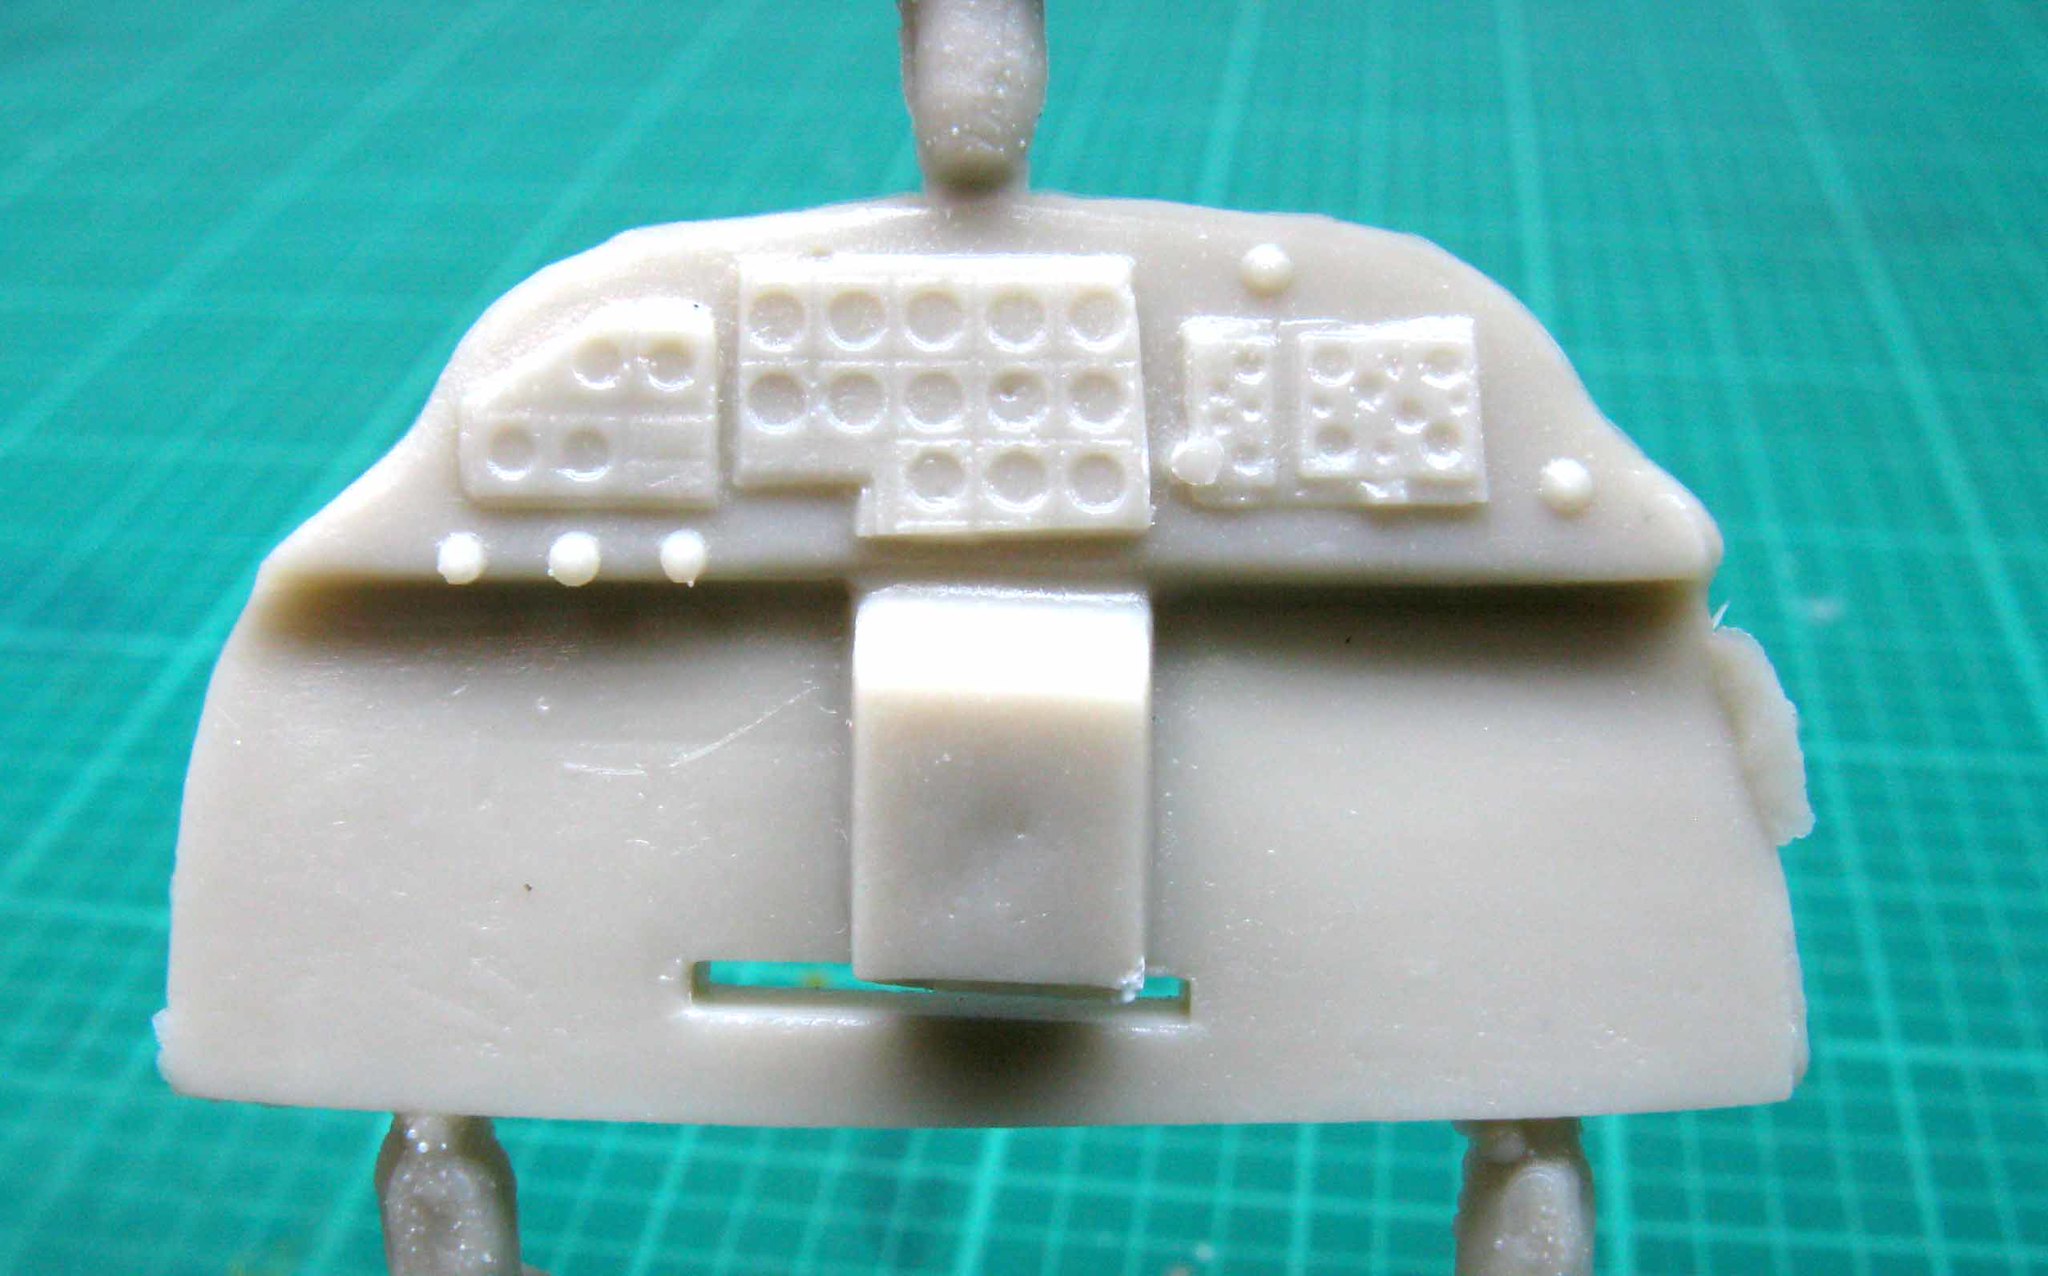
[/url]Seamaster-04 by N.T. Izumi, on Flickr

The other photo I posted does not convey the ooey-gooey-ness of the kit!  Stick out tongue  The IP shroud is really thick, so the plan is to vac form a new one and fit a sheet plastic panel to it.  I have just found out that the seats are supposed to be closer together, and the rear bulkhead needs to be moved up to the canopy cut line.  I have True Details Escapac seats coming in, so I need to wait for them to make sure the consoles are put in the right place.  For the rear bulkhead, I'll just make another and paste it over the one I already made.  I also ground off the molded-in boxes on the fuselage sides, as there are supposed to be regular side consoles there.  I'm a measure once (or not at all) and cut twice kind of guy, so it's all good.

While waiting for the seat, I'll work on fixing the tail group.  There are globs in the control line recesses that really put me off when I got the kit, but the solution is simple.  I used to wonder why the guys in the model mags cut away control surfaces only to reglue them in the neutral position, but that is how I will sharpen up the definition and correct the hinge lines on the Seamaster.

https://flic.kr/p/HNCZWB] 
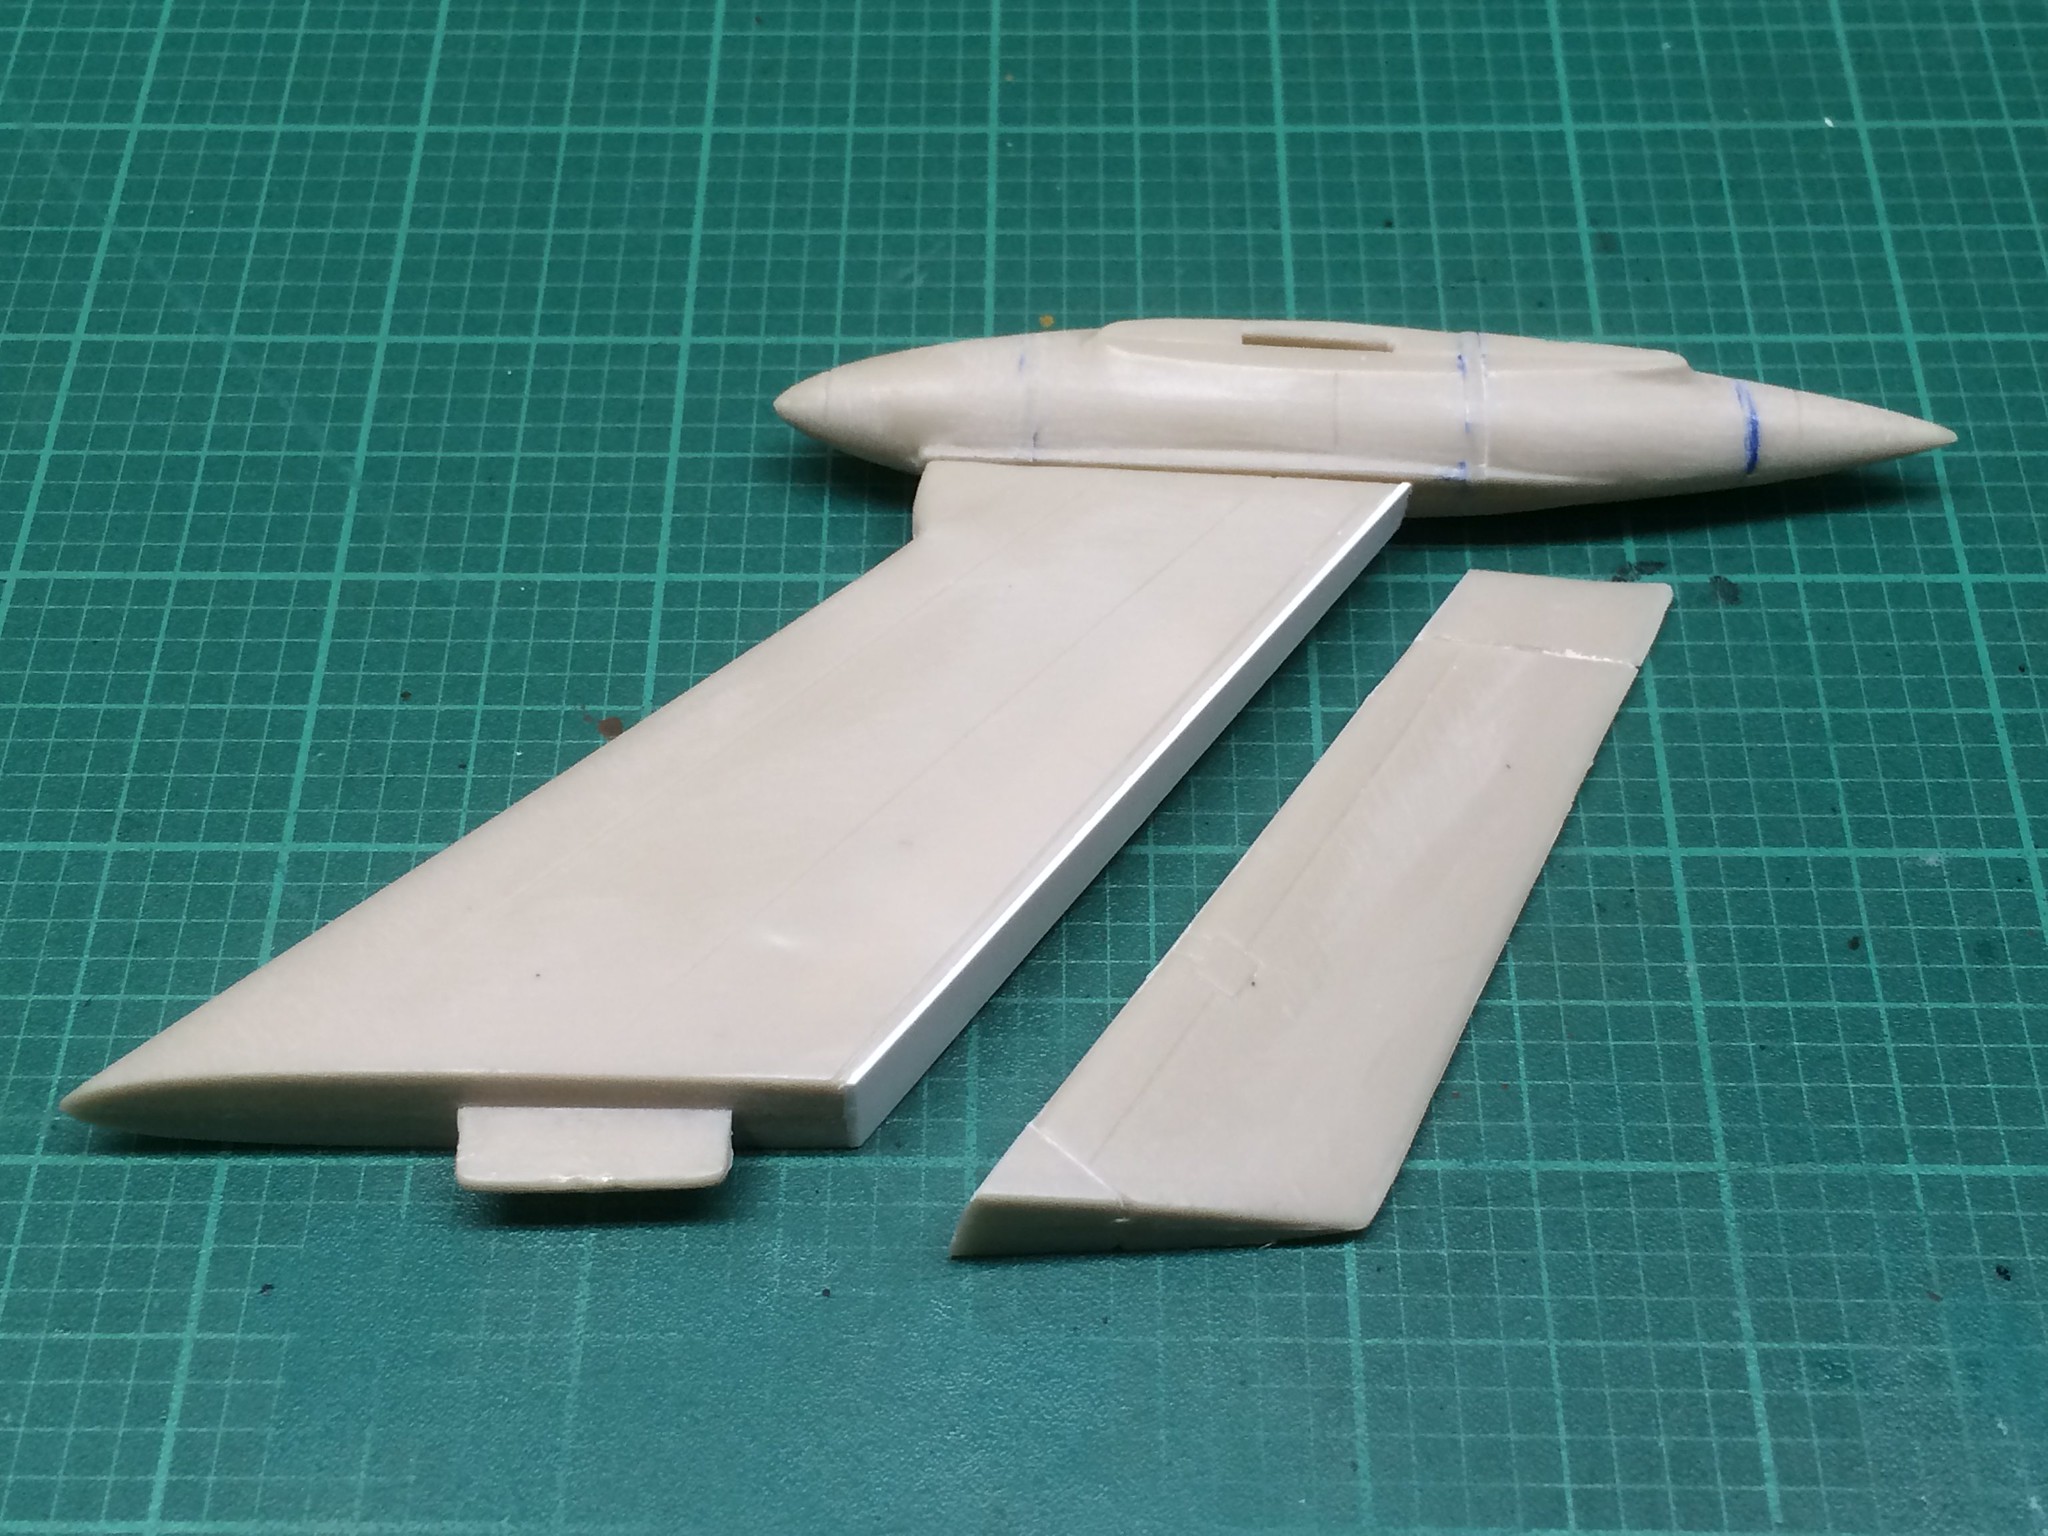
[/url]Seamaster-20 by N.T. Izumi, on Flickr

For an easy clean line, I just made a cut all the way across the rudder.  The top and bottom bits will be added back to the fin later on.  i also discovered that the base of the fin has a rectangular fairing, so the taper at the trailing edge will need to be replaced.

https://flic.kr/p/HRYvUS] 
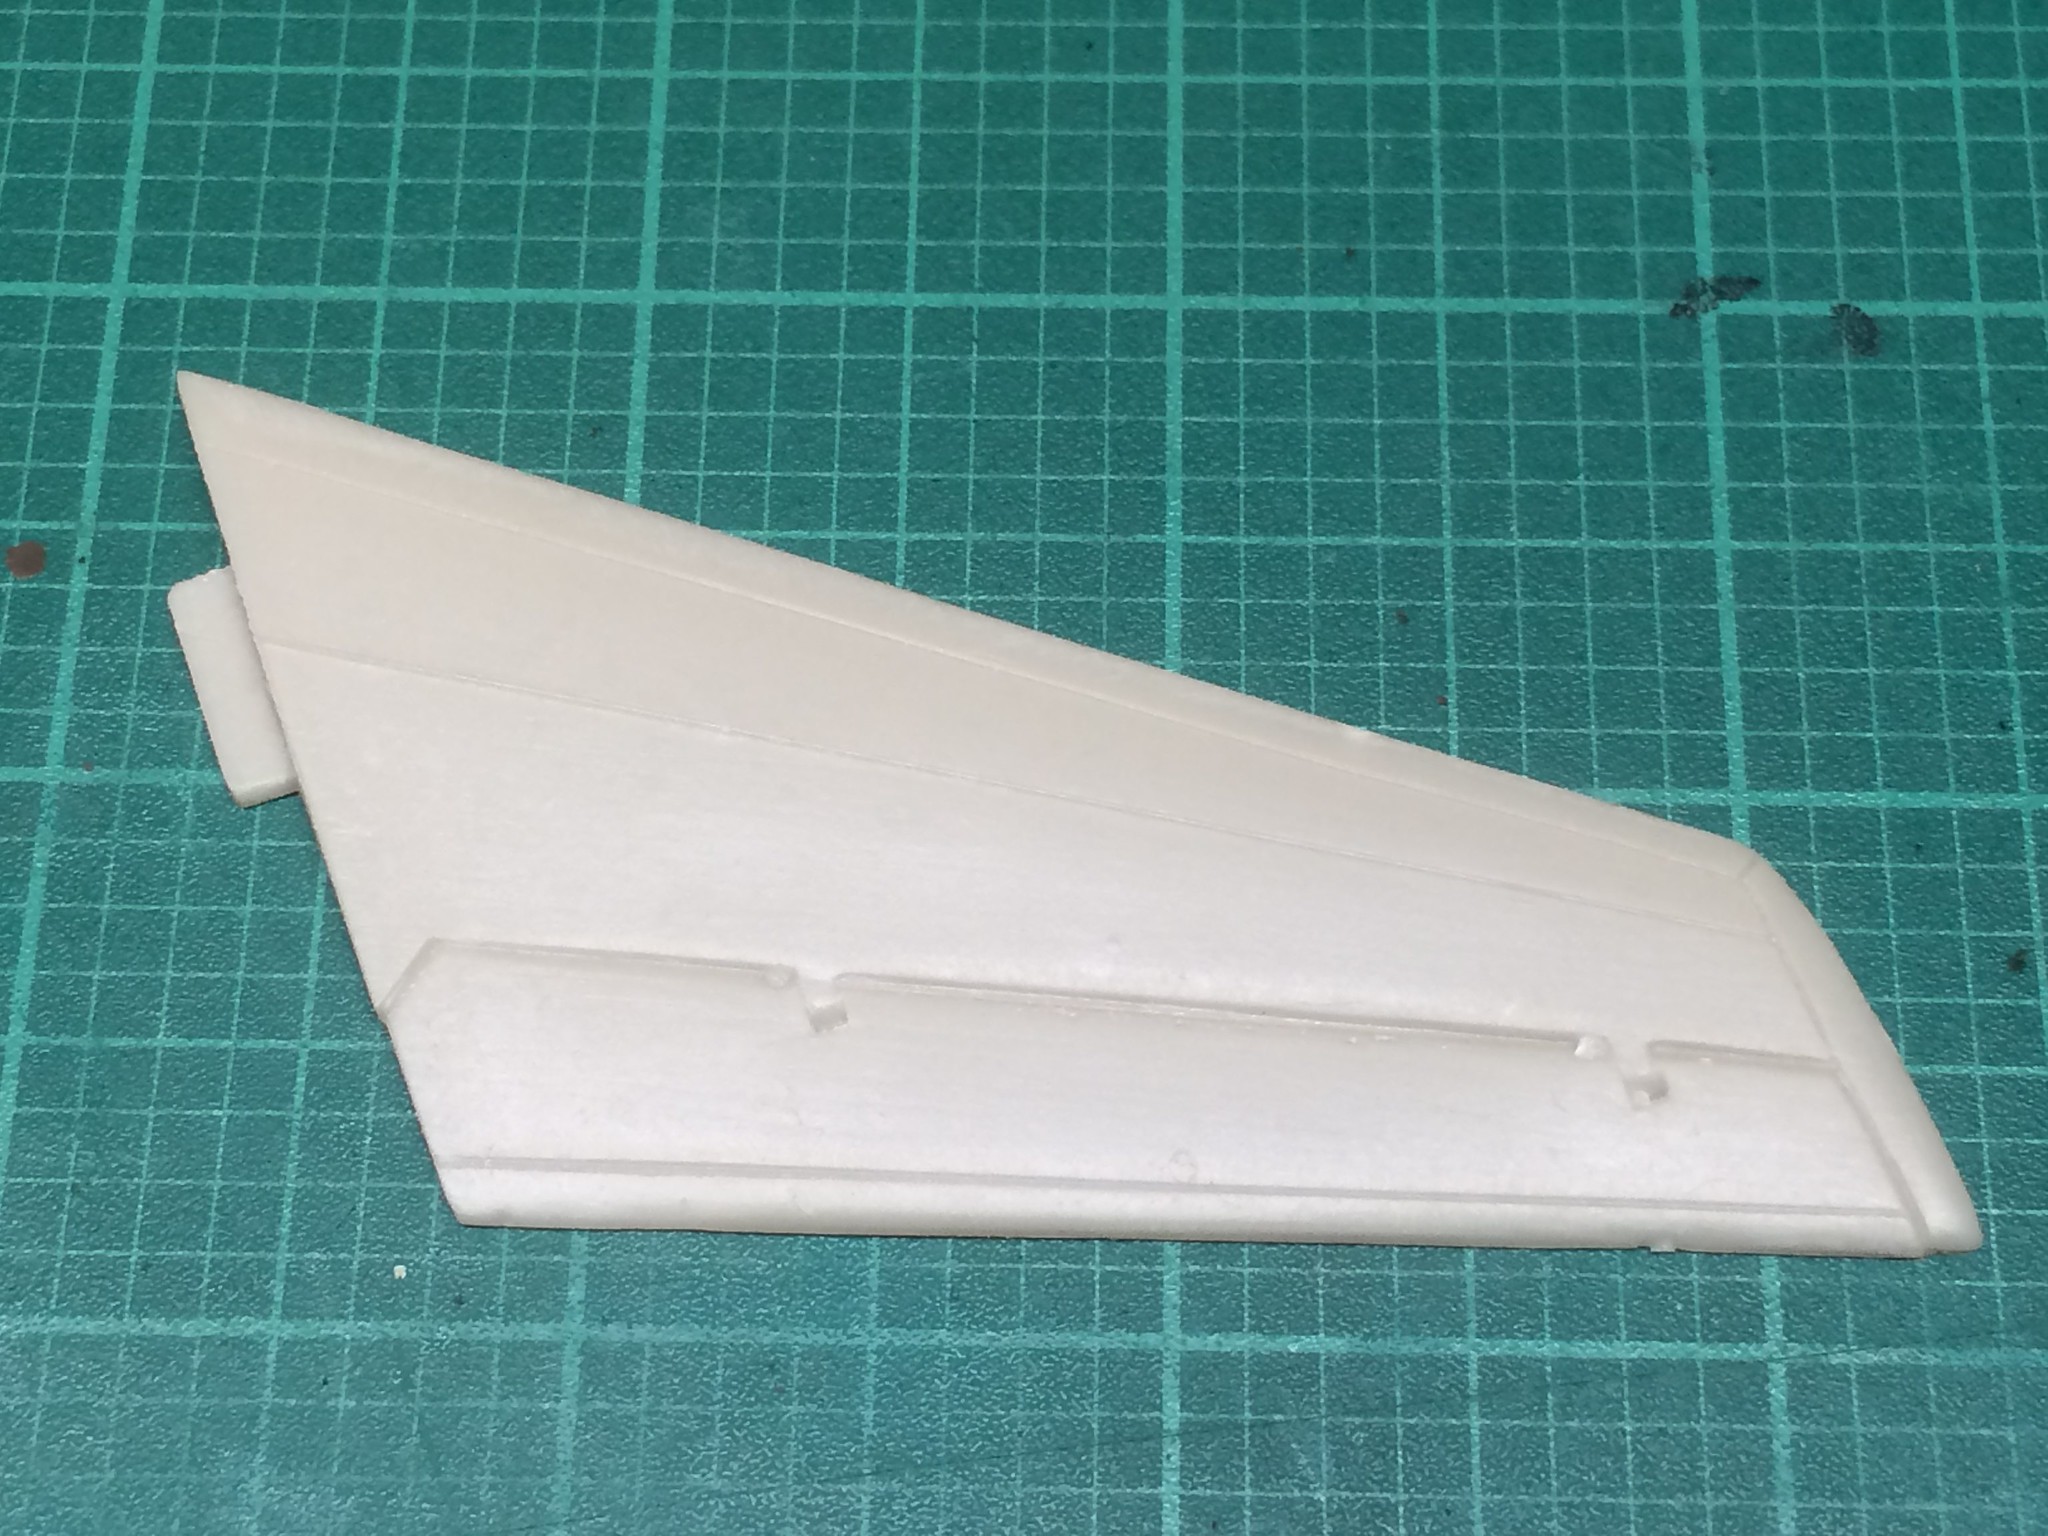
[/url]Seamaster-22 by N.T. Izumi, on Flickr

The elevator hinges will also need to be corrected, as they are supposed to be perpendicular to the break line.  Which is fine, as they really needed to be sharpened up.  It's all good fun!

Taxtp, good luck on your Wildcatfish!


“Ya ya ya, unicorn papoi!”

  • Member since
    July 2009
  • From: lafayette la
Posted by 40.mm on Wednesday, June 8, 2016 10:42 PM

Dear Sir,s i would like to join this GB if you have room for one more ?

My entry would be a 1/48 Glencoe JF-2 Duck .


                                            The Original

                                 Mike Oscar Julet Oscar 

                                          Outcast !

               End Transmission-Semper Fi !

http://www.vairhead.net/forum/dhg.jpg

  • Member since
    July 2014
Posted by modelcrazy on Wednesday, June 8, 2016 11:26 PM
40.mm there’s always room for more, BK will get you up as soon as he can.
Well I replaced the needle valve on the airbrush because the old one was bent. That’s OK for one color but stinks when you’re trying to do a scheme like this.
So here’s the Mariner is so far. I need to install the turrets and canopy, gloss coat it, start the decaling and weathering. The water will have cotton wave peaks and spray added.

Steve

Building a kit from your stash is like cutting a head off a Hydra, two more take it's place.


http://www.spamodeler.com/forum/

  • Member since
    December 2002
  • From: Bury St Edmunds, Suffolk, England
Posted by Bish on Thursday, June 9, 2016 1:07 AM

Great work there Steve, the model is really coming on nicely and i like the wake effect.

I am a Norfolk man and i glory in being so


On the bench: Airfix 1/72nd Harrier GR.3/Fujimi 1/72nd Ju 87D-3

  • Member since
    April 2005
  • From: Australia
Posted by taxtp on Thursday, June 9, 2016 1:11 AM

That's looking good so far Steve.  I like it a lot.

This is the box art for my Wildcatfish.

Cheers

Tony


I'm just taking it one GB at a time.

  • Member since
    March 2006
Posted by simpilot34 on Thursday, June 9, 2016 1:54 AM

G she's coming along fine mate! Like the surgery your doing, looks much better now.

MC your lil lady keeps getting better and better! Love the paint scheme with that base! Man, can't wait to see her bout to liftoff!

Tony that will be a rarely seen kit, real or model lol. Looking forward toseein that come together.

Cheers, Lt. Cmdr. Richie "To be prepared for war, is one of the most effectual means of preserving the peace."-George Washington
  • Member since
    June 2014
Posted by BrandonK on Thursday, June 9, 2016 9:12 AM

40.mm
i would like to join this GB

Welcome aboard, there is always room, whether there is time is another matter. Looking forward to seeing your work.

BK

On the bench:

A lot !! And I mean A LOT!!

2024 Kits on deck / in process / completed   

                         14 / 5 / 2  

                              Tongue Tied

  • Member since
    July 2009
  • From: lafayette la
Posted by 40.mm on Thursday, June 9, 2016 2:51 PM

Thank you sir - Time i have lots of that.. 

http://www.vairhead.net/forum/dhg.jpg

  • Member since
    May 2011
  • From: Honolulu, Hawaii
Posted by Real G on Thursday, June 9, 2016 3:50 PM

OMG Tony, your Wildcatfish is from A-Model!  Welcome to the hard-to-build model club!  Stick out tongue

Steve, that Mariner is looking very nice!

“Ya ya ya, unicorn papoi!”

  • Member since
    April 2005
  • From: Australia
Posted by taxtp on Thursday, June 9, 2016 6:09 PM

Real G

OMG Tony, your Wildcatfish is from A-Model!  Welcome to the hard-to-build model club!  Stick out tongue


I think you're right Real G. Have a look at the photo of me holding the float halves together. They're bent outwards like a banana !

Cheers

Tony

I'm just taking it one GB at a time.

  • Member since
    May 2011
  • From: Honolulu, Hawaii
Posted by Real G on Thursday, June 9, 2016 7:32 PM

Tony,

Would your project go faster (i.e. easier) if you used an Airfix Wildcat and modified it to take the float struts and ventral fin?  It's pretty cheap and probably the best 1/72 Wildcat out there.  (But where would the fun be in THAT?  Cool  )

Meanwhile back at the Seamonster hangar, I had to raise the floor and move the rear bulkhead foward, as the kit locations were wrong.  Why didn't I check before?  Because I am a measure once, cut twice guy!  Embarrassed

https://flic.kr/p/HXiLPU] [/url]Seamaster-28 by N.T. Izumi, on Flickr

BTW, the kit is really wavy and uneven, so I have been using stretched sprue to fill the realy bad stuff.  Since the material is identical to the kit, it blends in and will not flake off like putty.  I had a (dim) lightbulb moment last night and realised that if the sprue is heated then flattened out before re-heating and stretching, a thin ribbon of plastic results.  The shallow dimples in the kit now get plated over very quickly versus using round section sprue.  Yes, I could use sheet plastic strip, but the color difference would make it hard to judge subtle contour irregularities.

https://flic.kr/p/HXiR8J] [/url]Seamaster-23 by N.T. Izumi, on Flickr

Did I mention the kit's fit is bad?  The fin base molded to the fuselage does not match the fin cross section.  Not a biggie, as the base can be carved and sanded to match, but this is just another highlight of tackling this super-fun kit!  Stick out tongue  Okay, a confession:  The fin actually matched up with the base, but I savagely reprofiled it into something resembling a fin leading edge from a Mach 0.9 capable airframe.

https://flic.kr/p/H5x8ji] [/url]Seamaster-27 by N.T. Izumi, on Flickr

I can't wait to finish up the cockpit, as that means the fuselage can be zipped up and work can be shifted to the airframe!


“Ya ya ya, unicorn papoi!”

  • Member since
    July 2014
Posted by modelcrazy on Thursday, June 9, 2016 10:04 PM

Ooooo, I love the Duck.

Steve

Building a kit from your stash is like cutting a head off a Hydra, two more take it's place.


http://www.spamodeler.com/forum/

  • Member since
    April 2005
  • From: Australia
Posted by taxtp on Thursday, June 9, 2016 10:09 PM

I like the look of that Duck, I'lleventually get to one in 1/72.

Real, I am considering using some parts from the Airfix kit, which is sitting conveniently in my stash. I just haven't worked it all out as yet. Thanks for a good idea.

Cheers

Tony

I'm just taking it one GB at a time.

  • Member since
    June 2014
Posted by BrandonK on Thursday, June 9, 2016 11:50 PM

I love the Duck also, and yes that IP is rather sparse. But, I can feel you're gonna do some awesome work on this one. Dang, this GB is really fun.

BK

On the bench:

A lot !! And I mean A LOT!!

2024 Kits on deck / in process / completed   

                         14 / 5 / 2  

                              Tongue Tied

  • Member since
    March 2006
Posted by simpilot34 on Friday, June 10, 2016 6:09 AM

RealG I must say your office is coming along nicely! AND Sir, that is an excellent idea about flattening the stretched sprue when sheet isn't readily at hand. Well done!

40mikemike Looking forward to your Quacker! That is another plane that just looks right! Have the Airfix one in 1/72, Not the best kit I must say but the only one I could get in that scale. Will have to scrounge or make a prop out of spares, the kit one is just not happening.

Cheers, Lt. Cmdr. Richie "To be prepared for war, is one of the most effectual means of preserving the peace."-George Washington
  • Member since
    July 2014
Posted by modelcrazy on Friday, June 10, 2016 7:23 AM

Simplot,

Here's my Airfix one. The canopy doesn’t fit if you close it with the pilots and the decals are very thick and tend to silver. Everything else about it sees decent. My prop of course didn’t matter.


This was my first water build by the way.

Steve

Building a kit from your stash is like cutting a head off a Hydra, two more take it's place.


http://www.spamodeler.com/forum/

  • Member since
    August 2015
  • From: the redlands Fl
Posted by crown r n7 on Friday, June 10, 2016 8:39 AM

Nice finish ! Like the movie murphy's war but American markings and not in a river  great job 


 Nick.

  • Member since
    March 2006
Posted by simpilot34 on Friday, June 10, 2016 8:49 AM

MC that Quacker looks great! I just don't have the gumption to try a water base...yet! Have a lil stable of floaters that would benefit from it though. Especially an Alaskan seaplane base or something as I have an Otter, Beaver, Norseman, and an An-2 Colt floater.

Cheers, Lt. Cmdr. Richie "To be prepared for war, is one of the most effectual means of preserving the peace."-George Washington
  • Member since
    December 2002
  • From: Bury St Edmunds, Suffolk, England
Posted by Bish on Friday, June 10, 2016 1:00 PM

I realised last night its been nearly two weeks sinc ei updated. I don't where the time has gone and despite haveing the build nearly complete, i don't seem to have done much. So, here is a short update before the final pics.

The aircrfat itself didn't ned much work to get it finishe. I used some Flory Wash, especially long the water line, to get the look i wanted. Then it was just some exhaust staining and all the last pieces were added.

The beaching trolley is now ready for the aircraft to be added.

And the SS 100 just needs a few more pieces fitted.

And the base has realy come on. I wanted to change from the darker grey concrete i have been doing on aircrfat builds. I found a tutorial online that i really liked the look of so gave that a try.I am much happier with this finish.

And for the wtaers edge, i started with some flory washes and then added some Woodland fine turf for algea and then wodland realistic water. After that dried i use some water effects fr ropples. This is suppose to dry clear but a few bits have stayed white. But i still have a bit more to add to this.

So, just got to finish the water, add everything to the base and a couple more figures.


I am a Norfolk man and i glory in being so


On the bench: Airfix 1/72nd Harrier GR.3/Fujimi 1/72nd Ju 87D-3

JOIN OUR COMMUNITY!

Our community is FREE to join. To participate you must either login or register for an account.

SEARCH FORUMS
FREE NEWSLETTER
By signing up you may also receive reader surveys and occasional special offers. We do not sell, rent or trade our email lists. View our Privacy Policy.