SEARCH FINESCALE.COM

Enter keywords or a search phrase below:

2016 OTS (1/72) SMALL IS BIG

24617 views
566 replies
1 rating 2 rating 3 rating 4 rating 5 rating
  • Member since
    January 2016
  • From: Salt Lake City, Utah
Posted by Sailor Steve on Monday, June 13, 2016 10:01 PM

Harriers are cool, and that one certainly does the adjective proud.

  • Member since
    December 2002
Posted by Bossman on Monday, June 13, 2016 10:17 PM

Thanks Lew and Steve !

Lew - nice grab !   A Squadron scratch/dent/and return sale ?  You gotta be kiddin me !  I don't suppose they make it up here to New York very often.  

Chris

  • Member since
    July 2014
Posted by modelcrazy on Tuesday, June 14, 2016 1:48 PM
Now that is a beautifully executed build Chris Bow Down What a little gem you have in your hands.

Steve

Building a kit from your stash is like cutting a head off a Hydra, two more take it's place.


http://www.spamodeler.com/forum/

  • Member since
    December 2002
Posted by Bossman on Tuesday, June 14, 2016 4:53 PM

Thanks Steve - the Mariner is gorgeous and the diplay base is most excellent !  That's a very striking diorama.  For a static display - it seems full of motion. 

Chris

  • Member since
    April 2005
  • From: Australia
Posted by taxtp on Wednesday, June 15, 2016 9:41 PM

MC, thats probably the best depiction of motion I've seen in a static aircraft model. Congratulations on a quality piece of work.

Chris, thats a very cleanly executed Harrier. It's an aircraft that I love, and you've motivated me to build another.

I've progressed my Hunter and the two Spitfire XIXs. The Spit just got a coat of primer, so no photos, but most of the spraying is done on the Hunter.

Cheers

Tony


I'm just taking it one GB at a time.

  • Member since
    March 2006
Posted by simpilot34 on Thursday, June 16, 2016 7:45 AM

Bossman- Yeah I was luck with my fingerprint too! I gently sanded away the print with 1000 grit and of course the paint and the gloss went and so did the print! woohooSmile Because I put the glue on and then repositioned my hand to better hold the wing almost immediately, so the glue only got the paint, WHEW!

Love your little gem of a Harrier!! Very nicely done! I know it's a bit late but, as I was looking at your pics, I thought something just didn't quite look right, then the penny dropped, it's the canopy position. I googled a pic to make sure.

MC-WOWBow Down What a stunning finish to a stunning build!! You'll flood the competition with that one! Pardon the punWhistling

Tony- The Hunter is really starting to take on it's character now! Nice colors!

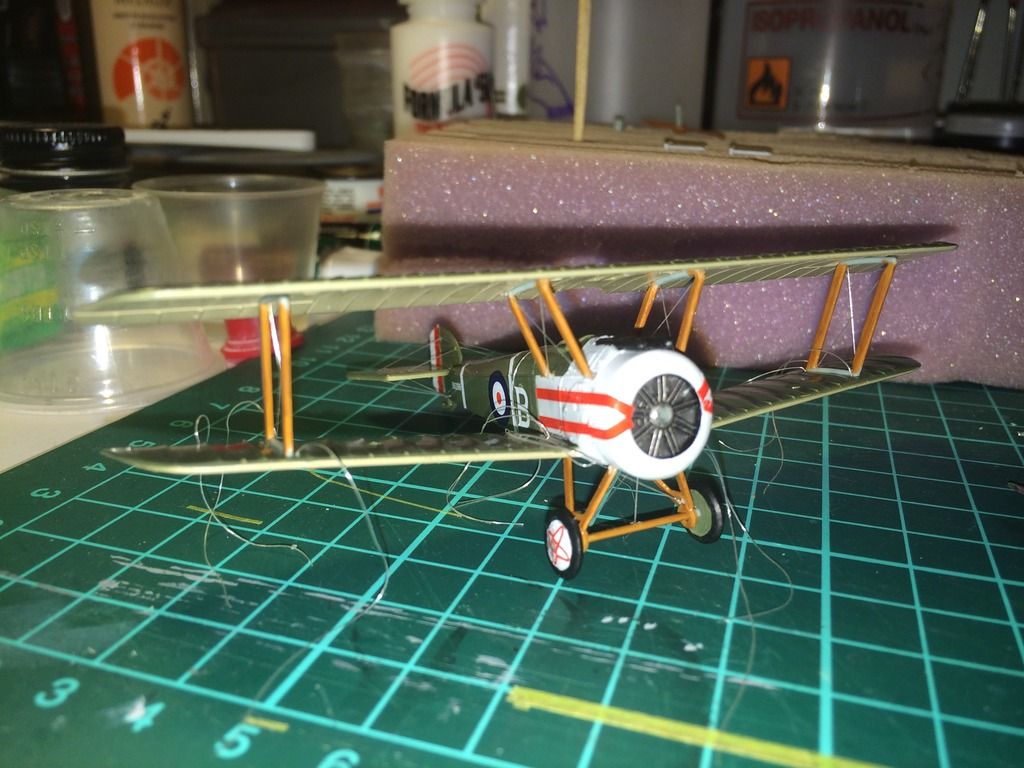
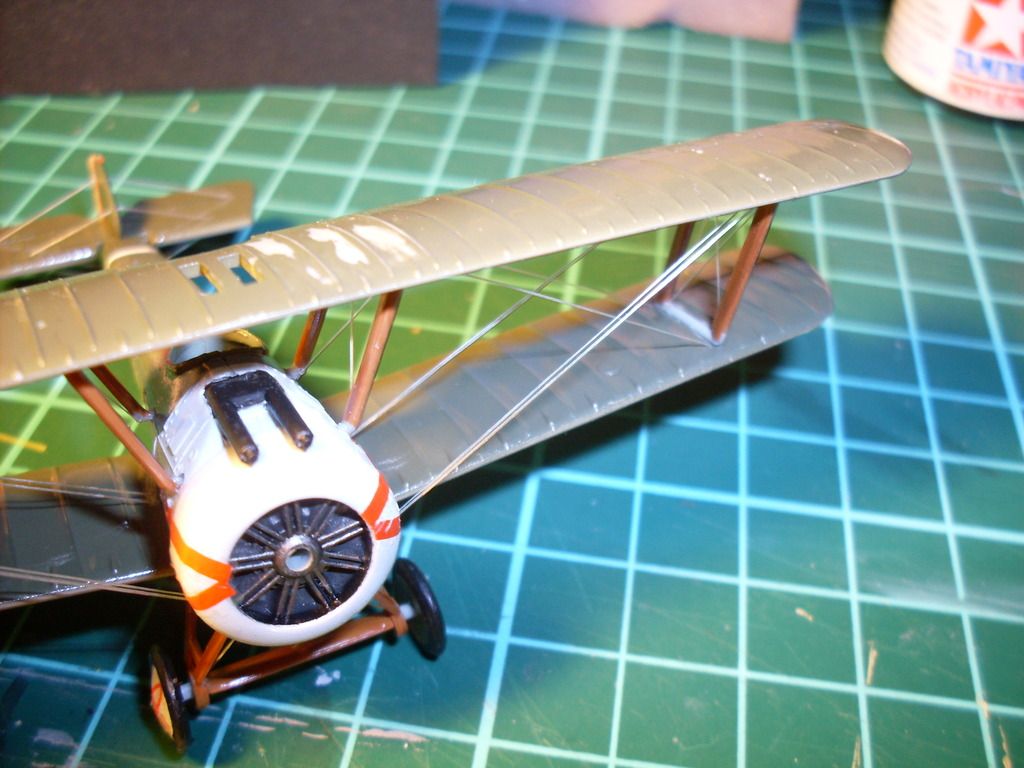
After my finger print removal and reattaching of the cabanes to the fuse, I glued the outer struts on, let them dry and then glued the top part of the struts. They had a lil bit of a gap at the front as the incedence of the top wing wasn't quite kosher. put glue in and taped them overnight, then after work today, I sat down and sewed this thing together lol almost literally, yes, the wing rigging is done! Now just have to put the oddly angled cross rigging above the guns. Was wondering how I was going to do that, decided in this scale I think I can get away with draping a piece across the top then have the bottom piece come off one side, over the top piece then pull tight enough to give the right look and attaching to other side. Tiny dob of glue for the knuckle looking bit. When nearly finished I will go over it and do touchups. Anyways here's a few pics.Toast

Cheers, Lt. Cmdr. Richie "To be prepared for war, is one of the most effectual means of preserving the peace."-George Washington
  • Member since
    December 2002
Posted by Bossman on Thursday, June 16, 2016 9:50 PM

Thanks Tony,  The Hunter looks great.  The highlighting colors are striking.  I just checked out the 2015 OTS GB for the first time tonight.    I guess you really like Hunters !

Sim,  Thanks so much for the pic.  It shows me three things.  First, I need to make the correction - the canopy needs to ride on the edge of the cockpit - not hang out in space like it does now.  Second, I guess the canopy doesn't open up very wide.  I'm assuming your pic shows it fully open (?)  So at least I wont run into a problem there.  Third . . . that's a mighty glossy finish !  DOH !   If I get really ambitious I might go to the trouble of putting on a satin finish.  I'm not sure why - but in this scale, a full gloss finish just doesn't look right to me.

Nice rigging on the Camel - I guess you got over that hump !

Chris

  • Member since
    December 2002
Posted by Bossman on Saturday, June 18, 2016 2:32 PM

Harrier canopy corrected !

Thanks Sim !

So I've been giving some thought on what to do next . . .  I was thinking it would be kinda lame to just finish off another mostly built kit.  After all, this is a group BUILD.  So I'll start something new and different.  

I picked up the MPM A-20 Havoc kit at a show about a year ago for $15 from a guy who was selling stuff from his stash.  It was quite a steal as it came with an extra set of Zotz decals with some nice artwork, and a very nice Eduard photoetch fret.  The only issue is that there are a few decals cut from the kit supplied page of decals.  I havent figured out which decals were removed yet, but I'm sure I can figure something out.

I don't think I've ever seen a 1/72 A-20 kit built before - so it's kinda unique.

Here she is:

Nice molded and recessed detail including cockpit sidewalls.

Sweet Photoetch !

This one may take alot longer.  There's more gardening and housework to do now that the weather is nice.  But there are always rainy days. StormSmile

See ya,

Chris

  • Member since
    July 2014
Posted by modelcrazy on Saturday, June 18, 2016 3:21 PM

The Harrier looks great on the base. I'm looking forward to the Havoc. 

Steve

Building a kit from your stash is like cutting a head off a Hydra, two more take it's place.


http://www.spamodeler.com/forum/

  • Member since
    December 2002
Posted by Bossman on Saturday, June 18, 2016 9:28 PM

Thanks Steve,

It's the only grass base I have - so I use it for all the glamour shots of A/C that might land on a grass field.

The other day I thought of your work with the water base when I was watching a different kind of "water landing".  It was video of a P-39 from the Aleutians landing on Adak Island.

They say there was about a 1/2 foot of water on the runway.  The nosewheel was kicking up a rooster tail of spray that covered most of the plane - with just the nose and the wingtips poking out.  

Check it out - from around the 2:00 to 2:30 mark.

https://www.youtube.com/watch?v=yOX_M8-q62A

That would be a challenging dio !

Chris

  • Member since
    July 2014
Posted by modelcrazy on Saturday, June 18, 2016 10:34 PM

Wow thanks Chris, it sure would. It looks like they are landing on a lake and it probably felt like that to.

I just may have to try that. 

Steve

Building a kit from your stash is like cutting a head off a Hydra, two more take it's place.


http://www.spamodeler.com/forum/

  • Member since
    December 2002
  • From: Bury St Edmunds, Suffolk, England
Posted by Bish on Sunday, June 19, 2016 4:56 PM

Lovely job on the Harrier Chris.

I am a Norfolk man and i glory in being so


On the bench: Airfix 1/72nd Harrier GR.3/Fujimi 1/72nd Ju 87D-3

  • Member since
    April 2010
Posted by Theuns on Tuesday, June 21, 2016 5:10 AM

Wayne, please put me down for this one.

The new tool airfix 1/72 Fokker E3.

I hope I can got it built in a week or two.


Theuns

  • Member since
    August 2015
  • From: the redlands Fl
Posted by crown r n7 on Tuesday, June 21, 2016 9:23 AM

I would like to join this interesting GB with this kit 1/72 Hasegawa MIG-27 what markings ? I dont know yet


 Nick.

  • Member since
    April 2010
Posted by Theuns on Tuesday, June 21, 2016 9:35 AM

The fuselage uses (in my veiw) an un nessesarly "complex" way of engineering. You have the bottom section and the two side sections incorperating the top section. 

I found it rather fiddly to allign and cement together. You have to hold it all inplace and try run cement into the seam...needless to say I got a fingerprint or two on the model doing this.

There will be some filling and sanding to be done on the fuselage seams.


Theuns

  • Member since
    April 2010
Posted by Theuns on Wednesday, June 22, 2016 1:55 AM

I tried to replicate the anti-corosion treatment they used on the Eindecker's sheetmetal parts.

I sprayed the cows X-11 silver and with a fine brush randomly painted streaks with humbrol "steel" that is a little darker.


Theuns

  • Member since
    March 2006
Posted by simpilot34 on Wednesday, June 22, 2016 4:11 AM

Bossman- You are very welcome for the pic and glad the fix was painless. She's a lil beauty!! I know what you mean about a high gloss finish in 1/72, sometimes yes, it's ok, but even for a glossy finish, I would give the slightest touch of matt just to kill a bit of the sheen so as to not look like glass, however struggle to maintain having the same smoothness. Does all that make sense lol. Looking forward to seeing the Havoc progress!! Thanks for the compliment, and I like the pun lol.

Theuns- The Eindecker is coming along nicely, like the effect on the metal!

Crown- A double dose of Mig's, looking forward to them!!

Don't have anything to report, been a bit under the weather since the weekend. I also had problems getting logged in since Thursday or Friday! Was like I had been blocked or something. Even re-registered with the same email, which usually you can't do, so dunno what was up with that but was finally able to get back on Monday, but by then my cold had taken hold and just longed for the bench but that was frommy bed lol, reluctantly I know I needed rest. Hopefully in the next couple days will get some progress posted.

Cheers, Lt. Cmdr. Richie "To be prepared for war, is one of the most effectual means of preserving the peace."-George Washington
  • Member since
    April 2010
Posted by Theuns on Wednesday, June 22, 2016 7:09 AM

I am waiting for the natural doped linnen paint to dry so I can do the shading for the rib tapes.

Sofar the build is quite enjoyable.


Theuns

  • Member since
    July 2014
Posted by modelcrazy on Wednesday, June 22, 2016 9:15 AM

crown r n7
I would like to join this interesting GB with this kit 1/72 Hasegawa MIG-27 what markings ? I dont know yet

Welcome Crown,

Wayne will get you on the roster when he can.

Steve

Building a kit from your stash is like cutting a head off a Hydra, two more take it's place.


http://www.spamodeler.com/forum/

  • Member since
    April 2010
Posted by Theuns on Wednesday, June 22, 2016 9:33 AM

To try give some feel to the othewize mono-tone look I cut 1mm strips of tamiya tape and stick it over the ribs. Then I lightly spray tamiya "smoke" over the rest to darken and dirty up the exposed fabric.

where tapes were attached to the fabric it had a more dence lighter look to the rest. 


  • Member since
    July 2014
Posted by modelcrazy on Wednesday, June 22, 2016 9:54 AM

That's a good idea Theuns. I was wondering how you were going to do that. 

Steve

Building a kit from your stash is like cutting a head off a Hydra, two more take it's place.


http://www.spamodeler.com/forum/

  • Member since
    April 2010
Posted by Theuns on Wednesday, June 22, 2016 10:13 AM

I used the tame idea on my 1/48 Nie 11, I hope the scaled down size will deliver the same results.

Theuns

  • Member since
    August 2015
  • From: the redlands Fl
Posted by crown r n7 on Wednesday, June 22, 2016 7:54 PM

here are some lastest pics from a straight forward mig-27.


 Nick.

  • Member since
    July 2014
Posted by modelcrazy on Wednesday, June 22, 2016 8:13 PM

I built a Hase Mig 27 years ago, nice kit. 

Steve

Building a kit from your stash is like cutting a head off a Hydra, two more take it's place.


http://www.spamodeler.com/forum/

  • Member since
    April 2010
Posted by Theuns on Thursday, June 23, 2016 4:00 AM

Here is the basic airframe assembled.

I have 2 coats of future as a glosscoat for decals.

Hoping to get them on soon...

The undercart was a little fiddly to put on but cyno works well for this.


Theuns

  • Member since
    July 2014
Posted by modelcrazy on Thursday, June 23, 2016 7:24 AM
That is really looking good Theuns Yes The tape turned out well and the undercarriage turned out great.

Steve

Building a kit from your stash is like cutting a head off a Hydra, two more take it's place.


http://www.spamodeler.com/forum/

  • Member since
    March 2006
Posted by simpilot34 on Thursday, June 23, 2016 9:25 AM

Theuns that Eindecker is looking great! Love the effects you're doing! Yes the undercarriage is a trapeze that has organised chaos. But it looks good! Have a build article in a mag, will see if I can relay any pertinant info to you!

Crown you're Mig is looking the part! I built the MPC Mig-23 back in the 80's. From what I remember it went together like a dream as i think most of those MPC 1/72 kits did. They were like all over at every supermarket and five and dime, then POOF, GONE! Now when you find an unopened one you're paying 5 times the price. Sorry,for the rant lol, if it was one lol.

Ok I have delivered on my promise of a little progress on the camel, and I do mean it isn't much,but any step forward is progress. Got the wing decals on and the grey patch painted over. Going to put that last little bit of rigging on the center cabanes. Bit or complete gloss to progress to a semi gloss for a final finish. Here's a couple pics.

Yes, touch ups are also yet to come.

Cheers, Lt. Cmdr. Richie "To be prepared for war, is one of the most effectual means of preserving the peace."-George Washington
  • Member since
    July 2014
Posted by modelcrazy on Thursday, June 23, 2016 9:35 AM
 

The rigging looks absolutely fantastic Simplot Bow Down

Steve

Building a kit from your stash is like cutting a head off a Hydra, two more take it's place.


http://www.spamodeler.com/forum/

  • Member since
    April 2010
Posted by Theuns on Thursday, June 23, 2016 9:41 AM

wow that rigging does look very good indeed. What dod you use?


Theuns

  • Member since
    June 2003
  • From: Rowland Heights, California
Posted by Duke Maddog on Thursday, June 23, 2016 12:44 PM

Wow, I gotta say, there's all kinds of great projects going on here. Way to go guys, everything is looking fantastic!

JOIN OUR COMMUNITY!

Our community is FREE to join. To participate you must either login or register for an account.

SEARCH FORUMS
FREE NEWSLETTER
By signing up you may also receive reader surveys and occasional special offers. We do not sell, rent or trade our email lists. View our Privacy Policy.