SEARCH FINESCALE.COM

Enter keywords or a search phrase below:

75th Anniversary of 1943 (World at War)

35815 views
633 replies
1 rating 2 rating 3 rating 4 rating 5 rating
  • Member since
    September 2003
  • From: AandF in the Badger State
Posted by checkmateking02 on Monday, August 20, 2018 3:18 PM

docidle

Thanks CK. I’m hoping to get some paint on her this week.

Doc(Steve)

 
That'll be great to see.  What kind/color paint are you planning on?


  • Member since
    July 2010
  • From: Tempe AZ
Posted by docidle on Monday, August 20, 2018 12:00 AM

Thanks CK. I’m hoping to get some paint on her this week.

Doc(Steve)


  • Member since
    September 2003
  • From: AandF in the Badger State
Posted by checkmateking02 on Saturday, August 18, 2018 9:33 AM

Really nice, Doc.  Great looking kit.  PE enhances the details very well.  Good work!


  • Member since
    July 2010
  • From: Tempe AZ
Posted by docidle on Saturday, August 18, 2018 2:18 AM

Here are some images of the test fittings of the various subassemblies.  

Enjoy

Doc(Steve)


  • Member since
    December 2003
  • From: 37deg 40.13' N 95deg 29.10'W
Posted by scottrc on Monday, August 6, 2018 10:25 AM

Excellent work on the Corsair Mark.

  • Member since
    February 2010
  • From: Berkeley CA/St. Paul MN
Posted by EBergerud on Sunday, July 29, 2018 8:41 PM
As noted in a post from a couple of days ago, I have ceased receiving any posts from this GB nor the Commonwealth GB that I am also subscribed to. I've checked "Email Notifications" and it says I am not subscribed to any forums. However, under "Forum Topics" everything is listed. Toward the end of the Forum list there is a technical assistance forum. As I understand it, other modelers are having the same problem. I urge everyone that's having trouble to make a post there. As everything was going fine for me on this forum until about a week ago (and yes I subscribed) and then halted, it's got to be glitch on their end. For me the Group Build Forum is basically crippled. It's nuts to make people manually check all messages themselves. As I understand it, Facebook hosts a multitude of modeling sites. Although the idea is a bad one, if Finescale can't get their act together, I'll have to start using them.


A model boat is much cheaper than a real one and won't sink with you in it.

  • Member since
    May 2015
Posted by Griffin25 on Sunday, July 29, 2018 8:18 PM

Great looking Corsair bud! Top notch stuff


Griffin

  • Member since
    September 2003
  • From: AandF in the Badger State
Posted by checkmateking02 on Sunday, July 29, 2018 2:12 PM

Thanks, Mark.  Finish photo is up on the front page.  It's really a fine looking Corsair.  I'm going to have to invest in some Tamiya planes.

Thanks again for your participation!


  • Member since
    October 2009
  • From: Worcester, England.
Posted by aeroplanegripper on Sunday, July 29, 2018 1:07 PM

Thats fine by me mate, many thanks again for organising a great GB.

Best Regards

Mark

"bis vivit qui bene vivit"


  • Member since
    September 2003
  • From: AandF in the Badger State
Posted by checkmateking02 on Sunday, July 29, 2018 12:37 PM

Jack (and everyone else affected):  I noticed in the settings for my "email notifications," I don't have any subscriptions; and I know I used to.  When I open it, it says I haven't subscribed to any threads.  So it appears something must have deleted them.

Maybe you could try re-subscribing?  Other than that, not being techy-minded, I don't have any solutions or suggestions.    


  • Member since
    September 2003
  • From: AandF in the Badger State
Posted by checkmateking02 on Sunday, July 29, 2018 12:28 PM

Excellent, Mark.  Nice work on the panel lines, too.  Very pleasing Corsair!

Which photo would you like for the finished build?  I like the second one, but it's your choice.

Thanks for being part of the GB!  I appreciate very much your participation.


  • Member since
    October 2009
  • From: Worcester, England.
Posted by aeroplanegripper on Sunday, July 29, 2018 12:10 PM

Hello everyone,

Well thats me finished with the Tamiya 1/72 Birdcage Corsair. The last things to do were the fitting of the undercart and doors, aerial wires and prop.

 Sorry the pics are a bit dark, Ive only got my iPhone 6, and it was a bit dark out as we are having rain at last!

 Heres the underside

 This kit represents a Corsair flown, at its demise in a landing accident, in Bouganville in 1943 by 1st Lt Ed Olander of Marine VMF 214. Thanks for all the encouragement and kind comments and letting me join this great GB.

Thanks for looking.

Best Regards

Mark

"bis vivit qui bene vivit"


  • Member since
    April 2006
  • From: ON, Canada
Posted by jgeratic on Saturday, July 28, 2018 10:53 AM

Thanks Check, and same here, have not been receiving any email notifications from the forums.

regards,

Jack

  • Member since
    September 2003
  • From: AandF in the Badger State
Posted by checkmateking02 on Saturday, July 28, 2018 8:12 AM

Eric, Steve:  I noticed a post about this issue in the "Ships" forum, too, so it must be an FSM issue.

I have no idea why or what can be done about it.  Confused


  • Member since
    July 2014
Posted by modelcrazy on Saturday, July 28, 2018 1:30 AM

EBergerud
Checkmate I haven't received a copy of any post from this forum since I displayed the T-34. Ditto on the Commonwealth GB. Any advice appreciated. Eric
 

I noticed that myself. I haven't received any notifications to subscribed posts in a day or three. I had to look through "your discussions" to see what I missed.

Steve

Building a kit from your stash is like cutting a head off a Hydra, two more take it's place.


http://www.spamodeler.com/forum/

  • Member since
    February 2010
  • From: Berkeley CA/St. Paul MN
Posted by EBergerud on Friday, July 27, 2018 11:31 PM
Checkmate I haven't received a copy of any post from this forum since I displayed the T-34. Ditto on the Commonwealth GB. Any advice appreciated. Eric


A model boat is much cheaper than a real one and won't sink with you in it.

  • Member since
    September 2003
  • From: AandF in the Badger State
Posted by checkmateking02 on Monday, July 23, 2018 12:21 PM

That's a clever idea with the figure peeking through the visor, Jack.  Don't think I've seen that done before.

Neat work on the hull, too.


  • Member since
    April 2006
  • From: ON, Canada
Posted by jgeratic on Monday, July 23, 2018 9:20 AM

Thank you Steve and Griffen.

For the cap insignia I used a decal for the cockade, while the eagle is just a few deft brush strokes to suggest it's presence.


regards,

Jack

  • Member since
    May 2015
Posted by Griffin25 on Sunday, July 22, 2018 7:59 PM

Jack That's a nice touch with the head looking out. Great idea and wonderfully painted. The insignia really makes it pop! 


Griffin

  • Member since
    July 2014
Posted by modelcrazy on Sunday, July 22, 2018 4:44 PM

Great job Jack, especially on the figure. I wish I had your skill painting figures.

Steve

Building a kit from your stash is like cutting a head off a Hydra, two more take it's place.


http://www.spamodeler.com/forum/

  • Member since
    April 2006
  • From: ON, Canada
Posted by jgeratic on Sunday, July 22, 2018 12:40 PM

Still deep in the construction phase, but so far 94 kit parts, and completed steps 1 through 9, out of 40 total.  Lot of detail parts on the rear half.  Reviews appear to be positive about these AVF Club Valentine kits, though I did see a forum post stating that these were finicky builds.  I would have to agree, there are parts that mate onto flat surfaces and have some play in their location.  So sometimes test fitting with further parts, or skipping ahead and then going back helps determine exact positions.


43524333662_ecc0b18d5b_b.jpg

There is a specific build review of this particular kit, and it points out some errors on the instructions, so good to have this:

http://web.ipmsusa3.org/content/afv-valentine-mkiii-wrotatrailer

 In the above work photo, there are four brackets glued to the corners of the center hull roof.  Instruction have you drill out locations holes, but this won't give accurate placement., particularly as the two forward brackets have a notch in them to accommodate bolt heads on the roof.  So  drilled holes were filled in with white plastic rod and sanded smooth.

43570873061_0227fb69e9_b.jpg

The only other significant hiccup was the bottom hull plate at either end.  I found them to be oversize and would overlap instead of being flush with the vertical plates.  A little sanding fixed that.


42665837395_0a05ea633c_b.jpg

Before closing up the driver compartment, I did paint up a spare head so there is something behind the opened visor.


regards,

Jack

  • Member since
    September 2003
  • From: AandF in the Badger State
Posted by checkmateking02 on Thursday, July 19, 2018 3:51 PM

Done, Eric; front page updated.  It looks great, although the one with only the turret visible above the terrain exudes a very sinister and dangerous visage.  But of course the terrain also masks the tank; still, I think it's an impressively dramatic photo.

Thanks for contributing to the GB!


  • Member since
    February 2010
  • From: Berkeley CA/St. Paul MN
Posted by EBergerud on Thursday, July 19, 2018 1:38 PM
Kind of partial to the one at the top, but maybe you should use the one right under my name - easier to see the base and tank. Eric


A model boat is much cheaper than a real one and won't sink with you in it.

  • Member since
    April 2006
  • From: ON, Canada
Posted by jgeratic on Thursday, July 19, 2018 10:39 AM

Eric, excellent final reveal, and great write up too. Yes


regards,

Jack

  • Member since
    September 2003
  • From: AandF in the Badger State
Posted by checkmateking02 on Thursday, July 19, 2018 10:02 AM

Outstanding work with the tank, Eric.  And a very informative tutorial about the weathering and the base work.  Fine job!

Do you have a preference for the finish photo?

Thanks for being part of the GB.  Watching your work is always an inspiration.


  • Member since
    December 2002
  • From: Bury St Edmunds, Suffolk, England
Posted by Bish on Thursday, July 19, 2018 4:05 AM

Eric, great finish, she is really well done and looks good on that base.

I am a Norfolk man and i glory in being so


On the bench: Airfix 1/72nd Harrier GR.3/Fujimi 1/72nd Ju 87D-3

  • Member since
    December 2002
  • From: Bury St Edmunds, Suffolk, England
Posted by Bish on Thursday, July 19, 2018 4:02 AM

Mark, great work on the Corsair, those decals seem to have gone down well, can't see any silvering in the pics.

I am a Norfolk man and i glory in being so


On the bench: Airfix 1/72nd Harrier GR.3/Fujimi 1/72nd Ju 87D-3

  • Member since
    February 2010
  • From: Berkeley CA/St. Paul MN
Posted by EBergerud on Thursday, July 19, 2018 1:35 AM


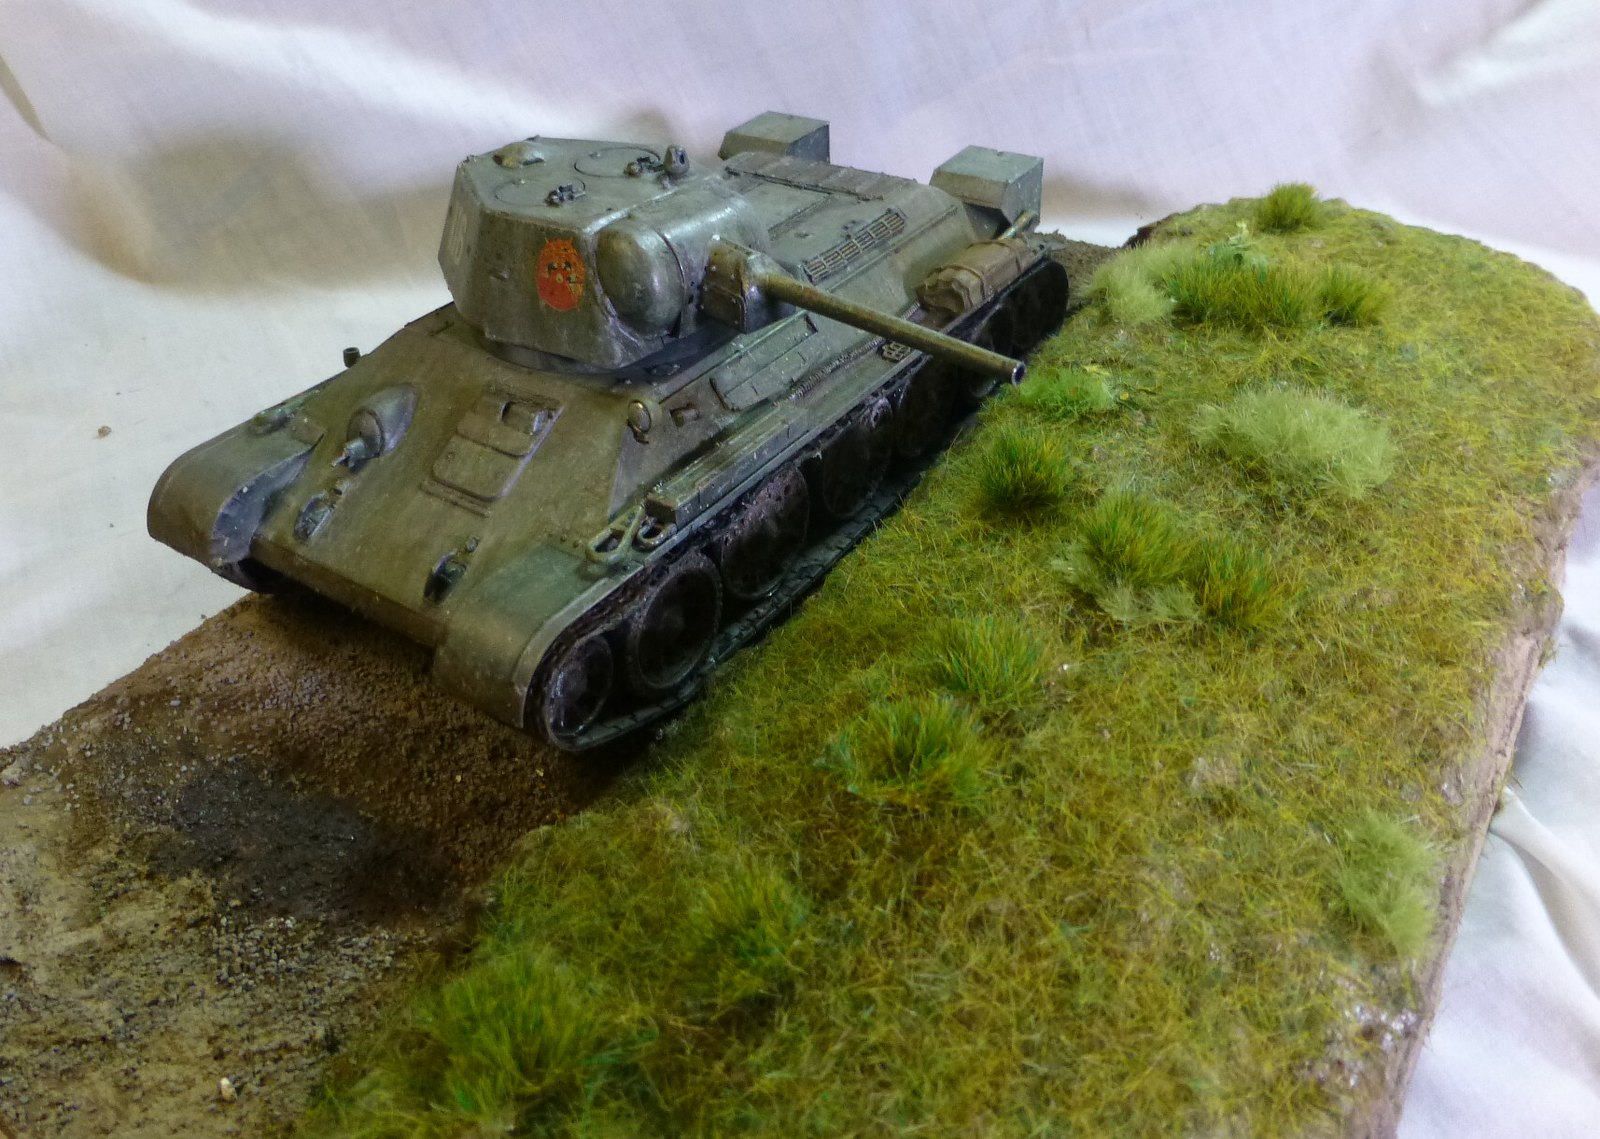
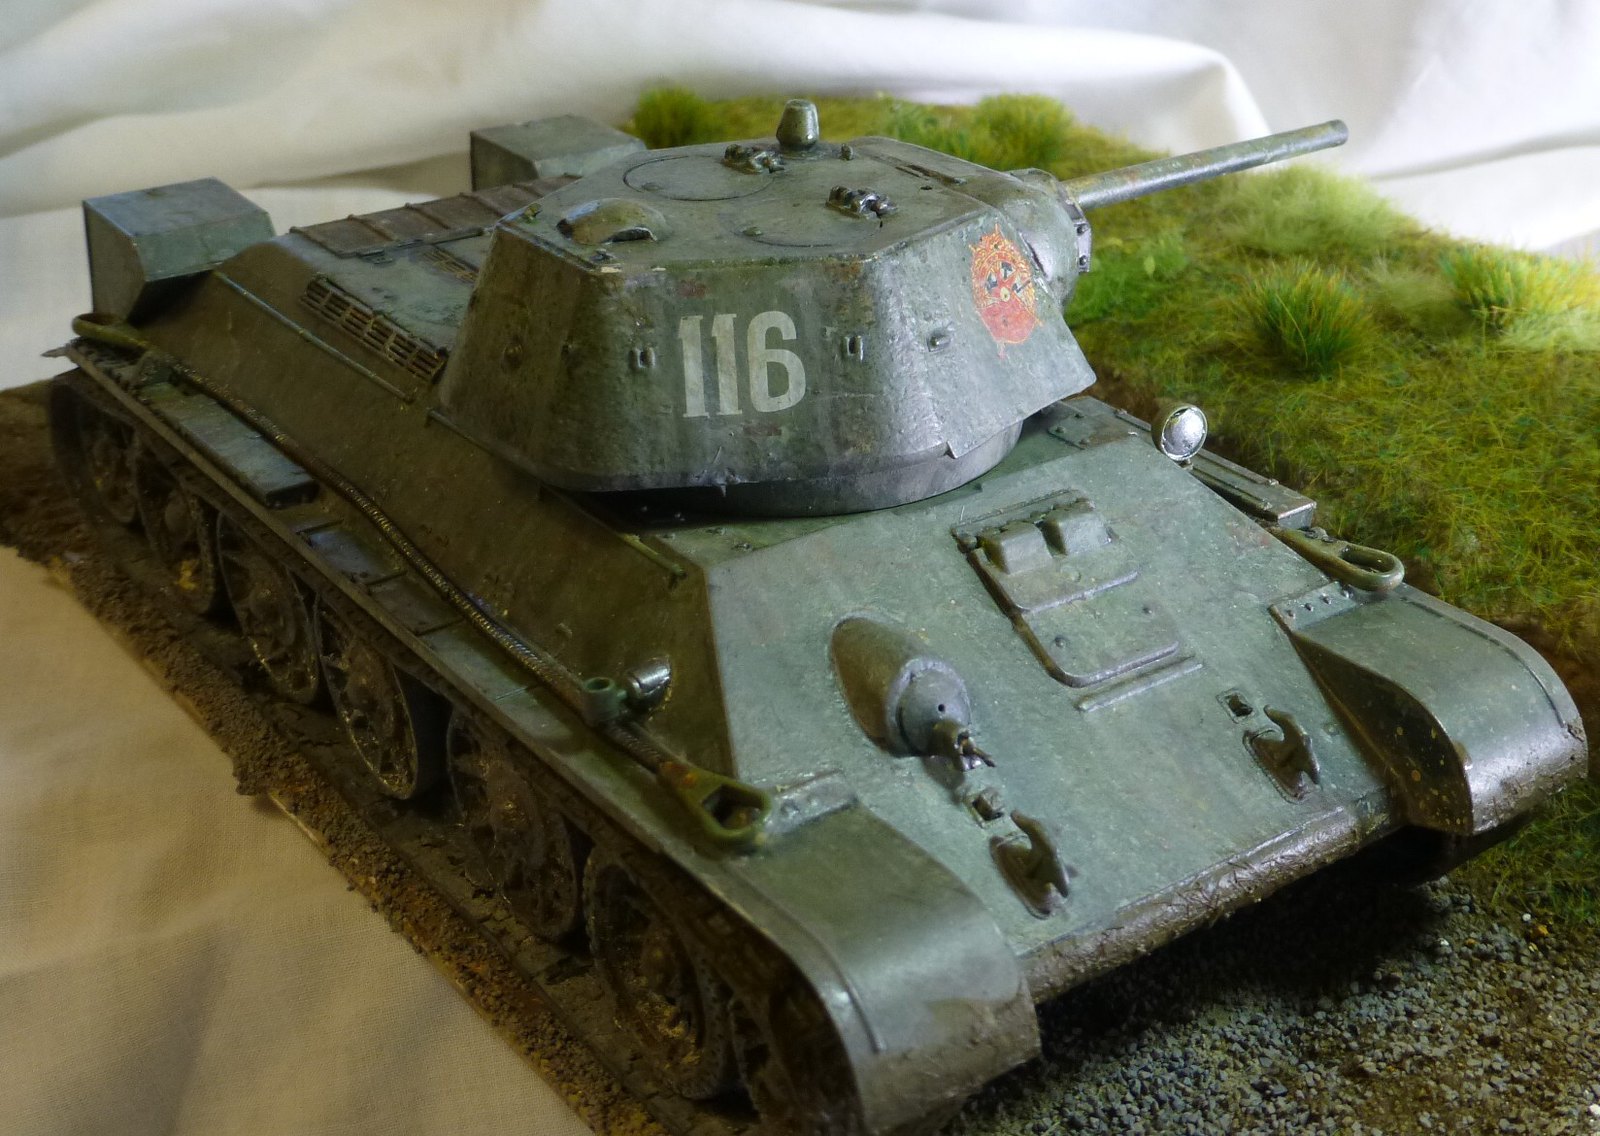
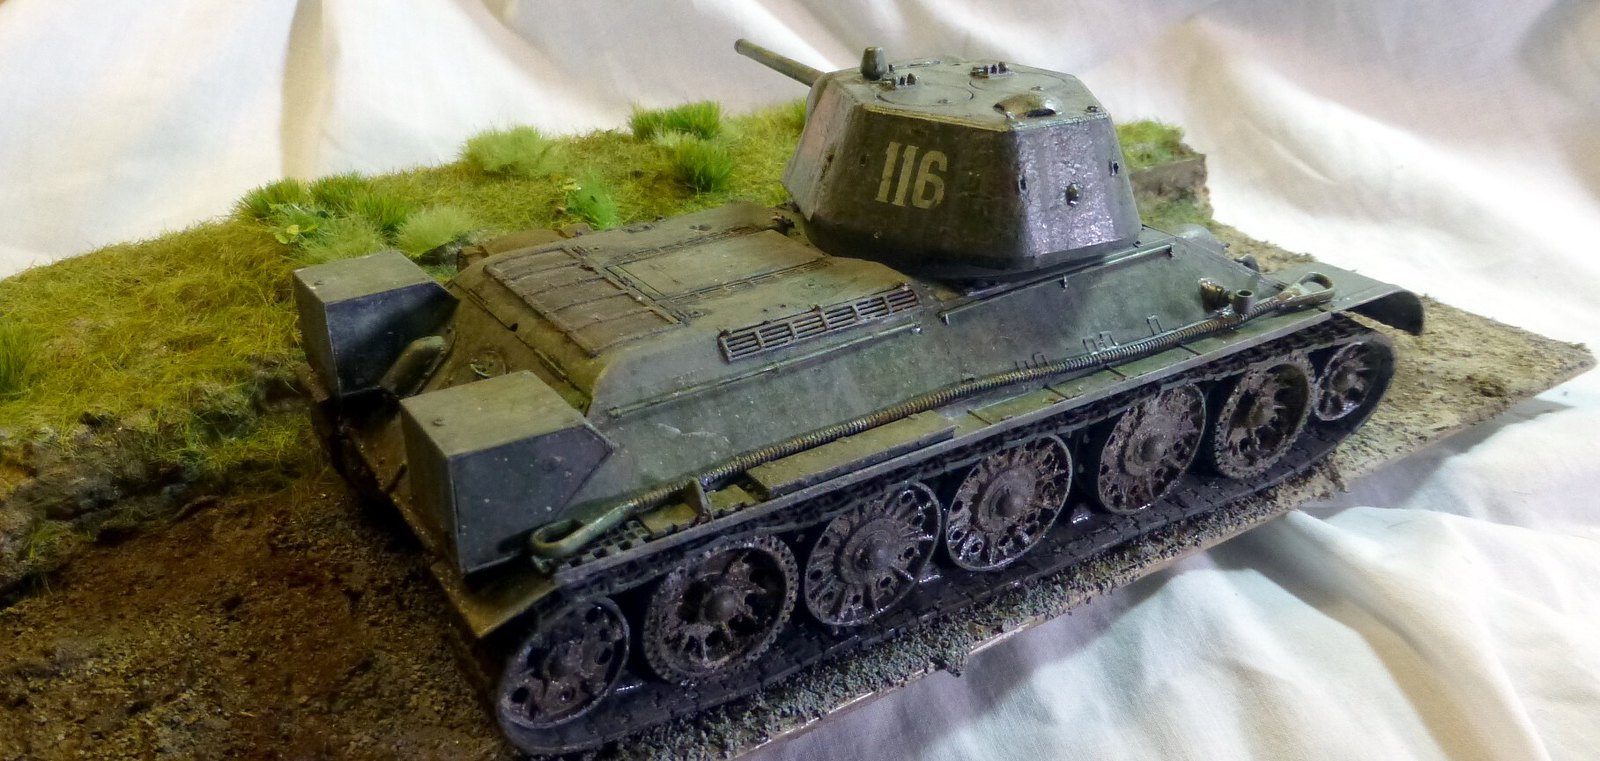
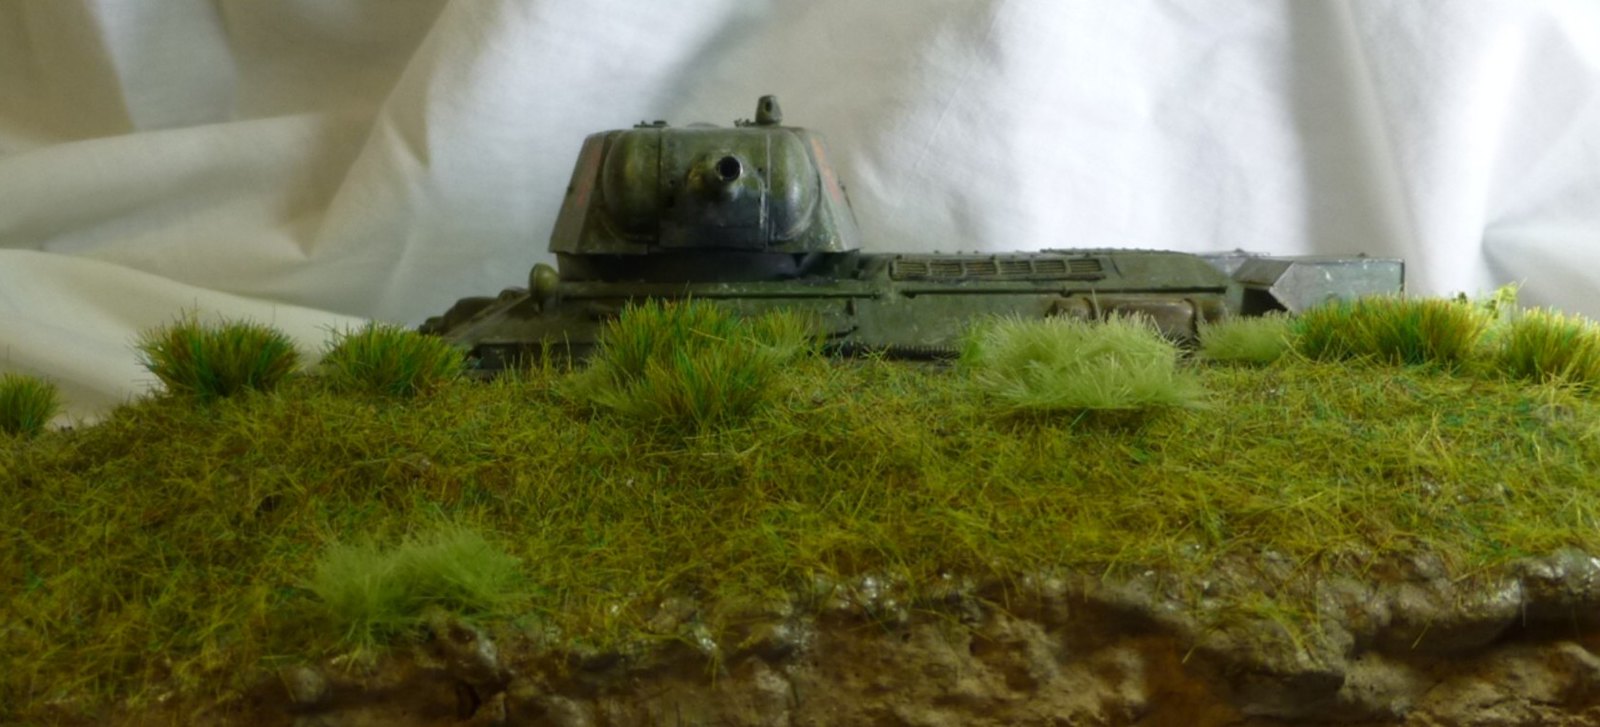
OK: I think we have a wrap on the Kusk T-34/76.


Kit: 1/35 ICM T-34/76

Paints: Golden High Flow Acrylics


Weathering: Vallejo Washes, Vallejo Acrylic Weathering Effects, Wilder AquaLine Weathering Products, Medea Com.Art Paints, Sennelier pigments. MIG oils


Base: PVC Foamboard, Sculptamold, Static Grass – GrassTech USA Applicator I & WWS Weathering Products (2mm, 4mm, 6mm grasses) & Silfor prepared 10mm clumps.


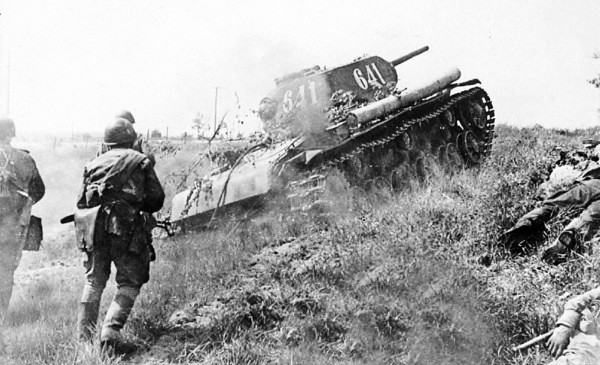
 00kursk by Eric Bergerud, on Flickr


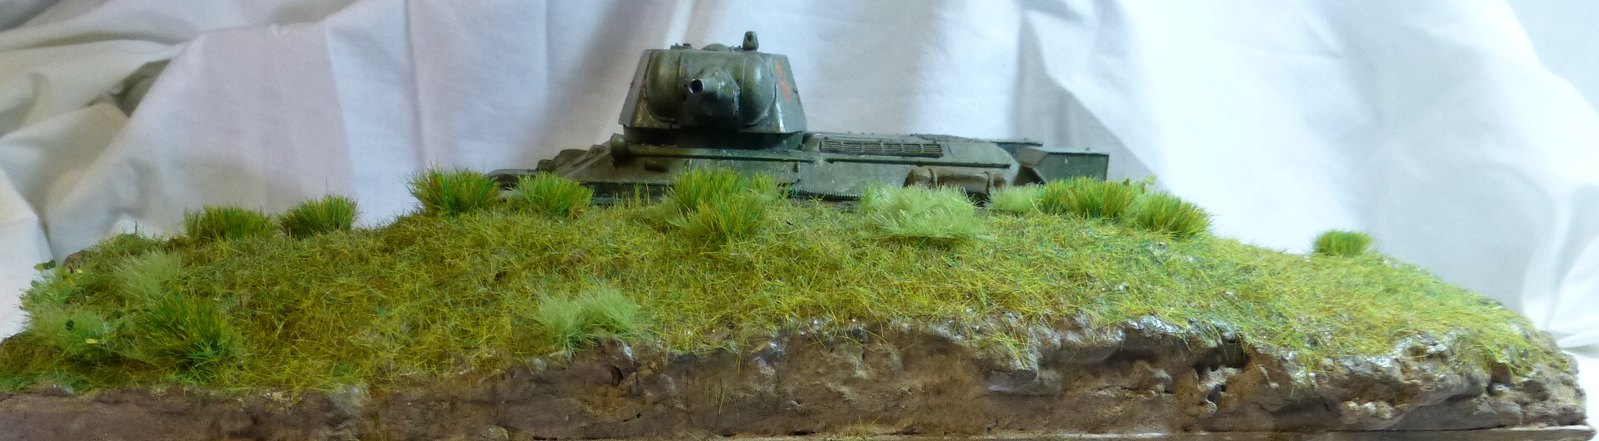
 0base-tnk-n2! by Eric Bergerud, on Flickr


This build turned was longer and more complex than I planned. Normally I find the greatest challenge in trying to evoke a historic artifact as realistically as possible – splendid modelers like Mig Jimenez argue this approach is both impossible and no fun. I'll live with the impossible – that's inherent in modeling – and enjoy trying to catch a bit of reality. Aside from that, I don't have the graphic skills to create some of the really fancy effects often seen by elite armor modelers and now even in airplanes. (AMMO/MIG published a jaw-dropping book on aircraft weathering by Jamie Haggo which I found well worth the money. Check Phil Flory's channel for an hour chat with the gent. Remarkable stuff done with panache and skill. But real? No, but if you can master those techniques you could tone things down easily. This is not a right/wrong matter.) Ship modelers, perhaps because of the time required on their builds, are much too restrained in my view, at least when picturing warships in heavy action.


But on this build I wanted to follow the bouncing ball on a 23 episode KV-1 build sequence on YouTube done by Adam Wilder, my favorite AFV guru. So this meant trying to create acrylic equivalents of the multitude of steps produced by Adam often using enamels. Overall, as Wilder himself points out, one doesn't need 22 weathering steps to make a good kit. I just thought I'd try it. I've done bases before and I thought I'd give static grass applied with an electric/ion applicator a try – another new. In other words, I spent a lot of time trying things out. I learned a lot and hope it will pay off down the road. So this was a kind of self-tutorial. I don't think I did much damage throwing everything but the kitchen sink at my humble T-34.


But there was history always in the background. This is a 1943 build, and that means Kursk, especially if you've never built a T-34. (That was me.) The model presented here by ICM was very late 42/early 43 and would have been at Kursk in large numbers. Russians went through tanks fast. Ironically, one of these models could have been a veteran in Russian terms because of the long lull in the East after the early 43 thaw and Manstein's recapture of Kharkov. Once Hitler decided on a 1943 offensive (there was opposition in OKH) the Germans needed to get everything they could to the East to launch an offensive. (It's true Manstein wanted to hit the Kursk salient created by his Kharkov victory in May, but with the strength then available it could only have been a “spoiling attack.” A substantial victory needed more tanks, troops and planes of all types – not just the Panthers and Tigers.) Stalin decided to stand on the defensive which meant an unusually long delay: fun started on July 4. During May/June the Soviets built a multitude of defenses in the Kurk area. The salient was about half the size of England. Was that big? It did dwarf Normandy. But it was much smaller than the Stalingrad/Baku front of 1942, which in turn was much smaller than Barbarossa in 1941. You can see what direction the war was following. Nevertheless a million Soviet troops plus were inside the salient – and more just to the west, northwest (Orel) and southwest (Belgorod). The Orel counter-blow of mid-July was a devastating German defeat almost lost to history because of the more famous failue at Kursk proper. When another counter-blow started south of the salient around August 1, the entire German front was sent fleeing to the Dnieper and Leningrad liberated.


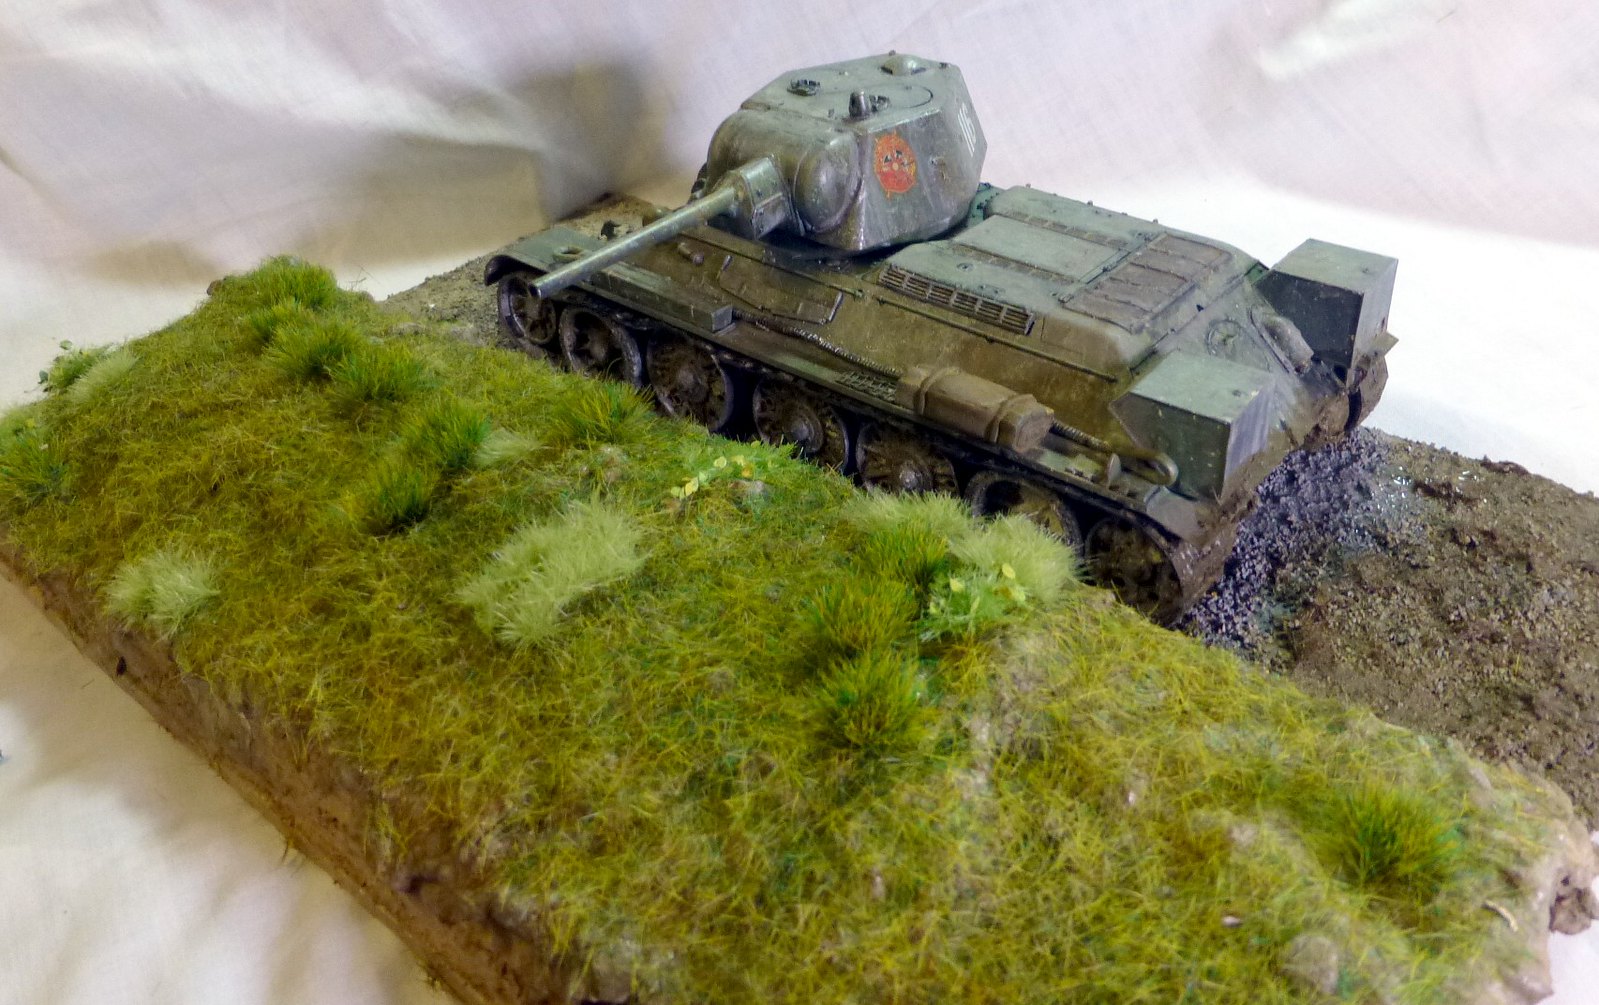
What this meant was that a Russian tank preparing for Citadel would have spent weeks in intensive training. Russian dispositions were changed on an almost weekly basis depending upon fresh intelligence. Everyone would have been moving around a lot. And people were digging. Hundreds of miles of trenches and new roads were built inside the salient including defensive positions of every type. There was a lot of rain, a lot of sun and a megaton of dust. This was the steppe. Under normal circumstances there would have been huge areas cultivated with grain, but with the local population digging this would have been largely fallow ground. But if you look at pics of the battlefield you can see thick grasses all over – probably a lot of it wheat that had planted itself. It was July, so I'm thinking the foliage would have had summer colors. But it would have been spare on trees and no major urban areas outside of Kursk itself. So I was thinking dust, dry mud, serious wear but not damage like missing fenders. There were hundreds of tanks inside the salient and many were literally “dug in.” That would have made a neat base but hid the tank, so I put a well worn T-34 “hull down” on a road behind a mound of earth and pretty dense grass. I think in the real world, the tank would have looked for a little more earth to guard everything but the turret, but that too would have hid the model. In any case, if you check the Kursk photo above, I think you can get the idea.


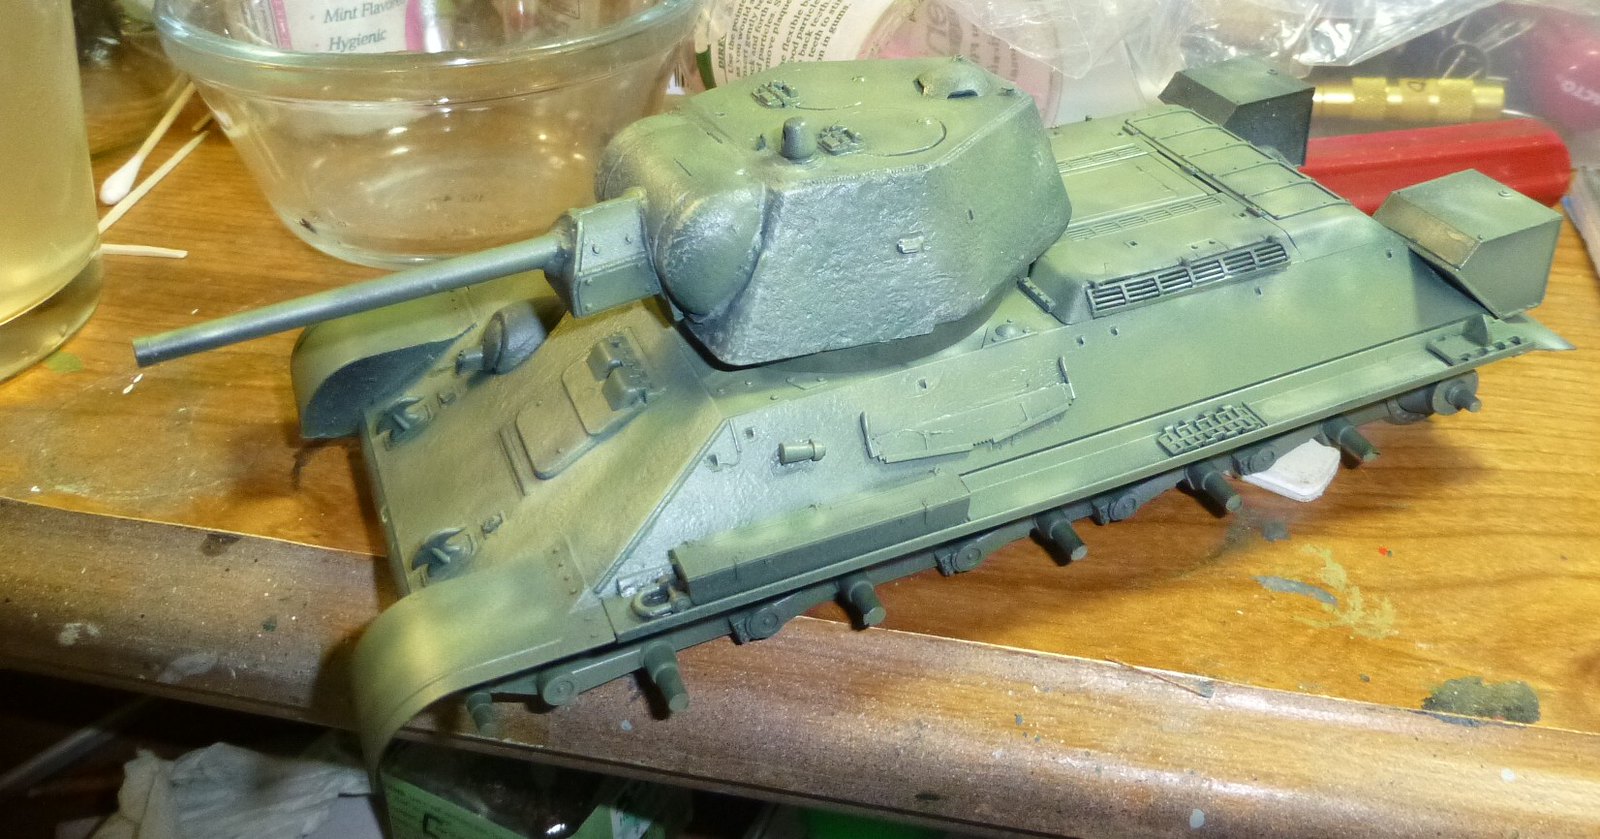
Back to the tank. Gurus like Wilder and Mike Rinaldi talk about “layering” a tank's weathering. Actually as the steps built up, you could see what they were getting at. Here's the base coat (I didn't keep the exact recipe – think it was platho blue, cadmium yellow, raw umber and SAP green):


 meld! by Eric Bergerud, on Flickr


Here's how it looked after filters, oil dots and chipping. I was actually a little worried about the chipping getting out of hand:


 chip1 by Eric Bergerud, on Flickr


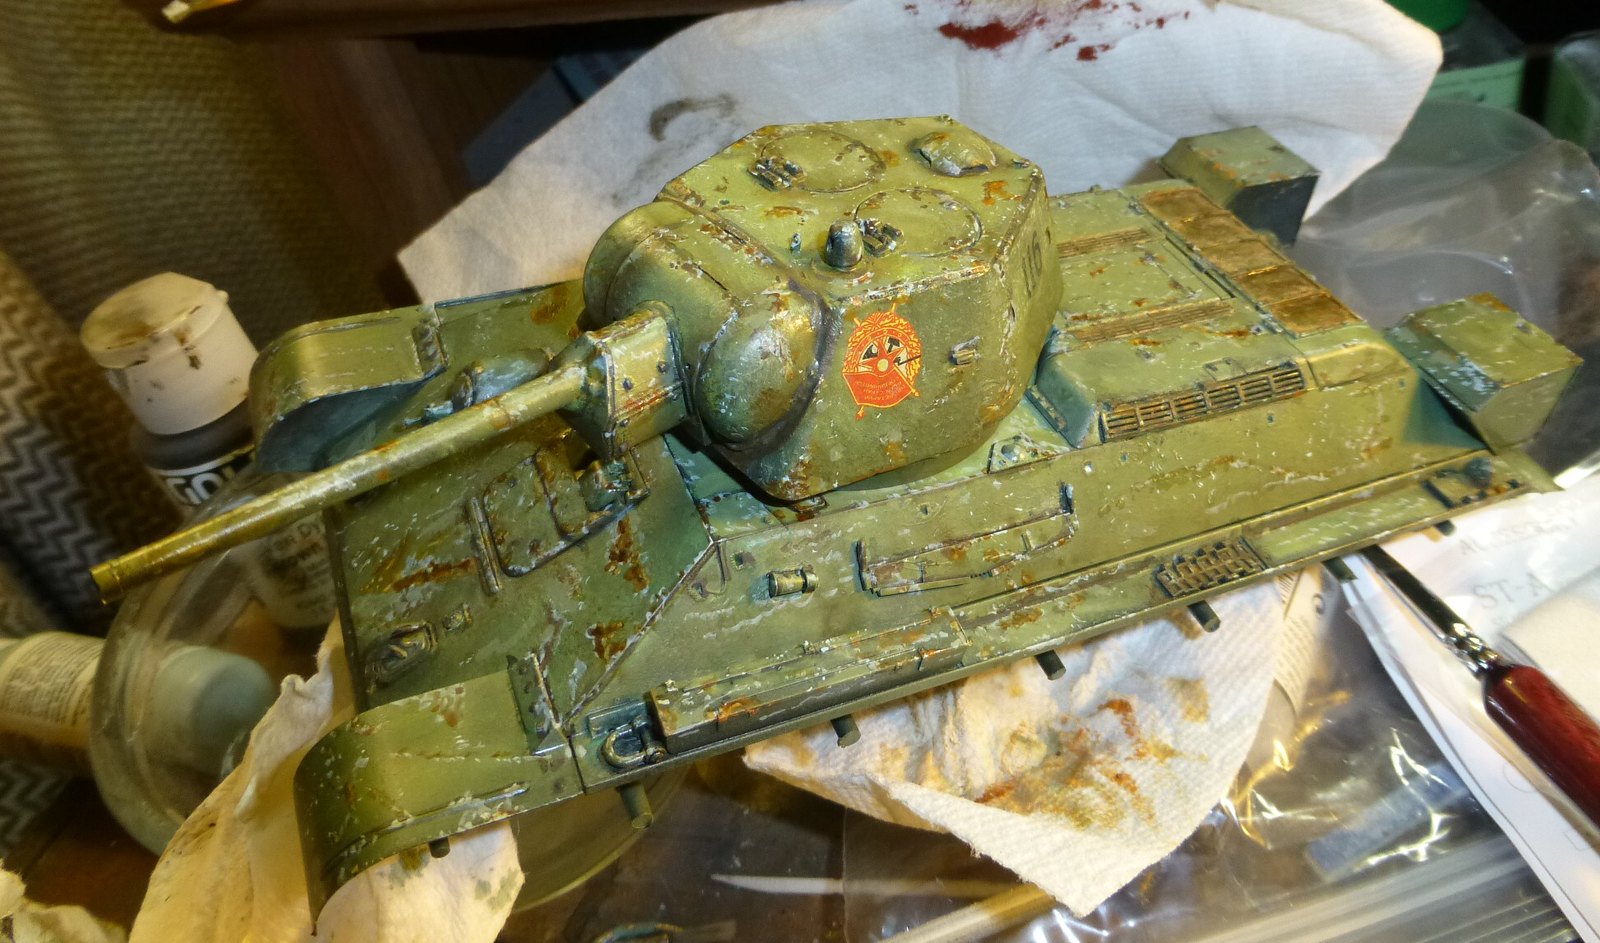
I admit that I elminated some chips with base coat, but not many. What followed was extra fading, streaking (with Com.Art, Vallejo Washes and Wilder's acrylic stuff) and very complex layered pigments. The result is quite different:


 1aRT-tank by Eric Bergerud, on Flickr


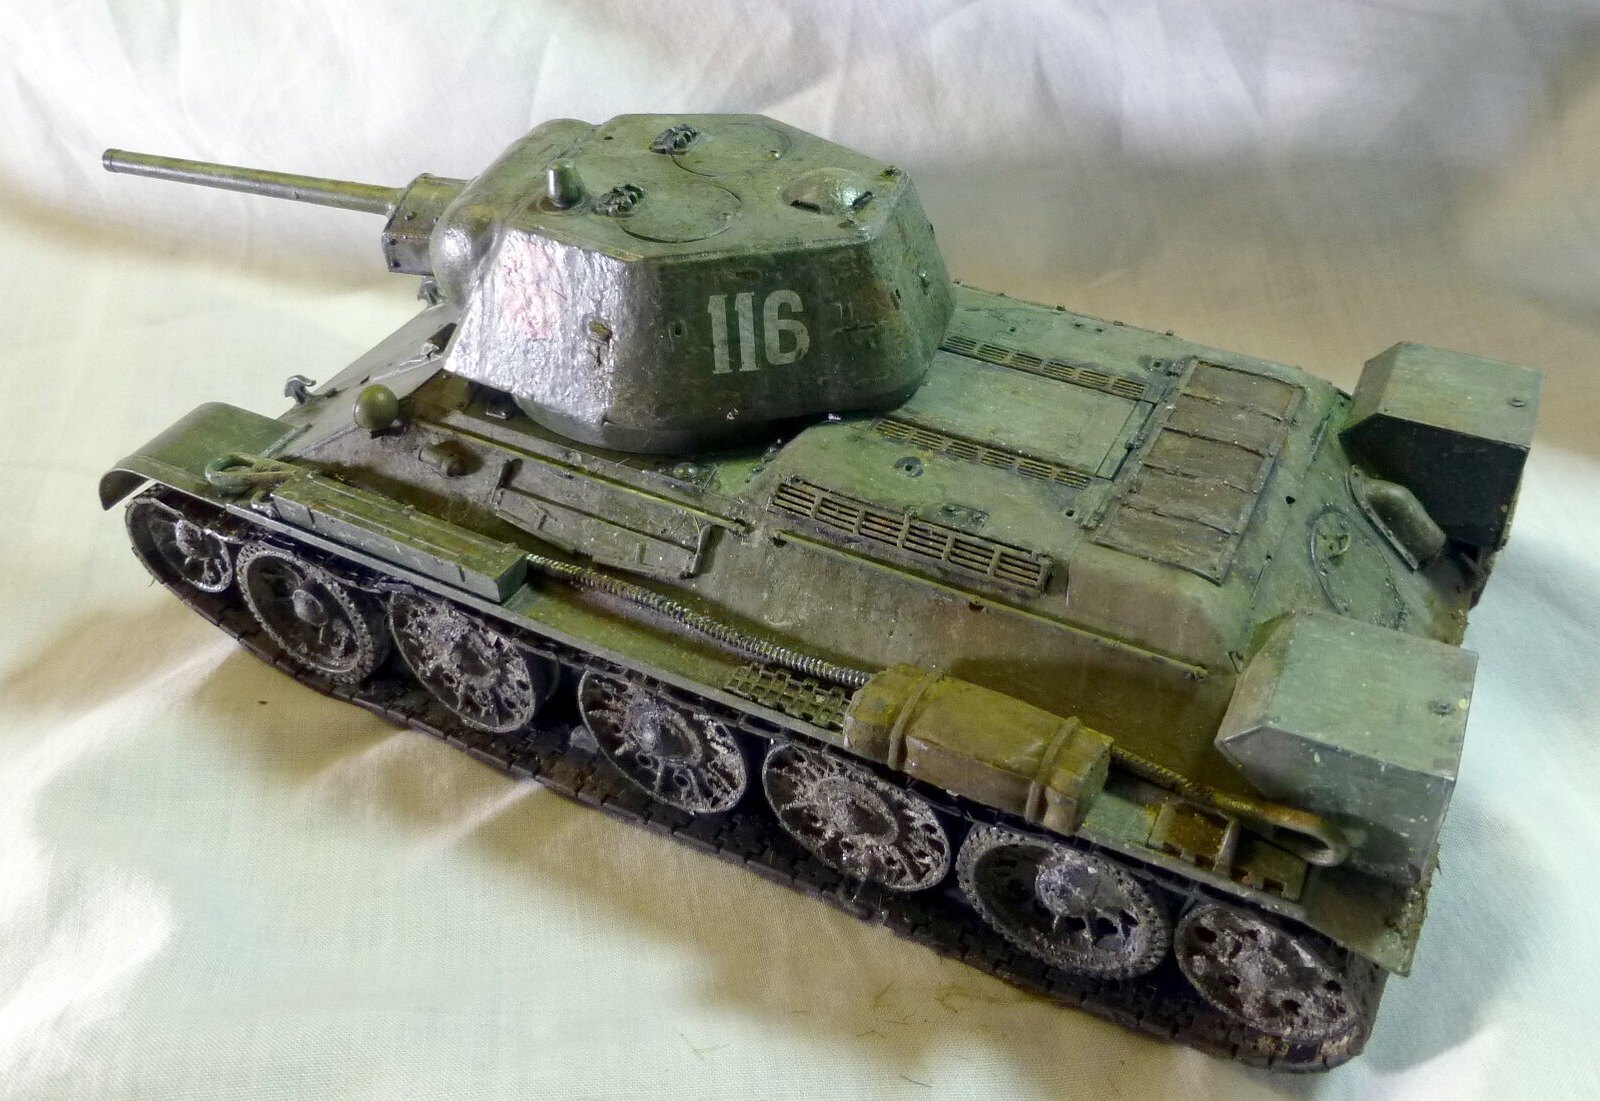
 1blft-tank by Eric Bergerud, on Flickr


Here are some close ups – the surface is much richer than anything else I've done in armor and you can see how much the later steps lessened the rust, chipping etc.


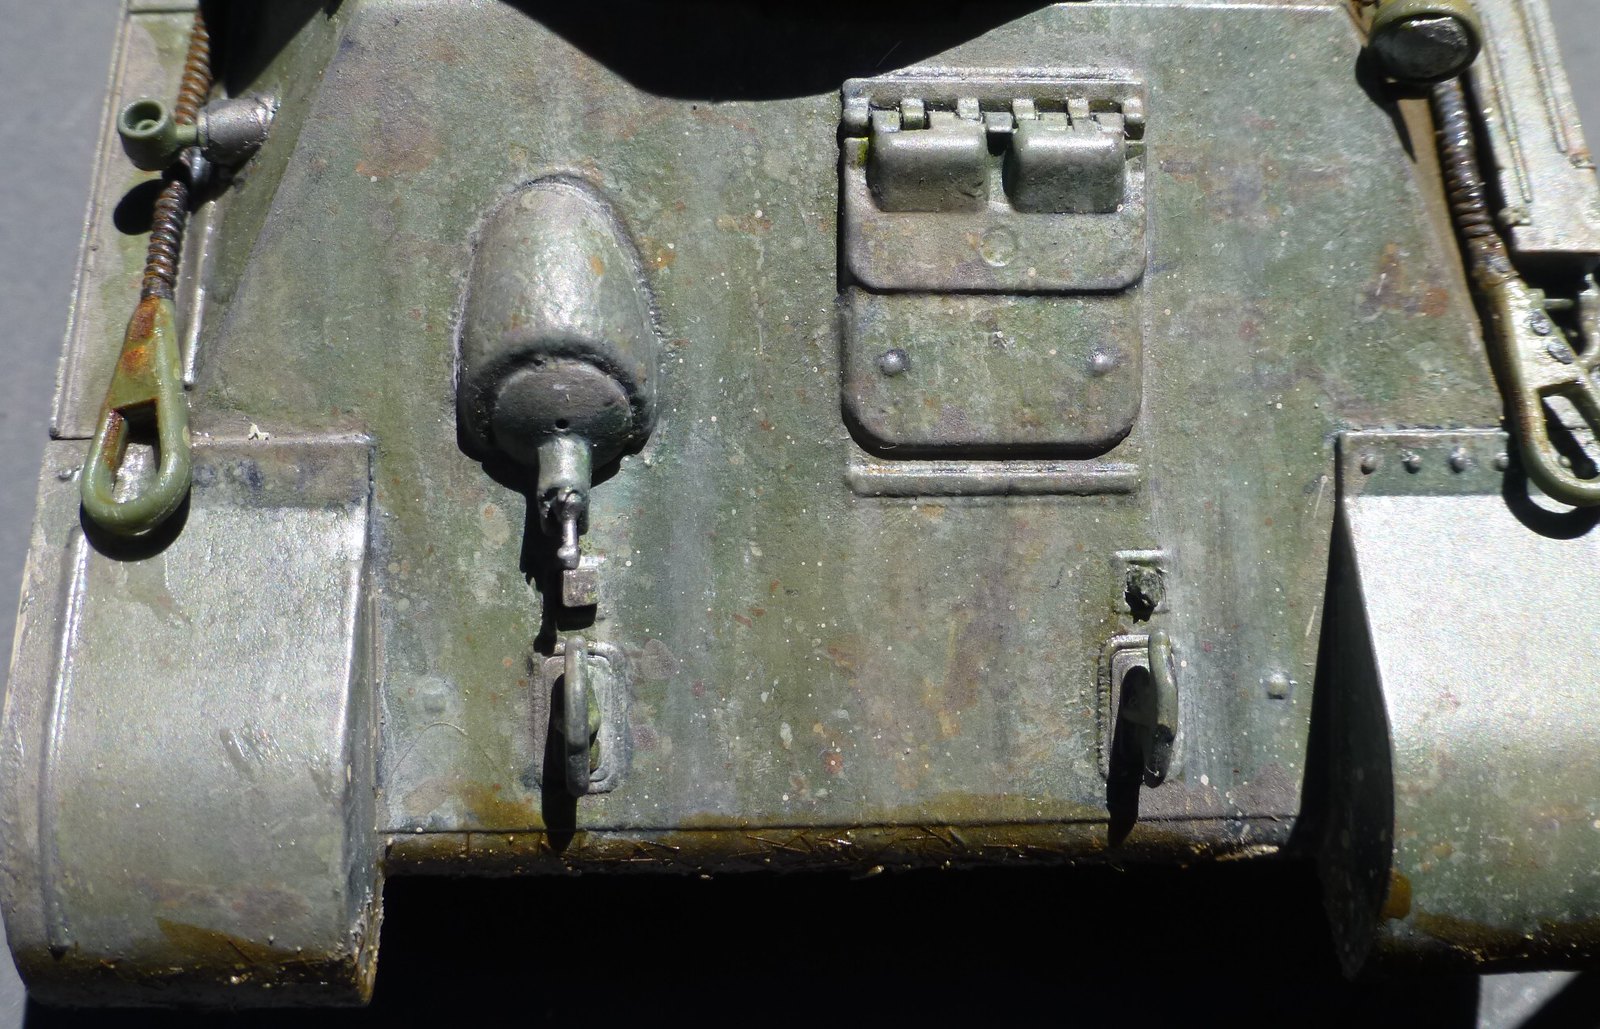
 1D-FT-O! by Eric Bergerud, on Flickr


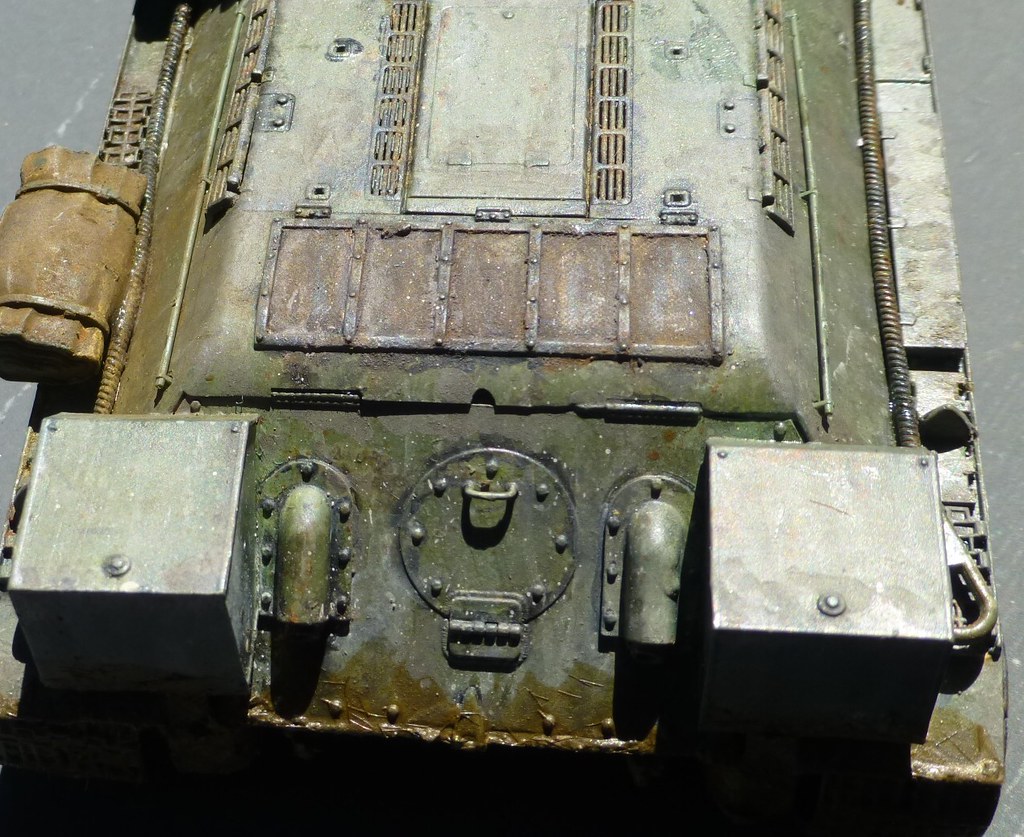
 1D-Rear-O by Eric Bergerud, on Flickr


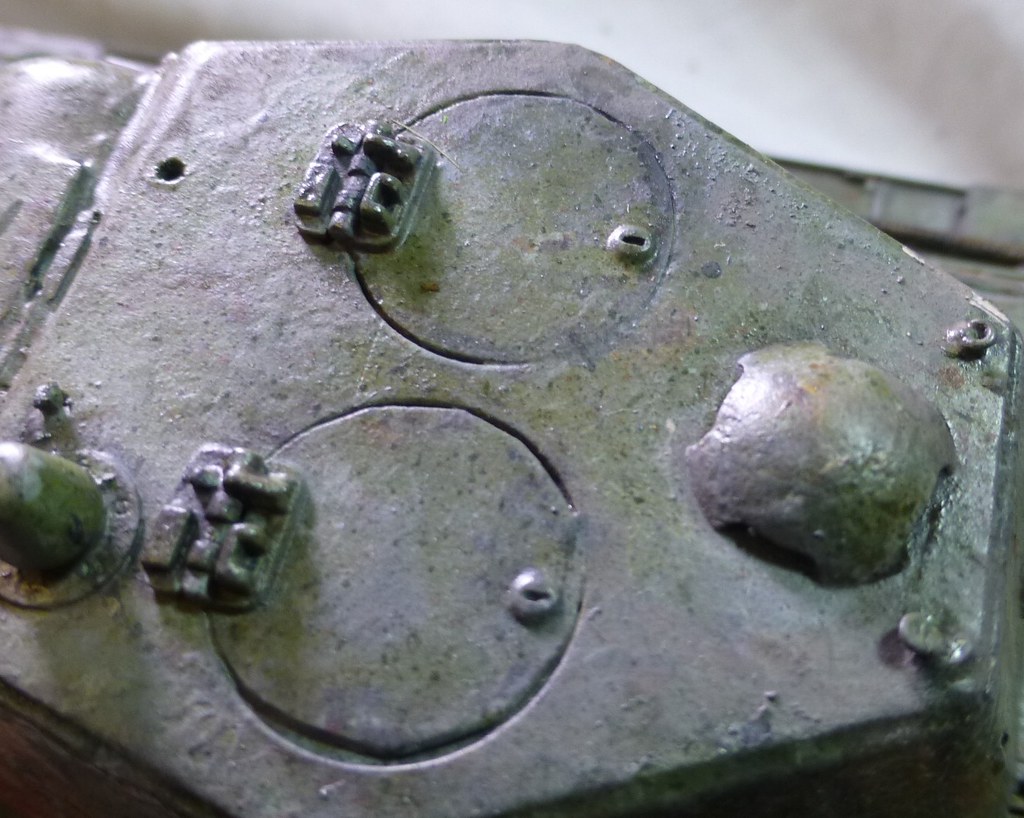
 1Det-Tur-Top! by Eric Bergerud, on Flickr


As noted I wanted a base. This vignette really needed static grass and so I got some. This is different stuff from usual flock which is normally some kind of colored sawdust. Instead it's nylon fiber. You attach an electronic gizmo to a nail in the base which creates static electricity, and you dust static grass out of a round sieve on the gizmo (carefully – a shock would wake you up). And sure enough, the stuff stands up. I used static grass from a Brit company WWS in sizes of 2mm, 4mm and 6mm in four different colors. I added some prepared 10mm clumps from the pricey company Silfor – you'd need a larger applicator to apply 10mm grass. The base is PVC Board. This stuff is a real find. It's very light, doesn't warp and is very strong. You cut it with several passes with a good utility knife, so it's much tougher than foam board, but much easier to use wood products. I bought a 12X12X3” piece on Amazon for $6 and have enough left over for another tank dio. The stuff is often used to back photos or make signs – it's much cheaper by bulk. Definite thumbs up, although I'll stay with styrofoam for sea bases. Here's the base and a detail pic:


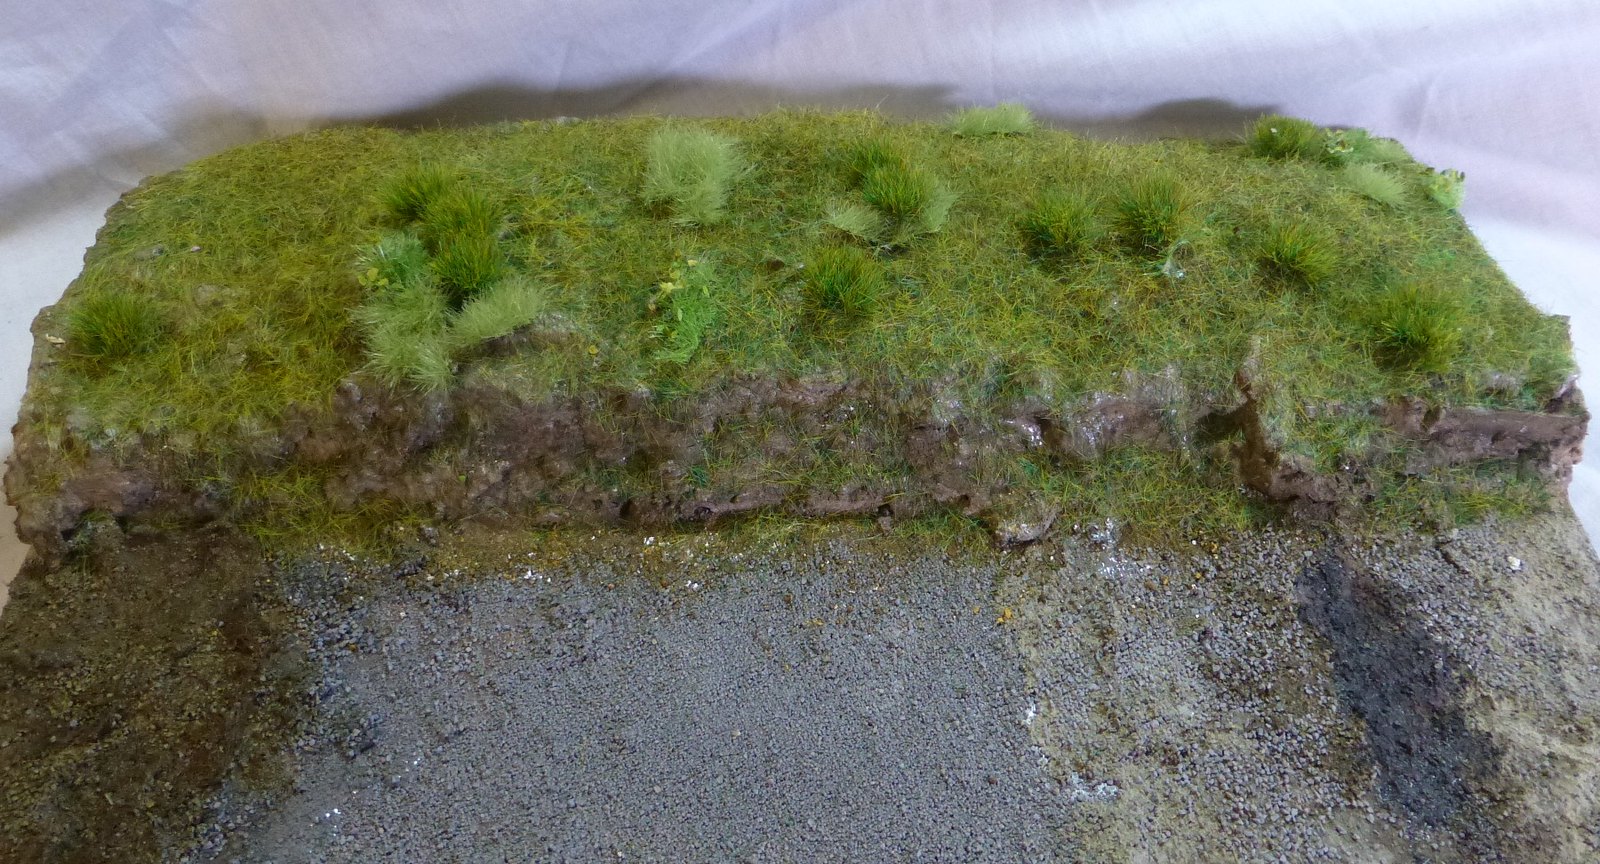
 2base2 by Eric Bergerud, on Flickr


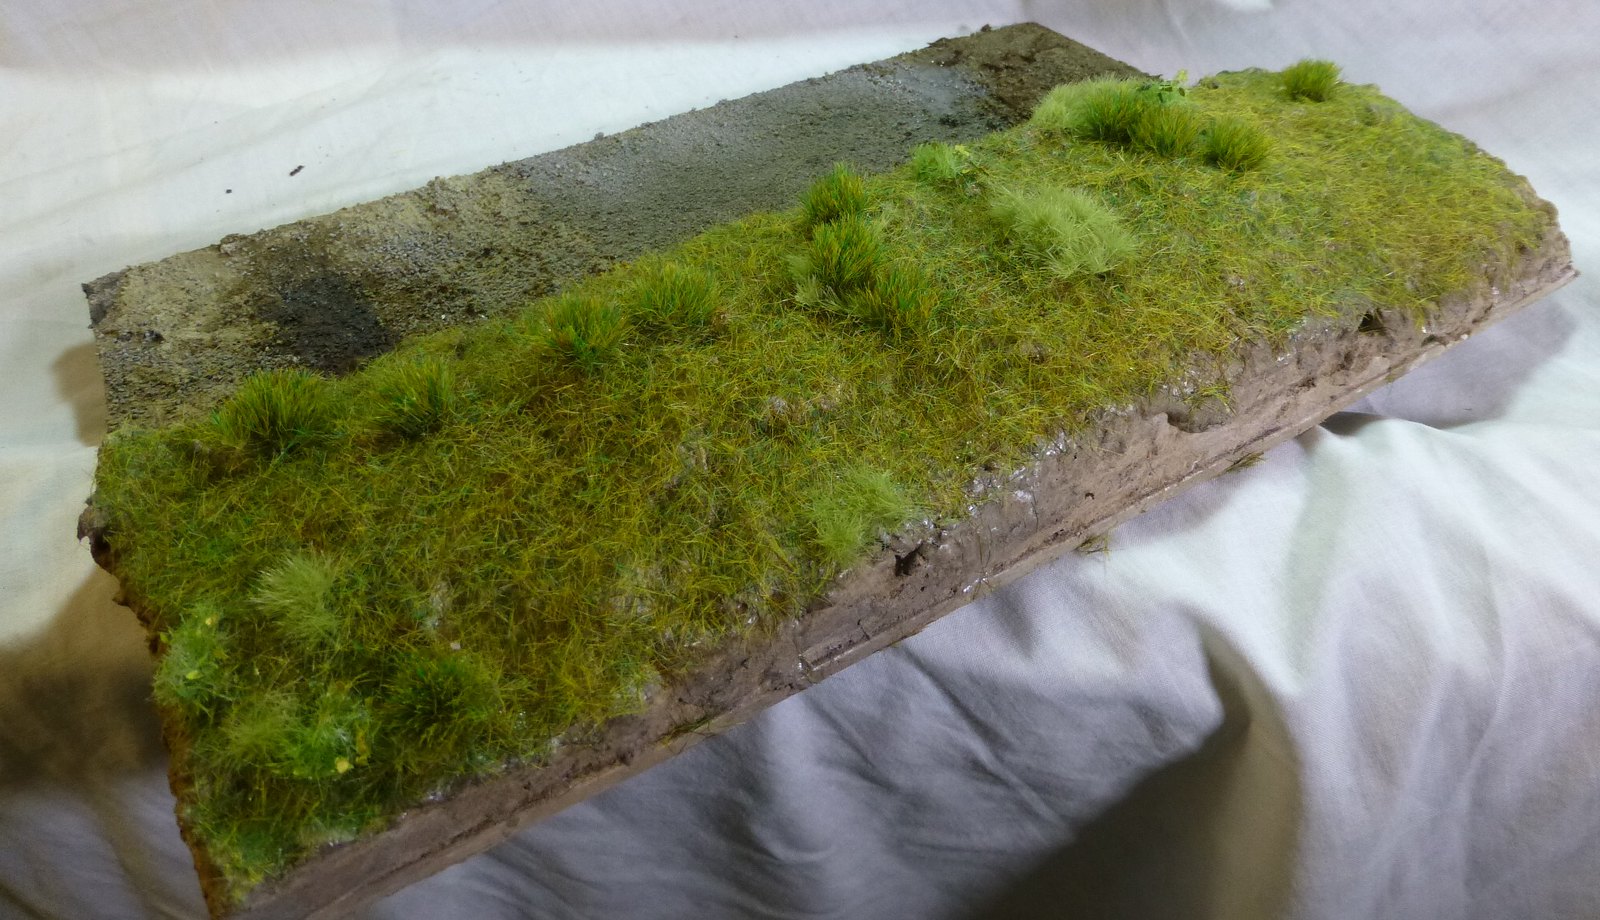
 2base1 by Eric Bergerud, on Flickr


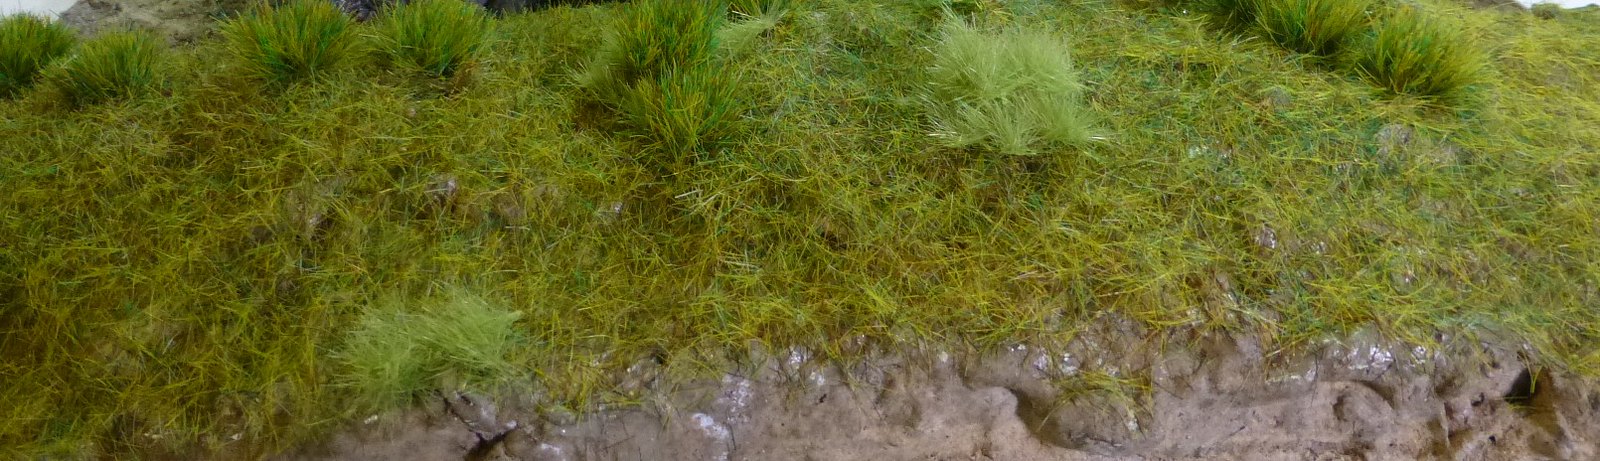
 2grass-D by Eric Bergerud, on Flickr


Well, below are some pics of the tank on the base and that's it. I hope to get another tank in on this GB before year's end (Panther or Sherman – not sure). But next up, is an Airfix Tomahawk done in Desert Air Force colors that I owe Bish for the Commonwealth build.


Eric


 3lft-rearV by Eric Bergerud, on Flickr


 3lft-ft-V by Eric Bergerud, on Flickr


 3-RTFT-V! by Eric Bergerud, on Flickr


 3R-R-V by Eric Bergerud, on Flickr


 L-Vig! by Eric Bergerud, on Flickr


A model boat is much cheaper than a real one and won't sink with you in it.

  • Member since
    September 2003
  • From: AandF in the Badger State
Posted by checkmateking02 on Wednesday, July 11, 2018 7:18 PM

That is very sharp-looking, Mark.  Great job you've done!


  • Member since
    May 2015
Posted by Griffin25 on Wednesday, July 11, 2018 4:41 PM

That is looking really good, bud. That wash looks great. I think I might have to get some of that stuff. I can't believe Croatia is in the final. Croatia?? What?


Griffin

JOIN OUR COMMUNITY!

Our community is FREE to join. To participate you must either login or register for an account.

SEARCH FORUMS
FREE NEWSLETTER
By signing up you may also receive reader surveys and occasional special offers. We do not sell, rent or trade our email lists. View our Privacy Policy.