SEARCH FINESCALE.COM

Enter keywords or a search phrase below:

Wirbelwind---FINISHED PICS! pg 7

19888 views
136 replies
1 rating 2 rating 3 rating 4 rating 5 rating
  • Member since
    December 2002
  • From: Bury St Edmunds, Suffolk, England
Posted by Bish on Tuesday, December 17, 2013 4:05 PM

Looking nice Karl. can't wait for that track tut.

I am a Norfolk man and i glory in being so


On the bench: Airfix 1/72nd Harrier GR.3/Fujimi 1/72nd Ju 87D-3

  • Member since
    January 2007
Posted by the doog on Tuesday, December 17, 2013 4:39 PM

lol, Kenny, you flatter me too much! Of course you would have been prompted to get back into modeling! I would hate to think that my simplistic details would dissuade anyone from enjoying the enjoyable act of building OOB! I only wish I could build MORE OOB builds--but at this point, modeling for me is another potential source of income, so I have to buck up and notch up the finish factor a bit. But sometimes it's a real albatross!

  • Member since
    January 2007
Posted by the doog on Tuesday, December 17, 2013 4:40 PM

It'll be coming soon, Bish! Hang in there--I just have to find the time!!

  • Member since
    January 2007
Posted by the doog on Tuesday, December 17, 2013 4:41 PM

Thanks for looking in, SchattenSpartan, Bill and Steve!! I Hope to get another update sooner than later!

  • Member since
    March 2013
  • From: Puebla, Mexico
Posted by garzonh on Tuesday, December 17, 2013 5:11 PM

Another great buidl, cant wait to see the paint.

good work pal!

  • Member since
    January 2007
Posted by the doog on Thursday, December 19, 2013 7:46 PM

Thanks, Hugo! Paint update coming up this weekend!

  • Member since
    March 2003
  • From: El Dorado Hills, CA
Posted by IBuild148 on Thursday, December 19, 2013 11:33 PM

As always looks good! Welcome back home and Merry Christmas.

Thanks for your and Bills Nashorn blog. Progress is slow but I have finished all steps up to 8. Without the blogs I was contemplating seeing a shrink.

IBuildOne48

Teach modeling to youth!

Scalefinishes.com

http://i712.photobucket.com/albums/ww122/randysmodels/NMF%20Group%20build%20II/Group%20Badge/NMFIIGBbadgesmall.jpg


  • Member since
    January 2007
Posted by the doog on Sunday, December 22, 2013 4:19 PM

Glad to hear that, Ernest! Merry Christmas to you too!

  • Member since
    July 2006
  • From: San Francisco Bay Area
Posted by bufflehead on Monday, December 23, 2013 9:15 PM

Shoot!  I've been busy and thought this was done already!  I'm pleasantly surprised that you're still working on it Karl and I must say its looking very nice!  Love the detail work on the gun and interior....some of us just can't leave well enough alone!! Whistling

Oh, and nice track assembly method.......I think I've used that before! Pirate

Ernest

Last Armor Build - 1/35 Dragon M-26A1, 1/35 Emhar Mk.IV Female


Last Aircraft Builds - Hobby Boss 1/72 F4F Wildcat & FW-190A8


  • Member since
    January 2007
Posted by the doog on Wednesday, December 25, 2013 2:18 PM

Thanks for taging along here again, Ernest! And a Merry Christmas to you as well! Glad that track toot worked for you!

  • Member since
    August 2012
Posted by JimNTENN on Wednesday, December 25, 2013 2:30 PM

It looks really good. I built this one a long time ago. It was my first serious attempt at doing armor and it doesn't look anywhere near as good as yours. Nor does it have any PE details on it.

Current project(s): Hobby Boss: 1/72 F9F-2 Panther

                                  Midwest Products: Skiff(wood model)


  • Member since
    January 2007
Posted by the doog on Wednesday, December 25, 2013 2:51 PM

Hello all, and Merry CHristmas to you all!

Well, it's been a weird CHristmas--Jenn had to work (there are no "holidays" in the hospital!) and since we couldn't travel north to visit our families, I'm just modeling through the day and practicing guitar.

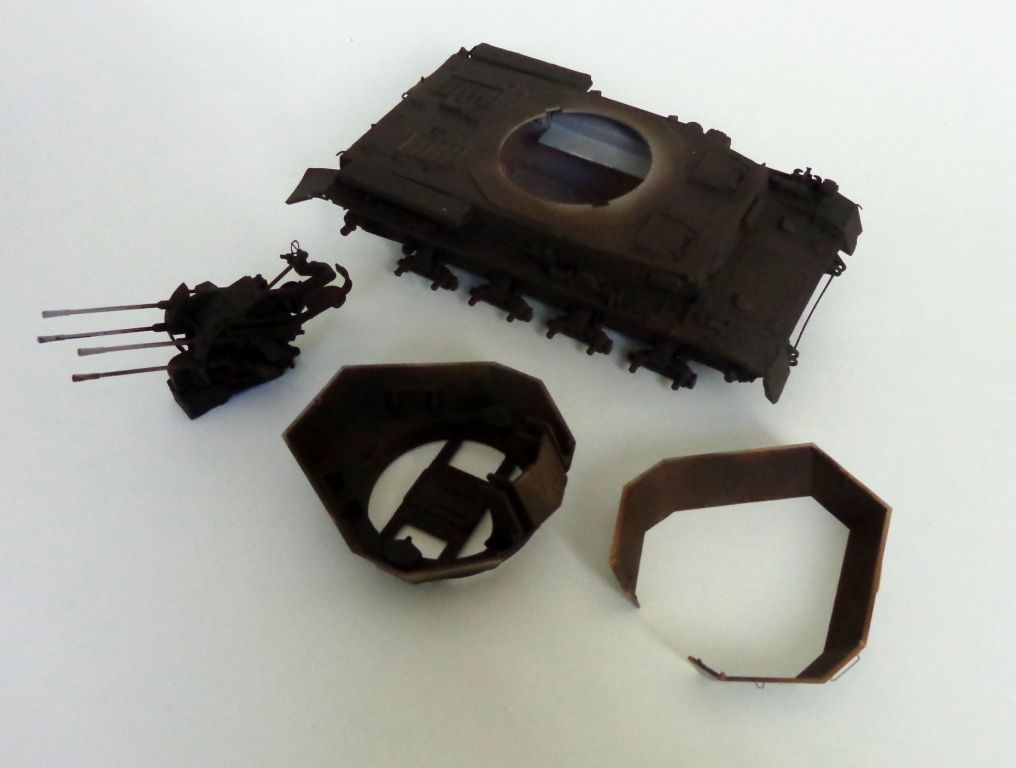
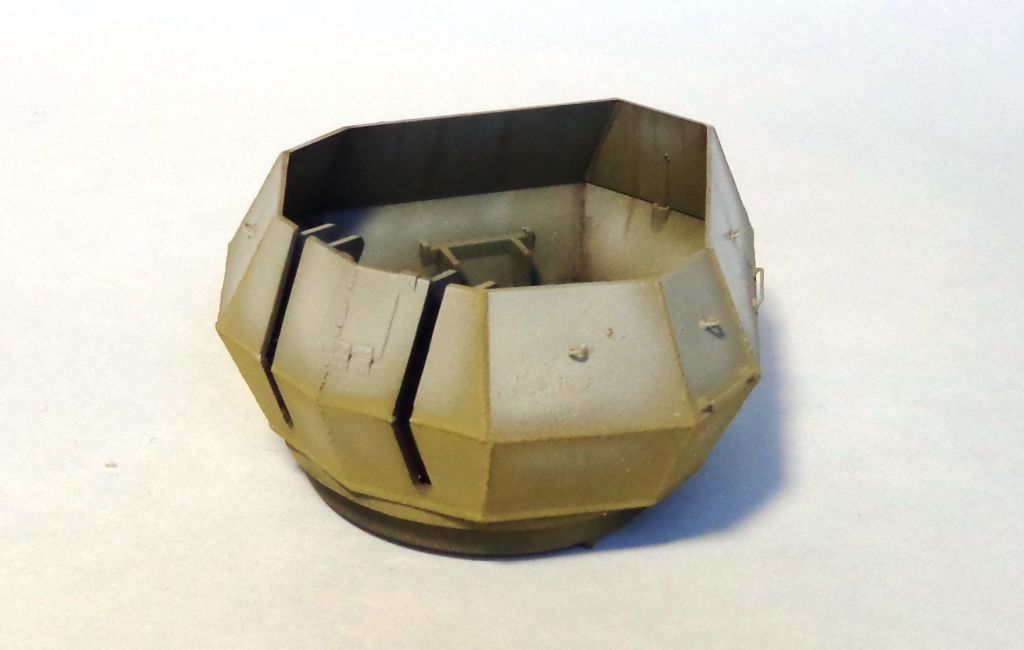
I have another painting update. Lotsa work here: since Wirbelwinds were modifications of existing Pz IV hulls, I wanted to go for a look of a new add-on turret with a fresher paint job than the old hull. First thing I did was give it a all a shot of Tamiya gray primer to cover all that PE.

 '

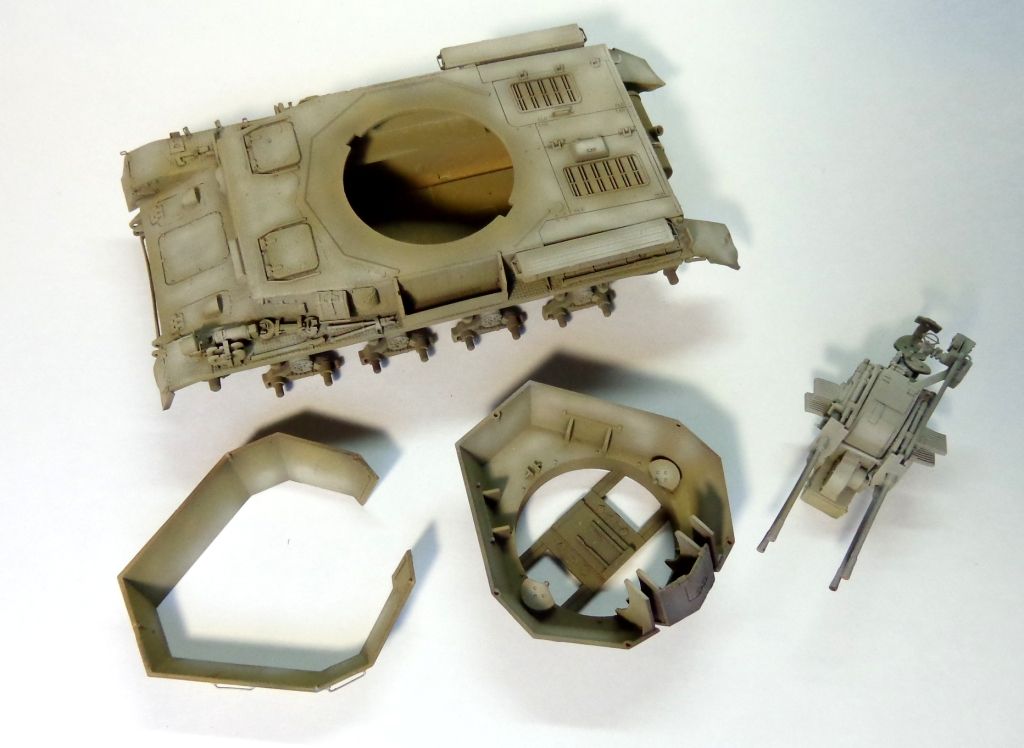
Then, a coat of Tamiya Brown + Black as an undercoat..

Next, uninted Tamiya Dark Yellow

Wheels got the same treatment, but I"m omitting the inneccesary coverage of that for now.

Then I made a "light"  mix of DY by adding WHite and Buff, and sprayed it in the panels of the hull. In the turret, I only bothred to fo the inside fo it, as the outside will be painted when the interior is weathered a bit.

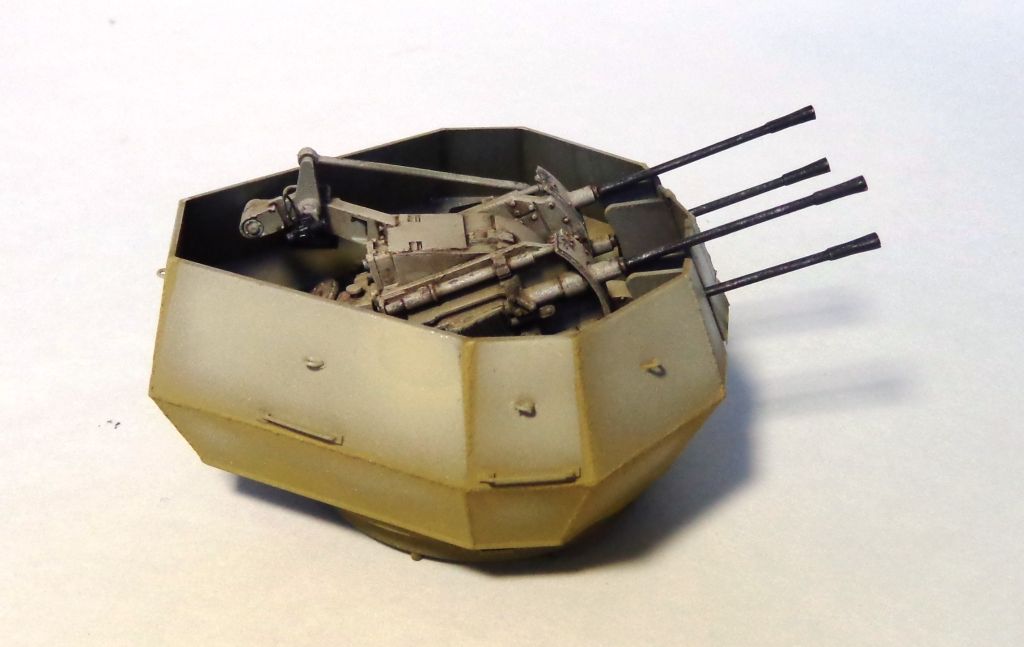
One small detail I did to add some life to the interior ws to build "empty" magazine holders. Just to make it look like the vehicle has seen some use. This was easily accomplished with styrene.

Next,. some light Dark Umber washes was added in the seams and corners, and the guns were painted along with the barrels in MM Semi-Gloss Black, and then lightly drybrushed with steel.

The turrert was sealed, and sprayed with untinted DY over the plastic. Leaving the brown undercoat out of this step will give me a slightly different tint to it-a key step in making the DY coat just ahair different than the hull's.

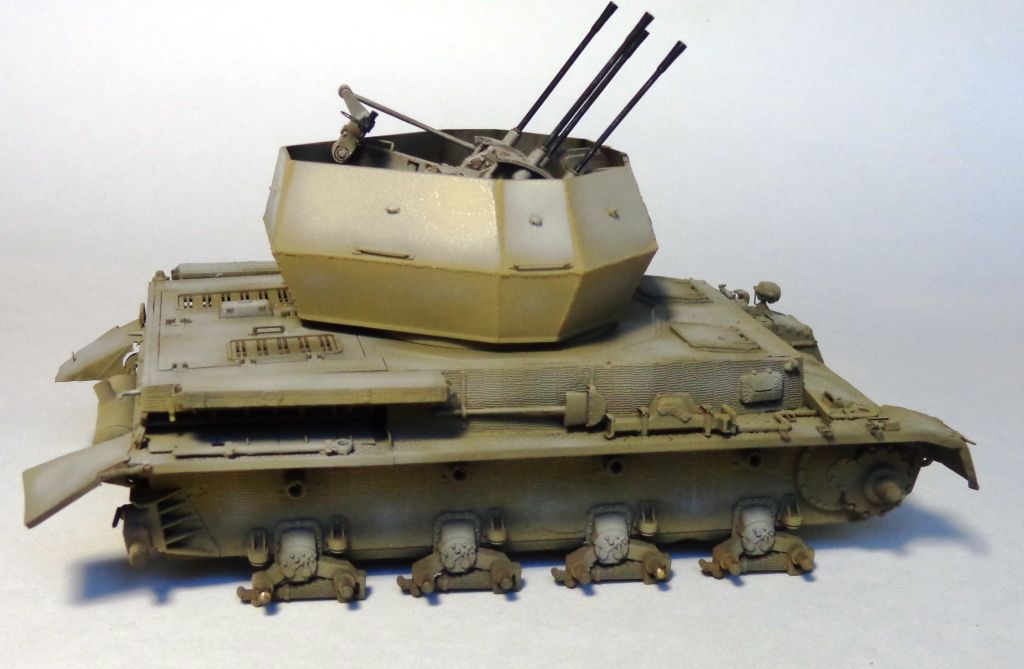
Next, new welds were added to the plate joints using white putty and lacquer thinner.

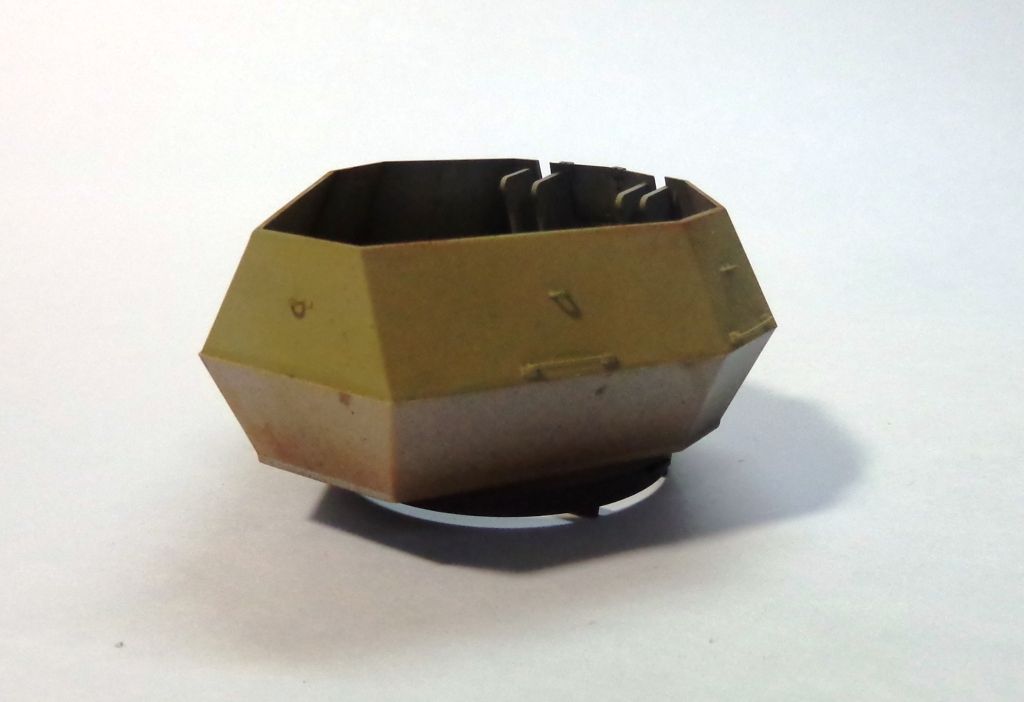
After a quick repaint of DY (slightly backwards step there...) I masked and taped the panes in oder to do some Color Modulation Technique.

The panels were sprayed with a new light DY mix ONLY on the top, and from the top-left corner, in. The lower right panel would be shaded darker by not painting it. Additionally, I won't paint the lower half of the hull.

ANd here's the result:

It looks kinda funny, now, but I then mixed a "middle" DY color and highlighted the bottom panels so as not to have such a stark difference.

I then mixed a green color from Olive Green + Buff and sprayed a pattern. I used it on the turret as well to provide some color harmony.

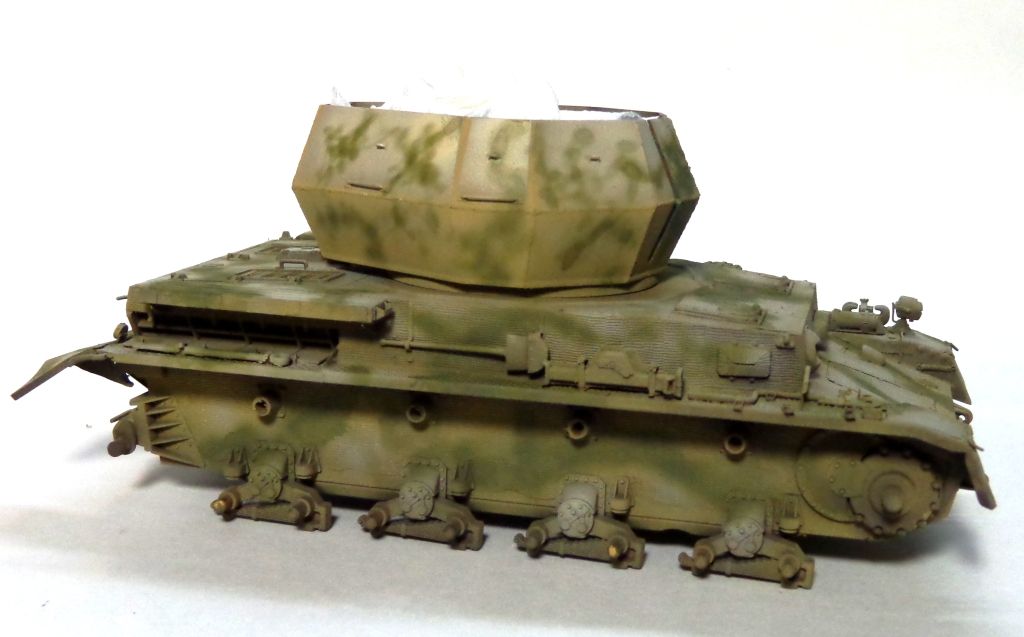
Next, I took Tamiya "Field Gray" and sprayed the turret lines again, so I had two different shades, but predominantly Field Gray.I also added some Red Brown.

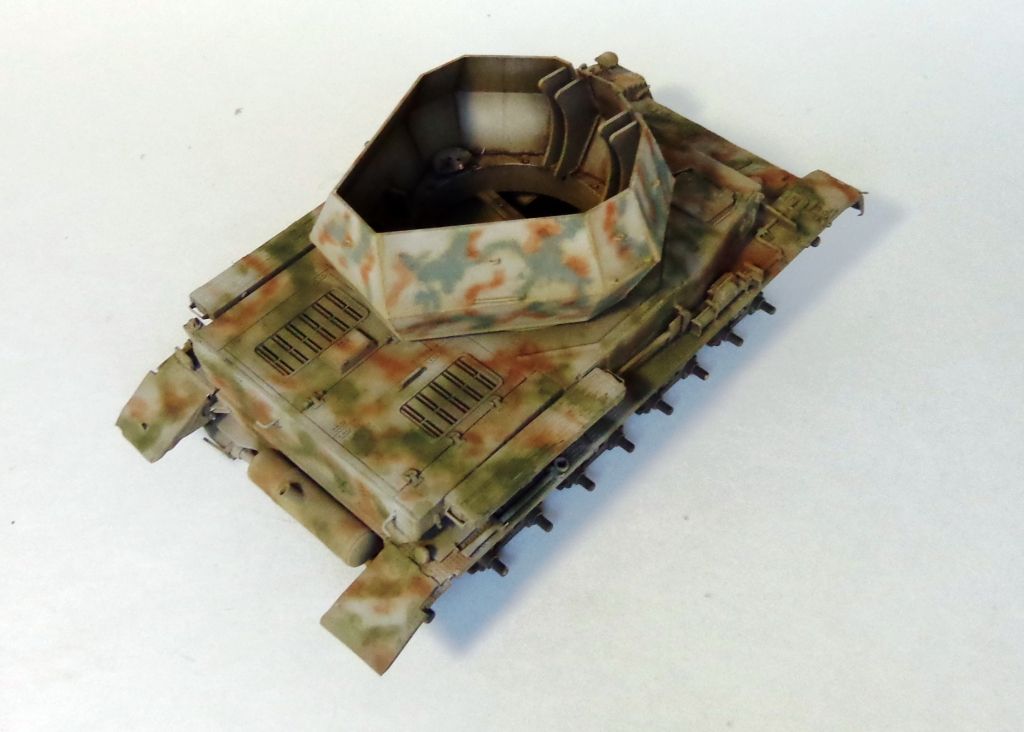
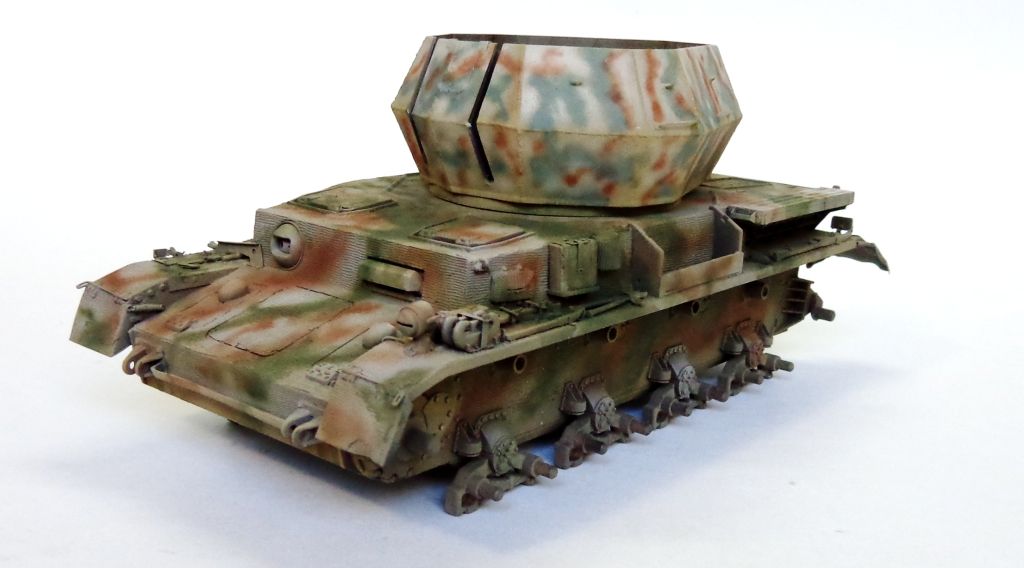
I feel like I"ve succeeded in making a subtle-but-noticeable dstinction between the hull and turret. Hopefully the weatering will serve to tie it together even moire and make a cool presentation.

Thanks for looking in, all, and please let do me know what you think of the concept? Smile

  • Member since
    December 2008
  • From: Goffstown, NH
Posted by New Hampshire on Wednesday, December 25, 2013 4:20 PM

Ho ho ho, Santa Doog brings us a nice present in the form of photo goodies.  Thank you Santa Doog! YesBig SmileYes

Brian

  • Member since
    January 2006
  • From: California
Posted by SprueOne on Wednesday, December 25, 2013 9:05 PM

Looks good from here. Nice realistic weld seams too

Anyone with a good car don't need to be justified - Hazel Motes


Iron Rails 2015 by Wayne Cassell Weekend Madness sprueone

  • Member since
    July 2006
  • From: San Francisco Bay Area
Posted by bufflehead on Thursday, December 26, 2013 12:00 AM

"You ARE a bold one!"

Much bolder than I was with my last attempt with color modulation!!  I must admit its looking a little funky right now, but you've always managed to apply some great weathering that tones all of those stark colors right down!

I like your method of applying the two tone camo.  It looks very random, haphazard and rushed, just like a field maintenance crew would do when hard pressed for time (which most were!)  Many of us, myself included, tend to make it much neater....falling into the "hand of God" trap when applying camo.

Looking forward to the end result Karl!

Ernest

Last Armor Build - 1/35 Dragon M-26A1, 1/35 Emhar Mk.IV Female


Last Aircraft Builds - Hobby Boss 1/72 F4F Wildcat & FW-190A8


  • Member since
    April 2006
  • From: ON, Canada
Posted by jgeratic on Thursday, December 26, 2013 2:57 AM

Karl, looking stellar.  

Really impressed with how the turret interior turned out.

regards,

Jack

  • Member since
    January 2007
Posted by the doog on Thursday, December 26, 2013 7:27 AM

"Santa Doog", lol. I like that, ha ha. Thanks, Brian!

Thanks for looking in, SprueOne. Glad you like the weld seams; the turret really needs the detail on the old Tamiya kit.

Ernest, thanks for the confidence in my future weathering, and for the comment on the camo--i DID try to make it look rather "field painted". It's a relief to hear that someone thinks I made a mark in that regard.

Thanks too, Jack! I appreciate the thumbs-up on the turret interior!

  • Member since
    March 2013
  • From: Puebla, Mexico
Posted by garzonh on Thursday, December 26, 2013 5:17 PM

What can I say my friend!!

you are a master at modeling,the colors are amazing, to be sincere in fact I liked it more before the cammo patern, the base color with the darken areas looke perfect for me.

But I should wait and see it finished before giving an opinion, Im sure it will be another museum quality piece

Happy Holidays!!

  • Member since
    January 2007
Posted by the doog on Thursday, December 26, 2013 6:51 PM

lol, thanks, Hugo----yeah, I admit, it was kinda cool looking without the camo, but I've never see one in overall yellow--they all seem to have had elaborate paint schemes in 3-color. I apppreciate you enthusiasm though, honestly,

Hope you had a Happy Holidays as well!

  • Member since
    July 2006
  • From: New Jersey
Posted by redleg12 on Friday, December 27, 2013 6:26 AM

Karl - doing a catch up and as usual what do I find.....you are performing your magic here. The color modulation work is great.

Rounds Complete!!

"The Moral High Ground....A Great Place to Emplace Artillery."

  • Member since
    January 2007
Posted by the doog on Friday, December 27, 2013 9:05 AM

Thanks, Mike! I appreciate the support!

  • Member since
    July 2004
  • From: Texas
Posted by wbill76 on Friday, December 27, 2013 10:46 AM

Looks like Christmas was good to you in terms of bench time there Karl! Nice work on the paint scheme. Beer

  • Member since
    January 2007
Posted by the doog on Friday, December 27, 2013 6:51 PM

Thanks for looking in Bill! It was nice to have the whole day just to model!

  • Member since
    December 2006
  • From: N. Georgia
Posted by Jester75 on Saturday, December 28, 2013 11:26 PM

Looking good Karl. You can definitely tell the difference between the turret and the hull. I've lucked up and just added the Dragon version of this beast the the stash. Bring on the weathering, lets see you work that Doog magic!

Eric


  • Member since
    December 2002
  • From: Bury St Edmunds, Suffolk, England
Posted by Bish on Sunday, December 29, 2013 3:32 AM

I really like what you have done with this. The idea of getting the turret and hull to look slightly different is a good one and makes a lot of sense. Not something I would have thought of. I think you have pulled it off nicely.

And I with Ernst, getting that scheme right isn't easy because our brains tell us its just wrong, when we all know it isn't.

I am a Norfolk man and i glory in being so


On the bench: Airfix 1/72nd Harrier GR.3/Fujimi 1/72nd Ju 87D-3

  • Member since
    March 2003
  • From: Western North Carolina
Posted by Tojo72 on Sunday, December 29, 2013 7:49 AM

Nice camo job as usual,I see what you were telling me about the lightened DY

  • Member since
    January 2007
Posted by the doog on Sunday, December 29, 2013 10:19 AM

Jester75

Looking good Karl. You can definitely tell the difference between the turret and the hull. I've lucked up and just added the Dragon version of this beast the the stash. Bring on the weathering, lets see you work that Doog magic!

Eric,

Thanks for that affirmation. I'm hoping I can make this look like something special. I'm aware that there's a better-detailed version of the Dragon model out there, and hope that this one can live up to the newer release. Smile

Bish

I really like what you have done with this. The idea of getting the turret and hull to look slightly different is a good one and makes a lot of sense. Not something I would have thought of. I think you have pulled it off nicely.

And I with Ernst, getting that scheme right isn't easy because our brains tell us its just wrong, when we all know it isn't.

Thanks too, Bish--that makes me happy to hear, that you "get" what I was going for here.

Tojo72

Nice camo job as usual,I see what you were telling me about the lightened DY

Thanks, Anthony. Lightening the DY is, in my opinion, the first prerequisite for making a realistic-looking model. It's called "Scale Effect", and it holds that light reacts differently on a 1/35 sized model than it does on a huge vehicle in real life. As a modeler, you have to learn how to fool the eye into believing that light is playing upon your model the same as it would if your model was a real-scale vehicle. That';s the principle behind it. Smile

  • Member since
    December 2013
Posted by jetmaker on Monday, December 30, 2013 10:47 AM

That looks awesome! Those welds on the turret are killer!

  • Member since
    January 2007
Posted by the doog on Monday, December 30, 2013 5:51 PM

Hi all,

I've been working on some weathering, and have gotten the tracks on. Don't worry--I"m still going to do a Tracks Tutorial, but let me finish up here first!

I started the weathering with some good old fashioned drybrushing using a light tan acrylic paint from a craft store.

Let me apologized too, for those of you who click on the photo, trying to blow it up a little--I know that it takes you directly to Photobucket now, which really stinks--I don't know how to change that though. The link I used to use doesn't work on the FSM site now. Anyhoo...

I then used a metallic-brown-black mix of oils to do some light chipping, and used some raw umber to do some streaking. Pretty standard stuff here.

I used oil paint to do the muffler. Just some orange and raw umber. Started with dark tones and added lighter ones to get the end result.

Next came the tracks. These were painted and detailed on both sides using Adam Wilder's "Gunpowder" Line of pigment.

Next I decided to try something daring--chipping and weathering with just acrylic paints. I used Model Master Flat Black, Leather, and Steel, with a fairly "club-like" brush.

I dropped the brush against the sides, transferring the paint.

I also later used a smaller brush and, by keeping the paint thin and rather watery, was able to make thin lines and scratches in three different shades--tan, dark brown, and primer red. Scratches and chips wre done in the 3-color "depth" method. Tan first, primer red 2nd, and then steely-gray. Tools were painted with the same initial combination of colors. A few oil washes of raw umber were used for stains behind the bullet splash rail.

I'm about to start doing the lower hull--dirt, mud, spatters, etc. Stay tuned to see the finished result coming up by the end of the week! Comments or questions always welcomed! Big Smile

  • Member since
    December 2002
  • From: Bury St Edmunds, Suffolk, England
Posted by Bish on Monday, December 30, 2013 6:39 PM

Some more great work there karl, she is looking great.

I clicked on a couple of pics and it just blew them up as normal

I am a Norfolk man and i glory in being so


On the bench: Airfix 1/72nd Harrier GR.3/Fujimi 1/72nd Ju 87D-3

JOIN OUR COMMUNITY!

Our community is FREE to join. To participate you must either login or register for an account.

SEARCH FORUMS
FREE NEWSLETTER
By signing up you may also receive reader surveys and occasional special offers. We do not sell, rent or trade our email lists. View our Privacy Policy.