SEARCH FINESCALE.COM

Enter keywords or a search phrase below:

Wirbelwind---FINISHED PICS! pg 7

19890 views
136 replies
1 rating 2 rating 3 rating 4 rating 5 rating
  • Member since
    August 2008
  • From: S.W. Missouri
Posted by Pvt Mutt on Monday, December 30, 2013 6:46 PM

Keep practicing Karl you'll get the hang of it and you'll surprise yourself when you do buddy.Whistling

What you've done so far ain't bad thoughWink

Tony lee

Shoot Low Boys They're Ridin Ponys

  • Member since
    January 2006
  • From: California
Posted by SprueOne on Monday, December 30, 2013 6:56 PM

Bish

Some more great work there karl, she is looking great.

I clicked on a couple of pics and it just blew them up as normal

yeah, me too. Looking good, Karl

Anyone with a good car don't need to be justified - Hazel Motes


Iron Rails 2015 by Wayne Cassell Weekend Madness sprueone

  • Member since
    December 2008
  • From: Goffstown, NH
Posted by New Hampshire on Monday, December 30, 2013 7:17 PM

She's the bees knees Karl.  Them's the apples!  Top notch!  Insert any other old tyme pun here. Big Smile

Brian

  • Member since
    January 2007
Posted by the doog on Monday, December 30, 2013 7:37 PM

Hey, thanks guys, for both looking in, and for letting me know about the pics---yeah, they made a liar out of me, lol. I dunno why, but when I was finished posting and clicked on them, it took me right to my PB page--maybe it had something to do with me being still signed in or having an open tab there? Weird.

Anyway, thanks for the luv... :)

  • Member since
    January 2007
Posted by the doog on Monday, December 30, 2013 7:37 PM

New Hampshire

She's the bees knees Karl.  Them's the apples!  Top notch!  Insert any other old tyme pun here. Big Smile

Brian

lol! Thanks, Brian! Big Smile

  • Member since
    July 2003
  • From: On my kitchen counter top somewhere in North Carolina.
Posted by disastermaster on Monday, December 30, 2013 7:43 PM

Jeez Karl.....

              http://www.cool-smileys.com/images/2073.gif  ......that looks awesome!

 I could express approval and admiration for this over and over but I would surely fail to express how impressed I am with it..... and you're not even done yet.                                               

     You're continually motivating me to finish my stalled project....                   

                       https://encrypted-tbn2.gstatic.com/images?q=tbn:ANd9GcQXdHU1L5ai4DarLdHsqfh9kkjCl7NRD1c8D8oz0DSLGKpIKh0LTpoHQQStalled, SEE.

.... but currently it's just not possible given the recent turn of events I'm still having to deal with.

                LOVE IT!

http://i170.photobucket.com/albums/u244/heydoog/Wirbelwind/DSC03789_zpsca41964d.jpg

Sherman-Jumbo-1945

"I never know what to expect here anymore."


  • Member since
    March 2013
  • From: Puebla, Mexico
Posted by garzonh on Monday, December 30, 2013 9:27 PM

WOW my friend..that looks so good!, I knew I had to wait for the finished product.

As always you are an example to follow...or at least dying in the intent.

One more to you museum collection.

  • Member since
    July 2006
  • From: San Francisco Bay Area
Posted by bufflehead on Tuesday, December 31, 2013 1:42 AM

YEAH!!  Its looking awesome Karl!!  I knew your weathering would tie all the painting together!  Can't wait to see the finished product!  

Ernest

Last Armor Build - 1/35 Dragon M-26A1, 1/35 Emhar Mk.IV Female


Last Aircraft Builds - Hobby Boss 1/72 F4F Wildcat & FW-190A8


  • Member since
    January 2007
Posted by the doog on Tuesday, December 31, 2013 8:56 AM

Thanks, Steve! I'm patiently waiting for your next masterpiece! I hope that your life circumstances gives you more bench time some!

Hugo, thanks, too---you're always so kind, so complimentary with your comments. I DO appreciate them, and your enthusiasm!

Thanks too, Ernest--I am watching your latest build as well. Judging from your results, I would say that I'm in good company with you looking in here!

  • Member since
    January 2007
Posted by the doog on Wednesday, January 1, 2014 11:27 AM

Hello, all---Happy New Year and all that jazz...Smile 

Well, here's the last update and the finished pics. Time to go into the suspension weathering here.

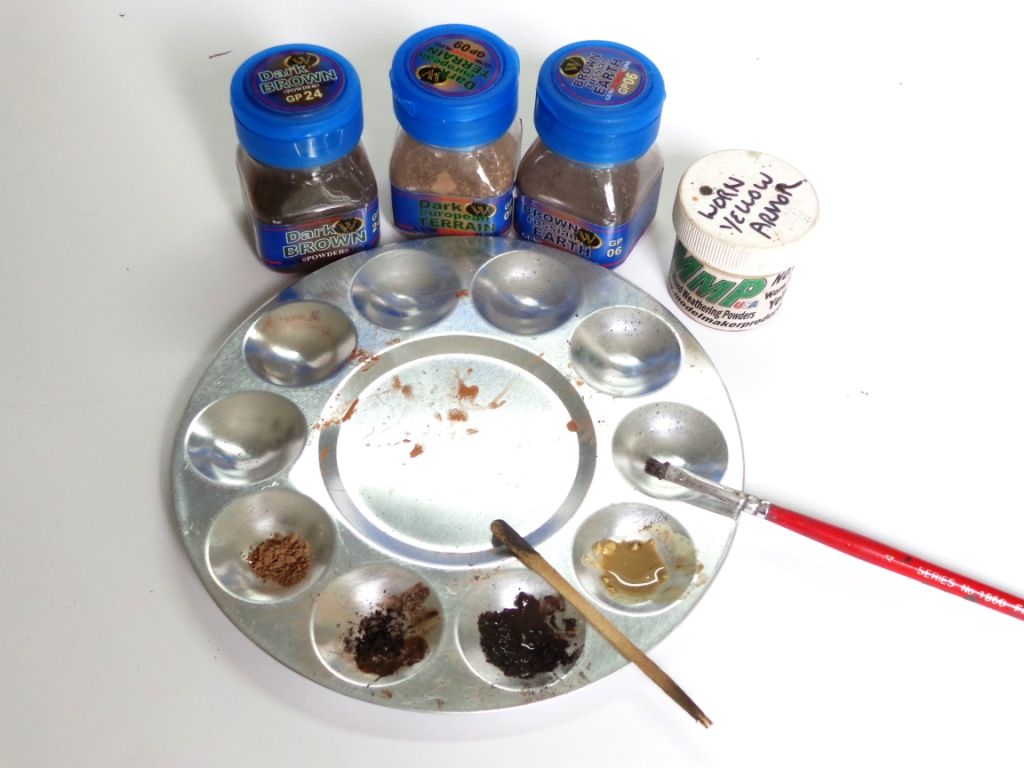
I mixed up some pigments from Adam Wilder's new Gunpowder line--Dark Brown, Dark European Terrain, and Russian Brown Earth. I also added some old MM Powders in "Worn Yellow Armor". Later I also added in some White pigmnents as a lightening agent.

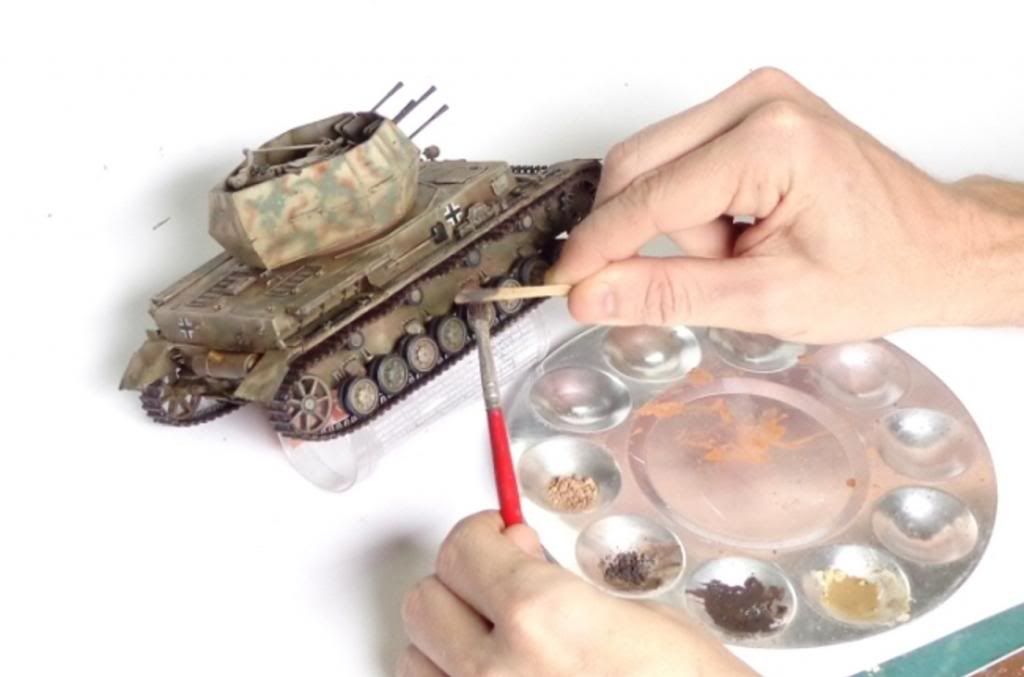
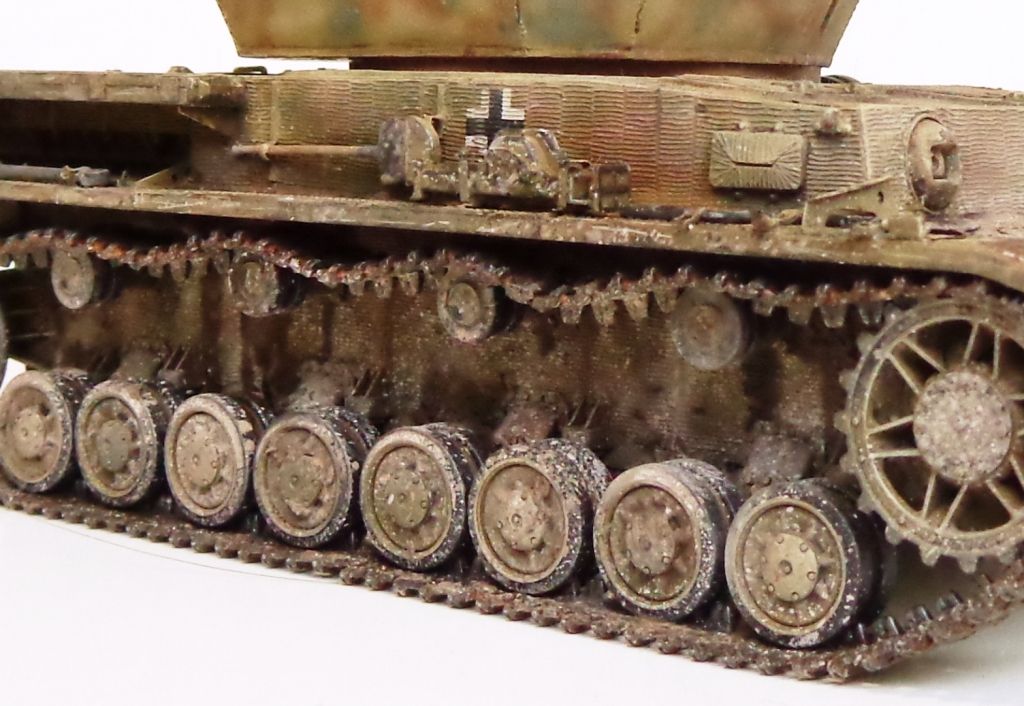
I started out by just doing some heavy spattering. Using a cut-down brush, I saturated the bristles with a thickish mixture of pigments and mineral spirits and used a wood cocktail stick to flick the bristles, causing the goop to fly off the bristles onto the suspension. If you are trying this for the first time, PLEASE practice aginst a bare piece of paper to learn how the goop behaves and in which direction it disperses. This can be a messy procedure if you don't know what you're doing.

Here's what you will get if you do it right. This is done with three different shades. If you don't mix it up, it will appear flat and one-dimensional.

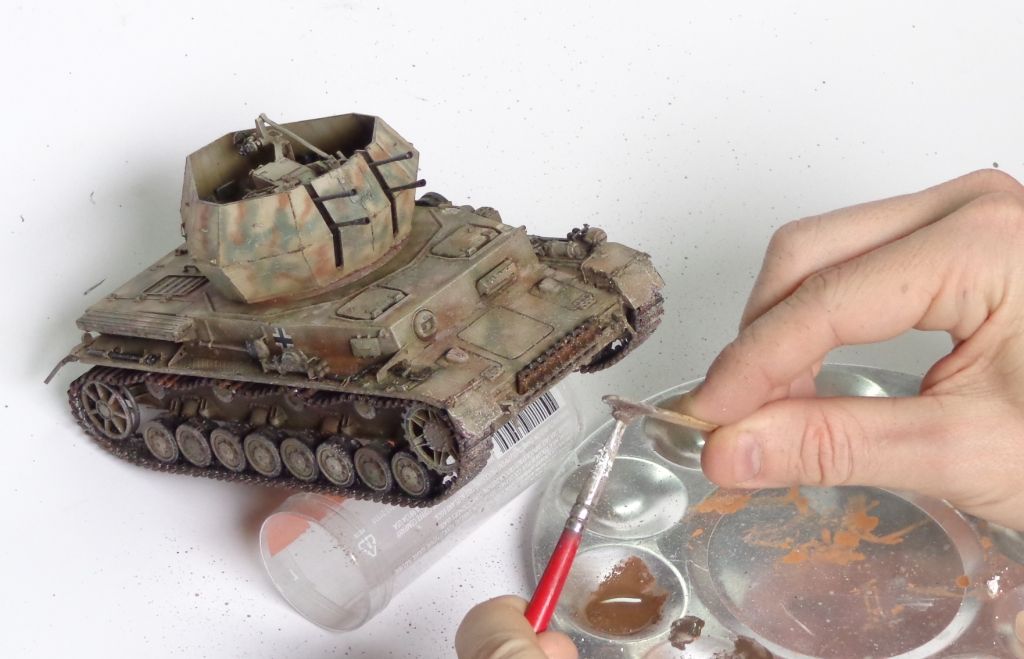
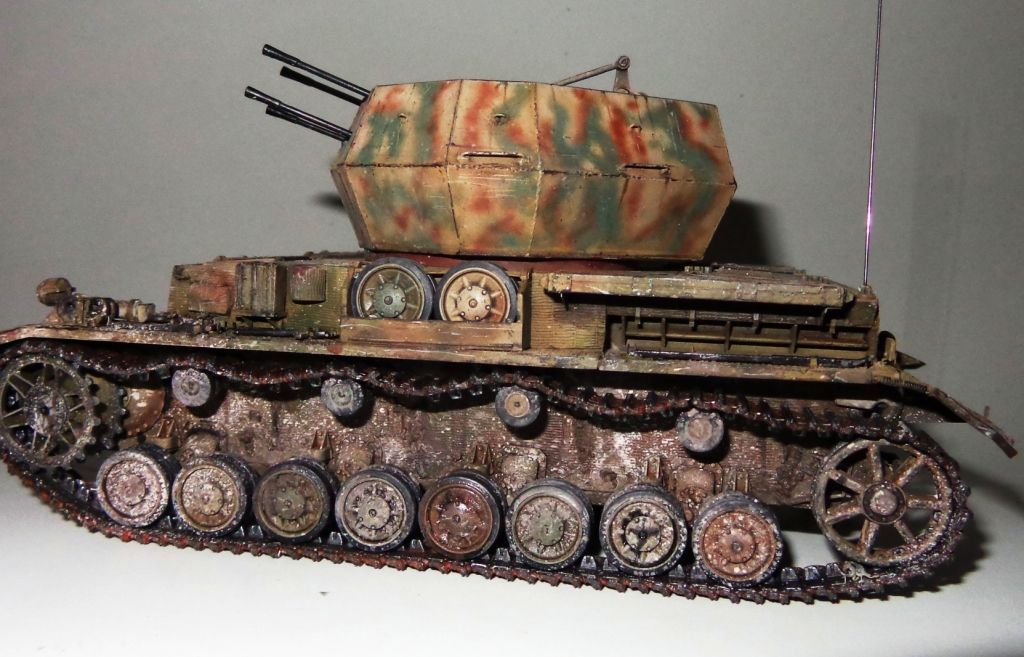
At this point, I started adding runs and drips of oil paint. Raw Umber, and Black. I pulled them down the zimmerit, over the splatter. I also used mixtures of the previous pigment mixtures for color harmony. I added some MIG "Wet Effects" for glossier patches--this gives a depth to the finish beyond just "dry" dirt. The final step was adding a bit of white glue to the pigment shades and mixing them into a paste with a little bit of real dirt added for bulk, and then dragging that around the suspension and lower hull.

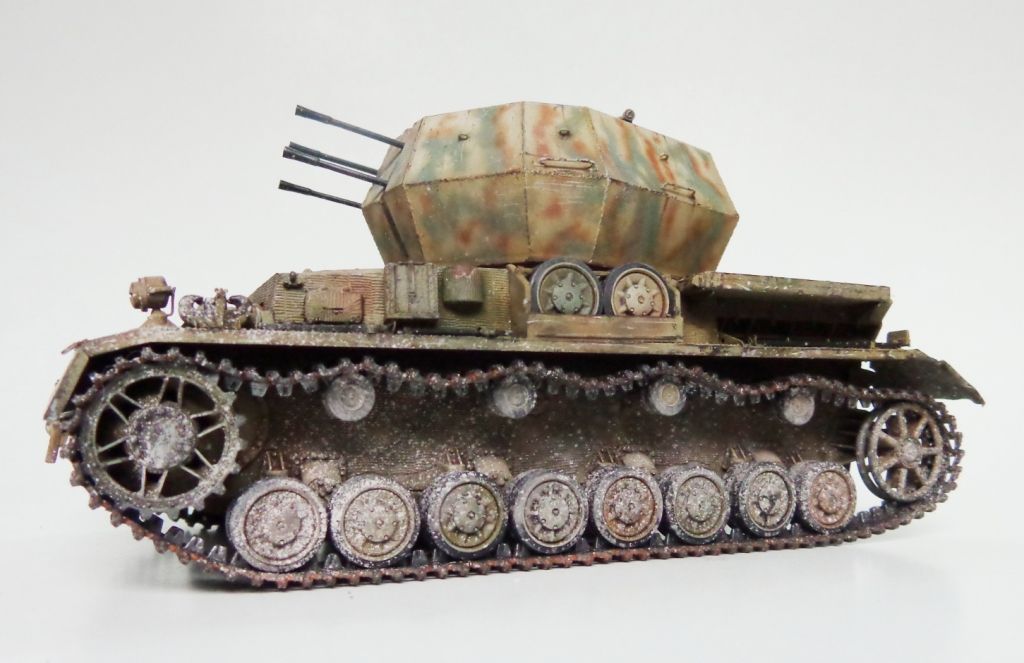
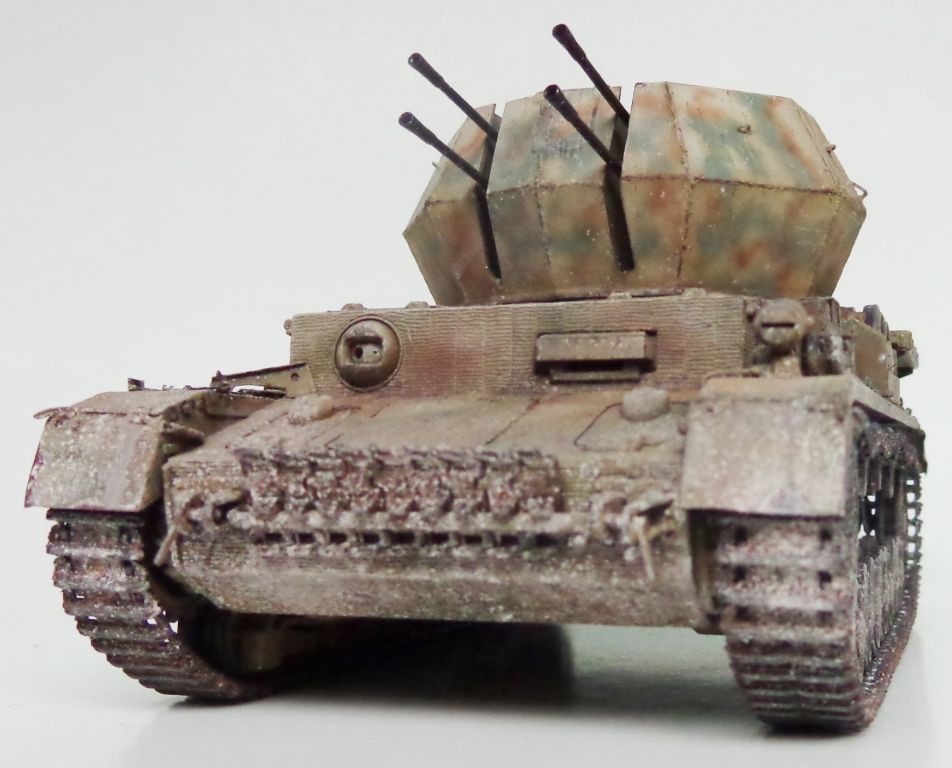
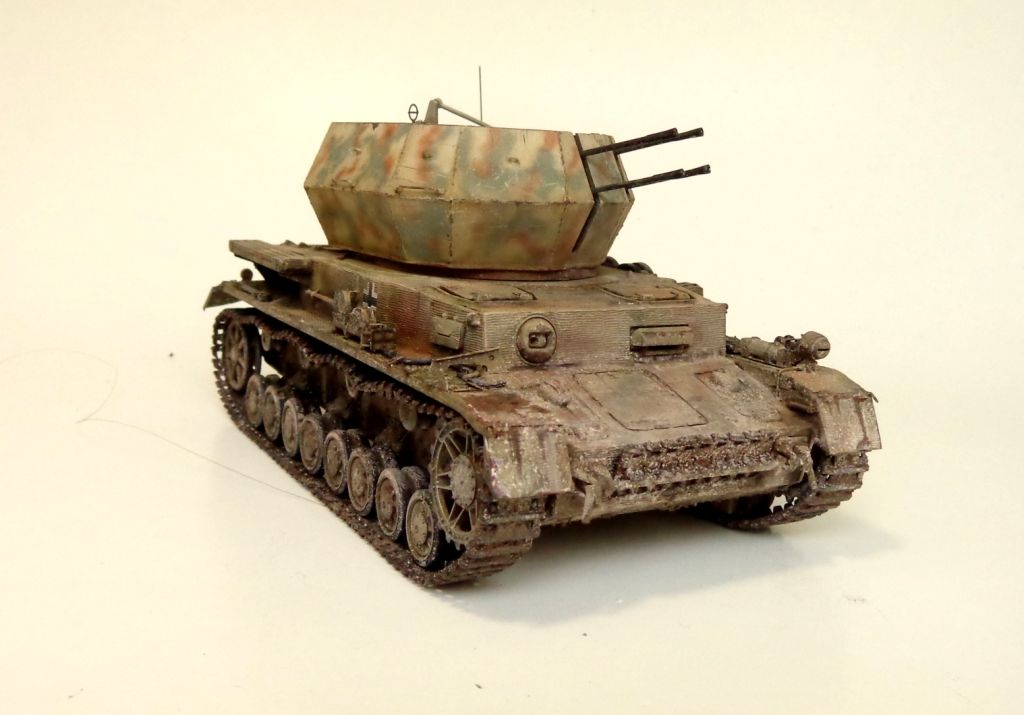
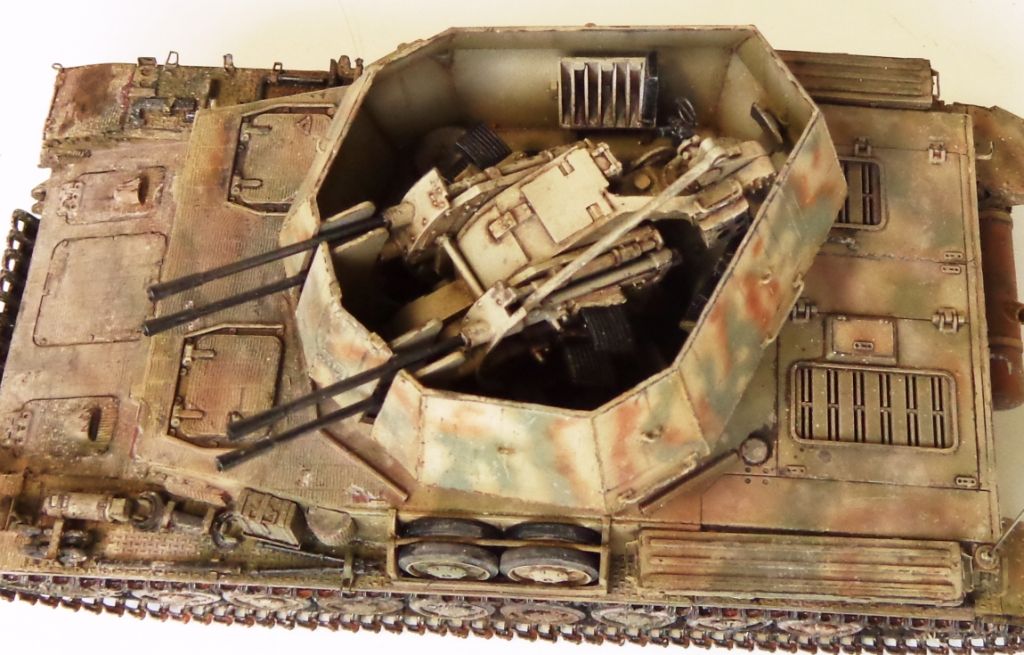
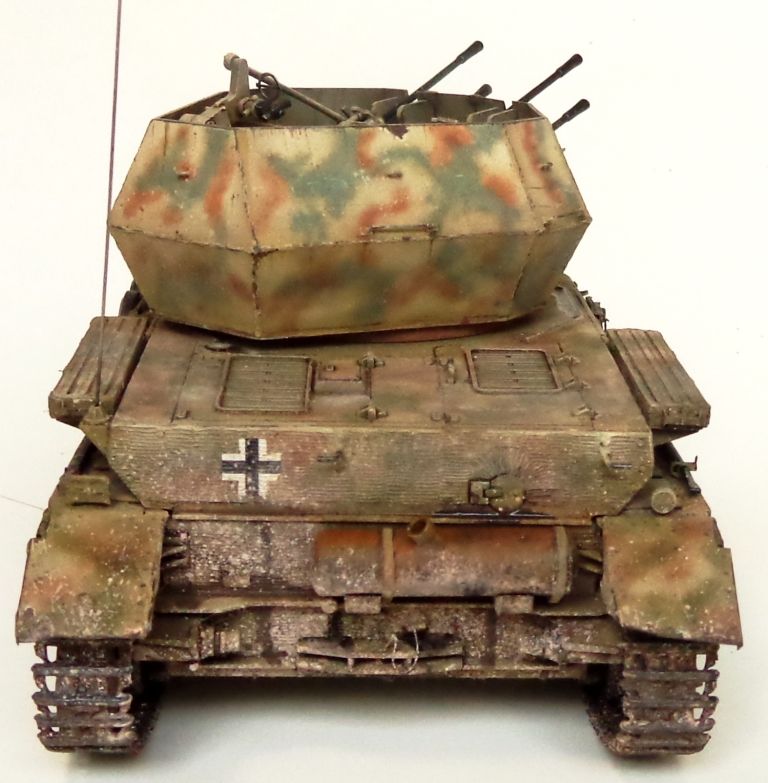
I present the Finished Pictures.

Note the difference in this photo to the one above--the darker highlights and shades are evident.

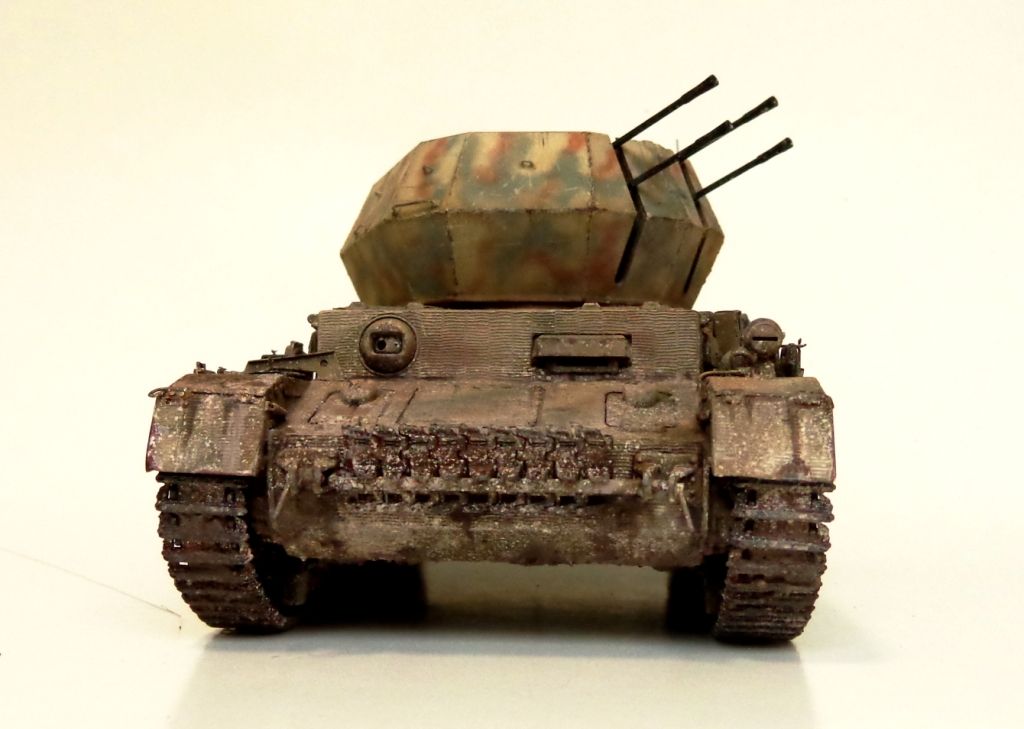
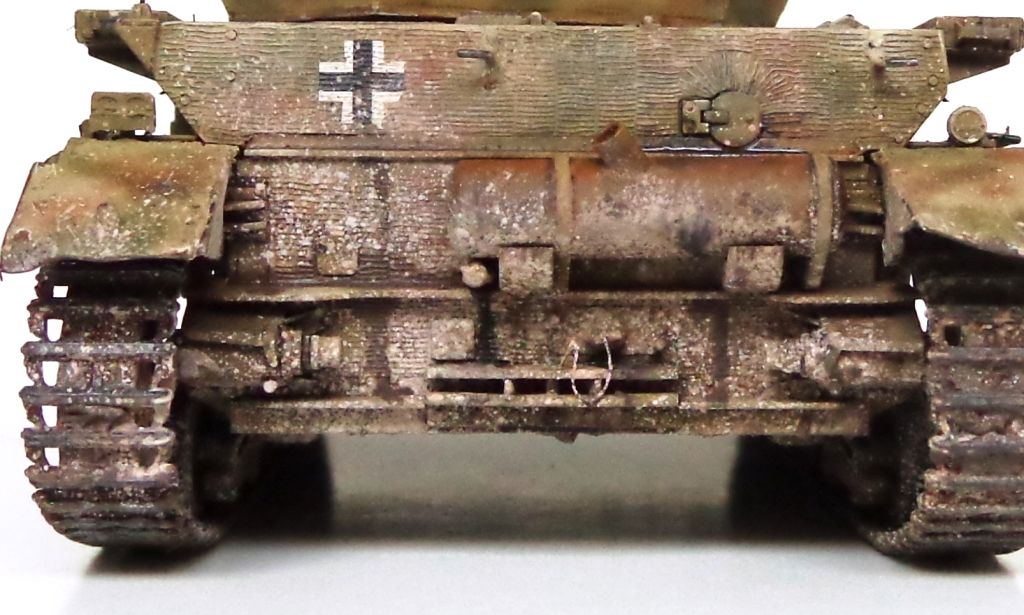
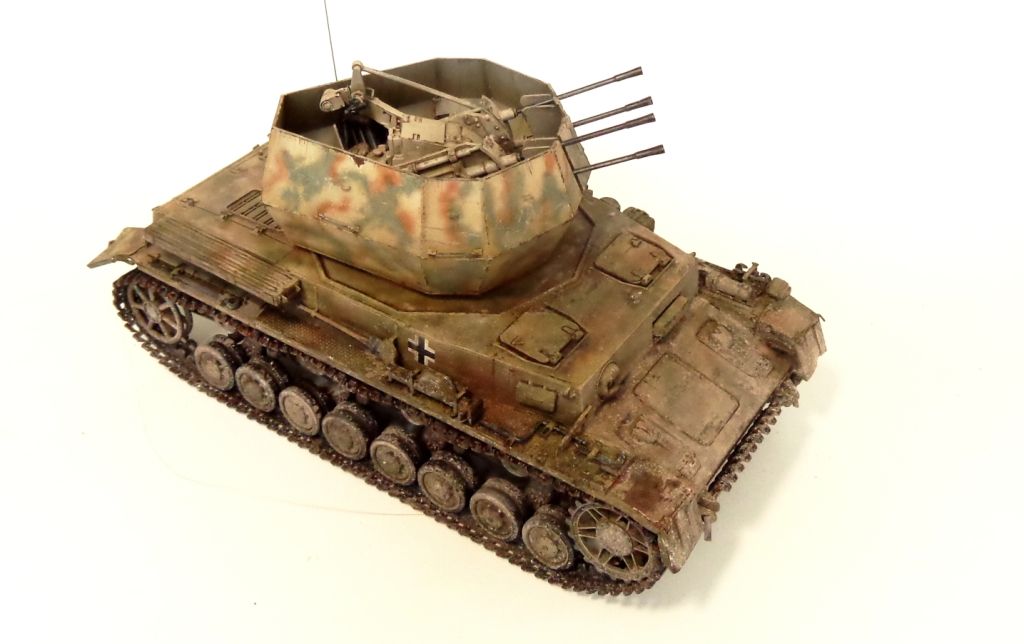
You can see more dustiness on the front hull as you would expect to see. Tools were painted in the usual way.

Thanks to everyone who looks in and is kind enough to leave a comment! Thanks for following along, and I'll try to get that track tutorial up by the end of the week.

Got a SUPER-busy period coming up, guys--not sure when I'll be back with another project. Jenn and I are moving into our new dooghouse that we're building down here in Charlotte after I return from Europe. I"m traveling a LOT this year, but hope I"ll be able to find time to model again soon. Oy, but it's going to be a busy 6 months though...Indifferent

  • Member since
    July 2003
  • From: On my kitchen counter top somewhere in North Carolina.
Posted by disastermaster on Wednesday, January 1, 2014 3:03 PM

https://encrypted-tbn2.gstatic.com/images?q=tbn:ANd9GcRAH22O6T0v13GosZGLWcj6T9TZisoDbd7QQlsiNbvf1fUIYdIotJUarSA .....and Hurry Back!

Sherman-Jumbo-1945

"I never know what to expect here anymore."


  • Member since
    February 2010
  • From: Maine
Posted by Stage_Left on Wednesday, January 1, 2014 6:32 PM

Karl- great job as usual; thanks for another informative tutorial. Yes

Congrats to you and Jenn on the upcoming new home.

Dave

  • Member since
    December 2008
  • From: Goffstown, NH
Posted by New Hampshire on Wednesday, January 1, 2014 6:47 PM

Wirbelwind?  More like WirbelWOW Karl!  No one can doubt you are at the top of your game my friend.  Never content to stick to a single process you push the boundaries, and we are all lucky for your sharing the experience! Bow Down

Brian

  • Member since
    July 2006
  • From: San Francisco Bay Area
Posted by bufflehead on Wednesday, January 1, 2014 8:11 PM

Karl, you've taken that venerable Tamiya kit and turned it into a piece of modeling art!!  I love whole overall look of your Wirbelwind; the weathering is just awesome!   Like Brian said, you push the boundaries and aren't afraid to use any and all methods in your modeling arsenal to give us these great build logs and completed builds!  I've been on this forum for over seven years and I'm still learning from the Masters on this forum!

Sorry to hear that you'll be away from the forums, we'll miss you.  Have fun and take care while you're away!

Ernest

Last Armor Build - 1/35 Dragon M-26A1, 1/35 Emhar Mk.IV Female


Last Aircraft Builds - Hobby Boss 1/72 F4F Wildcat & FW-190A8


  • Member since
    April 2006
  • From: ON, Canada
Posted by jgeratic on Thursday, January 2, 2014 2:03 AM

hi Karl, super job and can really see that textured  mud.    Very successful  at creating the look of a new turret on an older chasis, and at the same time still comes across as unified piece - well done!

regards,

Jack

  • Member since
    December 2002
  • From: Bury St Edmunds, Suffolk, England
Posted by Bish on Thursday, January 2, 2014 3:14 AM

Amazing job again Karl. I think you have defiantly pulled off what your going for, new turret on old hull.

I hope you will pop in and check up on us from time to time. Safe travels.

I am a Norfolk man and i glory in being so


On the bench: Airfix 1/72nd Harrier GR.3/Fujimi 1/72nd Ju 87D-3

  • Member since
    March 2003
  • From: Western North Carolina
Posted by Tojo72 on Thursday, January 2, 2014 7:45 AM

Another great project done Karl,best wishes on your move.

  • Member since
    January 2007
Posted by the doog on Thursday, January 2, 2014 8:05 AM

Guys, thanks all, for the nice comments, the well-wishes on the house, and the sentiments on my travels. It's much-appreciated and I will indeed be looking in as much as I can. I am happy to know that after so many years on this forum that there are still things to share and show, and that some new modelers and friends here are still finding my WIPs educational. Just paying back what I got from the modelers before me who taught me through their own WIP posts!

I have to leave here some time in late January and will be on the road a month, then home for a few weeks before jetting off to Europe again. When I come home a month later I have to move, and then May and June brings a few more weeks of travel. It's going to be crazy. I will be trying to get on and keep in touch though!

  • Member since
    March 2004
  • From: Spartanburg, SC
Posted by subfixer on Thursday, January 2, 2014 8:53 AM

Due to my own move to another home, I have been slacking on my posting.

YesYesToast on the Wirbelwind, Karl. Another super piece of work.

Lee

I'm from the government and I'm here to help.

  • Member since
    April 2005
  • From: Gothenburg
Posted by JohanT on Thursday, January 2, 2014 9:32 AM

Hi Karl,

I would agree with Jack that a lot of focus on a Wirbelwind goes to the interior of the turret and you simply scored there. The contrasts make all the difference and you have it all the way from the sighting aperture in there instrument black, the worn but clean interior over to the outer turret and then finally the beaten up hull itself.

Very good way to finish 2013 and an inspirational kick start for 2014.

Happy New Year and Good Luck!

Johan

  • Member since
    January 2007
Posted by the doog on Thursday, January 2, 2014 1:17 PM

Thanks, Lee and Johan!

I hope that you get more FSM time, Lee, and good luck with the new house---I know how exciting that can be!

And thank you, Johan, for the well-wishes! Hope your new year is as rewarding as well!

  • Member since
    July 2004
  • From: Sonora Desert
Posted by stikpusher on Thursday, January 2, 2014 1:31 PM

That is another beautiful finished build from you my friend. That splatter technique is sure interesting. I might suggest more concentration of that stuff in areas more likely to have increased mud build up around the running gear. When your other stuff in the near future is done, your modeling batteries should be recharged, and I am sure you will wow us with another superb build.


F is for FIRE, That burns down the whole town!

U is for URANIUM... BOMBS!

N is for NO SURVIVORS...

       - Plankton

LSM


  • Member since
    December 2006
  • From: N. Georgia
Posted by Jester75 on Thursday, January 2, 2014 3:16 PM

I have to echo what others have already said Karl, she looks great!

Best of luck with the move and the new house and safe travels my friend!

Eric


  • Member since
    May 2013
  • From: Indiana, USA
Posted by Greg on Thursday, January 2, 2014 3:36 PM

Amazing work! Thank you so much for sharing this build.

  • Member since
    March 2004
  • From: Kincheloe Michigan
Posted by Mikeym_us on Thursday, January 2, 2014 6:14 PM

Karl if you build this kit again would you do an interior? The Wirbelwind and the Ostwind both had visible interiors due to the open bottom turrets. And seeing as these are on former frontline Ausf H chassis would said interiors retain their primer red flooring and ivory interiors or would the interiors have been painted Dunkelgelb to camoflage the interior?

On the workbench: Dragon 1/350 scale Ticonderoga class USS BunkerHill 1/720 scale Italeri USS Harry S. Truman 1/72 scale Encore Yak-6

The 71st Tactical Fighter Squadron the only Squadron to get an Air to Air kill and an Air to Ground kill in the same week with only a F-15   http://photobucket.com/albums/v332/Mikeym_us/

  • Member since
    January 2007
Posted by the doog on Thursday, January 2, 2014 7:38 PM

stikpusher

That is another beautiful finished build from you my friend. That splatter technique is sure interesting. I might suggest more concentration of that stuff in areas more likely to have increased mud build up around the running gear. When your other stuff in the near future is done, your modeling batteries should be recharged, and I am sure you will wow us with another superb build.

Carlos,

Thanks, man!. You have to be careful for doing too much "spatter"--it is very difficult to control, and not really the proper technique to "build up" bulk like you suggest. Much better to use plain pigments with acrylic medium--white glue will also suffice-- with dirt or plaster filler and make a dedicated thick slurry to then add around the suspension. I did some of that, but didn't want to go crazy with it as it tends to obscure the paint.

Thanks for your vote of confidence---I'm already excited about the next project--whatever I decide that will be! Smile

  • Member since
    January 2007
Posted by the doog on Thursday, January 2, 2014 7:39 PM

Thanks, Greg and Eric! I appreciate you leaving such nice comments!

  • Member since
    January 2007
Posted by the doog on Thursday, January 2, 2014 7:52 PM

Mikeym_us

Karl if you build this kit again would you do an interior? The Wirbelwind and the Ostwind both had visible interiors due to the open bottom turrets. And seeing as these are on former frontline Ausf H chassis would said interiors retain their primer red flooring and ivory interiors or would the interiors have been painted Dunkelgelb to camoflage the interior?

Mike, ya got me!? Embarrassed Honestly, I don't know. wbill would be a better guy to ask about stuff like that. I'm more an "artist" in my approach than a diehard historian. And I don't think I'd monkey around with an interior much because I simply don't know what would be in them--and nor does anyone else, really. And to be honest, it doesn't much matter to me anyway--the interior on this is so cramped that you wouldn't be able to see much of it anyway.

From what I know and have read, primer red as an interior color was VERY unpopular with the crews---there were, apparently, many complaints about it. So I would think that if they had the paint to do the exterior DY, they would most likely have gone and painted the interior in a DY as well.

I've got a DML Ostwind, but probably won't get to it for quite a while. On to another variant of another vehicle after this one. I may do a big paper panzer after this one?

  • Member since
    December 2002
  • From: Bury St Edmunds, Suffolk, England
Posted by Bish on Thursday, January 2, 2014 8:18 PM

Mikeym_us

Karl if you build this kit again would you do an interior? The Wirbelwind and the Ostwind both had visible interiors due to the open bottom turrets. And seeing as these are on former frontline Ausf H chassis would said interiors retain their primer red flooring and ivory interiors or would the interiors have been painted Dunkelgelb to camoflage the interior?

I am not sure about the Wirbelwind, but on the Ostwind, once everything is in place, you can't see inside anyway. The Italeri kit has a flooring section that goes right under the turret, and looking at some pics of a Wirbel with the turret removed, that had a raised floor as well, with nothing else directly under the turret. The pics are from a vehicle in a museum and are black and white, the interior does look dark, I would say primer red, while the drivers compartment, which you can see with the turret off, is defiantly white.

I am a Norfolk man and i glory in being so


On the bench: Airfix 1/72nd Harrier GR.3/Fujimi 1/72nd Ju 87D-3

JOIN OUR COMMUNITY!

Our community is FREE to join. To participate you must either login or register for an account.

SEARCH FORUMS
FREE NEWSLETTER
By signing up you may also receive reader surveys and occasional special offers. We do not sell, rent or trade our email lists. View our Privacy Policy.