SEARCH FINESCALE.COM

Enter keywords or a search phrase below:

Meng FT-17 French Light Tank Riveted Turret

21556 views
137 replies
1 rating 2 rating 3 rating 4 rating 5 rating
  • Member since
    August 2007
  • From: back country of SO-CAL, at the birth place of Naval Aviation
Posted by DUSTER on Wednesday, October 29, 2014 4:35 PM

Bill,  Great job on the base. I like how you handled the sand bags and the 2nd color wood choice seems to be in keeping with the "breakage" shown,.

 If I may be so bold, to suggest that some earth/dirt clumps and staining on portions of the wood ; may help convey the idea they were in close contact with the dirt of the trench before being broken/shattered. Also, the ends of the wood would be new wood color(s) as they are broken./split apart.

  All that said, should your plans already have covered this and doubtless other further enhancements, I apologize and will go sit in a corner until allowed the come back out to view the post.  

ps the tank is no slouch either    

Steve

Building the perfect model---just not quite yet  Confused

  • Member since
    July 2004
  • From: Texas
Posted by wbill76 on Wednesday, October 29, 2014 4:11 PM

Thanks Mustang!

Karl

I thought it was kind of fitting and since it was included with the kit, figured why not? Wink

Ixion

thanks for the comments as well! I chose Gunmetal (the enamel version, not the metalizer version) for two reasons. 1) I already had some of it mixed up and use it regularly for different things and 2) it's the perfect dark gray for my purposes particularly with the lighter dry brushing that followed. The enamel version doesn't have a metallic quality but is in the gray spectrum which is what I wanted to convey with the 'aged' wood look. It fit perfectly for what I needed it to do despite the slightly misleading title on the paint bottle. Big Smile
  • Member since
    December 2012
Posted by Ixion on Wednesday, October 29, 2014 11:35 AM

Cue The Lego Movie theme song; "Everything is Awesome". Headphones

But you've thrown me a curve here, why wash the wood grain with Gunmetal? Doesn't that give it a metallic sheen, especially in a groove that would normally be in shadow? 

  • Member since
    January 2007
Posted by the doog on Tuesday, October 28, 2014 8:19 PM

Totally cool beans, Bill! I love the idea of a trench!

  • Member since
    March 2012
  • From: Corpus Christi, Tx
Posted by mustang1989 on Tuesday, October 28, 2014 5:58 PM

One these days I'll brave dioramas and figure painting. Great work! Yes


 Forum | Modelers Social Club Forum (proboards.com) 

  • Member since
    July 2004
  • From: Texas
Posted by wbill76 on Tuesday, October 28, 2014 5:33 PM

More progress on the base to report. I applied some weathering to the sand bags in the form of some black artist pastels and some dry brushing to create some shadows and highlights.

For the wood braces/planks, things turned out a little more interestingly. I originally started out planning to finish them as relatively 'new' wood and applied a wash of MM enamel Leather over the previous paint base color. This worked out fine by themselves but when I placed them on the base I didn't like the tonal contrast, so I switched gears and decided to go aged wood instead. Rather than strip it and start over, I decided to keep what I'd already done and build on it instead. So I applied another wash, this time using MM enamel Gunmetal, and then dry brushed some MM enamel Light Gray to bring out the wood grain pattern. Some strategic use of black artist pastels also helped add some definition here and there.

I'm fairly happy with the direction this one's heading in so far especially since it's sort of uncharted territory as I don't usually do bases for my builds.

  • Member since
    July 2004
  • From: Texas
Posted by wbill76 on Tuesday, October 28, 2014 11:58 AM

Thanks Steve! Bombs away! Big Smile

Rob

Thanks as well! Meng provided a nice touch with this little base IMHO. Yes
  • Member since
    December 2002
  • From: Fort Knox
Posted by Rob Gronovius on Tuesday, October 28, 2014 11:48 AM

.

  • Member since
    July 2003
  • From: On my kitchen counter top somewhere in North Carolina.
Posted by disastermaster on Monday, October 27, 2014 6:56 PM

 http://forum.star-conflict.com/public/style_emoticons/default/storm.gifLooks good enough to bomb......

                         http://forums.insidelacrosse.com/images/smilies/naughty.gif Mighty fine Bill.

Sherman-Jumbo-1945

"I never know what to expect here anymore."


  • Member since
    July 2004
  • From: Texas
Posted by wbill76 on Monday, October 27, 2014 4:57 PM

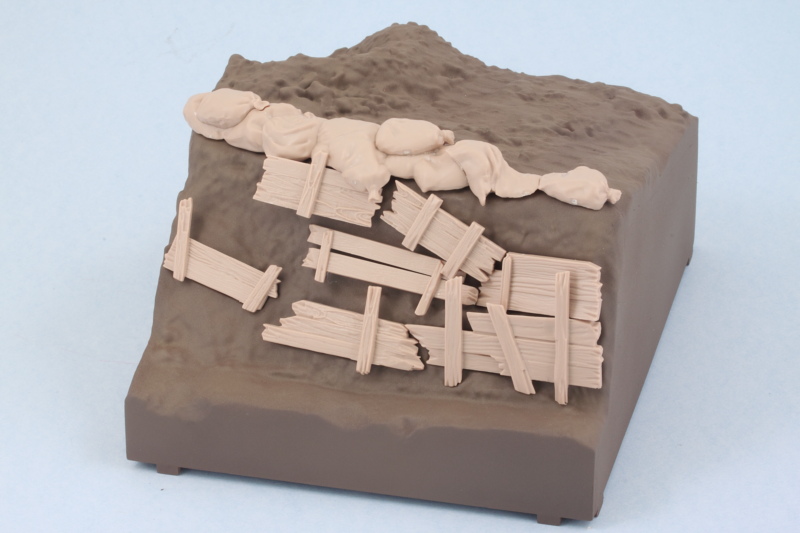
After giving it some thought I decided to go ahead and continue work on the base area first before I start weathering the vehicle. This way I can treat them all as elements of the same end result more or less instead of working on them independently. To that end, I turned to Step 21 which deals with the trench details (sandbags, wooden frames/braces, etc.)

The sandbags that go in along the top edge consist of 5 different pieces, 4 of which you can assemble together to create one large unit with the 5th piece, K4, needing to be dealt with separately. I had to enlarge a couple of the slot openings in this area to take the tabs on the underside of the sandbags but nothing major. I also cleaned up and test fit all of the L sprue parts that make up the frames/braces for the trench to see how they would all play together.

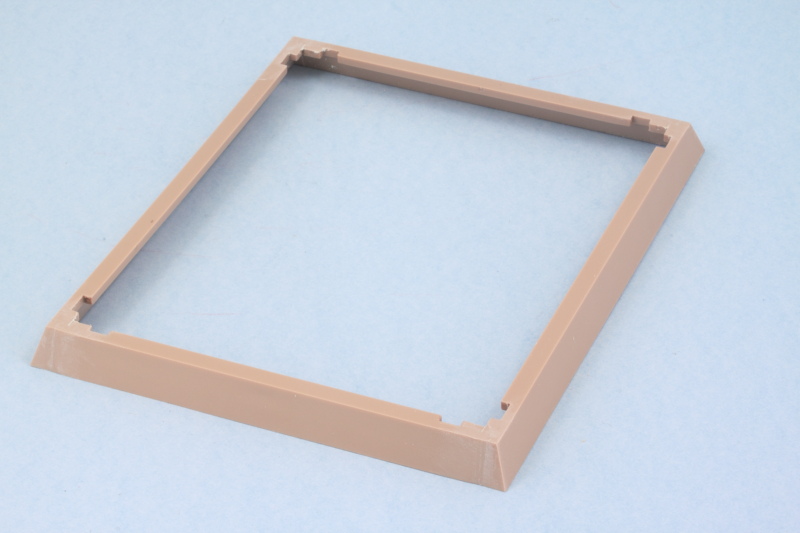
In Step 20, the instructions would have you add the angled frame plates of the base individually but I found it easier to attach them separately to create a single frame as some sanding/putty was needed at the joins to create a seamless result. I also had to sand down a couple of the tabs as they were slightly too wide to fit the slots in the base frames.

So with that done, it was time to give the airbrush a workout to 'block in' the colors I needed for the trench detail elements. I used Testors Model Master enamel Afrika Grunbraun for the canvas on the sand bags and used my 50/50 custom mix of Dunkelgelb/Light Gray for the wood frames/braces. That may seem like an odd choice but it's just a foundational color that's going to undergo some significant changes before its all said and done! While I was at it, I also applied some MM enamel Flat Black to the base frame.

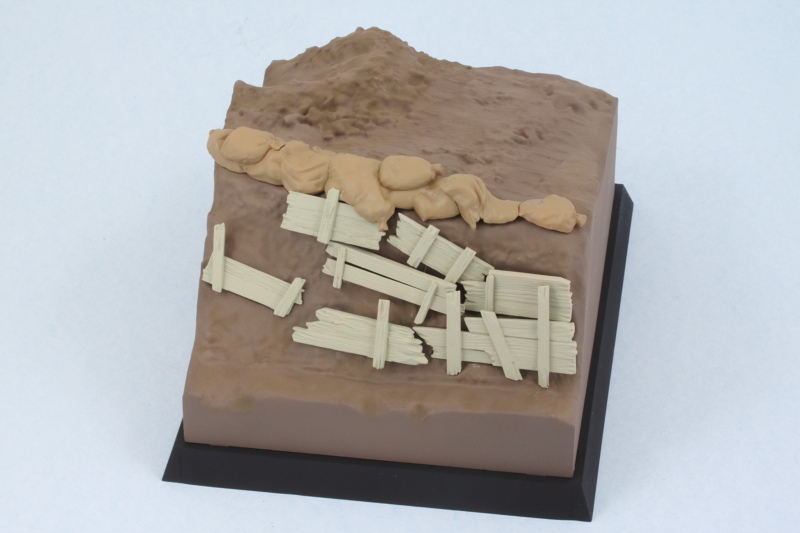
This will all get a chance to cure before moving on to the next steps but it is moving ahead!

  • Member since
    July 2004
  • From: Texas
Posted by wbill76 on Sunday, October 19, 2014 2:24 PM
Bish

I would not have thought of schemes like this in WW1. Its rather forward thinking, I am sure I am not the only one who see's the similarity to the late war German schemes.

Funny thing about camo schemes is the more they change, the more they stay the same over time! Big Smile The French and Germans were using three-tone schemes at the end of WW1, the Germans actually used three-tone again in the interim pre-war period for several years in the early thirties before shifting to the German Grey/Dark Brown scheme...then in 1943 the three-tone returns and does its evolution to hard-edge factory schemes that we know and love so much. All of it depended on when/where the units were fighting and under what conditions!
  • Member since
    December 2002
  • From: Bury St Edmunds, Suffolk, England
Posted by Bish on Sunday, October 19, 2014 12:19 PM

I would not have thought of schemes like this in WW1. Its rather forward thinking, I am sure I am not the only one who see's the similarity to the late war German schemes.

I am a Norfolk man and i glory in being so


On the bench: Airfix 1/72nd Harrier GR.3/Fujimi 1/72nd Ju 87D-3

  • Member since
    July 2004
  • From: Texas
Posted by wbill76 on Sunday, October 19, 2014 11:58 AM

Thanks Mustang!

Rob

that's true. There were about 500 of these vehicle still in active service with the French army in 1939. The Germans made use of them in a variety of different capacities including airfield security up until 1945! Talk about a long service life... Wink

Bish

this one's a WW1 scheme for a vehicle at Verdun in October 1918 with an American unit. Wouldn't surprise me if some of these were still kicking around in 1948 for the Arab-Israeli conflict...that time period was really interesting in terms of the sheer variety of hodge-podge gear used on both sides! Beer
  • Member since
    December 2002
  • From: Bury St Edmunds, Suffolk, England
Posted by Bish on Sunday, October 19, 2014 1:32 AM

Looking great there Bill. Is this a WW1 scheme or later.

I recall reading some where that these were still is use in the late 40's by Egypt during the Arad Israeli war, not sure if that's true or not though.

I am a Norfolk man and i glory in being so


On the bench: Airfix 1/72nd Harrier GR.3/Fujimi 1/72nd Ju 87D-3

  • Member since
    December 2002
  • From: Fort Knox
Posted by Rob Gronovius on Saturday, October 18, 2014 9:44 PM

.

  • Member since
    March 2012
  • From: Corpus Christi, Tx
Posted by mustang1989 on Saturday, October 18, 2014 2:46 PM

This is gonna get intense! Can't wait for you to bring it home with the weathering. Awesome paintwork Bill.


 Forum | Modelers Social Club Forum (proboards.com) 

  • Member since
    July 2004
  • From: Texas
Posted by wbill76 on Saturday, October 18, 2014 2:42 PM

Just a quick little update albeit an important one. Tracks received their base coat treatment by airbrushing some MM enamel Burnt Umber over the black plastic and will get some additional detailing/weathering attention later on. That doesn't mean they aren't still useful as it was time to go ahead and permanently fix the suspension elements in place to the hull. It was necessary to scrape some paint that had accumulated inside the drive sprocket and final drive mount holes as well as the mount pins themselves as the fit was too tight otherwise...something I had thought to prevent by masking those areas off with blue tack but forgot to do until it was too late. Liquid glue did the trick for those areas along with some CA for the metal struts at the front of the hull. The track runs were dry fit once more to ensure I had a level set top and bottom for the suspensions on both sides.

As you can see, having the tracks on totally changes the visual perception of the camo pattern as well, so that works out nicely. Just for fun, I also checked to see how it would look on the kit's dio base.

I'll let the suspension set up nice and solid before the next steps deal with the remaining details prior to getting the weathering process started.

  • Member since
    July 2004
  • From: Texas
Posted by wbill76 on Friday, October 17, 2014 5:00 PM

Got the rest of the camo pattern on today with the red-brown portions. Same drill as with the green, I used the blue-tack approach to mask off the appropriate areas first.

Out with the airbrush and a mix of 50-50 MM enamel Military Brown and Leather did the trick in no time.

After doing some light touch-ups here and there with the base coat, I sprayed a mist/filter coat of heavily thinned base coat color to tie the scheme all together and fade the scheme a bit.

Once the tracks are on it will help break up the pattern some as well and provide some additional visual contrast.

  • Member since
    July 2004
  • From: Texas
Posted by wbill76 on Thursday, October 16, 2014 5:16 PM

First stage in applying the camo pattern is complete! I'm using the kit's finishing guide for an American tank at Verdun in October 1918 that sports a hard-edged three-tone scheme, so the first order of business was marking out the green areas. I used some 'worms' of poster blue tack putty rolled out and pressed down with a wooden toothpick to create the masks.

Some Model Master enamel Khaki was airbrushed at low pressure using a fine detail tip. After sitting for a couple of hours to touch dry, I removed the blue-tack to see how it turned out.

So far, so good, just some tiny areas that might need touch-up later on. Next up will be the red-brown portion.

  • Member since
    July 2004
  • From: Texas
Posted by wbill76 on Thursday, October 16, 2014 12:02 PM

Thanks Mike! I agree it feels a little odd not working on a German tank but it's just a momentary diversion! Big Smile

  • Member since
    July 2006
  • From: New Jersey
Posted by redleg12 on Wednesday, October 15, 2014 7:47 PM

As always it is great to watch a master at work. Still.....strange its not German.....but looks great

Rounds Complete!!

"The Moral High Ground....A Great Place to Emplace Artillery."

  • Member since
    July 2004
  • From: Texas
Posted by wbill76 on Wednesday, October 15, 2014 4:29 PM

I've started in on the painting process and the first order of business was laying down a primer coat of Testors Model Master enamel Italian Dark Brown via airbrush.

I let that set up overnight and then, since I'm applying a three tone camo and the yellow part of the pattern seems to be the most dominant, I applied the yellow portion as a base coat to work off of. I used a 50-50 mix of MM enamel Dunkelgelb/Light Gray as it will not doubt darken during the weathering process.

This will get the chance to set up just like the primer as I don't want to take any chances with paint lifting when I mask off the areas for the brown and green areas of the scheme. In the meantime, I decided to give the kit-included base a try. It assembles pretty easily and has a nice cross brace at the bottom that helps hold everything together and give it some rigidity. I did have to employ small amounts of putty in a couple of spots on some of the joins and of course sanding was called for to smooth everything down on all four sides but nothing major.

Since I had the airbrush out, I decided to also paint the base. A primer coat of Italian Dark Brown came first, then some highlights using MM enamel Afrikabraun, and an overall filter/mist coat of MM enamel Raw Sienna. It's a little hard for the camera to pick up all the subtleties but it produced a nice starting point to work from that will get further refinement with pigments and dry brushing later on. I will admit to a sudden craving for chocolate cake though...can't imagine why!

That's where things stand at the moment, next up of course will be getting that camo pattern on the vehicle and then finalizing the suspension installation.

  • Member since
    July 2004
  • From: Texas
Posted by wbill76 on Tuesday, October 14, 2014 11:39 AM

Sorry to tempt you Rob! I applaud you for your discipline in sticking with the RPM kit...maybe for Christmas you can get yourself a little treat...these Riveted Turret kits often go for substantially less than the full interior kits if you catch a sale just right. Wink Thanks for the comments and support on this build. Beer

  • Member since
    December 2002
  • From: Fort Knox
Posted by Rob Gronovius on Tuesday, October 14, 2014 10:20 AM

.

  • Member since
    July 2004
  • From: Texas
Posted by wbill76 on Tuesday, October 14, 2014 10:00 AM

Thanks Sprue! I'm very impressed with what Meng came up with in terms of both fit/engineering and quality of detail on this kit. Beer

  • Member since
    January 2006
  • From: California
Posted by SprueOne on Monday, October 13, 2014 8:44 PM

Progress flowing together nicely. The suspension sub-assemblies looked a little gnarly but handled well 

Anyone with a good car don't need to be justified - Hazel Motes


Iron Rails 2015 by Wayne Cassell Weekend Madness sprueone

  • Member since
    March 2012
  • From: Corpus Christi, Tx
Posted by mustang1989 on Monday, October 13, 2014 2:36 PM

This and the weathering is what separates the men from the boyz here. Looking forward to this part.


 Forum | Modelers Social Club Forum (proboards.com) 

  • Member since
    July 2004
  • From: Texas
Posted by wbill76 on Monday, October 13, 2014 12:45 PM

Thanks Bish! Wink Now the fun begins in the painting department.

  • Member since
    December 2002
  • From: Bury St Edmunds, Suffolk, England
Posted by Bish on Monday, October 13, 2014 12:02 PM

Really coming to life now Bill, looking great.

I am a Norfolk man and i glory in being so


On the bench: Airfix 1/72nd Harrier GR.3/Fujimi 1/72nd Ju 87D-3

  • Member since
    July 2004
  • From: Texas
Posted by wbill76 on Monday, October 13, 2014 11:39 AM

Duster

I hear you there! These things had a very low top speed at 8 km/h and were powered by a 4-cylinder engine, so the clanking would've been in slow-motion! Wink

Mustang

thanks as always!

BeerJibber

you're right on the link count. This vehicle had tensioned tracks so 32 is exactly what is needed on both sides, no more, no less! Wink The only small drawback to the track links is Meng's decision to mold them in black styrene. This makes it very hard to spot any small amounts of flash that could interfere with the fit, so I just took the standard precaution of cleaning up all the contact points on each link to ensure a good fit. A little tedious, but pays off in the end.  
JOIN OUR COMMUNITY!

Our community is FREE to join. To participate you must either login or register for an account.

SEARCH FORUMS
FREE NEWSLETTER
By signing up you may also receive reader surveys and occasional special offers. We do not sell, rent or trade our email lists. View our Privacy Policy.