SEARCH FINESCALE.COM

Enter keywords or a search phrase below:

T54-E1 FINISHED PICS!

12940 views
222 replies
1 rating 2 rating 3 rating 4 rating 5 rating
  • Member since
    December 2002
  • From: Fort Knox
Posted by Rob Gronovius on Wednesday, April 5, 2017 11:49 AM

the doog


Gamera


Whoops yeah, I meant the M103 heavy, not the M113 APC... Embarrassed


Haha, good to know; I thought they somehow slipped that release by me.. Big Smile


My first time on an M103 was a hard target at Fort Drum in 1985. We had fired at it the night before and the next day, were checking out our handiwork. It is one of the Black Label kits I would have liked to get, but in order to just build the kit as it should be (not correcting accuracy errors) seemed like just too much work and you wouldn't end up with a good model in the end. Now, I have see some modelers make outstanding models, but it was probably a labor of love.

  • Member since
    December 2002
  • From: Fort Knox
Posted by Rob Gronovius on Wednesday, April 5, 2017 11:45 AM

HeavyArty

Another area you may want to address is the missing mud release holes on the rear sprockets.


My old photograph of my new (at the time) M88A1 sprocket sure has made the rounds. Somewhere I have a close up photo of the holes. They are not tear drop shaped on this M88 sprocket carrier; they are oval, but with straight sides, more like a medicine capsule or a Good and Plenty candy piece.

  • Member since
    January 2007
Posted by the doog on Monday, April 3, 2017 9:30 AM

Gamera


Whoops yeah, I meant the M103 heavy, not the M113 APC... Embarrassed


Haha, good to know; I thought they somehow slipped that release by me.. Big Smile

  • Member since
    November 2009
  • From: SW Virginia
Posted by Gamera on Monday, April 3, 2017 9:28 AM

the doog


Gamera

 I'm almost finished assembling Takom's T30/34 and the fit is perfect, it's a friggin' shake the box and it assembles itself kit. .


Good to know; I just picked that baby up too. and it's a cool looking kit!


What is the "Black Label M113"? That a misprint?? :)

Thanks for stopping in, Cliff, and speaking out! :)


Whoops yeah, I meant the M103 heavy, not the M113 APC... Embarrassed

"I dream in fire but work in clay." -Arthur Machen


  • Member since
    January 2007
Posted by the doog on Monday, April 3, 2017 9:23 AM

Gamera

 I'm almost finished assembling Takom's T30/34 and the fit is perfect, it's a friggin' shake the box and it assembles itself kit. .


Good to know; I just picked that baby up too. and it's a cool looking kit!

What is the "Black Label M113"? That a misprint?? :)

Thanks for stopping in, Cliff, and speaking out! :)

  • Member since
    September 2005
  • From: Groton, CT
Posted by warshipguy on Monday, April 3, 2017 7:57 AM

I don't mind thoughtful comments concerning a given kit's flaws; Lord knows I did my fair share of complaining with the Hasegawa 1/350 IJN Nagato after the manufacturer forgot to erase the CAD lines, but I did not resort to profanity, nor did I complain about the good fortunes of other modelers.  The contributors to the Armorama thread did both. I love the German tanks of WWII, and I have started my sojourn into tank modeling by starting with them.

I would much rather see specific complaints that might help a new tank builder such as myself, as well as helpful advice for the more advanced builder.

Bill

  • Member since
    November 2009
  • From: SW Virginia
Posted by Gamera on Sunday, April 2, 2017 7:37 PM

Great job there Karl, I'll be sure to refer back to your solution if I ever pick up this kit. Which I might if I can get it on sale, sorry not paying fifty bucks for something with this many issues. Plus hopefully someone will release a resin turret that actually looks like the real thing, which I frankly consider a joke to have to buy aftermarket to fix Dragon's screw-up. Still if I can get it cheap enough it might be a go.  And I want the aftermarket option in case I should screw-up modifing the turret.

I bought the Black Label M103* when it first came out and well it does look like an M113 in basic shape but I've been a bit gun-shy since hearing about all the other problems. I did pick up the M6 on sale and I'm not sure how accurate it is but it is together and mostly painted and the fit was pretty darn good. Only real issue is the double rows of four bogies on each side, that's sixteen bogies in total for thirty-two road wheels to clean up. As opposed of course to a M4 or M3's single set of three bogies per side for only twelve road wheels...

I don't even get why Dragon can't do better here. I'm almost finished assembling Takom's T30/34 and the fit is perfect, it's a friggin' shake the box and it assembles itself kit. Not sure how accurate but it looks the part and Takom did post photos of their Facebook page showing how they climbed around on the real thing to get the details right. I'm sad to say I haven't bought hardly anything Dragon in years while loading up on Takom and Meng kits.....

*Edit: I meant to say M103 heavy tank, not the M113 APC... Embarrassed

"I dream in fire but work in clay." -Arthur Machen


  • Member since
    January 2007
Posted by the doog on Sunday, April 2, 2017 7:31 PM

Pawel


the doog
I think that "Pavel" here on FSM allegedly was in contact with them beforehand when this model had been announced and was very critical and helpful in pointing out these significant errors.


I sure hope you don't mean me... The Polish modeller in question here is "Vodnik". His first name is also Pawel (also with a "W"), so some people flatter me confusing me with my distiguished colleague.


Paweł


Oh my god, Pawel, forgive me! I genuinely thought that that WAS you! Embarrassed haha, well GOOD that it's NOT! I was wondering why you hadn't made some comments about how you tried to get Dragon to change these blueprints and CADs. :)

Thanks for your suggestion about the Milliput---that may indeed be helpful, but then again, it would also be a lot more mess when grinding the plastic. I thought about just sawing the undercut, but gringing it just seemed easier. Having said that, the turret piece is pretty stable and doesn't really deform when working it.

  • Member since
    May 2009
  • From: Poland
Posted by Pawel on Sunday, April 2, 2017 5:05 PM

the doog
I think that "Pavel" here on FSM allegedly was in contact with them beforehand when this model had been announced and was very critical and helpful in pointing out these significant errors.

I sure hope you don't mean me... The Polish modeller in question here is "Vodnik". His first name is also Pawel (also with a "W"), so some people flatter me confusing me with my distiguished colleague.

One tip for the turret - for other people wanting to try the correction - maybe it would be better to fill the turret with Milliput and THEN dremel it - this would give the turret more stability while working on it.

Then again - I can understand people complaining about those kits. First you pay 50$, then you put still more very special work to just get the turret to rotate and in the end you might end up with a model that just isn't accurate or doesn't look right. It seems natural to me to complain about a situation like that, especially since we know that it doesn't have to be that way.

Anyhow, I'm glad to see your progress here, good luck with your build and have a nice day

Paweł

All comments and critique welcomed. Thanks for your honest opinions!

www.vietnam.net.pl

  • Member since
    January 2007
Posted by the doog on Sunday, April 2, 2017 4:03 PM

warshipguy

I looked at the thread you posted on Armorama and was overwhelmed by the crying and whining.  As primarily a ship modeler, I have seen more than a fair share of poor kits that have only recently begun to be addressed.  As a sailing ship modeler, I would kill for a new kit. My God, the major manufacturers of that genre (except for Airfix) are notorious for releasing kits of ships that do not represent the real ship at all.  Just don't purchase the bad ones and be grateful for the good ones.  Vote with your wallet and let the manufacturers know.

I, for one, am most interested to see what you can do with this kit!

BIll Morrison


Thanks, Bill; I appreciate you looking in and leaving your thoughts here. :)

It's kinda the same way with car models---the output rate seems super slow as well, although it's been picking up lately with some nice new molds. Many of the old kits though are just abysmal---I recently spent 6 months revamping and improving three Indy car kits. The armor models that come out now are almost shake-n-bake, just add glue...but the criticisms of this one are somewhat "on", though I don't believe they warrant some of the histrionic language that have accompanied them, lol.

  • Member since
    January 2007
Posted by the doog on Sunday, April 2, 2017 4:00 PM

Rob Gronovius

Nearly their entire Black Label series has taken a hit. I've got their MBT70/Kpz.70 kit. It is a nice model kit, but folks have noted that they took features from one prototype tank and other features from the other to combine into one inaccurate model. It's the only one from that line that hasn't been ripped to shreds.

While I see their point, why not just copy one of the two prototypes so you have one accurate model?

Having said that, I am happy they made a model of the tank and that I can make my own modifications to produce a what if the tank was fielded version.

This T54 looks like a kit I will pass on. Not that I don't have the necessary skils required to fix. It's just that I do not wish to mess with a kit that isn't a "must have" to me. I guess if I played WoTs, I would feel differently. I am interested in how yours turns out.


I've got that MBT70 too---I'd been waiting for it ever since I got a tour of the Aberdeen "sheds" by Bill Atwater in the mid-80s...I saw one of the protoypes in the sheds, dusty and sitting there like an armorific "Holy Grail" at the time; it was like, mythical back then. I've got photos of it somewhere...I remember that it was a lot different than the model..but I'll take a bash-up of one, just the same... Stick out tongue

  • Member since
    September 2005
  • From: Groton, CT
Posted by warshipguy on Sunday, April 2, 2017 12:18 PM

I looked at the thread you posted on Armorama and was overwhelmed by the crying and whining.  As primarily a ship modeler, I have seen more than a fair share of poor kits that have only recently begun to be addressed.  As a sailing ship modeler, I would kill for a new kit. My God, the major manufacturers of that genre (except for Airfix) are notorious for releasing kits of ships that do not represent the real ship at all.  Just don't purchase the bad ones and be grateful for the good ones.  Vote with your wallet and let the manufacturers know.

I, for one, am most interested to see what you can do with this kit!

BIll Morrison

  • Member since
    December 2002
  • From: Fort Knox
Posted by Rob Gronovius on Sunday, April 2, 2017 11:49 AM

Nearly their entire Black Label series has taken a hit. I've got their MBT70/Kpz.70 kit. It is a nice model kit, but folks have noted that they took features from one prototype tank and other features from the other to combine into one inaccurate model. It's the only one from that line that hasn't been ripped to shreds.

While I see their point, why not just copy one of the two prototypes so you have one accurate model?

Having said that, I am happy they made a model of the tank and that I can make my own modifications to produce a what if the tank was fielded version.

This T54 looks like a kit I will pass on. Not that I don't have the necessary skils required to fix. It's just that I do not wish to mess with a kit that isn't a "must have" to me. I guess if I played WoTs, I would feel differently. I am interested in how yours turns out.

  • Member since
    January 2007
Posted by the doog on Sunday, April 2, 2017 11:01 AM

Rob Gronovius

That is a lot of work, something that shouldn't be necessary to assemble a kit out of box. Many casual modelers do not have the level of skill required to make the corrections. You've done a great job accurizing the turret. Is the turret designed to articulate like the actual tank or does it just glue into place?


Thank you, Rob! Smile I wholeheartedly agree--the developers really blew this turret, and it's honestly just baffling why--I think that "Pavel" here on FSM allegedly was in contact with them beforehand when this model had been announced and was very critical and helpful in pointing out these significant errors. I would bet some financial aspect of the reality of the perceived market for this oddball tank figured into it, but still, it's a shame. Modelers on many forums have already put the kibosh on this model, and I think that it seriously hurt the Black Label brand.

The model is engineered to articulate the turret via pins which go through the side of the "collar" part that I ground down and into the turret part itself. I didn't put those in because I wanted to be able to take that part in and out because of the necessary modifications. I'm going to make it immobile anyway with a Milliput mantlet cover. The DS one included is a neat option for casual builders, but it won't fit now with the mods I made.

  • Member since
    January 2007
Posted by the doog on Sunday, April 2, 2017 10:35 AM

Moff

Oooh, I always loved this tank. The build is looking good! Definitely following this. 


Thanks for following along! Welcome aboard! :)


  • Member since
    January 2007
Posted by the doog on Sunday, April 2, 2017 10:35 AM

HeavyArty

Looking good.  The turret correction came out great.  The turret looks 100% better.


Thank you, sir! Much obliged!! YesBeerBeer

  • Member since
    January 2007
Posted by the doog on Sunday, April 2, 2017 10:28 AM

stikpusher

Nice work in the correction mods. That looks far better than before. But e after your fixes, the contours still look a bit off overall on the turret compared to the reference photos. Not thru any of your doing, as you sure improved the look.....


Thanks, Carlos; I understand that there may indeed be more "dimensional" anomalies in this model--I mean, the development team basically punted on the turret shape!--but I've never been a numbers-and-calipers guy; if it looks like the real thing, that's good enough for me. Geeked Don'f forget though--the turret isn't even built up--there's no additional parts added yet, and I suspect that it will look better when all the odd parts are added and that mantlet engineered.

Thanks for tuning in and taking time to leave a comment. Yes

  • Member since
    December 2002
  • From: Fort Knox
Posted by Rob Gronovius on Sunday, April 2, 2017 9:41 AM

That is a lot of work, something that shouldn't be necessary to assemble a kit out of box. Many casual modelers do not have the level of skill required to make the corrections. You've done a great job accurizing the turret. Is the turret designed to articulate like the actual tank or does it just glue into place?

  • Member since
    January 2015
Posted by Moff on Sunday, April 2, 2017 9:11 AM

Oooh, I always loved this tank. The build is looking good! Definitely following this. 

"Gaiety is the most outstanding feature of the Soviet Union." - Josef Stalin 

  • Member since
    December 2002
  • From: Valrico, FL
Posted by HeavyArty on Sunday, April 2, 2017 5:57 AM

Looking good.  The turret correction came out great.  The turret looks 100% better.

Gino P. Quintiliani - Field Artillery - The KING of BATTLE!!!

Check out my Gallery: https://app.photobucket.com/u/HeavyArty

"People sleep peaceably in their beds at night only because rough men stand ready to do violence on their behalf." -- George Orwell

  • Member since
    July 2004
  • From: Sonora Desert
Posted by stikpusher on Saturday, April 1, 2017 11:27 PM

Nice work in the correction mods. That looks far better than before. But e after your fixes, the contours still look a bit off overall on the turret compared to the reference photos. Not thru any of your doing, as you sure improved the look.

Now I gotta ask, do Dragon Black Label kits like this one mean that the folks who create these kits partake in a little JW Black Label during the development and Quality Control process? I am thrilled to see the subjects they make in this series, but some of the goofs that Dragon makes on them....

Anyways, I do enjoy watching your overcoming of these gaffes Karl.


F is for FIRE, That burns down the whole town!

U is for URANIUM... BOMBS!

N is for NO SURVIVORS...

       - Plankton

LSM


  • Member since
    January 2007
Posted by the doog on Saturday, April 1, 2017 10:25 PM

Hey guys, thanks to evrryone commenting and following along; I've been in New York for a few days so I didn't get a chance to respond, but it seems like all questions have been answered so far. Smile

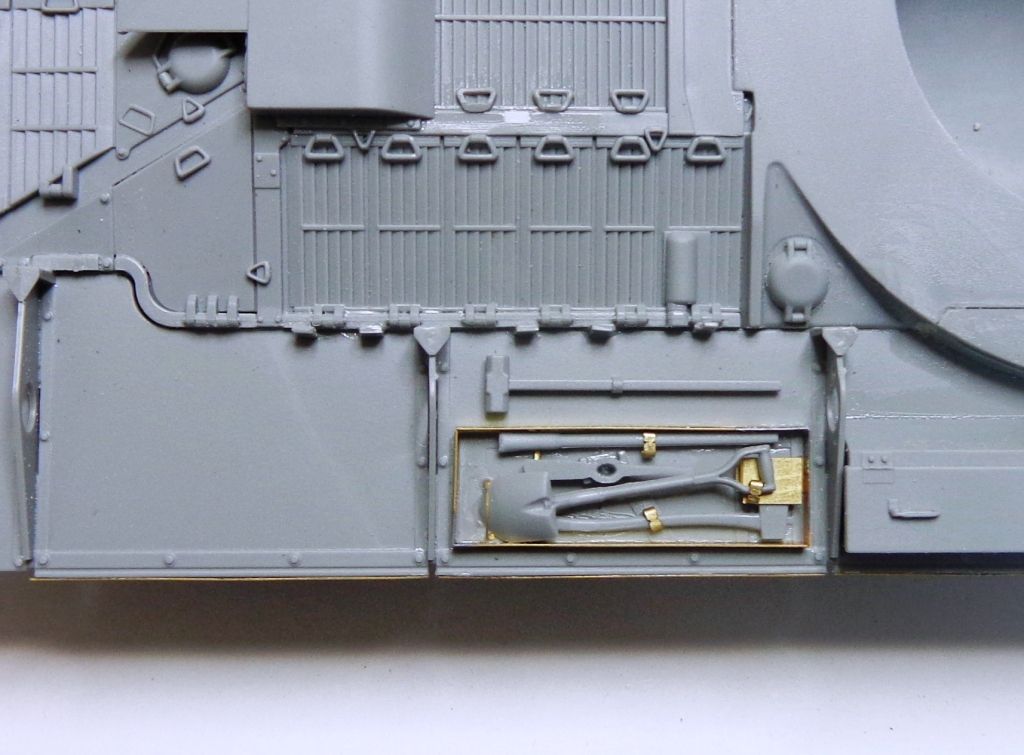
So....here's what that tool box loooks like when you're done with it. I soldered the two pieces that make the frame, but didn't bother soldering the clamps, as they can be just squeezed around the handles where indicated and glued.

Hoooo....kay...   ...now for that turret issue...

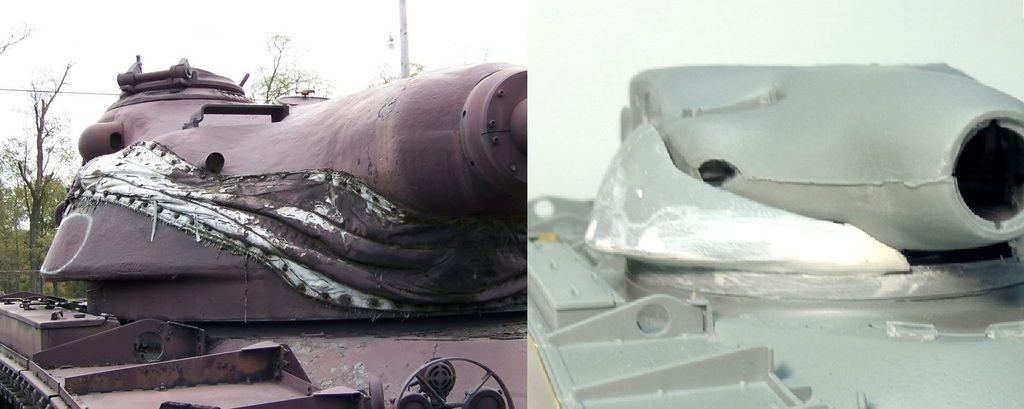
I'd like to credit "jcneel" from Armorama's site for this photo; I found it on a build he was doing on this model. This is an excellent photo of the turret problem area. Specifically, the undercut---or lack of it on the Dragon model...

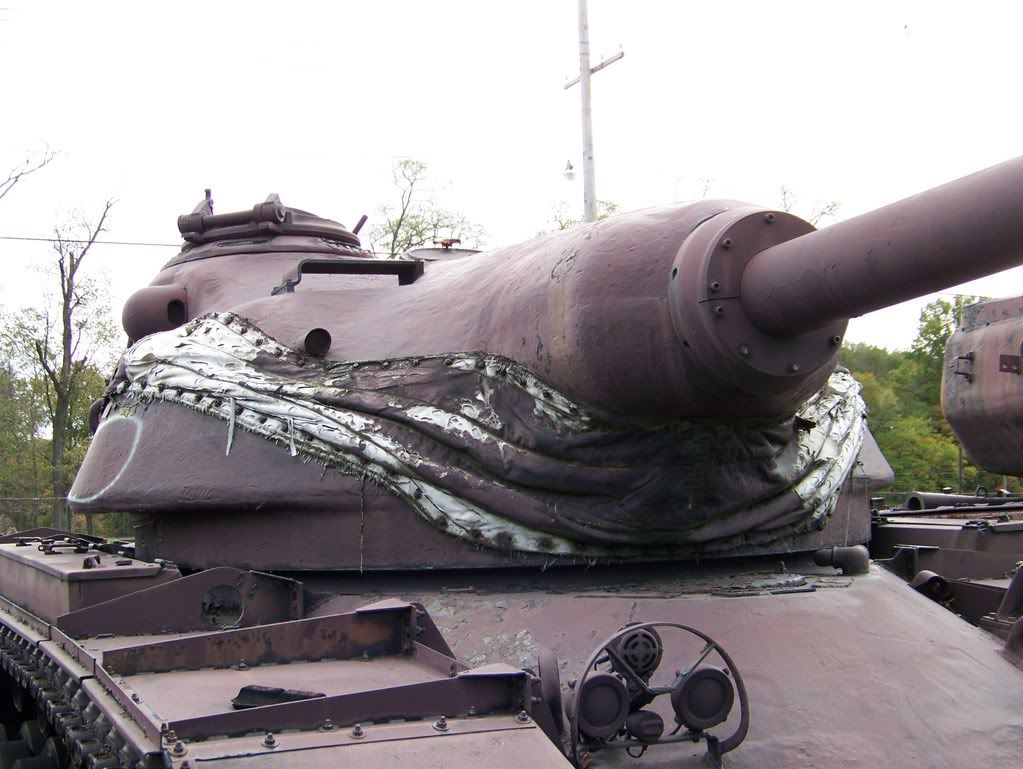
Side by side, you can see what a flabby pancake is the Dragon version. Like...."Whaaa??"

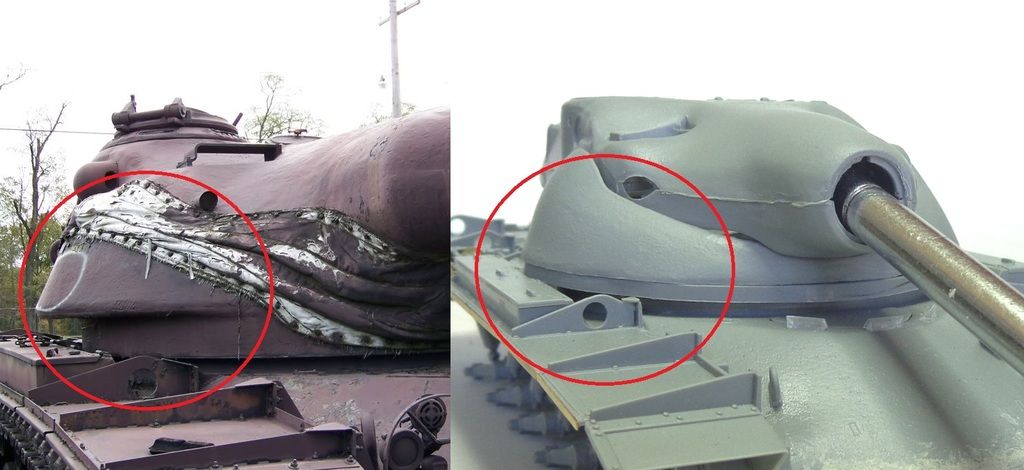
This is honestly pretty shocking, how bungled it is, if you ask me. (No need to post a litany of complaints; I've read them all elsewhere!) But it's not even close.

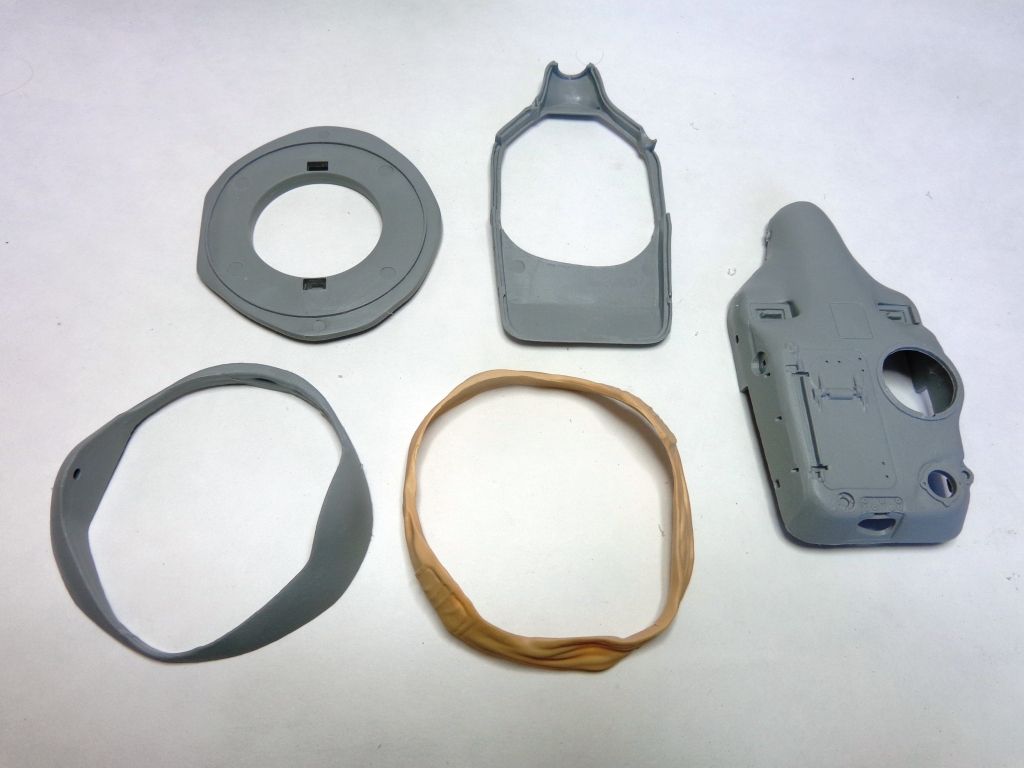
Here's the turret parts, including the "DS styrene" mantlet which I will not be using.

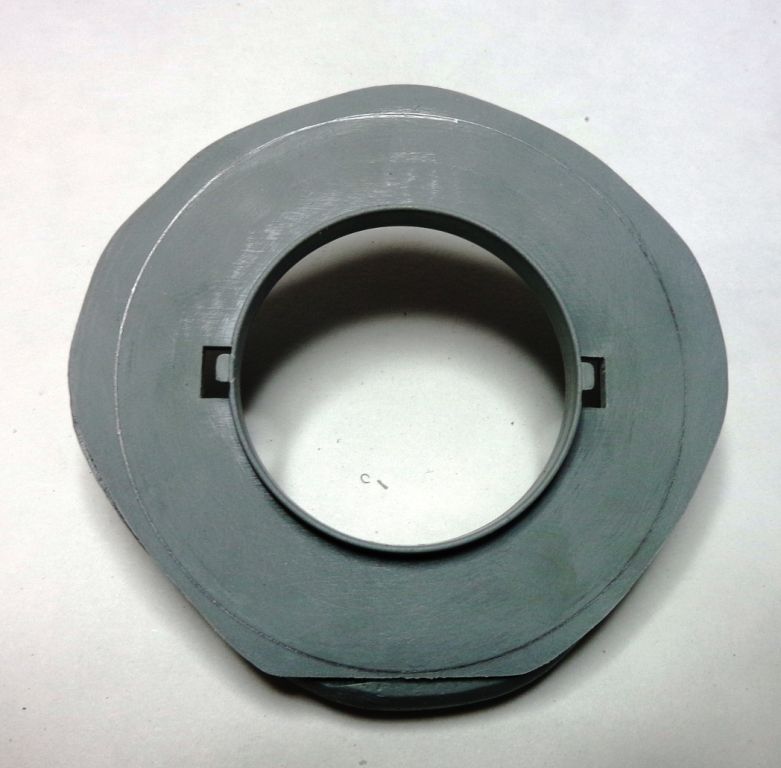
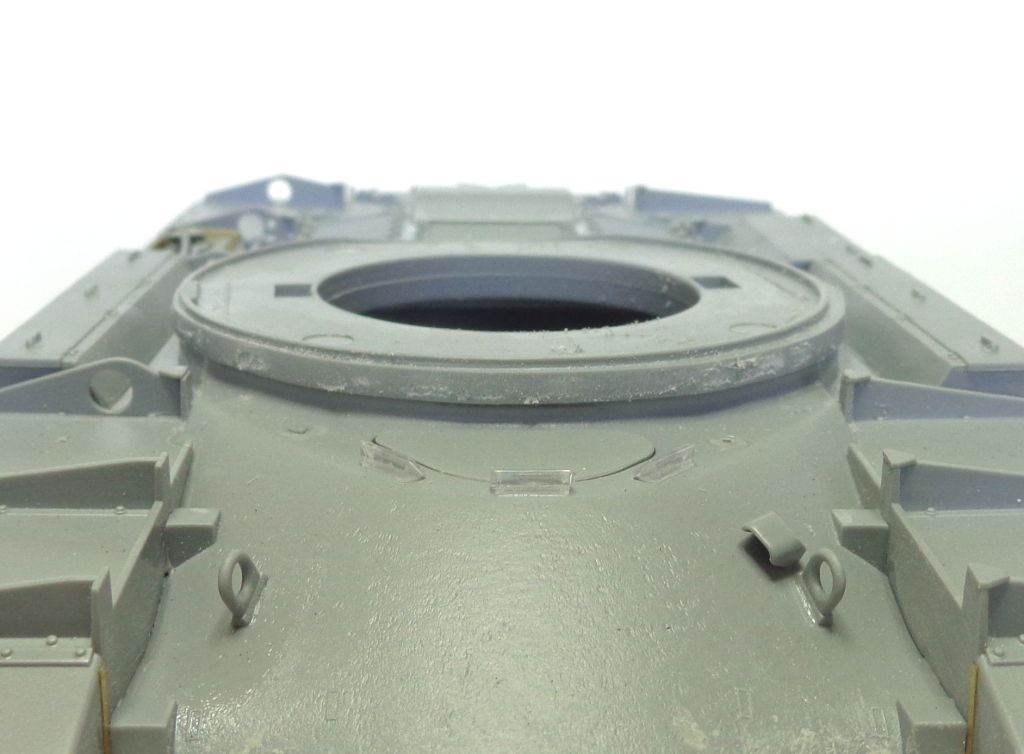
This is the turret bottom---the part that fits in the ring. As you can see, it most definitely impacts the boxes on the fender. Ugh...

It also barely clears the rear deck. So here's how I tackled a correction for this. Hold onto your Exacto's; this ain't gonna be pretty. Time for some old-school modeling.

First of all, I curse myself for not remembering to take a photo of this before I glued the hull halves together, so I made a crude diagram. BEFORE you glue the top hull on, put a pencil through the driver's hatch and trace a circle around the bottom-turret part "B4". Take off the top pieces and spin it like you're rotating the turret to get a perfect circle on the bottom of the part.

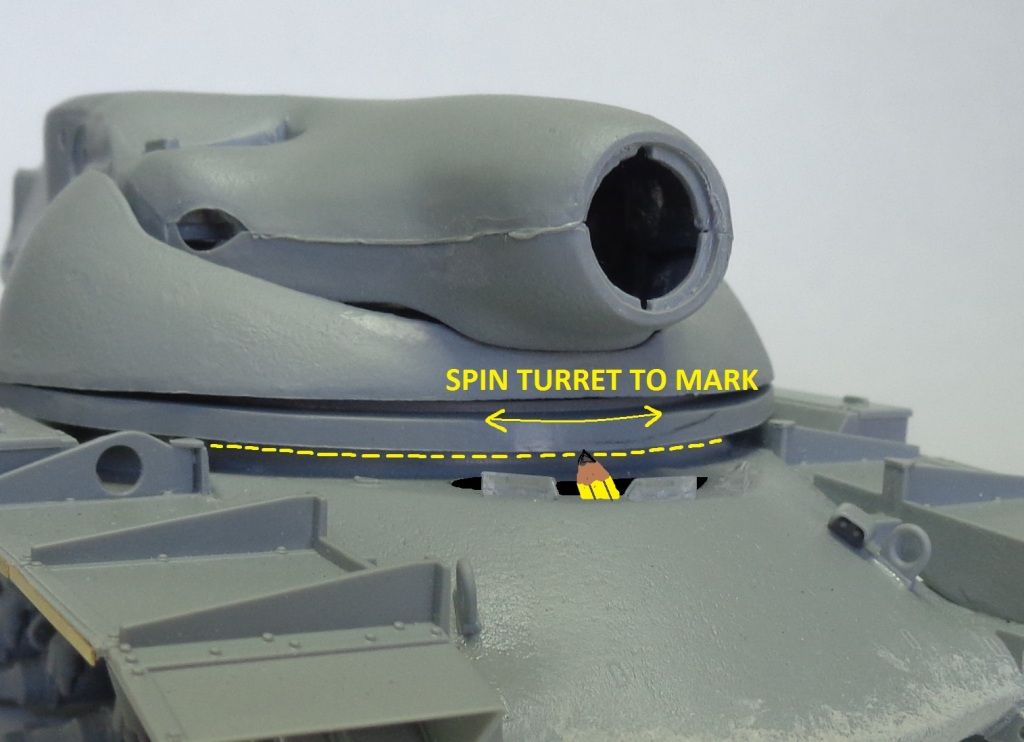
Next, trace or scribe the interior of where part B3 (misidentified in several step as "B4") rests on actual part B4. You'll need this to locate this part later..

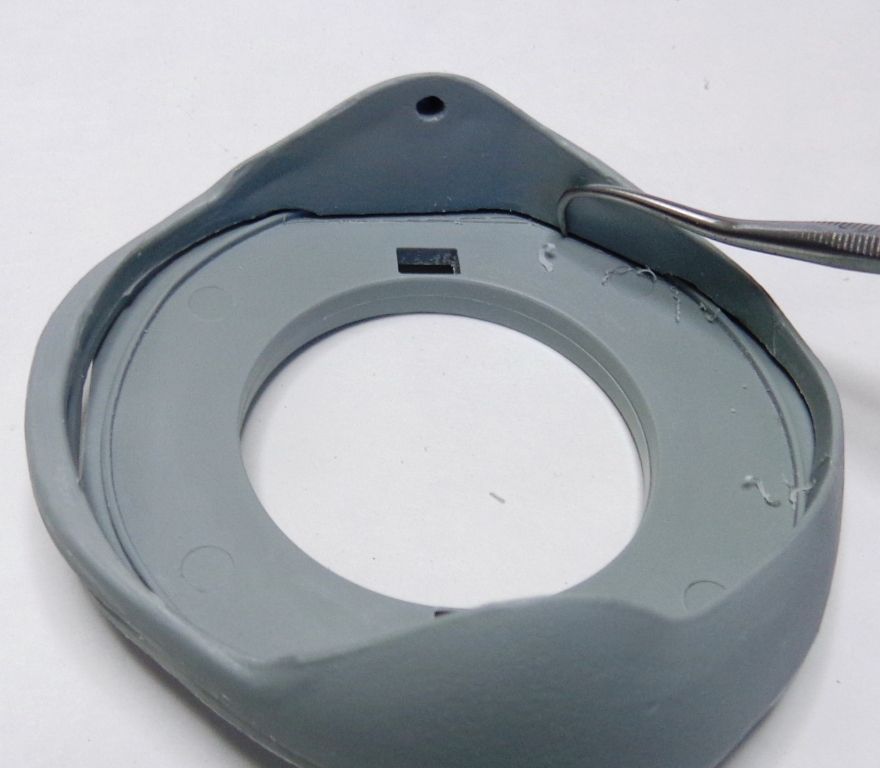
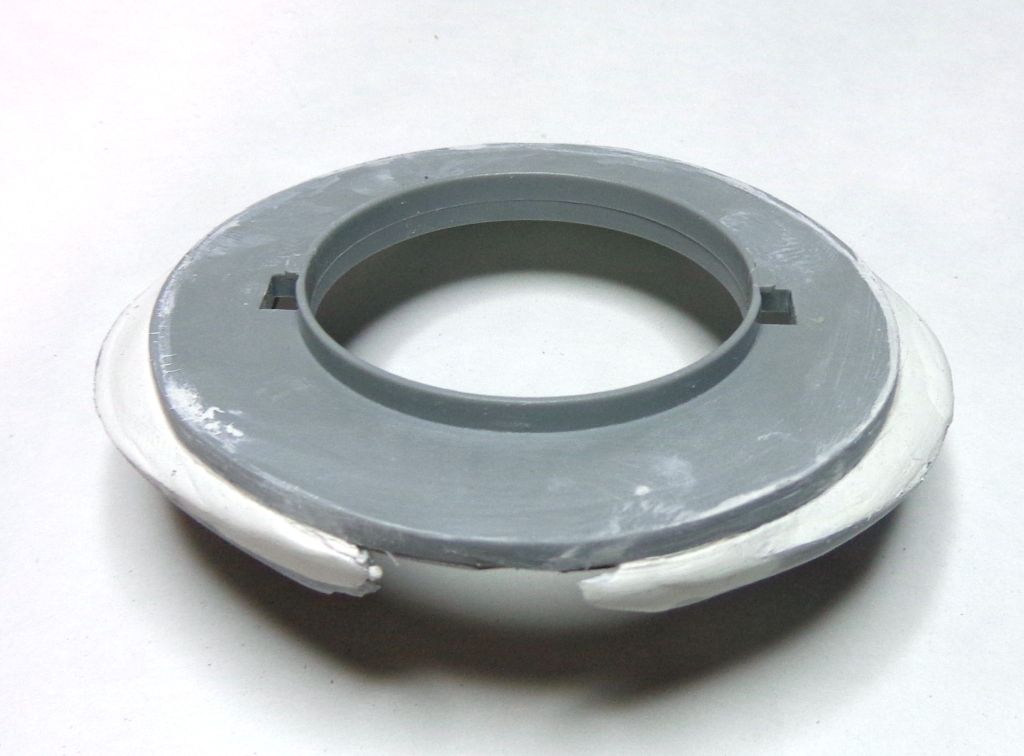
When you put the pencil line on B4, you'll get this---this circle matches the molded turret ring on the bottom hull.

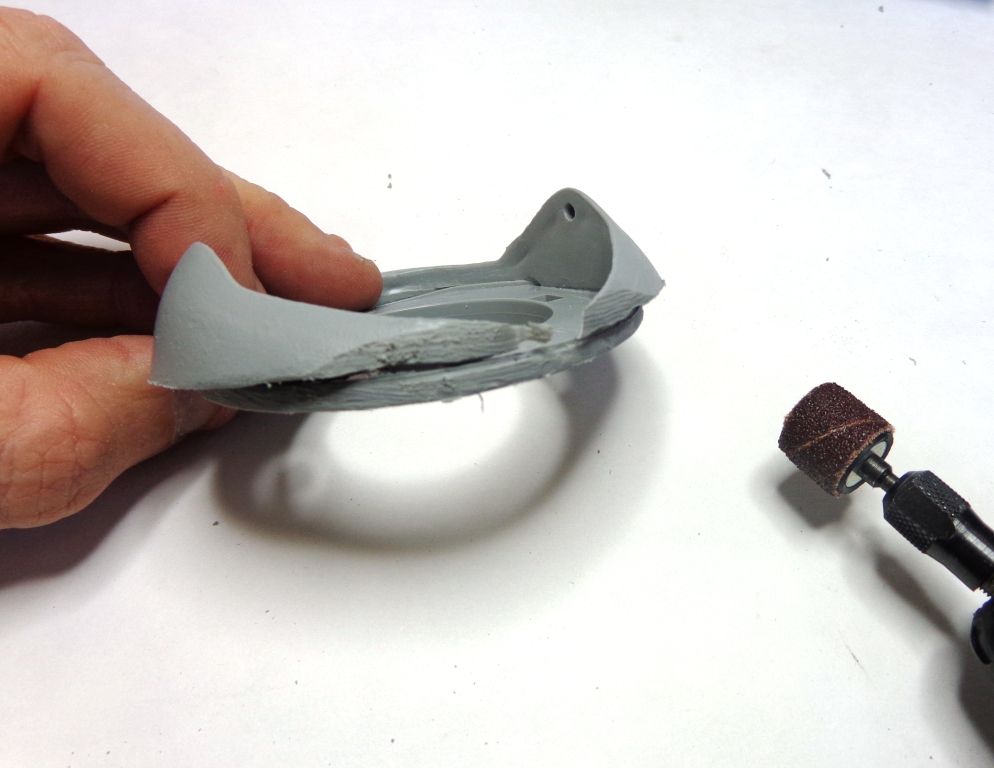
Now, I cut the excess plastic off outside of this pencil ring.

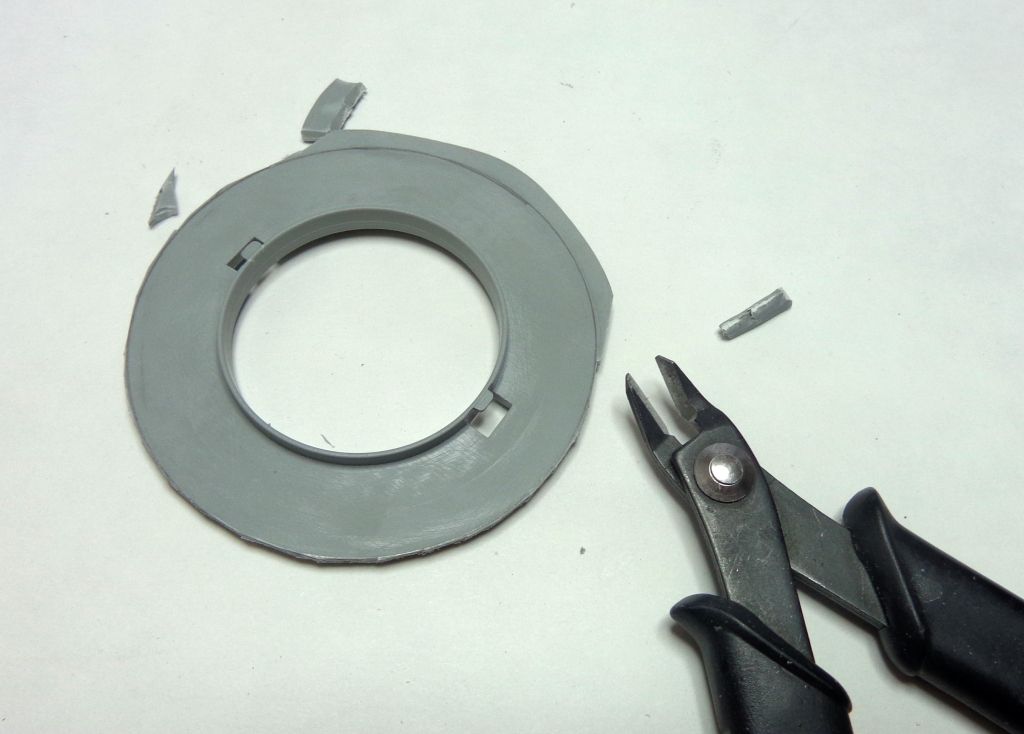
This solves part 1 of the problem..the huge turret ring. I'l refine this a bit in a few minutes to match the ring better.

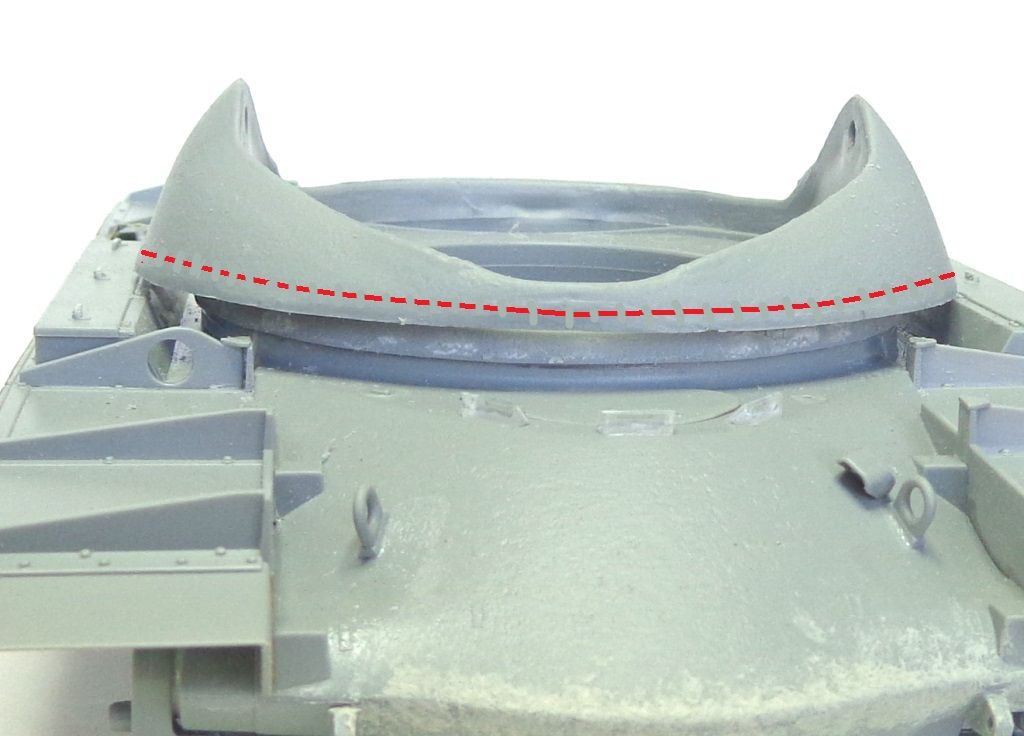
The Dremel is your best friend here...Here's how it sits, so far...I'm going to use the Dremel now to take off all of that flab beneath the red line here...this is "part 2" of the correction...

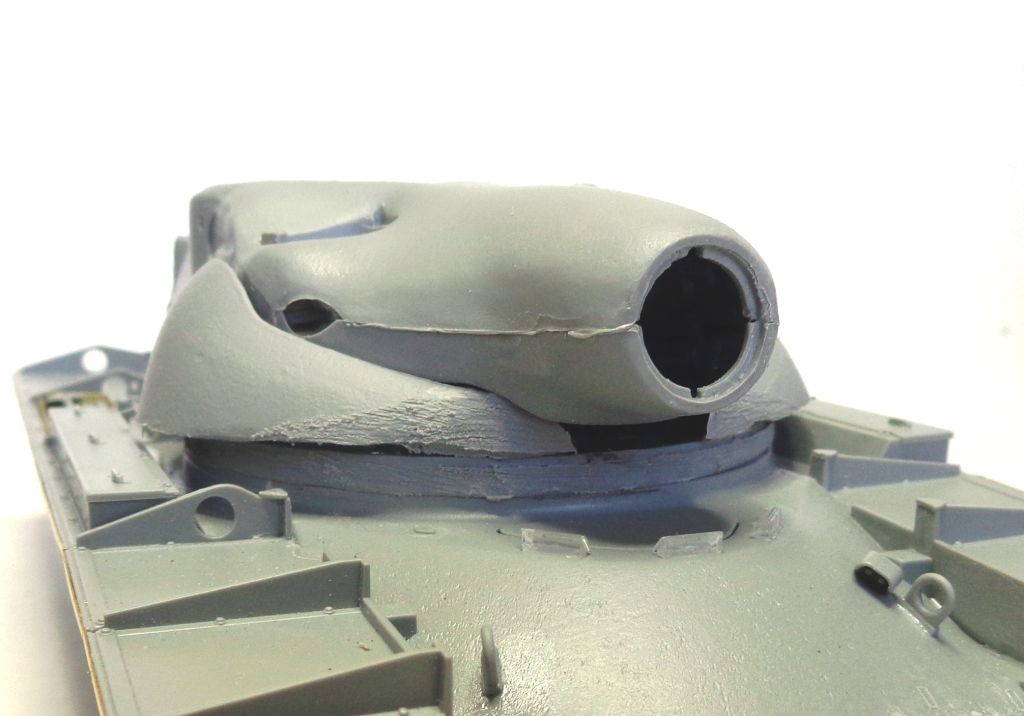
Using the Dremel with a sanding tip, I shaved it down, also contouring the front area to blend in the lines. This front looks pretty rough now--I blew right through the front wall--but this will all be hidden under the expansive mantlet cover.

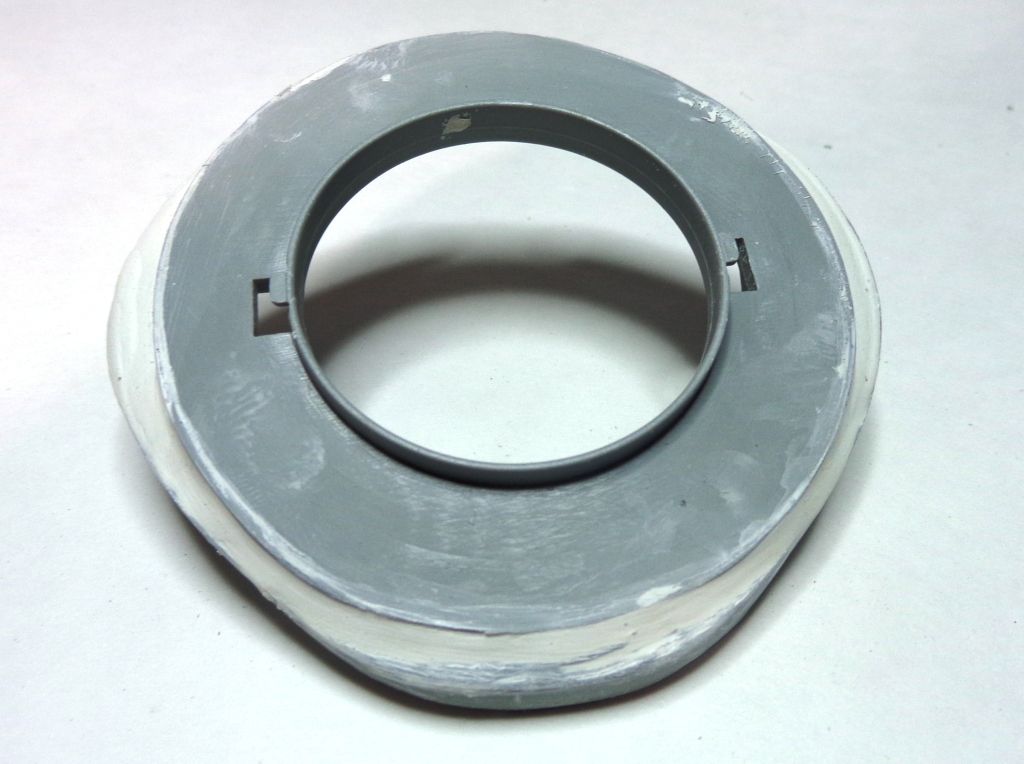
Looking better as far as the overall contour and undercut....


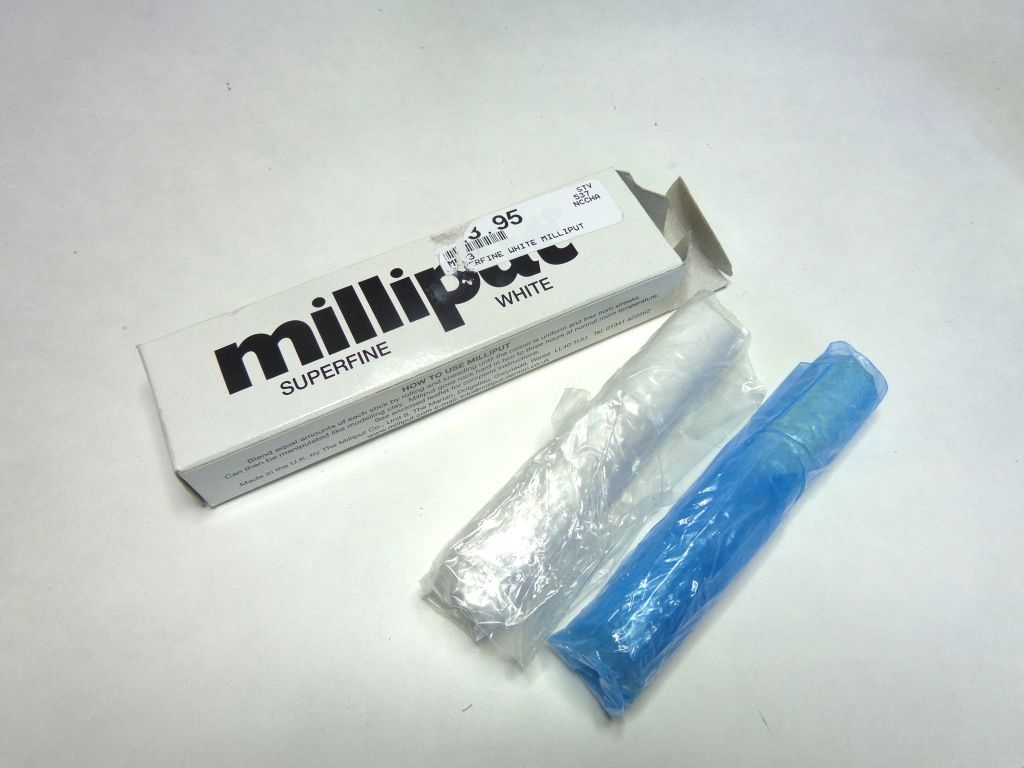
Now I need some Milliput, Fine grade..

After mixing the two parts, part B3 is semi-hollow, so I had to fill the gap in

The Dremel-damage will leave gaps in front and in the back. I filled the back in from inside the turret.

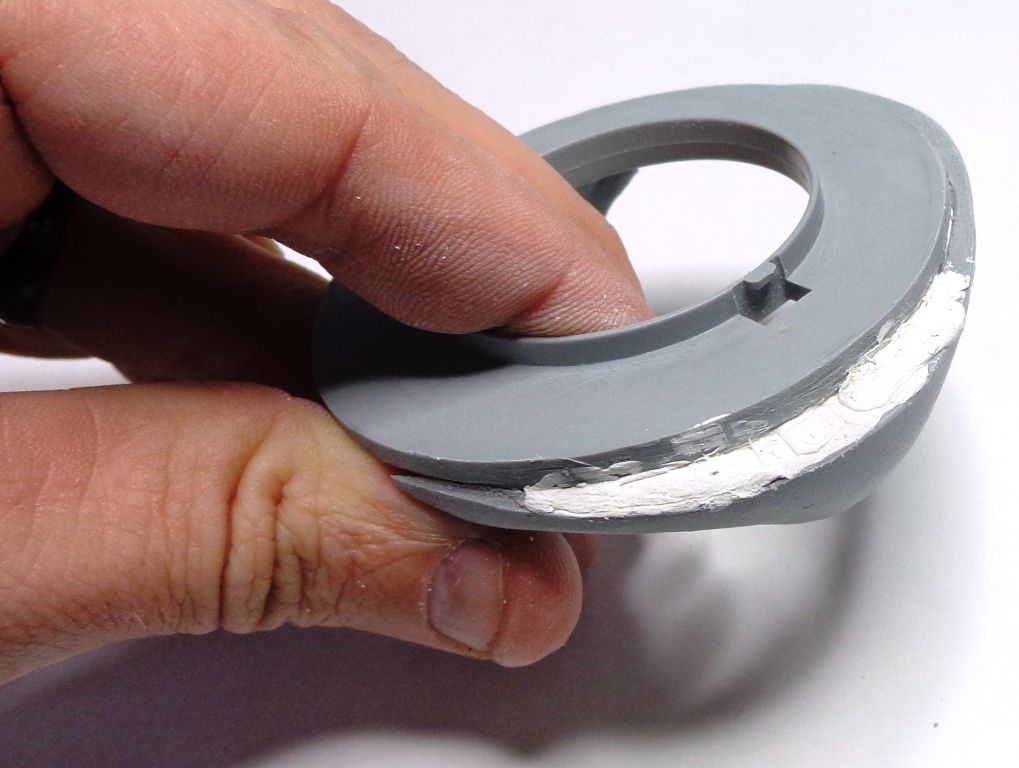
I shaped the underside to look like the real turret, and healed the front somewhat..

The front of the part with the putty...Milliput can be shaped very nicely with water, so I smoothed under the "undercut" and shaped it with some water. This will also be sandable when dried. It may need some touch up, or re-puttying in small some small measure.

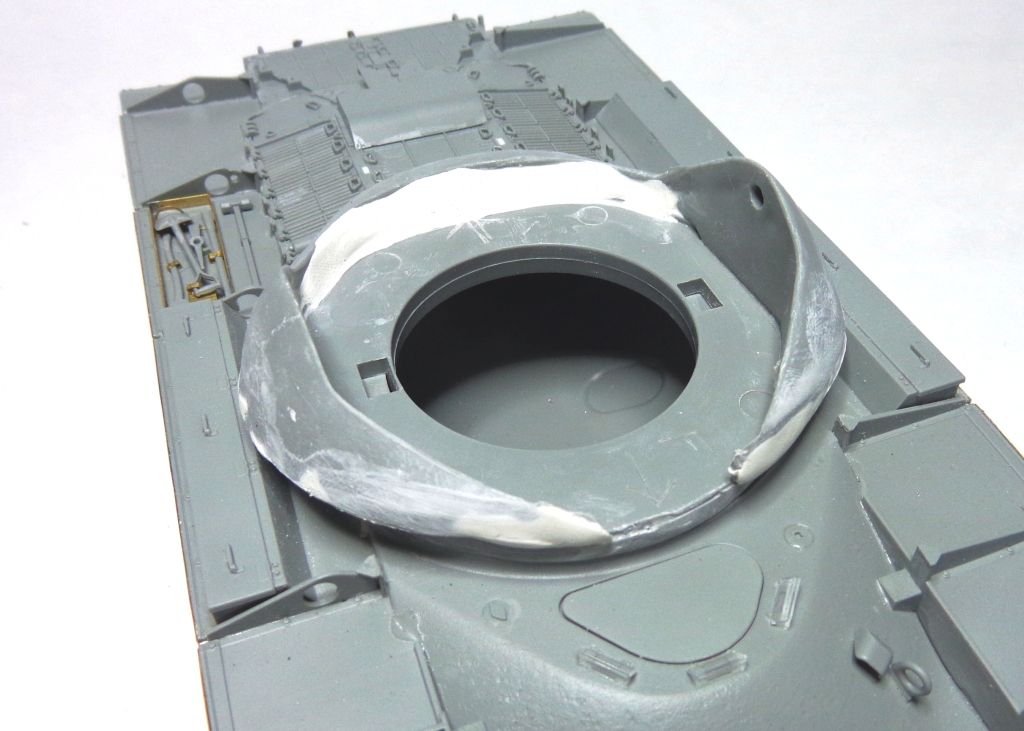
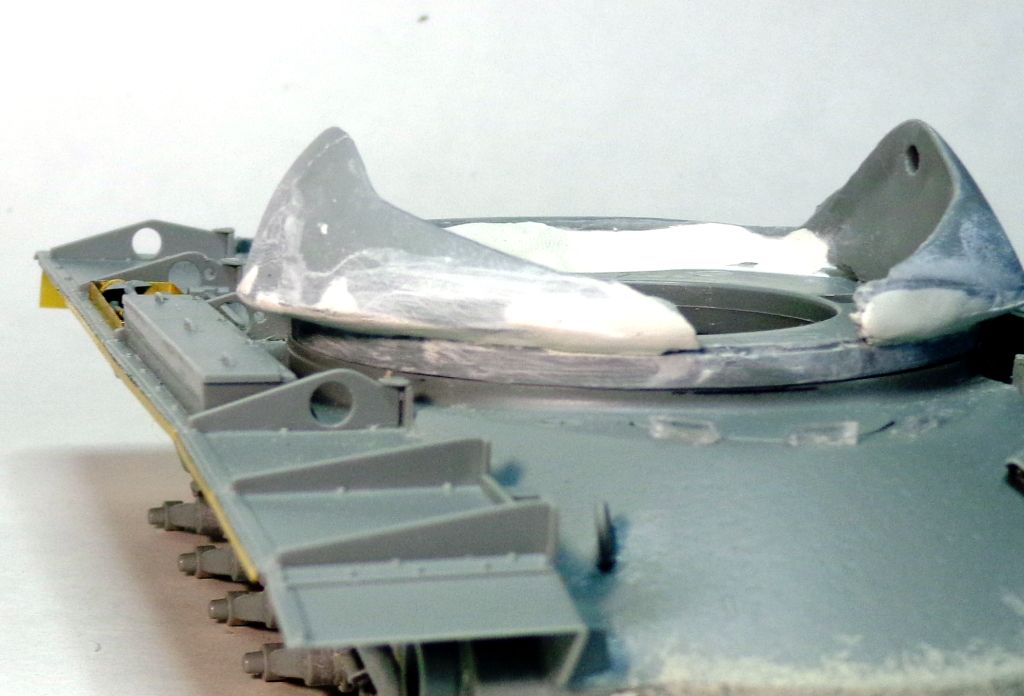
Rear contour.....this too will be obscured by the mantlet cover, whcih circles the entire turret.

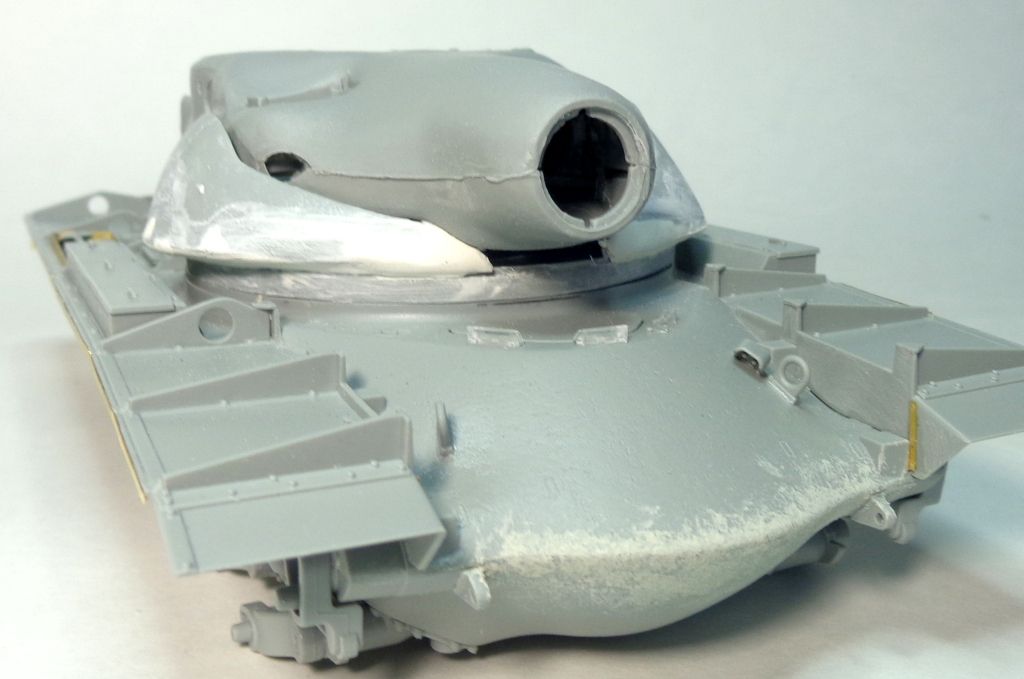
I'm pretty happy with what it looks like at this point. Is it perfect? Dimensionally correct? I dunno---but it looks a hell of a lot better than that flabby pancake that comes in the kit. Remember, the gap under the gun will be completely hidden by the mantlet cover.

A comparison with jcneel's turret photo.

I'm pretty confident that this is going to work just fine. It's a bit of a PITA correction, and the mantlet cover is going to take a bit of artistry, but I think it's going to make this a viable representation of this cool, unique tank. The mantlet cover will be made of Milliput as well, when I get there...

Thanks for looking in guys! Questions and comments always welcomed! Smile


  • Member since
    January 2007
Posted by the doog on Saturday, April 1, 2017 8:37 PM

HeavyArty

I believe it is just the M47/M48 based vehicles and up that uses the modern-style sprockets like the ones pictured.


Thanks for that info, Gino, and for the input on the turret ring. Good to know that that's not a necessary step. (I know that NOW, lol).

  • Member since
    December 2002
  • From: Valrico, FL
Posted by HeavyArty on Wednesday, March 29, 2017 1:13 PM

I believe it is just the M47/M48 based vehicles and up that uses the modern-style sprockets like the ones pictured.

Gino P. Quintiliani - Field Artillery - The KING of BATTLE!!!

Check out my Gallery: https://app.photobucket.com/u/HeavyArty

"People sleep peaceably in their beds at night only because rough men stand ready to do violence on their behalf." -- George Orwell

  • Member since
    February 2014
Posted by USMC6094 on Wednesday, March 29, 2017 11:31 AM

HeavyArty

Another area you may want to address is the missing mud release holes on the rear sprockets.


How far back in the "T" series of experimantal armor do these holes go( if at all)? Or is it just a later addition like M47 and up?

  • Member since
    December 2002
  • From: Valrico, FL
Posted by HeavyArty on Wednesday, March 29, 2017 7:50 AM

Gamera
Is the gap in the turret ring an issue though? ...in everything I've built the turret covers it all up. 


I have built Dragon's M48A1, M48A3 Mod B, and M60, which all have the same turret ring design.  I have found that there is no need to fill/sand the area where the seam is as it gets covered by the turret.  It cannot be seen once the kit is assembled.

Gino P. Quintiliani - Field Artillery - The KING of BATTLE!!!

Check out my Gallery: https://app.photobucket.com/u/HeavyArty

"People sleep peaceably in their beds at night only because rough men stand ready to do violence on their behalf." -- George Orwell

  • Member since
    November 2009
  • From: SW Virginia
Posted by Gamera on Wednesday, March 29, 2017 7:33 AM

Looking good! 

And yeah, not surprising Dragon still prints confusing instruction sheets. 

Is the gap in the turret ring an issue though? I've seen more than a few kits designed that way. I used to fill and sand the seam but in everything I've built the turret covers it all up. Now I just putty and sand the front and rear edges where it shows. 

"I dream in fire but work in clay." -Arthur Machen


  • Member since
    December 2002
  • From: Bury St Edmunds, Suffolk, England
Posted by Bish on Wednesday, March 29, 2017 1:54 AM

Some more nice work there karl, and good to see Dragon haven't gone completly soft with their instructions and are still getting things wrong. Would not want to make it to easy Big Smile

I am a Norfolk man and i glory in being so


On the bench: Airfix 1/72nd Harrier GR.3/Fujimi 1/72nd Ju 87D-3

  • Member since
    January 2007
Posted by the doog on Tuesday, March 28, 2017 2:09 PM

Hey guys, thanks for following along! Glad to have ya and glad to help! Big Smile

THIRD update:

Still working on the hull and its fittings. There are some PE parts, some of which add to the model, some of which are honestly just redundant and annoying. Before you work with any of it, use some fine sandpaper to put some micro-scratches into the surface to help hold glue and paint.

The first parts are some fittings on the rear panel; on the lowermost part is a semi-circle and two open blocks...

Watch the shape of this little clamp...

The rear panels so far. Be careful with parts F9 and F10. The travel lock attaches to them, and if not placed correctly, the travel lock will be slanted. I recommend gluing them lightly first and seating the lock; when it looks acceptable, seal their fate. Also watch the placement of the rear light blocks---their lower parts attach properly to the lower part of the hull, so before you glue these on, glue the whole panel (L1) to the rear. If you work on completing the panel off-the-model, you could wind up with these parts standing proud of the hull.

The hull so far, from the side. I added some stippled putty to the side to cover the hill joins. (No, that's not wbill's plinth! Wink)

These parts (C26, C27) are, annoyingly, wrongly shown in the directions. They are shown as being "below the surface" of the side of the hull where they're supposed to go...

When I glued them on properly as shown...

...they really interfere with placement of the fenders.....aargh!

After cutting them off, you can see the change;

They should be proud of the fenders---above them. Install the fenders FIRST!

Part MA4 has to be bent to make a fender end. I used the Exacto knife to curve the PE.

It has to follow a reasonable curve from the fender mold.

Those PE parts on the edges of the fenders---the long strips--are entirely redundant, as they only sit on the edges of the already-molded parts, not adding anything. The real fenders have a small lip on them, but these do nothing to represent that. I almost left them off but I think I'm going to putty-seal the topward egdes of them to make them appear a little better.

OK,  one of the inexlicably-weird piece of engineering in this model is the way that a piece of the turrent ring is molded onto the fenders, necessitating the filling of the joint.

More work to be done there..

The toolbox diagram is printed from two different directions, and I found that confusing...

Heck with that; I cut the diagram out and re-taped it to make the PE placement easier...

The parts in place; look carefully at how they are bent, as it's prety hard to tell from the diagram.

Make sure you use the hovel to properly locate the placement of part MA6---it traps the shovel end, and the handle part of the shovel will be trapped in a clamp. not yet shown.

That's where I am now....more work to be done when I get back from a short trip to New York tomorrow. I'm going to be back Friday, but probably won't get too much done over the weekend, as it's supposed to be nice.

Thanks for looking in, all. Toast

  • Member since
    January 2006
  • From: California
Posted by SprueOne on Sunday, March 26, 2017 10:10 PM

Excellent Blogging highlighting all the corrections. Yes Idea

Thank you.


Anyone with a good car don't need to be justified - Hazel Motes


Iron Rails 2015 by Wayne Cassell Weekend Madness sprueone

JOIN OUR COMMUNITY!

Our community is FREE to join. To participate you must either login or register for an account.

SEARCH FORUMS
FREE NEWSLETTER
By signing up you may also receive reader surveys and occasional special offers. We do not sell, rent or trade our email lists. View our Privacy Policy.