SEARCH FINESCALE.COM

Enter keywords or a search phrase below:

54 Chevy Sedan Delivery-COMPLETED-09/16

19908 views
336 replies
1 rating 2 rating 3 rating 4 rating 5 rating
  • Member since
    February 2003
  • From: East Bethel, MN
Posted by midnightprowler on Saturday, May 21, 2016 7:20 AM

Looking good, you might want to check clearance of the back of the couch against the inside of the body shell. Looks like it may be close.

Hi, I am Lee, I am a plastiholic.

Co. A, 682 Engineers, Ltchfield, MN, 1980-1986

1 Thessalonians 4:13-18 1 Corinthians 15:51-54

Ask me about Speedway Decals

  • Member since
    March 2012
  • From: Corpus Christi, Tx
Posted by mustang1989 on Saturday, May 21, 2016 7:47 AM

Thanks good buddy Lee!! I'm still in the process of painting the couch and figured as much with the clearance issue. It'll be moved to suit. Thanks for the input. Yes


 Forum | Modelers Social Club Forum (proboards.com) 

  • Member since
    August 2015
  • From: the redlands Fl
Posted by crown r n7 on Saturday, May 21, 2016 9:14 AM

Doing abit of catch up been away for a while your build is moving along very well ! Don't you wish for a clear truck body 


 Nick.

  • Member since
    March 2012
  • From: Corpus Christi, Tx
Posted by mustang1989 on Thursday, May 26, 2016 6:23 AM

LOL! Thanks Crown! I didn't think of the clear body.....

I'll be finishing this up with the paint and decals exactly how it is on the box. I was able to fab out the original decals to get a new set printed up with a customized license plate based off of the most recent Texas plate design that reads RUQWKR. lol

Folks this gets more "do-able" by the day. I've got the bulk of it all test fitted here and so far everything is fitting and clearing where it's supposed to. A couple of shots:


This is where things had to be adjusted a bit. The firewall was sitting to low from the rear of the body line at the rear of the engine bay opening causing a gap between the firewall and the body. I shimmed it up a little to close the gap up. I've already test fitted the body and I'm in good shape so far.


Hope to get a little more done over the long weekend.


P.S. Just in case anybody spotted it....I am working on the front wheel center caps. There aint no way I'm going to leave those things as is! ;)


 Forum | Modelers Social Club Forum (proboards.com) 

  • Member since
    December 2006
  • From: N. Georgia
Posted by Jester75 on Thursday, May 26, 2016 7:37 AM

Can't wait to see this thing with the body on it. Awesome work Joe!

Eric


  • Member since
    March 2012
  • From: Corpus Christi, Tx
Posted by mustang1989 on Thursday, May 26, 2016 8:08 PM

Thanks Eric! That'll make two of us on the car body. Man I've got a lot of work to do to clean that up. ALOT!!!


 Forum | Modelers Social Club Forum (proboards.com) 

  • Member since
    August 2009
  • From: MOAB, UTAH
Posted by JOE RIX on Friday, May 27, 2016 9:02 AM

Oh Yeah! That is looking fantastic Joe. I'm rather antsy for you to get the body on myself. I was meaning to ask you, are you displaying the back door open? If so, is the door already a seperate piece or will you have to cut that from the body? It is a pleasure to watch your builds Joe.

"Not only do I not know what's going on, I wouldn't know what to do about it if I did". George Carlin

  • Member since
    March 2012
  • From: Corpus Christi, Tx
Posted by mustang1989 on Saturday, May 28, 2016 7:24 AM

Thanks Joe! It's looking like I might be making it to the body fairly soon. I've got a lot of work to do when I get to it but it's coming.

As for what paint scheme I'll be going with? I'm sticking with the box top on that. I just recently got my reprint of the originals in the mail....and for a great deal. I'd probably do 'em myself but I don't want to experiment with this one.

Scheme:

Image

Decals: (The plates weren't part of the original sheet- I just had to do it!)

Image


 Forum | Modelers Social Club Forum (proboards.com) 

  • Member since
    February 2003
  • From: East Bethel, MN
Posted by midnightprowler on Saturday, May 28, 2016 1:55 PM

Looking great Joe, BTW, nice decals!Wink

Hi, I am Lee, I am a plastiholic.

Co. A, 682 Engineers, Ltchfield, MN, 1980-1986

1 Thessalonians 4:13-18 1 Corinthians 15:51-54

Ask me about Speedway Decals

  • Member since
    March 2012
  • From: Corpus Christi, Tx
Posted by mustang1989 on Saturday, May 28, 2016 6:17 PM

Thanks for the good word and the link on the decals. Wink


 Forum | Modelers Social Club Forum (proboards.com) 

  • Member since
    March 2012
  • From: Corpus Christi, Tx
Posted by mustang1989 on Monday, May 30, 2016 8:09 PM

Well I took a break from all the test fit and prep work to get this thing to fit together. All that is going ok so far though. I mentioned that I was going to work on the wheel center caps for the front wheels. I just couldn't stand leaving the front wheels the way they were with no cap:


I then took the two rear wheels that did have a center cap and sanded the backs of the wheels down until all I had left were......well ....the center caps:


I then test fitted them to the spare front wheel that still attached to sprue. This'll work is all I've gotta say:


Some clean up left to do but looks like I'm in business!


 Forum | Modelers Social Club Forum (proboards.com) 

  • Member since
    August 2009
  • From: MOAB, UTAH
Posted by JOE RIX on Monday, May 30, 2016 8:43 PM

Atta Boy Joe. That's the way improvise. Well done.

"Not only do I not know what's going on, I wouldn't know what to do about it if I did". George Carlin

  • Member since
    March 2012
  • From: Corpus Christi, Tx
Posted by mustang1989 on Tuesday, May 31, 2016 6:20 AM
Thank you Joe!
 
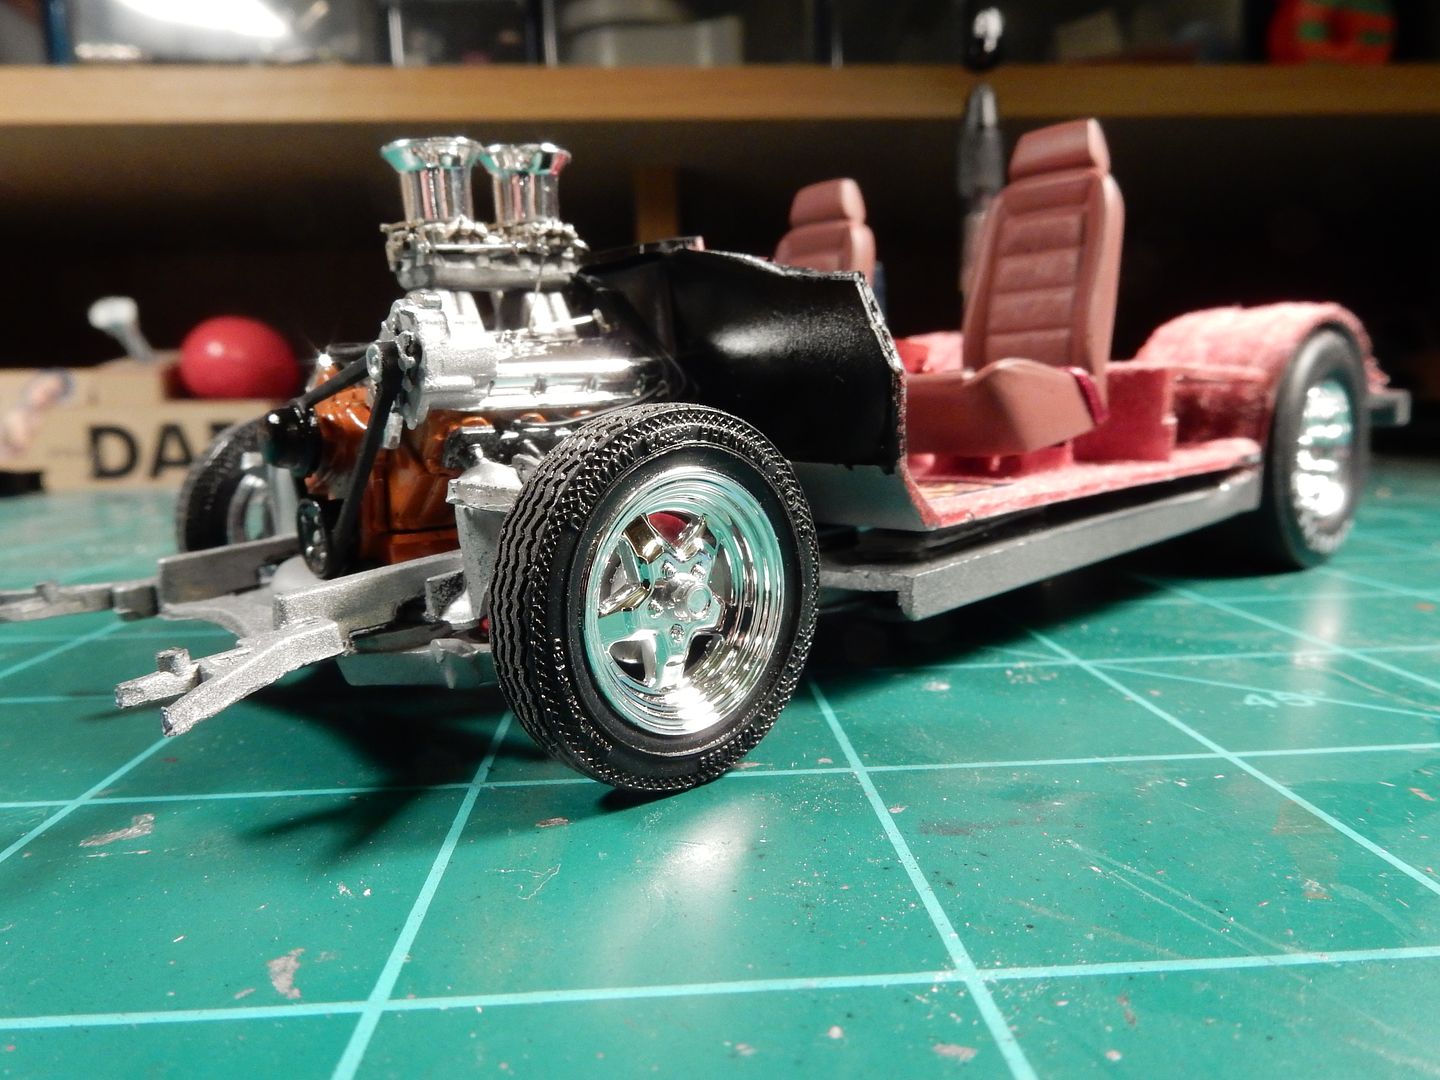
I've really been working hard on getting this thing under way in the last few days as progress throughout the last couple of months has been fairly slow.

Front wheels are completed in regards to wheel center caps and the flooring is now installed/ adhered to the chassis:

Image


 Forum | Modelers Social Club Forum (proboards.com) 

  • Member since
    March 2012
  • From: Corpus Christi, Tx
Posted by mustang1989 on Friday, June 3, 2016 6:53 AM

Ok I'm mostly finished with the rolling chassis and interior. I still have to build a master cylinder and power brake booster for it and add the brake lines but I figured that I'd start on the body some. To say that the body has it's fair share of problems would be an understatement.
I usually see mold lines down around the corners and "what-not" but on top of the front fender? Really????????

Image

This is pretty bad too....

Image

and this is just nasty!!

Image

and then there's the fact that there's not a headlight bucket one for the headlamp lenses. That's right! There aint nothin behind the lenses 'cept atmosphere! Good grief!! I'll be Frenching in some headlight buckets later on..............


 Forum | Modelers Social Club Forum (proboards.com) 

  • Member since
    March 2012
  • From: Corpus Christi, Tx
Posted by mustang1989 on Friday, June 3, 2016 6:54 AM

I'm really getting a workout with my body work skills with this ride. I forgot to mention these areas too:

The seam line that looks like an upside down "L" beneath that body line there. Wow!

Image

and this:

Image

What's fairly surprising to me, even for Revell, is the total lack of headlight buckets for the lenses. No bucket, no bezels...just pop a lens into a hole and that's it.

I bought this guy here to rob the buckets/bezels from ...( Hey, I got it for 40% off at HL so it wasn't too expensive of an addition)

Image

I frenched this one in there to show the difference this is gonna make by cutting the headlight opening back to match the headlight buckets diameter and trimming the inside of the opening so it would fit. In the following pictures you can see where I've gotten rid of a lot of the riff-raff in regards to seam/mold lines with the initial sanding. Wet sanding is to follow. I'll be taking care of the hood hinge cut-outs as well by filling those in.

Viva la difference:

Image

Image

I've still got a looooooooooooong way to go on the clean up just on the front end though. As tough as it's gonna be , it's far from impossible I can promise you that! :wink:


 Forum | Modelers Social Club Forum (proboards.com) 

  • Member since
    August 2015
  • From: the redlands Fl
Posted by crown r n7 on Friday, June 3, 2016 8:38 AM

Big file it looks like it eats a lot . 


 Nick.

  • Member since
    March 2012
  • From: Corpus Christi, Tx
Posted by mustang1989 on Friday, June 3, 2016 2:21 PM

LOL! That was just for the headlight openings.


 Forum | Modelers Social Club Forum (proboards.com) 

  • Member since
    February 2003
  • From: East Bethel, MN
Posted by midnightprowler on Saturday, June 4, 2016 7:11 AM

Yeah, the mold seams on some of those older tools can be a challange. Whatcha gonna do with the rest of that 51 Joe?

Hi, I am Lee, I am a plastiholic.

Co. A, 682 Engineers, Ltchfield, MN, 1980-1986

1 Thessalonians 4:13-18 1 Corinthians 15:51-54

Ask me about Speedway Decals

  • Member since
    August 2007
  • From: back country of SO-CAL, at the birth place of Naval Aviation
Posted by DUSTER on Saturday, June 4, 2016 8:45 AM

Geesh, At least it "seams" you have a handle on it-   sorry.

I know with your skill, you’ll be able to  beat this sows ear into a silk purse,  but man they didn’t give you a break at all


Steve

Building the perfect model---just not quite yet  Confused

  • Member since
    August 2009
  • From: MOAB, UTAH
Posted by JOE RIX on Sunday, June 5, 2016 12:10 AM

Yikes! I know you kept telling me that the body was a mess but, sheesh. Yet, I know that you will have that sucker in pristine shape in no time. You got this.

I'm guessing that by now your stash of kits that were acquired for "just that one part" now exceeds your regular "to build" stash. Just an observation.Wink

"Not only do I not know what's going on, I wouldn't know what to do about it if I did". George Carlin

  • Member since
    March 2012
  • From: Corpus Christi, Tx
Posted by mustang1989 on Sunday, June 5, 2016 8:34 AM

Lee: Yeah it's terrible alright! I'm going to use parts from the 51. I like the wheels that are in it as well as some of the other goodies.

Steve: I just can't get over the way Revell just threw this kit together. I've heard bad things about the kit and it really hasn't been all that bad until now.

Joe: I'm tryin'! lol . As far as the stash of kits.... I now have a wealth of kits to draw ideas from. The imagination soars.........Confused


 Forum | Modelers Social Club Forum (proboards.com) 

  • Member since
    August 2015
  • From: the redlands Fl
Posted by crown r n7 on Sunday, June 5, 2016 5:16 PM

 a new badge I see . Cool  awesome job 


 Nick.

  • Member since
    March 2012
  • From: Corpus Christi, Tx
Posted by mustang1989 on Sunday, June 5, 2016 5:25 PM

Grab one crown! I used one of the existing badges for last year and modified it a bit. Thanks BTW.

I'm getting ready to go to Kansas for this next week. I'll be taking the body with me with some clean up tools in order to keep progress moving along but I decided to post some of the progress since Friday. I did manage to smooth out a lot of the mold line issues on the whole front clip.


For instance, the mold lines on the top of the fenders are now gone and I'm filling in those nasty hood hinge cut outs:


The upside down "L" 's are gone from the front of the fenders on the sides:


and the disgusting seam line between the headlamp opening and the hood line are now gone as well.


Still got some work to do to the hinge openings but here's little bit more clear view:


 Forum | Modelers Social Club Forum (proboards.com) 

  • Member since
    August 2009
  • From: MOAB, UTAH
Posted by JOE RIX on Sunday, June 5, 2016 11:11 PM

Great job on the sanding so far Joe. You've got nice touch going on there.

"Not only do I not know what's going on, I wouldn't know what to do about it if I did". George Carlin

  • Member since
    March 2012
  • From: Corpus Christi, Tx
Posted by mustang1989 on Tuesday, June 14, 2016 5:09 AM

Thanks Joe! Folks I ended up in Kansas all of last week but I took the body with me with some fine sanding pads, sticks and clean up items and got all of the molding seams removed. I started cutting out the  rear swing out door that everybody's been wondering about with sewing thread but got off track and cut into the door some.

Comparison shots:


Mold/Seam lines present:


Mold/Seam lines gone.....


I've got a little bit of sanding work to do to repair the bottom of the door and to smooth out all the edges of the door as well as the door opening but it looks like it'll work fine. It's funny about that thread trick. Never thought thread would cut this stuff.


 Forum | Modelers Social Club Forum (proboards.com) 

  • Member since
    August 2009
  • From: MOAB, UTAH
Posted by JOE RIX on Wednesday, June 15, 2016 7:13 PM

Yowza! That right there is some dang fine sanding. Excellently done Joe. In fact, that is downright impressive. As is your effort on removing the rear door. Well done.

"Not only do I not know what's going on, I wouldn't know what to do about it if I did". George Carlin

  • Member since
    March 2012
  • From: Corpus Christi, Tx
Posted by mustang1989 on Friday, June 17, 2016 5:56 AM

Man thanks Joe! Hopefully my luck holds out. lol


 Forum | Modelers Social Club Forum (proboards.com) 

  • Member since
    August 2015
  • From: the redlands Fl
Posted by crown r n7 on Friday, June 17, 2016 6:35 AM

That is some fine work that's the stuff you can't put a price tag on. Making the  canvis then painting 


 Nick.

  • Member since
    March 2012
  • From: Corpus Christi, Tx
Posted by mustang1989 on Friday, June 17, 2016 6:43 AM

Thanks crown! Lots of tedious work that hopefully will pay off soon.

Well here's the body all washed up and ready for a primer coat to fine tune all the body work. Hood hinge openings are now filled in.


 Forum | Modelers Social Club Forum (proboards.com) 

  • Member since
    February 2003
  • From: East Bethel, MN
Posted by midnightprowler on Friday, June 17, 2016 4:31 PM

Great job Joe.

Hi, I am Lee, I am a plastiholic.

Co. A, 682 Engineers, Ltchfield, MN, 1980-1986

1 Thessalonians 4:13-18 1 Corinthians 15:51-54

Ask me about Speedway Decals

JOIN OUR COMMUNITY!

Our community is FREE to join. To participate you must either login or register for an account.

SEARCH FORUMS
FREE NEWSLETTER
By signing up you may also receive reader surveys and occasional special offers. We do not sell, rent or trade our email lists. View our Privacy Policy.