SEARCH FINESCALE.COM

Enter keywords or a search phrase below:

54 Chevy Sedan Delivery-COMPLETED-09/16

19908 views
336 replies
1 rating 2 rating 3 rating 4 rating 5 rating
  • Member since
    March 2012
  • From: Corpus Christi, Tx
54 Chevy Sedan Delivery-COMPLETED-09/16
Posted by mustang1989 on Monday, January 4, 2016 8:15 PM
As some of you know I picked this kit up a few months back and was thinking of doing this one in typical "Gasser" fashion with the nose up in the air............

Image


but lately I've had something else in mind..............

Different set of wheels and tires and a more wild stance............... :hmm:

I think I'm gonna move forward with this one............

Image

Image

Image


 Forum | Modelers Social Club Forum (proboards.com) 

  • Member since
    August 2014
Posted by aWintersTale on Monday, January 4, 2016 10:05 PM

Looks tubbed, suggesting a pro street look. I like it, '89!

  • Member since
    March 2012
  • From: Corpus Christi, Tx
Posted by mustang1989 on Tuesday, January 5, 2016 3:55 AM

Thanks aWT! That's the idea.Cool


 Forum | Modelers Social Club Forum (proboards.com) 

  • Member since
    December 2006
  • From: N. Georgia
Posted by Jester75 on Wednesday, January 6, 2016 7:31 AM
I like your new stance waaaay better than whats on the box top. Looking forward to this one. Are you going all out on the detail like the pickup?

Eric


  • Member since
    February 2003
  • From: East Bethel, MN
Posted by midnightprowler on Wednesday, January 6, 2016 9:37 AM

This should be sweet.

Hi, I am Lee, I am a plastiholic.

Co. A, 682 Engineers, Ltchfield, MN, 1980-1986

1 Thessalonians 4:13-18 1 Corinthians 15:51-54

Ask me about Speedway Decals

  • Member since
    March 2012
  • From: Corpus Christi, Tx
Posted by mustang1989 on Wednesday, January 6, 2016 9:40 AM

Eric: Thanks pal. Yeah I'll end up going into some detail with it. Jeez I don't know if it'll be on the scale that the truck was but then again..................we'll see.

Lee: Thanks good buddy!!!

As far as today's progress goes,

:hmm: ...............yeah..........we'll be big blocking this one............

Image


 Forum | Modelers Social Club Forum (proboards.com) 

  • Member since
    August 2007
  • From: back country of SO-CAL, at the birth place of Naval Aviation
Posted by DUSTER on Wednesday, January 6, 2016 9:51 AM

Oh Boy 'nother Cool Car from the fertile mind and hands of Mustang1989 

   OK, I'm ready, let the show begin.

Steve

Building the perfect model---just not quite yet  Confused

  • Member since
    November 2003
  • From: Nashville, TN area
Posted by bobbaily on Wednesday, January 6, 2016 11:40 AM

Very nice work indeed Mustang 1989-how about some details on what you had to do to get the lowered stance-I have several old gasser kits in the stash that sit just a bit too high.

Bob


  • Member since
    March 2012
  • From: Corpus Christi, Tx
Posted by mustang1989 on Wednesday, January 6, 2016 5:10 PM

Steve: Thanks buddy!Cool

Bob: Thank you sir! Right now it's just a mock up but what I'm in the process of doing is using a different chassis.

The OOB frame just aint going to get it as it will leave the vehicle sitting too high.

Image

So I'll be using the frame and suspension components from this rascal right here to correct that.............

Image

As it looks right now I'll have to cut the center of the Nova chassis out as noted by the areas shaded in black and then cut the '54 flooring at the demarcation line drawn in white. I'm going to have to lengthen the Nova frame by about a 1/4" in the front and shave off about 1/8" at the rear to make all of this work.

Image

Looks like we're rolling......


 Forum | Modelers Social Club Forum (proboards.com) 

  • Member since
    January 2007
Posted by the doog on Thursday, January 7, 2016 2:37 PM

Yeah, that's MUCH cooler than the goofy looking "gasser" look. I know those cars were purpose-built, but man, they look silly!

Thank you, thank you, THANK YOU for not putting those grotesque "Donks" style low-profile/big rim tires on it. They almost make me nauseous on anything I see them on!

  • Member since
    March 2012
  • From: Corpus Christi, Tx
Posted by mustang1989 on Thursday, January 7, 2016 3:27 PM

LOL. I kind of like the gasser look for some of the 30's and 40's rods but not so much for the 50's and newer. One of the most disgusting sights I ever saw was a 69 Mustang gasser. Yeesh! "Donks" .........................lolololol. There aint gonna be no dang black rubber band stretched around a big wheel from me. I don't like that look either. Surprise


 Forum | Modelers Social Club Forum (proboards.com) 

  • Member since
    March 2012
  • From: Corpus Christi, Tx
Posted by mustang1989 on Friday, January 8, 2016 9:46 AM

I started out with the engine build like I always do on an automotive build. I primed with black on this one and shot the coat of paint like always but this time instead of adding a light wash I shot it with a gloss coat. To compliment the shiny paint job I thought I'd depart from the norm again and dress this one up with some chrome. I'm giving thought to dunking the chrome rocker covers in a dip of future and Tamiya smoke mixed together to give it that extra shine as well as to preserve the chrome. It's a big block and doesn't say which one it is so I'll assume this is a 396.


Here's the mock up:

Image


 Forum | Modelers Social Club Forum (proboards.com) 

  • Member since
    November 2003
  • From: Nashville, TN area
Posted by bobbaily on Friday, January 8, 2016 2:33 PM

mustang1989

Steve: Thanks buddy!Cool

Bob: Thank you sir! Right now it's just a mock up but what I'm in the process of doing is using a different chassis.

The OOB frame just aint going to get it as it will leave the vehicle sitting too high.

Image

So I'll be using the frame and suspension components from this rascal right here to correct that.............

Image

As it looks right now I'll have to cut the center of the Nova chassis out as noted by the areas shaded in black and then cut the '54 flooring at the demarcation line drawn in white. I'm going to have to lengthen the Nova frame by about a 1/4" in the front and shave off about 1/8" at the rear to make all of this work.

Image

Looks like we're rolling......


Thanks for the info Mustang-I may have to consider buying some 'donor' kits like the Nova you have or the Monogram 41 Willy's Street Rod.

My other option is making some leaf springs that aren't arched that high....may have to give that a shot too.

Enjoying seeing your progess picks-keep'em coming!


Bob


  • Member since
    March 2012
  • From: Corpus Christi, Tx
Posted by mustang1989 on Monday, January 11, 2016 8:24 AM

Thanks Bob!

Ok folks. I didn't end up liking the chrome intake and plenum as it was just too much chrome and to me too much chrome just looks cheap. I stripped the chrome from the intake and plenum using Easy Off. You gotta soak this stuff for around 30-45 minutes but it works. Then I washed it in warm soapy water, dried and primed it in black. After that I shot a coat of aluminum on it and after that I applied a light coat of dark wash on it to add a little more convincing finish. Additionally the oil fill cap is supposed to go on the drivers side. Oops! Here's the results:

Image

There............that's better.


 Forum | Modelers Social Club Forum (proboards.com) 

  • Member since
    September 2005
  • From: Illinois: Hive of Scum and Villany
Posted by Sprue-ce Goose on Monday, January 11, 2016 9:09 AM

Cool Cool build, Mustang1989 Big SmileYes

  • Member since
    March 2012
  • From: Corpus Christi, Tx
Posted by mustang1989 on Monday, January 11, 2016 7:11 PM

Thanks Spruece!! Yes


 Forum | Modelers Social Club Forum (proboards.com) 

  • Member since
    February 2003
  • From: East Bethel, MN
Posted by midnightprowler on Tuesday, January 12, 2016 3:42 AM

Looking good. Might I suggest a gold/brass color on the carbs.

Hi, I am Lee, I am a plastiholic.

Co. A, 682 Engineers, Ltchfield, MN, 1980-1986

1 Thessalonians 4:13-18 1 Corinthians 15:51-54

Ask me about Speedway Decals

  • Member since
    March 2012
  • From: Corpus Christi, Tx
Posted by mustang1989 on Tuesday, January 12, 2016 7:33 AM

That's what I was shootin' for right there Lee!

Speaking of carburetors............

Looking ahead as to what to use for those........ :hmm: .......

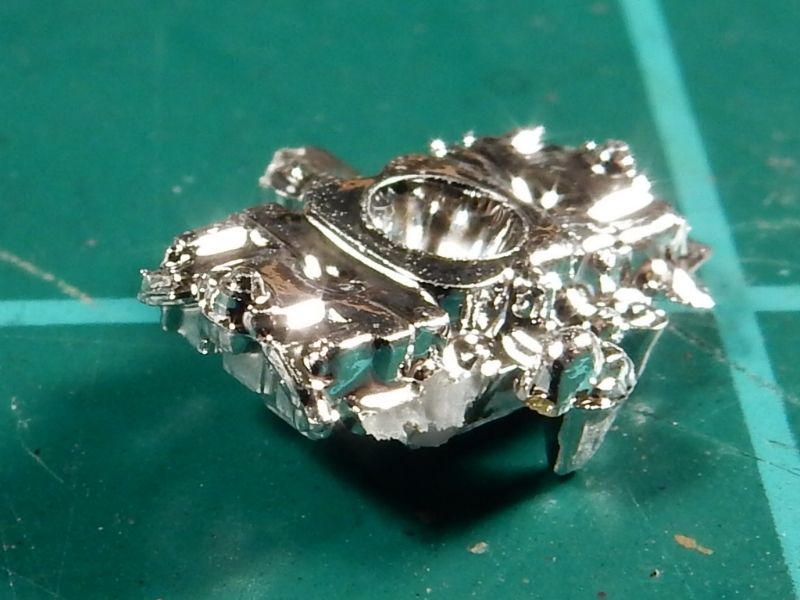
Well I can tell you for dang sure that I sure as Hell aint gonna use the OOB carbs that came with the 427. I don't know what these are but they are anything but a well represented carb.

Image

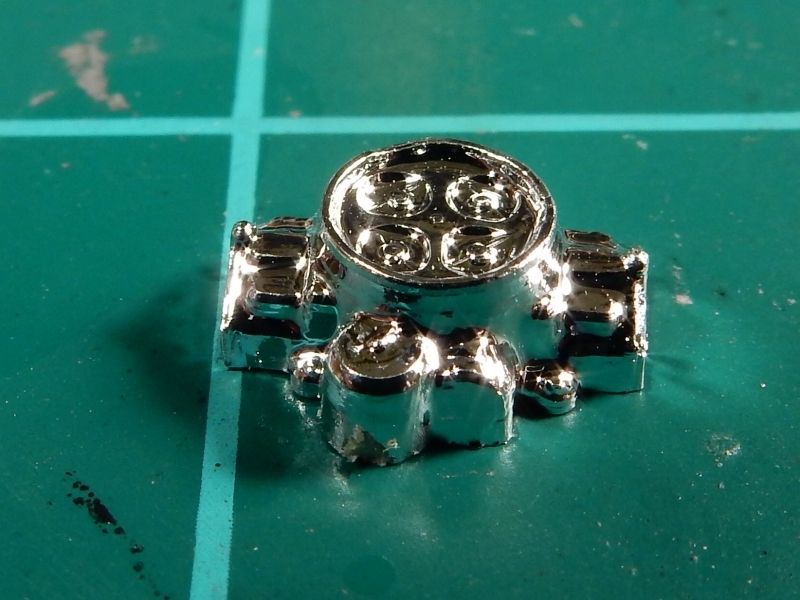
I thought about using some Dominator carburetors that came with my Motorcraft Thunderbird but in real life it would be too much for a street engine.....

Image

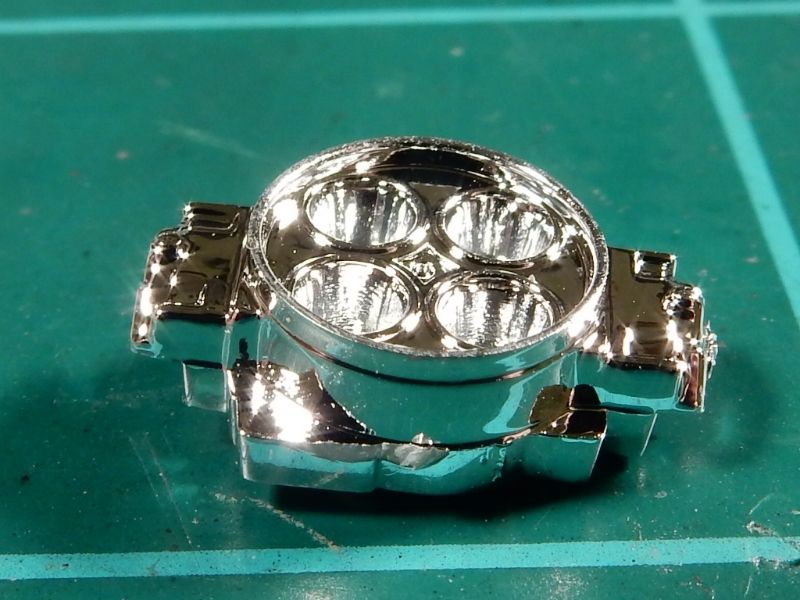
that leads me to my third option which is probably the best all around from the Revell 1970 Boss 429 kit. I haven't found an OOB Holley 4150 series carburetor that's been more well represented than these in terms of detail and accuracy. Only the AM stuff has them beat but I aint payin' $12 for two carburetors so we'll stick with the OOB offerings from Revell:

Image

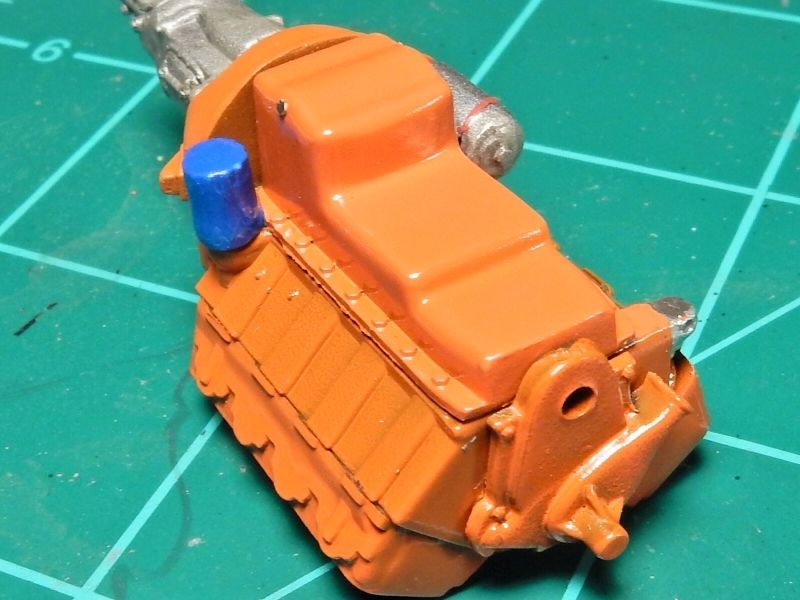
This is where I'm at so far on the bottom side. Oil filter was painted and installed yesterday and I just finished up installing the starter today. I've got the fuel pump painted up and the inlet and outlet holes already drilled in it for the fuel lines. And of course ....................the PE oil pan drain plug.

Image


 Forum | Modelers Social Club Forum (proboards.com) 

  • Member since
    March 2012
  • From: Corpus Christi, Tx
Posted by mustang1989 on Wednesday, January 13, 2016 7:00 AM

Carburetors are now in a bath of Easy Off to strip the chrome off. This morning I  drilled out all holes for the spark plug wires into the cylinder heads and for all the heater and bypass hoses in the intake manifold and water pump. I also managed to order my next little addition to this build a couple of days ago. No belt driven fan for this one. Check it out:

Image


 Forum | Modelers Social Club Forum (proboards.com) 

  • Member since
    August 2007
  • From: back country of SO-CAL, at the birth place of Naval Aviation
Posted by DUSTER on Thursday, January 14, 2016 7:05 PM

Oh,Boy! one of them E-Lectrik-ell fans.   should do the trick

You sure have those details well in hand Yes

Steve

Building the perfect model---just not quite yet  Confused

  • Member since
    March 2012
  • From: Corpus Christi, Tx
Posted by mustang1989 on Saturday, January 16, 2016 10:03 PM

Thanks Steve!!

I didn't get a whole lot done on the motor this week because I wanted to ensure the "do-ability" of this build since I'm using more than one kit to build this one. Given past experience I realize that all the detailing in the world doesn't mean crap if the kit won't "work" or fit right. I've taken steps this week to ensure the "do-ability" of this build so that I'll be trouble free on down the road from mistakes that one should catch in the beginning phases of a build like this one.

  I modified the Nova frame by shortening the frame in the back and shortening the leaf springs. Up front I cut the forward part of the frame completely off and cut out the center section. You can see the differences here........


After that I cut the front part of the '54 frame off and graphed that in. I still need a couple more bolt heads to make this more legit looking but I took all the measurements and this............is gonna work.


  I cut into the forward part of the frame about 3/16" where the front crossmember and front suspension mounts up in order to lower the car in the front another 3/16". Repositioning the front spindles up another 1/16" along with notching out the frame should round out to lowering the front of the car a total of 1/4" to get the look I was looking for in the first place. This is how the car is going to sit without the 1/16" spindle location. The rear of the rear suspension is exactly where it's supposed to be as well. Like I said , it's gonna work. It was even a little easier than I thought it was going to be.
 I even found some pre-printed slicks for the back so I don't have to worry about that either this time 'round.


About this time the ideas started soaring around in my head after I studied the back of the vehicle interior some. I still need to notch out where the wheel tubs are going to fit on the floor here but I've got some decent plans for this. First off here is the rear floor...


Now I thought to myself, "What can I do back here to make this interesting?"  Soooo. I found a 1/24 scale flat screen TV on ebay


Well I've gotta have something to sit this on and somewhere to sit so how about using a coffee table and couch from a 1:24 scale dollhouse set? Again..found these on ebay. Hey ......what tha hell...........ya know?


Gotta have somewhere to store the cold ones too so I found a 1:24 scale cooler with an opening lid to put those in....


and speakin' of cold ones.......I found some 1:24 scale cases of those too! A case of these'll go on top of the cooler....probably Bud or Heineken


I took measurements and plotted everything out on the floor using cut up post it notes to see if everything was gonna fit.....


Looks like it's gonna make it. I may throw another Hot Rod Magazine and scratch build a remote for the TV to put on the edge of the coffee table/ TV stand. Looks like I might need to run an air line and an airbag to the L/H side of the rear suspension to even things out back there for the weight on one side factor.


 Forum | Modelers Social Club Forum (proboards.com) 

  • Member since
    March 2012
  • From: Corpus Christi, Tx
Posted by mustang1989 on Monday, January 18, 2016 5:12 PM

I had an idea for a Jimmy Hendrix poster/ tapestry and think I found what I was after.

A little clear plastic to cover it with and maybe a little frame work and it's done.

The dimensions are roughly 1-18" x 3/4". Should work perfectly.

Image


 Forum | Modelers Social Club Forum (proboards.com) 

  • Member since
    August 2015
  • From: the redlands Fl
Posted by crown r n7 on Tuesday, January 19, 2016 7:00 PM
Hey that's looking real nice I'll be watching this build


 Nick.

  • Member since
    August 2009
  • From: MOAB, UTAH
Posted by JOE RIX on Thursday, January 21, 2016 5:40 AM

Fantastic stuff yor are doing with the panel wagon Joe. Love the concept and all the choice goodies you got to make it happen. The chassis that you have fashioned is very nicely done. I'm following along and I'm going to enjoy every minute of it. Great work.

"Not only do I not know what's going on, I wouldn't know what to do about it if I did". George Carlin

  • Member since
    March 2012
  • From: Corpus Christi, Tx
Posted by mustang1989 on Thursday, January 21, 2016 10:38 AM

Thanks crown and Joe!!! Found the rug for it today....

1-48-Scale-Dollhouse-Miniature-Colorful-Contemporary-Decor-Kitchen-Rug-Runner


 Forum | Modelers Social Club Forum (proboards.com) 

  • Member since
    August 2009
  • From: MOAB, UTAH
Posted by JOE RIX on Thursday, January 21, 2016 12:22 PM

Well, that's about butt-ugly. It's Perfect!!

"Not only do I not know what's going on, I wouldn't know what to do about it if I did". George Carlin

  • Member since
    March 2012
  • From: Corpus Christi, Tx
Posted by mustang1989 on Friday, January 22, 2016 5:11 PM

LOL!!!

Well I made a little extra progress on the chassis this morning. I got all the rear brake lines and fuel line formed and installed, got the differential and rear springs all painted up and glossed and started fitting the rear shocks. The chassis has been painted all aluminum with a gloss coat over it and the fuel cell and other two boxes in the back have been darkened slightly with a coat of Tamiya Smoke for a bit of contrast. Here's what I've got so far with that:

001_zpsrl8cys7j.jpg

002_zpsc42bz8eg.jpg


 Forum | Modelers Social Club Forum (proboards.com) 

  • Member since
    February 2003
  • From: East Bethel, MN
Posted by midnightprowler on Saturday, January 23, 2016 6:58 AM

Good ideas. Challenge Joe, could you do a factory stock build?

Hi, I am Lee, I am a plastiholic.

Co. A, 682 Engineers, Ltchfield, MN, 1980-1986

1 Thessalonians 4:13-18 1 Corinthians 15:51-54

Ask me about Speedway Decals

  • Member since
    March 2012
  • From: Corpus Christi, Tx
Posted by mustang1989 on Saturday, January 23, 2016 7:07 AM

Thank you Lee! I'm sure I probably could at some point! Why do you ask buddy?


 Forum | Modelers Social Club Forum (proboards.com) 

  • Member since
    August 2009
  • From: MOAB, UTAH
Posted by JOE RIX on Saturday, January 23, 2016 8:15 AM

Very nice work on the wire bending for the brake lines. Looking good so far there ole buddy.

"Not only do I not know what's going on, I wouldn't know what to do about it if I did". George Carlin

JOIN OUR COMMUNITY!

Our community is FREE to join. To participate you must either login or register for an account.

SEARCH FORUMS
FREE NEWSLETTER
By signing up you may also receive reader surveys and occasional special offers. We do not sell, rent or trade our email lists. View our Privacy Policy.