SEARCH FINESCALE.COM

Enter keywords or a search phrase below:

54 Chevy Sedan Delivery-COMPLETED-09/16

19918 views
336 replies
1 rating 2 rating 3 rating 4 rating 5 rating
  • Member since
    August 2007
  • From: back country of SO-CAL, at the birth place of Naval Aviation
Posted by DUSTER on Saturday, January 23, 2016 9:20 AM

Paisley rug?!?   Great since of  style, not over the top at all……..    ----------

Cool work on the break lines, the smoke adds a nice bit of differance to the fuel cell.Yes


Steve

Building the perfect model---just not quite yet  Confused

  • Member since
    March 2012
  • From: Corpus Christi, Tx
Posted by mustang1989 on Sunday, January 24, 2016 7:07 AM

Thanks Steve!

I finished up with the rear suspension this morning by painting the shocks , the rear mount points on the springs, painting the spring mount bolts at the axle and adding PE bolt & nut heads to either side of the leaf spring mount eyelets at the spring ends. Shocks and rear axle/ suspension are now part of the chassis. I also added PE bolt heads to the front subframe to main chassis for a bit more realism. I ended up using a spare drill bit for an axle so that everything would tie up nicely between the wheel/ axle fit.

Suspension progress with all shocks, plumbing and PE hardware installed:

Image

Here's the ride height I was looking for in the original mock up with attention directed towards the rear wheel/ tire in relation to the wheel opening.

Image

and here is where I'm at right now with the axle installed displaying assembled ride height as it is right now:

Image

Man those "meats" just look purdy underneath there don't they?

Image


 Forum | Modelers Social Club Forum (proboards.com) 

  • Member since
    February 2003
  • From: East Bethel, MN
Posted by midnightprowler on Sunday, January 24, 2016 7:27 AM

With your talent, I would love to see what you could do with one, you have a real talent.

Hi, I am Lee, I am a plastiholic.

Co. A, 682 Engineers, Ltchfield, MN, 1980-1986

1 Thessalonians 4:13-18 1 Corinthians 15:51-54

Ask me about Speedway Decals

  • Member since
    June 2003
  • From: Cavite, Philippines
Posted by allan on Monday, January 25, 2016 1:36 AM

Like watching an episode of Counting Cars, in miniature.


No bucks, no Buck Rogers

  • Member since
    March 2012
  • From: Corpus Christi, Tx
Posted by mustang1989 on Wednesday, January 27, 2016 5:24 AM

Dang! Thanks Lee ! I did build my 1970 Dodge Challenger T/A you know. Wink

Allan: 'Preciate it buddy!

Over the course of the last few days I've been working on wheels and tires and the stance I want out of this thing. First off I got the wheels to fit better in the tires and then scuffed the road surface part of the tire up using a 1/2" socket on a drill. I'll wait on the finishing touches to the sidewalls till later on in the build. Still handling the tires too much right now.

Then I went to work on manufacturing a set of springs for the front. The OOB ones were atrocious !!!

Then I did some more work in the front in regards to wheel to spindle mounting and dropping the front end where I wanted it.

 Everything is mounted up as it will be with the finished product and now the stance is dead on with the exact look I was after.

and finally the rear view.

Now I get to move on to construction.......finally!!!


 Forum | Modelers Social Club Forum (proboards.com) 

  • Member since
    February 2003
  • From: East Bethel, MN
Posted by midnightprowler on Wednesday, January 27, 2016 6:17 AM

Sweet! That's right, you did, I forgot. I guess oldtimers is setting in. Sorry Joe. Carry on sir, you are doing great.

Hi, I am Lee, I am a plastiholic.

Co. A, 682 Engineers, Ltchfield, MN, 1980-1986

1 Thessalonians 4:13-18 1 Corinthians 15:51-54

Ask me about Speedway Decals

  • Member since
    March 2012
  • From: Corpus Christi, Tx
Posted by mustang1989 on Thursday, January 28, 2016 3:24 AM

No worries Lee!   I've got the same thing going on. Thanks pal.


 Forum | Modelers Social Club Forum (proboards.com) 

  • Member since
    January 2016
  • From: A Galaxy Far, Far Away
Posted by Hunter on Thursday, January 28, 2016 6:37 AM

Mustang,

Very nice....she is looking awesome. I prefer the dumped look compared to the box art. One day right Mustang. 

Hunter 


  • Member since
    September 2005
  • From: Illinois: Hive of Scum and Villany
Posted by Sprue-ce Goose on Thursday, January 28, 2016 7:41 AM

Nice work on those tires and springs! Big Smile

  • Member since
    August 2009
  • From: MOAB, UTAH
Posted by JOE RIX on Thursday, January 28, 2016 7:47 AM

Glad to see you got the stance you were looking for. It's looking fantastic Joe.

"Not only do I not know what's going on, I wouldn't know what to do about it if I did". George Carlin

  • Member since
    December 2006
  • From: N. Georgia
Posted by Jester75 on Thursday, January 28, 2016 8:06 AM

Looks low and mean Joe, love the stance!

Eric


  • Member since
    August 2008
Posted by tankerbuilder on Thursday, January 28, 2016 11:59 AM

Uh Oh !

There you go agin ! I do have to agree with everyone on the " Donk " wheels .I think that's stupid even for "Low Rider " looking cars . Can't wait to see how far you go here .

 NOTE ;

 I used to heat the frames ahead of the firewall to get my stance .Worked fairly well . T.B.

  • Member since
    August 2007
  • From: back country of SO-CAL, at the birth place of Naval Aviation
Posted by DUSTER on Friday, January 29, 2016 11:46 PM

The side view of the rear wheels tucked behind the finder = Out Fuelin' Wink Standing!!

The rest is great too and the rear view of those mammoth meats is just plain scary  Whaa Whoo


Steve

Building the perfect model---just not quite yet  Confused

  • Member since
    March 2012
  • From: Corpus Christi, Tx
Posted by mustang1989 on Monday, February 1, 2016 8:53 PM

Mayan!!! I just caught up to this thread! Thanks gang!! Still working on some of the basics with the frame and suspension just trying to get everything together strong here so it don't come apart later. I appreciate all the encouragement fellas.


 Forum | Modelers Social Club Forum (proboards.com) 

  • Member since
    March 2012
  • From: Corpus Christi, Tx
Posted by mustang1989 on Monday, February 1, 2016 8:55 PM

Mayan!!! I just caught back up on this thread. Thanks gang!! I'm just trying to make sure the frame and suspension attachment points are really strong so I don't have this thing come apart later on in the build. Still having to tweak the front part of the frame as there is a slight twist in it. I really appreciate all the encouragement along the way with this thing guys.


 Forum | Modelers Social Club Forum (proboards.com) 

  • Member since
    March 2012
  • From: Corpus Christi, Tx
Posted by mustang1989 on Saturday, February 6, 2016 5:49 PM

I've got the front and rear suspensions set up.....finally!!! All the tires are test fitted into place. I have to order some replacement front tires. I trimmed 'em a little too much on the inner ring so the rim would fit properly.........dammit!


A little closer in there to show the front springs and the brake calipers that I robbed from a Dodge Viper kit.


I did a skeleton assembly of this kit the way it's supposed to look OOB. Good greif................


another view..........


A recap photo to show the difference......


Then the direct comparison shots....

Man am I ever glad I changed it up......Jeez!!


 Forum | Modelers Social Club Forum (proboards.com) 

  • Member since
    February 2003
  • From: East Bethel, MN
Posted by midnightprowler on Sunday, February 7, 2016 7:19 AM

Definitly a better stance, but in the kit's defense, it is designed to be a gasser, and nose high was a typical gasser stance. Like what you are doing. Hurry up and get it done, lol.

Hi, I am Lee, I am a plastiholic.

Co. A, 682 Engineers, Ltchfield, MN, 1980-1986

1 Thessalonians 4:13-18 1 Corinthians 15:51-54

Ask me about Speedway Decals

  • Member since
    August 2009
  • From: MOAB, UTAH
Posted by JOE RIX on Tuesday, February 9, 2016 11:14 PM

Yeah, you've got the stance looking way mo bedda. I like it. That is some sweet work on the suspension also Joe. All in all it's looking terrific. Looking forward to more my friend.

"Not only do I not know what's going on, I wouldn't know what to do about it if I did". George Carlin

  • Member since
    March 2012
  • From: Corpus Christi, Tx
Posted by mustang1989 on Sunday, February 14, 2016 7:25 AM

Lee: Thanks buddy!! "Hurry up and get it done". LOL. My "hurry" will hopefully be 4 months insteand of 10! lol

Joe: Thanks for the good word and for peekin' in pal!

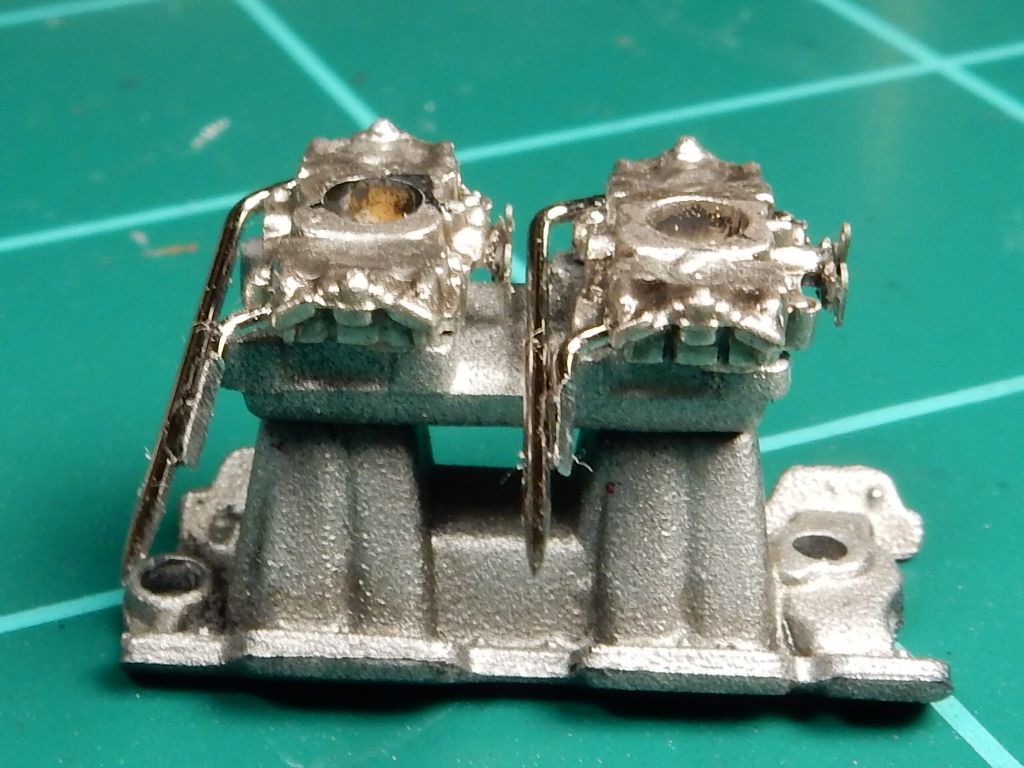
Got the carburetors underway. I used some throttle linkage from my Model Car Garage linkage PE set for the the throttle pivot lever and needles for the fuel inlet lines. I'll end up cutting the pointed portion of the "lines" off and routing fuel lines to them. I've got to finish the distributor and mount it into place with the ignition wires before I start on the rest of the throttle linkage but here's the start of that.

Image

Image


 Forum | Modelers Social Club Forum (proboards.com) 

  • Member since
    August 2009
  • From: MOAB, UTAH
Posted by JOE RIX on Sunday, February 14, 2016 7:47 AM

I always enjoy your amazing attention to detail Joe. Then the fact that you pull it off with incredible skill and creativity. Excellent work and thanks for the update. Always good to see you making progress.

"Not only do I not know what's going on, I wouldn't know what to do about it if I did". George Carlin

  • Member since
    February 2011
  • From: St louis
Posted by Raualduke on Sunday, February 14, 2016 9:00 AM
That's a fantastic "cast" look on the manifold. Even the flashing looks correct. Mike
  • Member since
    March 2012
  • From: Corpus Christi, Tx
Posted by mustang1989 on Tuesday, February 16, 2016 3:39 AM

Thanks alot fellas!! I ended up reworking one of the carburetors as it had an appendage on one of the float bowls. I took care of it though.


 Forum | Modelers Social Club Forum (proboards.com) 

  • Member since
    February 2003
  • From: East Bethel, MN
Posted by midnightprowler on Tuesday, February 16, 2016 6:21 AM

Coming along nicely Joe.

Hi, I am Lee, I am a plastiholic.

Co. A, 682 Engineers, Ltchfield, MN, 1980-1986

1 Thessalonians 4:13-18 1 Corinthians 15:51-54

Ask me about Speedway Decals

  • Member since
    August 2007
  • From: back country of SO-CAL, at the birth place of Naval Aviation
Posted by DUSTER on Thursday, February 25, 2016 4:21 PM

Just AweSome, Joe Yes

Steve

Building the perfect model---just not quite yet  Confused

fox
  • Member since
    January 2007
  • From: Narvon, Pa.
Posted by fox on Thursday, February 25, 2016 5:22 PM

Outstanding work Joe. Bow DownBow DownBow Down

Jim  Captain

 Main WIP: 

   On the Bench: Artesania Latina  (aka) Artists in the Latrine 1/75 Bluenose II

I keep hitting "escape", but I'm still here.

  • Member since
    May 2013
  • From: Indiana, USA
Posted by Greg on Thursday, February 25, 2016 6:33 PM

Raualduke
That's a fantastic "cast" look on the manifold. Even the flashing looks correct. Mike
 

I noticed that. How'd you do that, Joe?

Just found this thread. Looking good, as usual young man.

Those tires remind me of some rubber on my old customized HO slot cars back in the day. :)

  • Member since
    March 2012
  • From: Corpus Christi, Tx
Posted by mustang1989 on Thursday, March 3, 2016 5:09 AM

Thanks Lee, Steve, Jim and Greg.

As far as the cast look on the manifold I used a black primer on the intake and then shot it with a light coat of "Aluminum" enamel from Model Master. After that I treated it all with a real light acrylic wash.

 I've been on this one fairly consistently since last month. Alot of little tedious details to work out with the engine and I had the "three wheeler" effect going on with the L/H front wheel refusing to touch the ground. A little heat applied to the L/H side of the frame fixed that so I have all four tires contacting the ground now. Things have slowed a little within the last couple of weeks as my wife suffered from a stroke on the 21st of February. It's been a little topsy turvy since then but being at the bench helps to clear my mind for short periods of time. She's now recovering well in San Antonio so my weekends are spent with her until her return here to Corpus.

More updates coming soon with this one.


 Forum | Modelers Social Club Forum (proboards.com) 

  • Member since
    January 2016
  • From: A Galaxy Far, Far Away
Posted by Hunter on Thursday, March 3, 2016 10:35 AM

It's looking great Joe, I will be watching until the end. Enjoy

Hunter 


  • Member since
    March 2012
  • From: Corpus Christi, Tx
Posted by mustang1989 on Monday, March 7, 2016 6:23 AM

Thanks Hunter!

Just to show that I am still making progress on this bad boy. The wire looms/ retainers were a real PIA only in the fact that the holes were too dang small. I had to drill each hole out to .024" to be able to run the wires through them. The two hole looms were a nightmare to insert the second wire through due to the fact that they flopped all over the place. A friend of mine (Mopar D)  gave me the trick of leaving them on the PE fret and installing them over the wires that way but during the drilling process they came off of the fret!


Anyways here the engine is with the wires mostly ran. I've got the spark plug boots slipped onto the wires and painted and all the wire looms in place. Now for final routing and wire insertion into the cylinder heads. I've got the ignition coil all painted up as well and ready to go.


 Forum | Modelers Social Club Forum (proboards.com) 

  • Member since
    August 2015
  • From: the redlands Fl
Posted by crown r n7 on Monday, March 7, 2016 10:57 AM

Looking real Good how's things in Texas


 Nick.

JOIN OUR COMMUNITY!

Our community is FREE to join. To participate you must either login or register for an account.

SEARCH FORUMS
FREE NEWSLETTER
By signing up you may also receive reader surveys and occasional special offers. We do not sell, rent or trade our email lists. View our Privacy Policy.