SEARCH FINESCALE.COM

Enter keywords or a search phrase below:

54 Chevy Sedan Delivery-COMPLETED-09/16

19918 views
336 replies
1 rating 2 rating 3 rating 4 rating 5 rating
  • Member since
    August 2007
  • From: back country of SO-CAL, at the birth place of Naval Aviation
Posted by DUSTER on Sunday, March 27, 2016 6:40 PM

Hay Joe, happly Easter to you and Mrs.'stang 

Grand progress on the engine, you make it look simple and  do-able, for the ham (Easter get it?) fisted of us.

Steve

Building the perfect model---just not quite yet  Confused

  • Member since
    March 2012
  • From: Corpus Christi, Tx
Posted by mustang1989 on Tuesday, March 29, 2016 5:15 AM

Thanks Joe and Steve!

Of all the areas in automotive model building I find that by far the throttle linkage set up and build-up to be one of the most time consuming parts of it. If one thing is off, the whole thing seems to look wrong.

This morning I managed to build the throttle linkage bracket up on the front carburetor and get the common rod pivot point "L" bracket installed on it. I stretched a piece of sprue for the common pivot rod between the two carbs and inserted it in both pivot point "L" brackets. A little clean up on both ends and then I'm ready for installing both throttle levers onto the common rod. Then it's off to painting the rod itself.

This morning's progress:


 Forum | Modelers Social Club Forum (proboards.com) 

  • Member since
    February 2003
  • From: East Bethel, MN
Posted by midnightprowler on Tuesday, March 29, 2016 8:34 AM

Bow Down

Hi, I am Lee, I am a plastiholic.

Co. A, 682 Engineers, Ltchfield, MN, 1980-1986

1 Thessalonians 4:13-18 1 Corinthians 15:51-54

Ask me about Speedway Decals

  • Member since
    March 2012
  • From: Corpus Christi, Tx
Posted by mustang1989 on Tuesday, March 29, 2016 8:57 AM

LOL!!! Thanks Lee!


 Forum | Modelers Social Club Forum (proboards.com) 

  • Member since
    January 2016
  • From: A Galaxy Far, Far Away
Posted by Hunter on Tuesday, March 29, 2016 4:43 PM

Looking great, and wonderful detail!

Hunter 


  • Member since
    August 2009
  • From: MOAB, UTAH
Posted by JOE RIX on Wednesday, March 30, 2016 8:15 AM

Let me tell ya Joe, those "time consuming " efforts are more than well worth it. They certainly turn into something that is more than admirable. Stunning effort to say the least.

"Not only do I not know what's going on, I wouldn't know what to do about it if I did". George Carlin

  • Member since
    March 2012
  • From: Corpus Christi, Tx
Posted by mustang1989 on Thursday, March 31, 2016 6:23 AM

Thanks Hunter and Joe!! Hopefully I'll get enough done on this thing to be worthy of pictures this weekend. lol


 Forum | Modelers Social Club Forum (proboards.com) 

  • Member since
    March 2012
  • From: Corpus Christi, Tx
Posted by mustang1989 on Friday, April 1, 2016 6:28 AM

It's update time again fellas! I've put it off for a few days in order to get most of the way through the throttle linkage process. Here is everything but the return spring and throwing a little Tamiya Smoke on the PE linkage parts to give 'em that true metal look.

The big picture:


and a little closer at a couple of different angles:


What to use for the return spring? I was sittin' around thinkin' of what was best to use for one of those on my last build. I've seen folks wind their own and I just don't like the look. One the coils are not uniform most of the time and it looks like what it is.....a home made wound wire that's supposed to resemble a spring. I came up with the perfect solution.  Most of you have quick access to one of these:

A 1:1 scale turn signal bulb. Just break the bulb glass:


pull the element out:


and you've got yourself a return spring............


 Forum | Modelers Social Club Forum (proboards.com) 

  • Member since
    February 2003
  • From: East Bethel, MN
Posted by midnightprowler on Friday, April 1, 2016 7:55 AM

Brilliant idea! Now I am embarrassed by the spring on my Nomad!

Hi, I am Lee, I am a plastiholic.

Co. A, 682 Engineers, Ltchfield, MN, 1980-1986

1 Thessalonians 4:13-18 1 Corinthians 15:51-54

Ask me about Speedway Decals

  • Member since
    January 2016
  • From: A Galaxy Far, Far Away
Posted by Hunter on Sunday, April 3, 2016 3:07 PM

That is such a great idea, thank you for sharing that with all of us. The engine is....awesome, well detailed and perfect!! Great job sir.

Hunter 


  • Member since
    May 2013
  • From: Indiana, USA
Posted by Greg on Sunday, April 3, 2016 4:42 PM

That's some fine work, Joe. Good thinking on the spring.

  • Member since
    March 2012
  • From: Corpus Christi, Tx
Posted by mustang1989 on Monday, April 4, 2016 6:30 AM

Thanks Lee , Hunter and Greg! I'm working on the headers, extension tubes right now and that's proving to be a nightmare.


 Forum | Modelers Social Club Forum (proboards.com) 

  • Member since
    August 2009
  • From: MOAB, UTAH
Posted by JOE RIX on Monday, April 4, 2016 7:40 AM

The spring is a stroke of brilliance ny friend. You know, your wife may not find you handsome but, she dang sure must find you handy.Big Smile

"Not only do I not know what's going on, I wouldn't know what to do about it if I did". George Carlin

  • Member since
    March 2012
  • From: Corpus Christi, Tx
Posted by mustang1989 on Wednesday, April 6, 2016 6:30 AM

Thanks Joe!! LOL on the handsome & handy part.

Got the anodized fittings and braided fuel delivery lines installed this morning.  I think it's starting to look like an engine....


 Forum | Modelers Social Club Forum (proboards.com) 

  • Member since
    March 2012
  • From: Corpus Christi, Tx
Posted by mustang1989 on Friday, April 8, 2016 5:23 AM

Well after about two months of working with the engine......I think I've got the base assy completed. I still have to add the radiator hoses and clamps, the throttle linkage from the firewall to the engine and an engine oil dipstick but I'm going to call this part done.


The 427c.i.d. Dual Quad Chevrolet Rat Motor:


 Forum | Modelers Social Club Forum (proboards.com) 

  • Member since
    August 2015
  • From: the redlands Fl
Posted by crown r n7 on Friday, April 8, 2016 6:44 AM

man that engine looks real Drinks


 Nick.

  • Member since
    August 2009
  • From: MOAB, UTAH
Posted by JOE RIX on Friday, April 8, 2016 7:44 AM

Now that, my friend, is one outstanding piece of craftsmanship. That really is marvelous Joe. I really appreciate the patience and perseverance you put into that engine because it absolutely pays off.

"Not only do I not know what's going on, I wouldn't know what to do about it if I did". George Carlin

  • Member since
    February 2003
  • From: East Bethel, MN
Posted by midnightprowler on Friday, April 8, 2016 4:15 PM

Beautiful rat!

Hi, I am Lee, I am a plastiholic.

Co. A, 682 Engineers, Ltchfield, MN, 1980-1986

1 Thessalonians 4:13-18 1 Corinthians 15:51-54

Ask me about Speedway Decals

  • Member since
    March 2012
  • From: Corpus Christi, Tx
Posted by mustang1989 on Sunday, April 10, 2016 8:17 AM

Thanks crown, Joe and Lee!

Now that the engine's almost completed except for a few peripheral nick nacks I test fitted it once more on the rolling chassis:

Image

and then test fitted the body with the interior tub just to make sure we don't have any interference issues.....

Fits perfectly:

Image

Overall look so far is right in line with what I envisioned:

Image


 Forum | Modelers Social Club Forum (proboards.com) 

  • Member since
    March 2012
  • From: Corpus Christi, Tx
Posted by mustang1989 on Sunday, April 10, 2016 8:18 AM
Onto the interior.

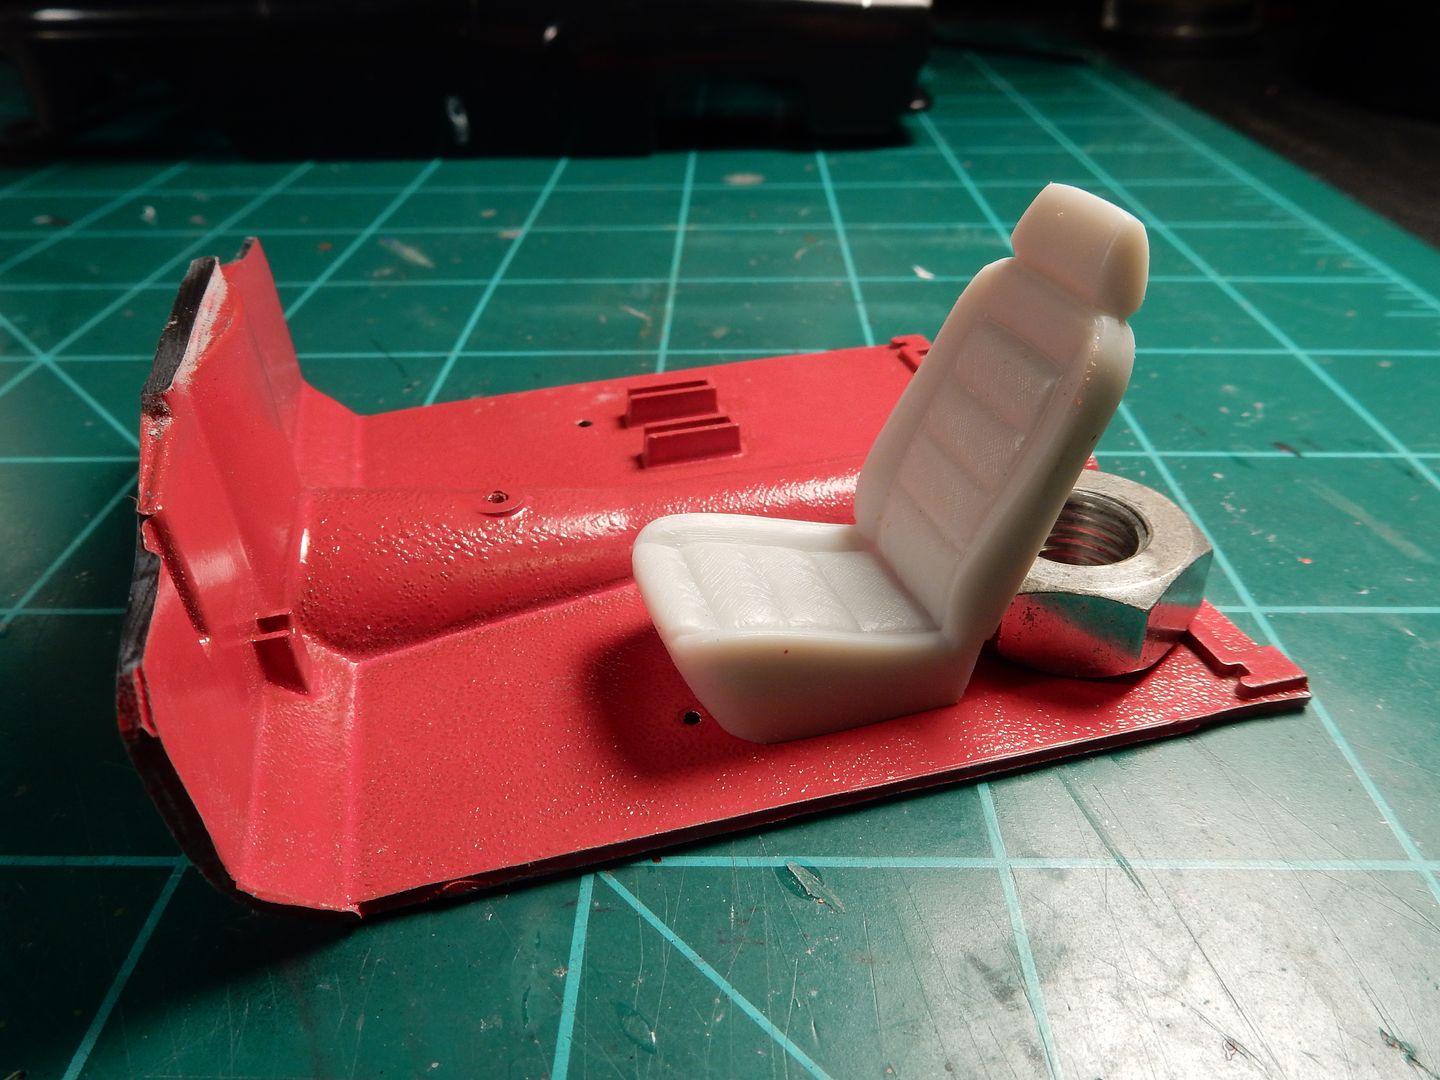
I am going to use seats from an AMT 1988 Mustang kit that I just recently acquired since it has two sets in the box. I'll also be using the center console out of it as well.
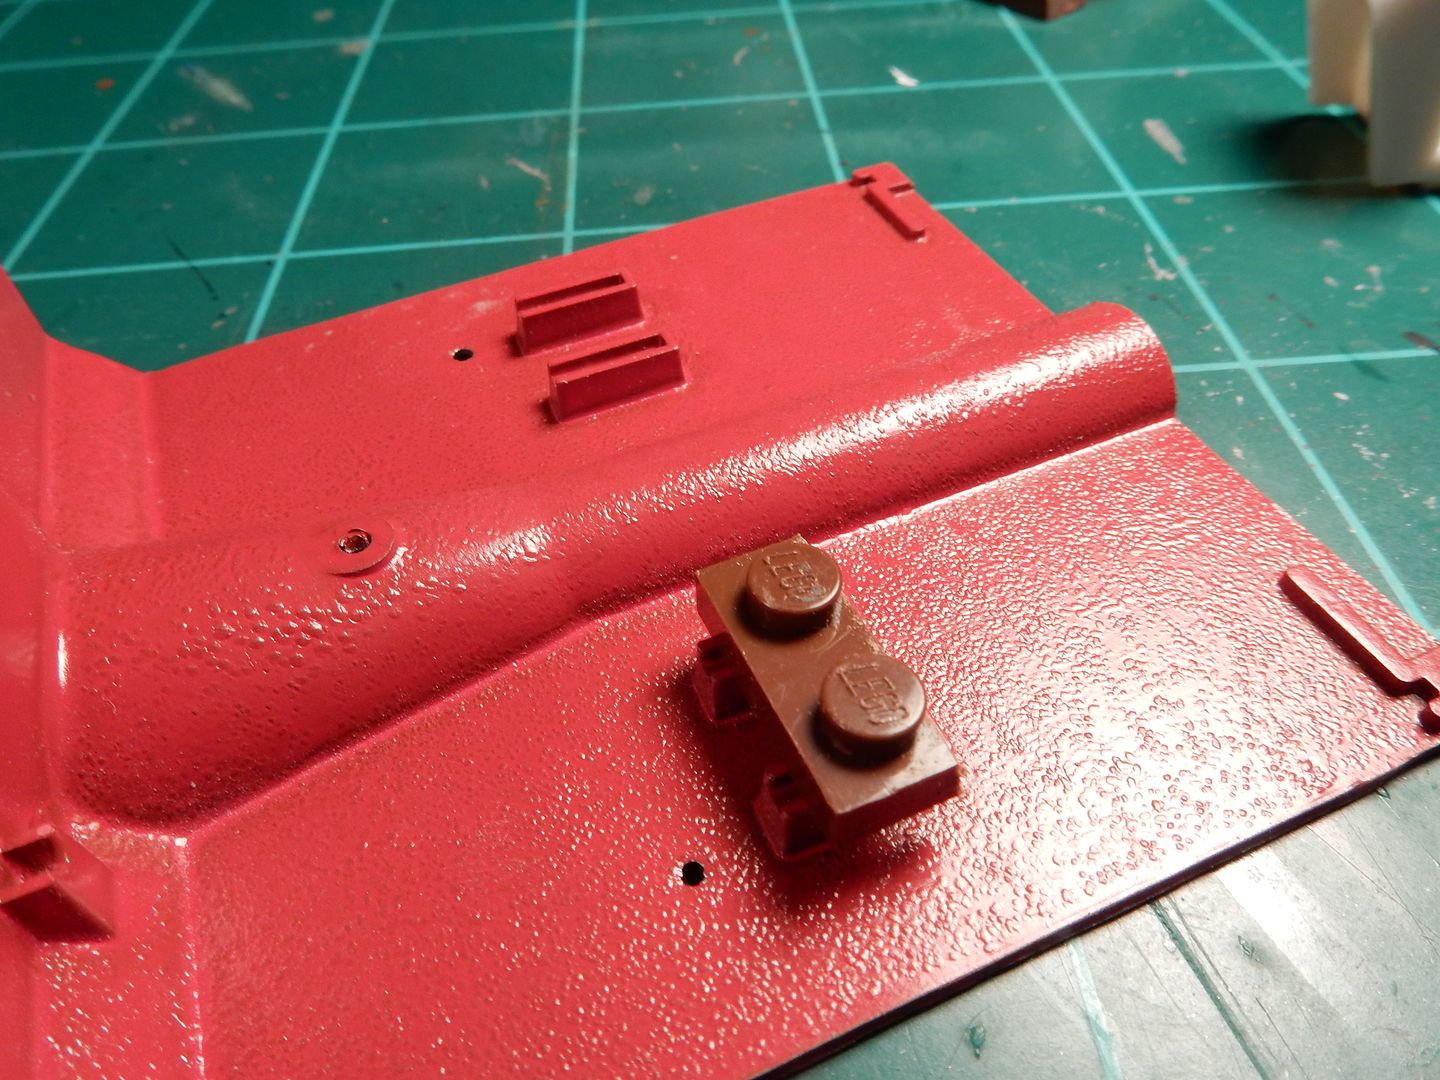
First off the seats sat too low for me.

Image

So I managed to snake a small Lego to use as a platform:

Image

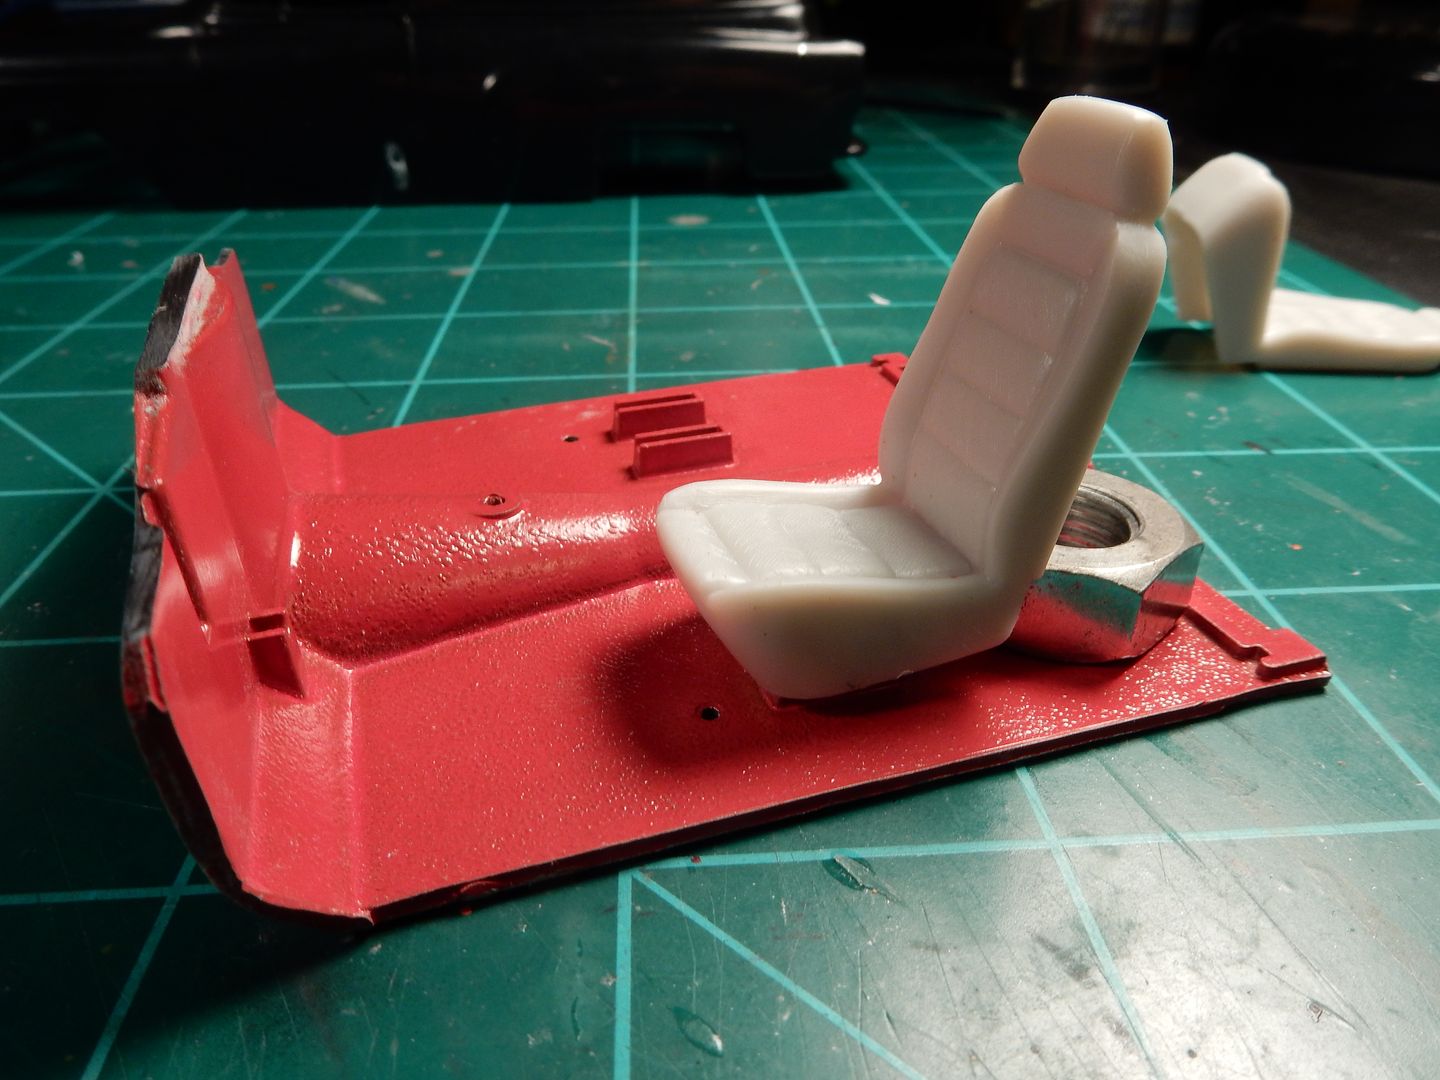
Seat is right where I want it in regards to height after sanding the towers of the Lego down a bit:

Image

So with that.....let's add some carpet to the equation:

Image


 Forum | Modelers Social Club Forum (proboards.com) 

  • Member since
    February 2003
  • From: East Bethel, MN
Posted by midnightprowler on Sunday, April 10, 2016 9:49 AM

Nice work.

Hi, I am Lee, I am a plastiholic.

Co. A, 682 Engineers, Ltchfield, MN, 1980-1986

1 Thessalonians 4:13-18 1 Corinthians 15:51-54

Ask me about Speedway Decals

  • Member since
    January 2016
  • From: A Galaxy Far, Far Away
Posted by Hunter on Sunday, April 10, 2016 12:37 PM

Joe - 

OMG!! That engine is flippin' insane! This is one heck of a build...so well thoughtout and detailed. I have really enjoyed watching you build this master piece. 

Hunter 


fox
  • Member since
    January 2007
  • From: Narvon, Pa.
Posted by fox on Sunday, April 10, 2016 1:03 PM

It's..........I can't........I don't..........Oh Hell  Bow Down Bow Down Bow Down Toast Toast Toast.

Jim  Captain

 Main WIP: 

   On the Bench: Artesania Latina  (aka) Artists in the Latrine 1/75 Bluenose II

I keep hitting "escape", but I'm still here.

  • Member since
    August 2009
  • From: MOAB, UTAH
Posted by JOE RIX on Sunday, April 10, 2016 11:14 PM

Magnifico!!! Just your usual spectacular stuff eh, Joe.

"Not only do I not know what's going on, I wouldn't know what to do about it if I did". George Carlin

  • Member since
    March 2012
  • From: Corpus Christi, Tx
Posted by mustang1989 on Monday, April 11, 2016 9:32 AM

Thanks fellas! I'm really lookin' forward to this interior part.


 Forum | Modelers Social Club Forum (proboards.com) 

  • Member since
    July 2014
  • From: Redcliffe, Queensland, Australia
Posted by Aussie Mick on Monday, April 11, 2016 9:07 PM

Hi Mustang,

Nice progress you're making there. Here's a little tip for your fuel lines, I do it on all of mine. if you don't want them to look all squashed and flat, just get some of the wire that you use for your plug leads and slowly and carefully slide it through the inside of the braided line. It fills it out and makes it easier and neater to route. Keep up the great work. 


Cheers

mick

  • Member since
    April 2015
Posted by Scarecrow Joe on Monday, April 11, 2016 9:12 PM

Looking good Joe.

  • Member since
    March 2012
  • From: Corpus Christi, Tx
Posted by mustang1989 on Tuesday, April 12, 2016 3:30 PM

Mick: I may take these lines loose where I have them secured to the transmission and do just that trick to it. Thanks man! Yes

Oscar: Thanks buddy! Good to see you around again!!!

Movin' on with the interior. I black based both of the seats and the console and will be painting the seats what will end up being a dark red color and the console will be gloss black.


The shifter in the console was for an automatic so I sanded the PRNDL and the raised portion down from that area and will be installing a shifter boot from another kit and will be using a bobby pin as a shifter lever/ stick that has a black head/ ball on it. I formed it back towards the drivers seat in an "S" curve. I just didn't like the straight stick. After smoothing out the ball I've already got the white dot on it and have a small syringe standing by so I can put the "8" in the center of it. I couldn't NOT put an "8 ball" atop the stick you know. ;)


 Forum | Modelers Social Club Forum (proboards.com) 

  • Member since
    March 2012
  • From: Corpus Christi, Tx
Posted by mustang1989 on Thursday, April 14, 2016 6:27 AM

I think I managed to pull the 8 ball on top of the shifter off................

Image


 Forum | Modelers Social Club Forum (proboards.com) 

  • Member since
    March 2012
  • From: Corpus Christi, Tx
Posted by mustang1989 on Friday, April 15, 2016 6:20 AM

I got the shifter boot finished this morning and married it up with the shifter lever.


 Forum | Modelers Social Club Forum (proboards.com) 

JOIN OUR COMMUNITY!

Our community is FREE to join. To participate you must either login or register for an account.

SEARCH FORUMS
FREE NEWSLETTER
By signing up you may also receive reader surveys and occasional special offers. We do not sell, rent or trade our email lists. View our Privacy Policy.