SEARCH FINESCALE.COM

Enter keywords or a search phrase below:

Imai Golden Hind 1/70

34774 views
153 replies
1 rating 2 rating 3 rating 4 rating 5 rating
  • Member since
    March 2012
  • From: Marysville, WA
Imai Golden Hind 1/70
Posted by David_K on Monday, May 5, 2014 6:51 PM

I'm starting my build of the Golden Hind now...and though I don't plan to keep a complete Build Log this time, I am making a few changes to the kit, and thought it would be good to highlight some of these mods here...

Some of these changes are going to be new challenges, so please bear with me!

Here's a list of some of the things I'm going to try:

-Furled sails (done that before, but this time, I'm puttying in the masts locator slots for the topsail yards, and making new ones in the *lowered position*)

-Using wooden deadeyes, making chainplates, and rigging shrouds and ratlines

-Replacing belaying pins with brass aftermarket parts

-Wooden display base with brass pedestals

-Rigging for gunports

-Rope wooldings on the masts

-Trying a new kind of paint (Vallejo Model Air acrylics)

Anyway, some of this is new to me, and I hope I can pull it off!  I welcome any helpful hints, or guidance along the way.

Here's a few pics of some preliminary work I've done:

Some of the molded belaying pins were broken when I got the kit, and the pieces were MIA, so I decided to cut them off, drill out the rails, and replace the pins with brass parts from Model Expo   Since I'm adding real chain chainplates, I wanted to put the "front strip" on the channels to help keep the lower deadeyes in place...I had some Evergreen styrene strip, so I cut some lengths and glued them to the front of the channels...they still need final shaping and, of course, nothing's painted yet...  So this is the beginning...should be exciting! Once I get some more parts prep done, I can lay down some basecoats, and I'll offer my opinion of the Vallejo paint.

        _~
     _~ )_)_~
     )_))_))_)
     _!__!__!_         
     (_D_P_K_)
   ~~~~~~~~~~~~~
    ~~~~~~~~~~~

Current Project:  Imai/ERTL Spanish Galleon #2

Recently Finished: Revell 1/96 Cutty Sark

Next Up:  ???


  • Member since
    May 2003
  • From: Greenville, NC
Posted by jtilley on Monday, May 5, 2014 7:09 PM

One thing you need to think about, Dave, is the way the sails are furled.  During this period each yard was normally just about half the length of the yard below it.  So the foot of the sail would be twice as wide as the head - and furling the sail up as a bundle on the upper yard wouldn't work.

The solution was to gather the clews (the lower corners of the sail) into a bundle lashed to the heel of the top mast.  The sail was bundled up into sort of a T shape, with the top of the T being the upper yard.  The clews, with the sheets and clewlines attached to them, stuck out from the bottom of the bundle.  Ina small ship the topsail yard sat on, or a couple of feet above, the railing of the top.

I'm working with my phone, which doesn't let me post pictures from the web directly to the Forum.  Next time I'm at the desktop computer Ill find some pictures that explain how a furled sixteenth-century sail looks.  The process isn't really difficult.  If you google some pictures of the "Jamestown ships," the Mayflower II, and the Elizabeth 2 (not to be confused with the QE2), you'll get the idea.

The golden rule in making furled sails:  don't make the bundles too fat!  The bundles for the topsails should be just about the diameter of the topsail yards.

Good luck.

Youth, talent, hard work, and enthusiasm are no match for old age and treachery.

  • Member since
    March 2012
  • From: Marysville, WA
Posted by David_K on Tuesday, May 6, 2014 5:02 PM

Thanks, John.

I did notice how narrow the topsail yards are, compared to the main yards...with my previous model sail furling (the Santa Maria...seems so long ago!) I actually just used a shorter "sail" to begin with, so when it was furled, it wouldn't have that sleeping bag look...it seemed to work okay.

But I don't know what you mean about the T shape of the 16th century furling style...I looked up some google pics, but I didn't see anything like what you described...do you have any specific ideas of where I can look for reference, in case I decide to try that avenue?

Thanks!

Dave

        _~
     _~ )_)_~
     )_))_))_)
     _!__!__!_         
     (_D_P_K_)
   ~~~~~~~~~~~~~
    ~~~~~~~~~~~

Current Project:  Imai/ERTL Spanish Galleon #2

Recently Finished: Revell 1/96 Cutty Sark

Next Up:  ???


  • Member since
    May 2003
  • From: Greenville, NC
Posted by jtilley on Wednesday, May 7, 2014 1:49 AM

Dave,

Here's a painting by Willem Van de Velde the Elder - from a later period, but the principle is the same:

bmagblog.files.wordpress.com/.../lenoxorhamptoncourt-scaled1000.jpg

You can see how most of the topsail is bundled up into a vertical bundle, with the clews sticking out.  Sort of like two letter J's, one of them backwards, stuck together.

Here's another one: 

http://www.topofart.com/images/artists/Willem_van_de_Velde_the_Younger/paintings/velde027.jpg

Notice also how thin the furled sail is when it's bundled to the yard.

Here's a good shot of the replica Susan Constant and Godspeed, at Jamestown:

http://www.williamsburgprivatetours.com/wp-content/uploads/2011/04/jamestown.jpg

If you look carefully you can see that the topsails are furled just like the ones in the Van de Velde paintings.  And the furled courses are bundled tightly to the yards.  (These ship, incidentally, have a couple of rigging features that aren't authentic, and were added in the name of safety:  they have jackstays and footropes on their yards, neither of which had been invented at the time of the actual ships.)

One of the most common mistakes among sailing ship modelers is to make the bundles of furled sails too fat.  If you're walking up the pier behind one of the Jamestown ships, you'll have trouble seeing that the furled sail is there; the bundle is, if anything, smaller than the yard.

The Jamestown picture shows one big reason why that system of furling was used in those days.  Those topsail yards are skinny - so skinny that they might well break under the weight of a man.  I've watched the Susan Constant's crew furl the topsails.  Two guys standing in the tops can do the job, without going out on the yards.

Since you're getting deeper into the sailing ship world, I'll recommend a book:  Seamanship in the Age of Sail, by John Harland.  It's a terrific work, showing through contemporary and modern drawings all sorts of details of how rigging works.  I think it's out of print, and used copies aren't cheap.  (The cheapest one I found in a quick web search is $69.00:  http://www.bookfinder.com/search/?ac=sl&st=sl&ref=bf_s2_a1_t1_1&qi=O3S9Uj00u2ftQ4MdesUmVE9Xyzo_3197690279_1:2:7&bq=author%3Djohn%2520harland%26title%3Dseamanship%2520in%2520the%2520age%2520of%2520sail%2520an%2520account%2520of%2520the%2520shiphandling%2520of%2520the%2520sailing%2520man%2Dof%2Dwar%25201600%2D1860%252C%2520based%2520on%2520contemporary%2520sources  ).  But if you can lay hands on it (maybe through a library) it will be a huge help to model building - and keep you up late at night studying the pictures.  Fascinating stuff.

Hope that helps a little.

Youth, talent, hard work, and enthusiasm are no match for old age and treachery.

  • Member since
    July 2010
  • From: Tempe AZ
Posted by docidle on Wednesday, May 7, 2014 5:13 PM

Looking good Dave.

Steve


  • Member since
    February 2014
Posted by Mr2bill4 on Wednesday, May 7, 2014 6:30 PM

She's gonna be a beauty, Dave. BTW, I've posted pics of my Black Swan, if ya wanna take a gander!

  • Member since
    March 2012
  • From: Marysville, WA
Posted by David_K on Friday, May 9, 2014 4:04 PM

Thanks for the pics, John.

Very interesting stuff.  Perhaps I'll experiment with that method of furling the sails.

Yes, the book you recommended is pricey!  Maybe I'll see if the library has a copy...I'm in the habit of reading from my limited stack of shipmodeling books at bedtime each night, and I've been through several of them several times by now...need something new, though I should mention that Mondfeld, Mastini, Landstrom, and Petersson are my faves.  I'll probably pick up that R.C. Anderson book that I keep hearing about, for my rigging edification.

Dave

        _~
     _~ )_)_~
     )_))_))_)
     _!__!__!_         
     (_D_P_K_)
   ~~~~~~~~~~~~~
    ~~~~~~~~~~~

Current Project:  Imai/ERTL Spanish Galleon #2

Recently Finished: Revell 1/96 Cutty Sark

Next Up:  ???


  • Member since
    March 2012
  • From: Marysville, WA
Posted by David_K on Friday, May 9, 2014 4:38 PM

Update:

I took advantage of a day off from work to get all the basecoats airbrushed on the Golden Hind parts today...took a few hours!  But it was a great opportunity to test the new paints...Vallejo Model Air acrylics.

I realize that the following might be better suited to a different area of the forum, but oh well.

So my initial impression of the paint is good...which is a relief, because I've heard varying accounts of its performance.  The Vallejo Model Air line offers many, many color choices, which is my primary reason for trying them out.  Here's what I've gleaned so far:

+Sprays well through the airbrush, with no sputtering or spitting, and none of the six colors I used required any thinning.  But they do separate after a time, and require thorough mixing before use.

+Easy cleanup. (typical for acrylic)

+Lays down pretty well.

+I had no problem with switching between Vallejo, Model Master, and Tamiya, and then back to Vallejo, just a simple cleanout by spraying some water through the brush.  (compatibility seems good)

+Doesn't dry too fast...which means it probably bonds better to the plastic, and also doesn't get dry on the nozzle/tip of the airbrush and cause spraying problems...it was very easy to use.

+Tons of available colors!  Lots of variety!

+Metallic gold came out really well.  Acrylic metallics have a tendency to be troublesome, either they're uneven, or the flakes separate really fast, or they just look crummy and bland.  The Gold from Vallejo was easy to use, didn't run, and made a nice solid coat...still, it's acrylic, and it doesn't have that super-shine that enamel metallics can give.  Very good for an Acrylic.

There are a couple of things that sort of concern me:

-It's not what I'd call a good *hiding* paint.  The same color sprayed on parts from differently-colored sprue parts come out very different.  Recommend primer for continuity of color between different molded colors...which is a drag.  I don't like to use primer, because I feel like every coat of paint applied lessens the crispness of detail on the parts.  The main reason I use an airbrush is for the super-thin coats that can be applied.  I find Model Master to hide under-colors quite a bit better.

-The finish of the paint seems to be more or less Satin, instead of a flat sheen.  Which is kind of weird, since all the colors I used are tans, browns, sand, etc., colors that would generally be flat.  The bottles don't indicate any level of sheen (flat, semi, gloss, etc.)...so I'm probably going to be hitting it with some Dullcote at the end.  Perhaps it will *flatten* out after a day or two?

-Kinda spendy...Vallejo was almost 4 bucks a bottle(17mL), compared to MM, which runs almost a buck cheaper (14mL) at my LHS.  Not hugely expensive, but it's a consideration.

Here's a pic showing some of the things I mentioned.

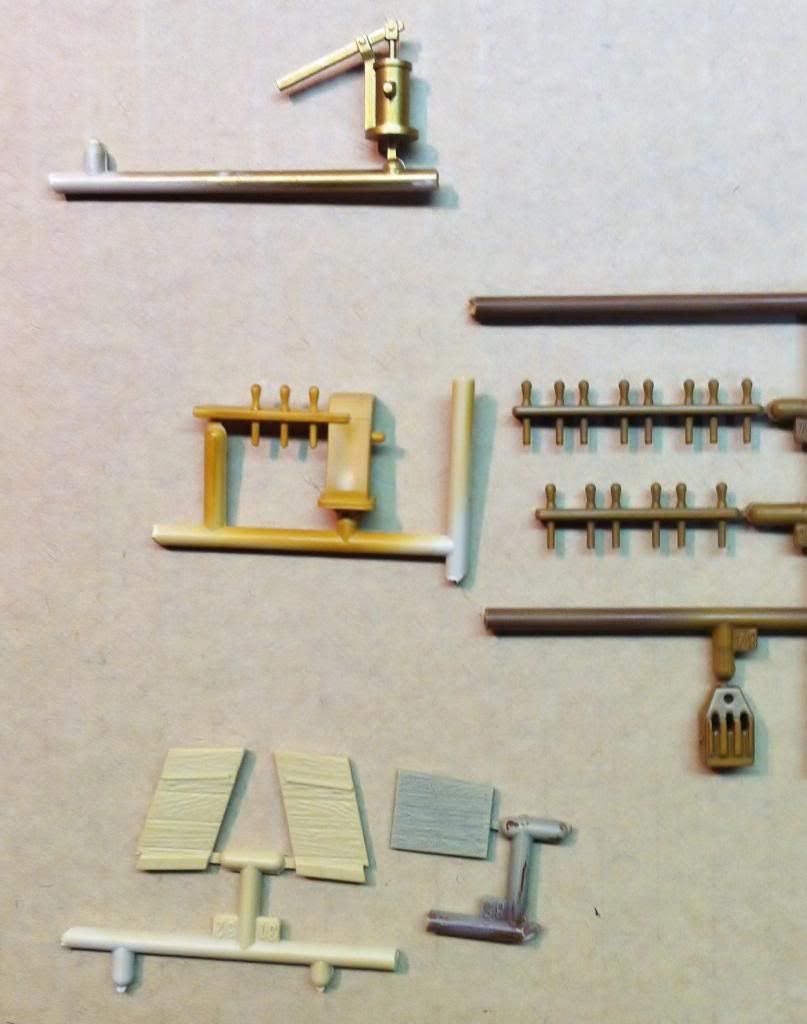
 On top, you can see the pump I painted with Gold. I know the pump would not be gold on a ship. but maybe brass (?)and I wanted to try the gold out, anyway. Below that, you can see to different sprues, each with some pinrail parts. Believe it or not, both of those sprues were painted with the SAME COLOR! Yes, so you can see how the underlying color of the molded plastic has a dramatic effect on how the Vallejo paint looks with a standard coat. And below that, another example of the same situation, this time with a different paint color. Two different sprues, molded in light and dark plastic, and the paint leaves a markedly different tone on each. Something to consider if you're going to use Vallejo paints.

Anyway, that's my impression of the Vallejo Model Air paints...pretty good stuff, but there are things to consider, especially when it comes to the color of base plastic.  Once I get into some detail-painting with a brush, I'll update on how this stuff works OUTSIDE the airbrush!

Thanks for looking in!

David

        _~
     _~ )_)_~
     )_))_))_)
     _!__!__!_         
     (_D_P_K_)
   ~~~~~~~~~~~~~
    ~~~~~~~~~~~

Current Project:  Imai/ERTL Spanish Galleon #2

Recently Finished: Revell 1/96 Cutty Sark

Next Up:  ???


  • Member since
    July 2010
  • From: Tempe AZ
Posted by docidle on Saturday, May 10, 2014 12:50 AM

Dave,

The color difference between the sprues is phenomenal!  If you hadn't pointed it out, I would have sworn they were two different colors.

If you don't mind some suggestions, I would use a primer, especially with the brass belaying pins. I would also etch the metal with some vinegar to give it tooth so that the paint has something to grab onto.  I know what you mean about the build up of paint hiding detail, which is why I prime with Tamiya's Fine Gray Primer.  It's a bit pricey, but, I really like it because when it dries it tightens up so you are not losing too much detail and being a neutral color it can go with the majority of top colors.

On the pump, especially for this time period, the trunk and lever of the pump would be wood, the upper collar and the connecting metal and rod would be a black iron.  The outlet, I would would drill out , but that's just me.

She is looking good so far, the brass belaying pins are sweet and look so much better than the original plastic ones.  I really like your idea of lowering the topmast as it should be.  I will have to try that out  on one of my future builds,

Steve


  • Member since
    March 2012
  • From: Marysville, WA
Posted by David_K on Saturday, May 10, 2014 11:12 AM

Steve-

Yeah, the color difference is ca-razy!  I just went over some of those parts with a second coat (brushed on), and it made them look a lot better...that'll do for now.  But, if I continue to use the Vallejo paints on future projects, I'll definitely have to use a primer.  They are thin, and brushing them on to bare parts would take a couple of coats... That Tamiya Fine Gray Primer...is that a spray can, or does it come in a bottle?

I'll add some wood and flat black to the pump, but I'll leave the gold on the body of it...I like it!  Probably will open up the outlet, didn't even think of that.

Hey, do you think Blacken It will work to etch the brass pins?  Am I right that Belaying pins are usually lighter colored than the rails?  More of a natural wood color?  

I've done furled sails on a couple of my previous builds, but didn't bother to lower the yards (though a few people mentioned it!)...it wouldn't nag me if they were left up, but since I'm trying new things with this one, I figure it's an obvious choice...and not hard to do.

Now that the basecoats are done, I get to proceed to my favorite part:  Detail painting and washing/weathering!

        _~
     _~ )_)_~
     )_))_))_)
     _!__!__!_         
     (_D_P_K_)
   ~~~~~~~~~~~~~
    ~~~~~~~~~~~

Current Project:  Imai/ERTL Spanish Galleon #2

Recently Finished: Revell 1/96 Cutty Sark

Next Up:  ???


  • Member since
    May 2003
  • From: Greenville, NC
Posted by jtilley on Saturday, May 10, 2014 2:03 PM

Blacken-it will work on the belaying pins all right, but I question whether that would be appropriate. The earliest references to iron belaying pins that I've run across dates from the 1770s.

There is, in fact, some argument about whether belaying pins were used at all in the sixteenth century.  If so, they probably were wood; the traditional woods to the purpose are oak, elm, and locust.

Rigging a model with lowered yards isn't one bit more difficult than rigging it with the yards raised. Essentially, all that happens when the yards are lowered is that the halliards and lifts are slacked off.  And you'd never see raised yards with furled sails on them. (On board the replica Susan Constant the topsails can't be furled until the yards are lowered to within reach of the guys standing in the tops).

You do need some kind of reference book with rigging diagrams in it, though.  One that would be a big help is a volume in the Conway "Anatomy of the Ship" series, the one about the Susan Constant.  (So little is known about either that ship or the Golden Hind that the drawings in the book could represent either of them.) The R.C. Anderson book is a classic, but it deals mainly with larger warships of a later period. Other good sources  (which don't cost anything) are the photos on the websites of the various replica ships -the Jamestown ships, the Mayflower II, the Elizabeth 2, and, of course, the Golden Hind replica. Those are operating ships, and the guys who sail them have found out (sometimes the hard way) that the authentic ways are the ones that work best. Sometimes the only ways that work.

Youth, talent, hard work, and enthusiasm are no match for old age and treachery.

  • Member since
    March 2012
  • From: Marysville, WA
Posted by David_K on Sunday, May 18, 2014 2:28 PM

Looking for some opinions...

Paint scheme.

I've been looking at web images of the Golden Hind, trying to find inspiration for the color scheme...basically, there seems to be an infinite combination of differing paint patterns...any combo of red, blue, yellow, or green...and no two models or paintings seem to be the same.

The hull has plenty of scribed-out areas for the diamond-patterned ornate decoration...the box art shows red and yellow, which I might go for...but I wondered if anyone has any input?

        _~
     _~ )_)_~
     )_))_))_)
     _!__!__!_         
     (_D_P_K_)
   ~~~~~~~~~~~~~
    ~~~~~~~~~~~

Current Project:  Imai/ERTL Spanish Galleon #2

Recently Finished: Revell 1/96 Cutty Sark

Next Up:  ???


  • Member since
    May 2003
  • From: Greenville, NC
Posted by jtilley on Sunday, May 18, 2014 6:00 PM

The bottom line is that, as in respect to so many other features of that ship, the color scheme is up to you.

You're quite right; there's virtually no reliable contemporary information about Tudor ship color schemes. As I understand it, the Tudor house colors were green and white. Most good models I've seen have at least one row of green and white triangles. But I've seen plenty of other colors on models and in old paintings.

Complicating the problem is the story that Drake disguised the ship to look Spanish. Heaven knows what that might have meant in terms of colors. And at least one modern scholar has cast doubt on whether Drake actually changed her name to Golden Hind. (Her original name was Pelican. That critter had symbolic significance to Queen Elizabeth,) In any case, I question the hind figureheads and stern carvings I've seen on lots of models and full-size replicas. Ditto the Elizabethan coat of arms that sometimes shows up as a transom ornament. That hardly seems likely for a ship that's trying to look Spanish. (The excellent Revell kit has a pretty hind figurehead and an exquisite coat of arms on the transom. If I ever finish the one I started several years ago, I confess I won't the heart to ditch them.

There's even room for doubt about the color of the underwater hull. The tradition among Modeler's is white or tallow color. But recent scholarship suggests that "dark stuff," a foul substance containing tar, sulfur, and horsehair, is just as likely.

Stuff like this. To my notion, makes this sort of subject particularly fun. You can paint that model pretty much any way you want, and nobody will be able to prove you're wrong.

Youth, talent, hard work, and enthusiasm are no match for old age and treachery.

  • Member since
    March 2012
  • From: Marysville, WA
Posted by David_K on Sunday, May 18, 2014 6:15 PM

:)

Yeah, I suppose I'll just come up with something that I like the look of...which is more or less my M.O, anyway...

You bring up another point I'm considering, John...the underwater hull.  On a couple of my models, I've masked and painted a lower hull color, with the BHR it was a light grey/beige, on the Medieval Thomas it was the *dark stuff* color...and on most of my builds I've just left the hull color throughout...

Perhaps the Modeling Majority can influence me as to whether it's important to add a lower hull coating, and also, which color would be more appropriate?  I figure if I'm going to paint the waterline and below, I should do it now, before I get into detailing the hull (which is apparently going to be an exercise in patience and meticulation [new word])....

Thanks,

Dave

        _~
     _~ )_)_~
     )_))_))_)
     _!__!__!_         
     (_D_P_K_)
   ~~~~~~~~~~~~~
    ~~~~~~~~~~~

Current Project:  Imai/ERTL Spanish Galleon #2

Recently Finished: Revell 1/96 Cutty Sark

Next Up:  ???


  • Member since
    May 2003
  • From: Greenville, NC
Posted by jtilley on Sunday, May 18, 2014 7:42 PM

The problem with any sort of bottom treatment (other than copper sheathing) is that if you make it realistic it will look like hCensoredl. Airbrushed, dark red modern hulls look beautiful, but let's not kid ourselves into thinking that a real hull that's been in the water for a wile actually looks like that.

My little Hancock shows one approach: a gently weathered tallow color. Since those days I've learned that "dark stuff" would be at least as likely for that period. But I've never been seriously tempted to adorn a model with miniature barnacles and seaweed. If some modeler wants to try it, I'll be happy to admire it, after I get through grossing out.

Which is a fancy way of saying - do the bottom however you think it looks best.

Youth, talent, hard work, and enthusiasm are no match for old age and treachery.

  • Member since
    March 2012
  • From: Marysville, WA
Posted by David_K on Sunday, June 29, 2014 6:28 PM
        _~
     _~ )_)_~
     )_))_))_)
     _!__!__!_         
     (_D_P_K_)
   ~~~~~~~~~~~~~
    ~~~~~~~~~~~

Current Project:  Imai/ERTL Spanish Galleon #2

Recently Finished: Revell 1/96 Cutty Sark

Next Up:  ???


  • Member since
    June 2012
Posted by arnie60 on Monday, June 30, 2014 10:52 AM

Impeccable David!

Below the water line does look lighter to me, but subtlety. You are truly becoming a master at this staining technique. I just picked up an HO scale schooner from BlueJacket that has some parts that should be mahogany. I will definitely shoot you a PM for advice when I get around to it.

  • Member since
    March 2012
  • From: Marysville, WA
Posted by David_K on Tuesday, July 1, 2014 8:14 AM

Thanks, Arnie!  I'm glad you like it so far.

:)

        _~
     _~ )_)_~
     )_))_))_)
     _!__!__!_         
     (_D_P_K_)
   ~~~~~~~~~~~~~
    ~~~~~~~~~~~

Current Project:  Imai/ERTL Spanish Galleon #2

Recently Finished: Revell 1/96 Cutty Sark

Next Up:  ???


  • Member since
    August 2008
Posted by tankerbuilder on Tuesday, July 1, 2014 9:16 AM

Hi;

   I use - Are you ready for this ? Rustoleum light grey primer on everything .I have used it since I found it over forty years ago . It still works great on figures and model cars,planes,ships and whatever .wood as well.  

    Try it . The light grey (pearl grey ) is great for ship models and stuff , and I use Vallejo paints as well as other brands over the top of it . It accepts All overcoats and is great on metals .

         By the way the suggestion of using " Blacken - It " as a metal toner is a good one .I even used it on chromed and stainless tweezers to dull the glare !                     Tanker-Builder

  • Member since
    August 2008
Posted by tankerbuilder on Tuesday, July 1, 2014 9:25 AM

Here's a surprise !

  If you decide to do another IMAII ship be advised .I have used regular furniture and wood stain on the plastic they use and it gives phenominal results .I have found using a mix of dark cherry and mahogany gives a very old look to the wood grain .

  The other thing about this plastic formulation is it's sensitivity to paint thinner .You might say really ? This is good .Yes , the plastic then allows you to use the kit color ( what it's molded it ) and then wash with thinner dirtied up with black and brown paint  , Three parts paint -each color, and one part thinner .This makes for a very old looking ship model !

   The other thing in passing is this .You can use the rub on silver and gold antiquing creams for an old gold or silver finish .The best ones I've found are the " Run n Buff " brand .       Tanker-Builder

  • Member since
    August 2008
Posted by tankerbuilder on Tuesday, July 1, 2014 9:29 AM

Gotta Go ;

   But before I do , that's one fine job your doing .     Tanker-Builder

  • Member since
    March 2012
  • From: Marysville, WA
Posted by David_K on Thursday, July 3, 2014 9:47 AM

Hey Tankerbuilder-

I know Rod Millard uses wood stain on his Imai kits, and they look fantastic!  I'm definitely going to give it a try on one of my builds...but I'm running out of Imai kits!  All I have left is the Mayflower...

Here's a question:

I've heard about the plastic in Imai kits being different than other brands (acceptance of stain, etc.)...but what about the ERTL/Imai kits?  Are they the same material?  The only *actual* Imai japanese kit I've built is the Junk, all the others have been ERTL/Imai...except for the Chebec, which was a Minicraft re-box of the Imai kit.

Anyways, I spent a few minutes this morning learning to assemble and install chainplates on the fore channel...here's a pic:

It was actually super easy!  I know that this channel looks funny, because the chains don't lead off in the correct orientation (they should go in a straight line following the shrouds to the masttop), but that's because of the pesky gunport...I suppose they had to make some concessions for things like that...so it looks a little uneven and weird.

To make the chainplates/lower deadeyes, I used some round wooden deadeyes, some black annealed wire, some brass pins, and some brass chain.  The chain and pins were darkened using Blacken-it.  I wrapped a couple inches of the wire around a deadeye once, and then pinched it and twisted it tight so it would grab the deadeye and make a spiral *tail*...then I cut the tail to a length of about 1/4"...bent it backwards to make it into a hook, then hooked a link of the chain onto it before bending the hook closed all the way.  Then I cut the chain to a length of ~1", and fed the chain through the top opening in the channel, until the deadeye sat neatly atop the channel.  I poked a brass pin through a link of chain at the appropriate distance below so that when the pin is inserted into the hull (I had drilled out the kit locator points for the included plastic shroud/ratline/deadeye pieces) it held the chain at a suitable tension.  Once I knew exactly how much chain I would need for each chainplate, I snipped the remaining couple of links off and inserted the pin all the way.  They're not glued in yet, in case I need to make any changes later...I figure I'll get them all installed before I make it permanent...

I'm also planning to make a short video for YouTube to demonstrate how I did it, in case anybody cares to see it happen!  I was actually really surprised at how easy it turned out to be...

Thanks!

Dave

        _~
     _~ )_)_~
     )_))_))_)
     _!__!__!_         
     (_D_P_K_)
   ~~~~~~~~~~~~~
    ~~~~~~~~~~~

Current Project:  Imai/ERTL Spanish Galleon #2

Recently Finished: Revell 1/96 Cutty Sark

Next Up:  ???


  • Member since
    July 2006
Posted by Michael D. on Thursday, July 3, 2014 10:22 AM

Hi David,

She's looking fantastic so fa...love the color scheme.... and that one chain would be located above the gunport lid thus keeping it in line with the shroud.

  • Member since
    June 2012
Posted by arnie60 on Thursday, July 3, 2014 3:31 PM

David;

Looks fabulous. I used the same method on my Connie for the chain plate. It was much, much simpler than making two or three separate "links" as it is normally depicted. I justified this after some research which indicated that this type of chain link was still in popular use late into the 19th century. Mainly it depended on the outfitters and the availability of materials on whether or not this type of chain link was used. Eventually, from the 1830's on, single flat or round bars replaced the links as can be seen in the Connie's present day configuration. I am not sure I would worry about that one link, although it wouldn't be that hard to move it to above the gun port as Michael suggested.

Looking forward to your next post.

  • Member since
    March 2012
  • From: Marysville, WA
Posted by David_K on Thursday, July 3, 2014 8:30 PM

Thanks!

I agree, it wouldn't be hard to move that chain, but I'm not too worried about it...

You know what's funny, though...on the Main Channel there's a gunport blocking a chainplate fall, and that one does attach above the port!  I guess there was some reason why they chose to do one but not the other??

By the way, your Connie is a heckuva beautiful model!!  Seriously.

Dave

        _~
     _~ )_)_~
     )_))_))_)
     _!__!__!_         
     (_D_P_K_)
   ~~~~~~~~~~~~~
    ~~~~~~~~~~~

Current Project:  Imai/ERTL Spanish Galleon #2

Recently Finished: Revell 1/96 Cutty Sark

Next Up:  ???


  • Member since
    March 2012
  • From: Marysville, WA
Posted by David_K on Thursday, July 3, 2014 8:40 PM

By the way, here's a link to the YouTube video I made today, showing how I did it...nothing too fancy, but maybe somebody might like to see this method.  Plus, you can see my handsome mug!  :)

www.youtube.com/watch

Sorry it's actually kinda blurry for the close-ups...

        _~
     _~ )_)_~
     )_))_))_)
     _!__!__!_         
     (_D_P_K_)
   ~~~~~~~~~~~~~
    ~~~~~~~~~~~

Current Project:  Imai/ERTL Spanish Galleon #2

Recently Finished: Revell 1/96 Cutty Sark

Next Up:  ???


  • Member since
    July 2013
Posted by steve5 on Friday, July 4, 2014 12:34 AM

thanks for the video david.,  you made it look a lot easier than I thought it was, by the way your model looks beautiful., love the colour scheme,


  • Member since
    July 2010
  • From: Tempe AZ
Posted by docidle on Friday, July 4, 2014 12:48 AM

Dave,

She is looking good bud.  You did a first rate job on the painting, especially the detail work.  After seeing your posts and the comments, I pulled out my imai Golden Hind and checked the alignments of the plates and the kit shrouds and "chains".  I hope I won't be burned at the stake for heresy, but the Imai designers sure did some slight of hand on not only the fore but also the main chain plates and chains.  

The kit chains that is just forward and aft of the fore gun hatch is molded at such a weird angle, that at first, I thought it was bent from storage, but after looking at both sides and the way they were molded on the sprue, it became obvious that they were designed that way. The main does some of the same things, so you might want to redo them or not, it's your call.  That being said, I still think you did a great job and the chains look MUCH better than the kit provided ones, so carry on.

Steve


  • Member since
    July 2010
  • From: Tempe AZ
Posted by docidle on Friday, July 4, 2014 1:48 AM

I checked out the video and well done!  I like it as much as your ratline video, so what is next on the video horizon?

Steve


  • Member since
    July 2013
Posted by steve5 on Friday, July 4, 2014 10:00 PM

david what size wire did you use in your video., i'm of to my hobby shop tomorrow, about 200 km away.,and intend to get some supplies


JOIN OUR COMMUNITY!

Our community is FREE to join. To participate you must either login or register for an account.

SEARCH FORUMS
FREE NEWSLETTER
By signing up you may also receive reader surveys and occasional special offers. We do not sell, rent or trade our email lists. View our Privacy Policy.