SEARCH FINESCALE.COM

Enter keywords or a search phrase below:

FINISHED PICS!--Page 10--DML HORNISSE

52486 views
193 replies
1 rating 2 rating 3 rating 4 rating 5 rating
  • Member since
    January 2007
FINISHED PICS!--Page 10--DML HORNISSE
Posted by the doog on Tuesday, December 30, 2008 11:07 AM

Hi guys,

Just back from Pa. for Christmas; starting in on the ol' DML Hornisse Early model, which does NOT come with the latter open ammo bins and additional detail of the late kit. So Verlinden had made a detail kit for it, which I'll be using on this build. Here's the contents of that.


I'lb be going with a summer camo scheme, and using the MIG stuff again, to see how a DY/green scheme goes with their stuff. I think I'm going to go two-tone here; DY+Green.

Not much progress yet; I'll be posting as soon as I get something to report!

  • Member since
    April 2008
  • From: Kristiansund, Norway
Posted by Huxy on Tuesday, December 30, 2008 11:18 AM

Can't wait to see this one, Doog! Big Smile [:D]


Make it great! You da man!

-Huxy 

"Every War Starts And Ends With An Invasion".

  • Member since
    January 2012
Posted by I make stuff on Tuesday, December 30, 2008 11:29 AM

Nice, I have eyed the premium kit, I don't know what has gotten into me, but TDs, SPs are on my mental need to build list. 


Looking forward to seeing your magic unfold.

  • Member since
    November 2005
Posted by T26E4 on Tuesday, December 30, 2008 11:35 AM

Doog: I'm pretty sure this kit (and the Hummel kits) has the vague directions about mounting the internal gun travel lock.  DML provides a huge template in order for you to correctly emplace the gun travel lock.  Bad thing is that lots of guys assume that this template was meant to be glued in.  This mistake has happened on SEVERAL articles that were published by some of the best AFV magazines.  I no longer have any Nashorn kits but the templates are the big rectangles with notches at top and bottom that are fitted to the lower side fighting compartment walls.  DON'T GLUE THEM IN!!!!


HTH


Roy Chow 

Join AMPS!

http://www.amps-armor.org


  • Member since
    November 2005
Posted by Anonymous on Tuesday, December 30, 2008 11:45 AM
Dinner [dinner]
  • Member since
    July 2004
  • From: Texas
Posted by wbill76 on Tuesday, December 30, 2008 11:54 AM
Welcome back from PA Karl! Looking forward to seeing what you do with this one. Thumbs Up [tup]
  • Member since
    April 2003
  • From: Crestview, Florida
Posted by MQM107 on Wednesday, December 31, 2008 10:49 AM

There is some pretty good info on DML's Nashorn's here. Also kit # 6166


http://www.perthmilitarymodelling.com/reviews/vehicles/dragon/dr6165.htm


Mike

  • Member since
    January 2007
Posted by the doog on Wednesday, December 31, 2008 2:08 PM
 T26E4 wrote:

Doog: I'm pretty sure this kit (and the Hummel kits) has the vague directions about mounting the internal gun travel lock.  DML provides a huge template in order for you to correctly emplace the gun travel lock.  Bad thing is that lots of guys assume that this template was meant to be glued in.......

DON'T GLUE THEM IN!!!!

Uh....Censored [censored]!!

Well, in case anyone here thinks that I really DO know what I'm doing...? 

Yup, I did glue them in Roy! AAAARRRRGH!!!

Here's the parts, for anyone wondering, or building either a Hummel. Nashorn, or Hornisse!

And here's what they look like when you have to pry them out like a total amateur! Sigh [sigh]...Blush [:I]

As you can see, I have totallly ruined the interior sides! So I'll have to make some replacement templates to cover the sides out of .010 plastic card.


It took me about 13 tries (not kidding! Black Eye [B)]) to align the 5 parts of the resin Verlinden gun. I used the first three parts from Verlinden--breech, main tube, and long collar, and then I used the kit's barrel because the Verlinden gun actually scaled out to about 3-4 real mm's short (got my "Rivet Counter" merit badge for that one Wink [;)]). Lastly I used a Tank Workshop Panther gun muzzle cover--it was the perfect size--on the end. Man---I thought I'd never get the damned thing straight! 

And here's where I am so far--the gun is about 70% finished, and I will of course build the sides off of the tank, to be attached after painting. And I still have to assemble the PE ammo stowage.

You can see the VErlinden PE exhaust boxes, and the fenders too. The exhaust has been textures with liquid glue--the weird color is because I used an old paint brush to do it which had paint dried in the base of it.

That's where I am so far...just brappin along into 2009....


  • Member since
    April 2008
  • From: Kristiansund, Norway
Posted by Huxy on Wednesday, December 31, 2008 2:24 PM

It looks great so far!! Big Smile [:D]

Why is the muzzle made of wood?  It atleast looks wood... :P


And did you glue the template on on the Hummel you did a while ago as well??  Laugh [(-D]

HAPPY NEWYEAR! Party [party] 


-Huxy 

"Every War Starts And Ends With An Invasion".

  • Member since
    January 2007
Posted by the doog on Wednesday, December 31, 2008 3:01 PM

Huxy, it's not wood--it's wrapped in canvas, to protect against dust and Russian bees.

I did glue in that stupid set of templates to both of my Hummels! Banged Head [banghead] I can't believe that DML hasn't corrected that in the directions! a LOT of work went into those models, but there's no way to get them out now without ruining the interior! 

  • Member since
    February 2004
  • From: Weymouth, Dorset, UK
Posted by chris hall on Wednesday, December 31, 2008 3:10 PM

I glued them in position on my Nashorn:

I think it looks better that way.

Cheers,

Chris. 


Cute and cuddly, boys, cute and cuddly!
  • Member since
    March 2003
  • From: Rain USA, Vancouver WA
Posted by tigerman on Wednesday, December 31, 2008 3:45 PM
You should've entered this in the 1000 roadwheel GB. Kicks off tomorrow. Oh well, this should be a treat to watch.

   http://i7.photobucket.com/albums/y269/wing_nut_5o/PANZERJAGERGB.jpg

 Eric 

  • Member since
    July 2007
  • From: Ohio
Posted by Geist on Wednesday, December 31, 2008 3:55 PM

Looking good Doog. I built this same kit minus the details for the hunters GB. It was a fun build.


Erik

On the bench: Italeri Leopard 1A2 correction build with Perfect Scale turret and Eduard PE

  • Member since
    January 2007
Posted by the doog on Wednesday, December 31, 2008 5:16 PM

 tigerman wrote:
You should've entered this in the 1000 roadwheel GB. Kicks off tomorrow. Oh well, this should be a treat to watch.
Yeah, I saw that, but I was already started when you posted your announcement. Besides, I prefer to share it here in the general Armor forums, as I'm not sure how many guys actually go into the GB's if they're not participating?

Thanks for looking in and commenting, guys! Smile [:)]

  • Member since
    November 2005
Posted by T26E4 on Wednesday, December 31, 2008 5:25 PM
Sorry I couldn't avert the glued template thing Doog.  Nice work w/the barrel.  I did the same thing when I built VP's 8.8cm Pak 43/41 (before the AFV Club one was available) several years ago.

Roy Chow 

Join AMPS!

http://www.amps-armor.org


  • Member since
    July 2004
  • From: Texas
Posted by wbill76 on Wednesday, December 31, 2008 5:29 PM
Making good progress Karl and a nice save/repair on the templates. Watch out for those Russian bees, I hear they're killers! Wink [;)]
  • Member since
    January 2008
  • From: Hickory, NC
Posted by Bushi on Wednesday, December 31, 2008 6:20 PM

Looks good Karl and very interesting. I hope those bees were not camo'd as T34!!Big Smile [:D]

Jeff

  • Member since
    December 2005
  • From: Syracuse, NY
Posted by lexesbenz on Wednesday, December 31, 2008 7:26 PM
Karl, the barrel still looks bent too me----------------Just kidding, looking geat so far!!!
The flying hamster of doom rains coconuts on your pitiful city!!!!
  • Member since
    January 2007
Posted by the doog on Wednesday, December 31, 2008 8:35 PM

 T26E4 wrote:
Sorry I couldn't avert the glued template thing Doog.  Nice work w/the barrel.  I did the same thing when I built VP's 8.8cm Pak 43/41 (before the AFV Club one was available) several years ago.
NO problem, Roy! I'm just thrilled that you got me to realize it before I put some paint on it-that's usually the way it goes! I have satisfactorily fixed it now though! Smile [:)]

Thanks for looking in and commenting, guys! Wink [;)]

  • Member since
    August 2008
  • From: S.W. Missouri
Posted by Pvt Mutt on Thursday, January 1, 2009 2:51 PM

Sign - Oops [#oops]

Doog, You know that the template mistake was really a good thing and serves to prove to           the mass amount of us duffers that the builders that we admire are human after all.

They can make mistakes just like us mire mortals. The next time I pull a bonehead i'll think back on this and smile.Big Smile [:D] I Thank You Sir for the inspiration you provide with these step by step builds.

PS: I just checked my DML Nashorn kit(6314) and the direction showing those have bright blue instructions telling you the two parts are "For positioning L4 only".                                                                                                   

Shoot Low Boys They're Ridin Ponys

  • Member since
    February 2005
  • From: Nashotah, WI
Posted by Glamdring on Thursday, January 1, 2009 4:02 PM

DML instructions plain suck.  I've lost track of the amount of pieces I have glued in place when they weren't supposed to be.

Looking good though, gotta love those Panzer IV variants!

PS: I'm glad you don't do GBs, you'd put the rest of us to shame!!!!  Laugh [(-D]

Robert 

"I can't get ahead no matter how hard I try, I'm gettin' really good at barely gettin' by"

  • Member since
    October 2007
  • From: N.H.
Posted by panzerguy on Thursday, January 1, 2009 6:58 PM

   Doog as always a great start of what I know will be an exceptional finish. Between you and Bill I'm sold on those Migs.   

"Happiness is a belt fed weapon"

  • Member since
    July 2006
  • From: New Jersey
Posted by redleg12 on Thursday, January 1, 2009 8:05 PM

Damm....you are either getting too fast or this old man is slowing down.....almost missed this.

As far as the Sign - Oops [#oops] a good modeler can make things look good. A great modeler can figure things out. Especially when an Sign - Oops [#oops] is involved. No one is perfect. Every build has any number of imperfections or not quite right that may not show but the builder knows what is there and has done a great job fixing it or hiding it. With you being the king of finishing, this type of work/repair makes your royality!!Thumbs Up [tup]

Nice recovery Karl. Now.....either the kit only has 10 parts or you have been working on it day & night. Grest initial progress.

Rounds Complete!!

"The Moral High Ground....A Great Place to Emplace Artillery."

  • Member since
    January 2007
Posted by the doog on Monday, January 5, 2009 6:45 PM

Hi again, guys!

Thanks to Pvt Mutt, Glamdring, panzerguy and Mike for comments! Interesting that the new kits have the "amended" directions! 

Well, I've been working away, and I'm finally finished up the building and will soon be on to the painting stage. Here's what I've got so far...

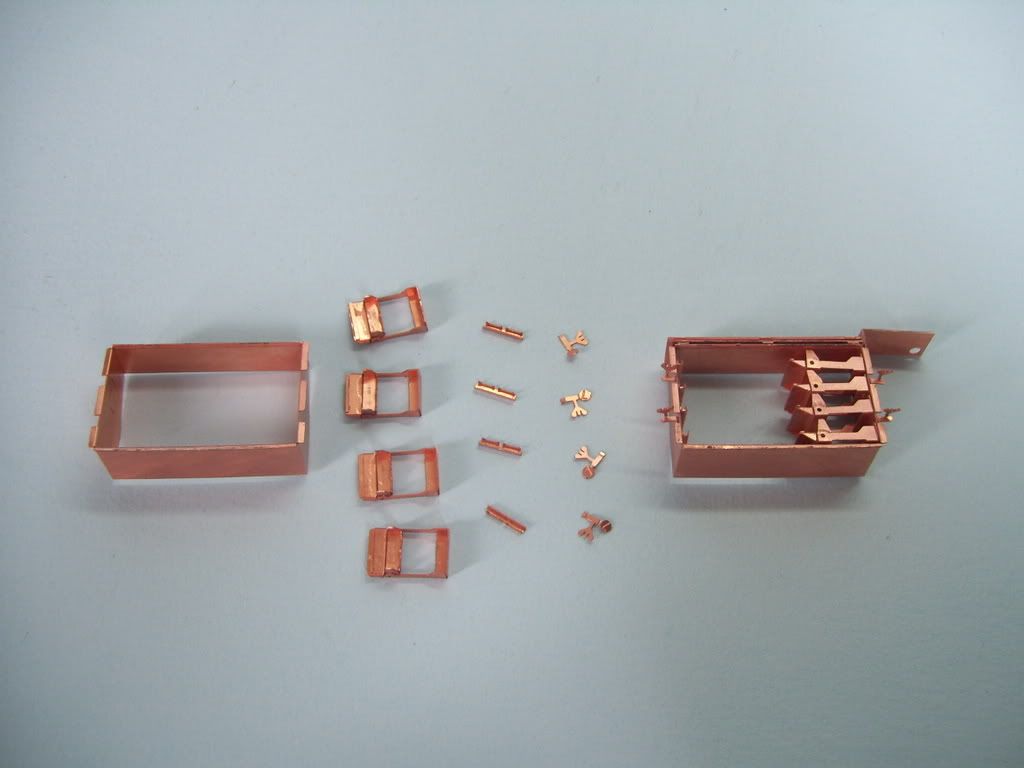
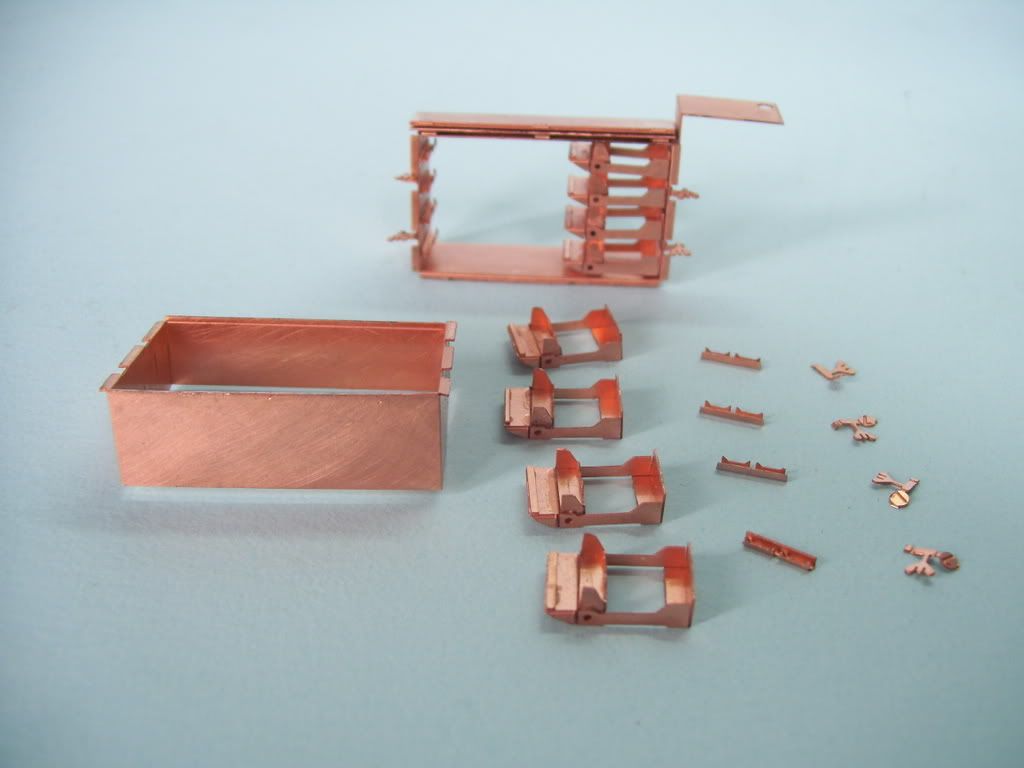
Here's the Verlinden ammo racks PE assemblies. The ones on the left are the individual pieces; the 2nd-from-left row of 4 "letterboxes" there are three assemblies each. On the right is the finished rack. They were a bit of a PITA to assemble--in order to get those shell trays to fit, I had to remove approximately 1mm from each of the aforementioned "letterbox" "ears" coming up off of them, otherwise they wouldn't fit! Lots of filing done against a small sharpening stine was in order as well, in order to fit certain parts...
Man, the side panels are just chock-full of knockout marks to be filled!

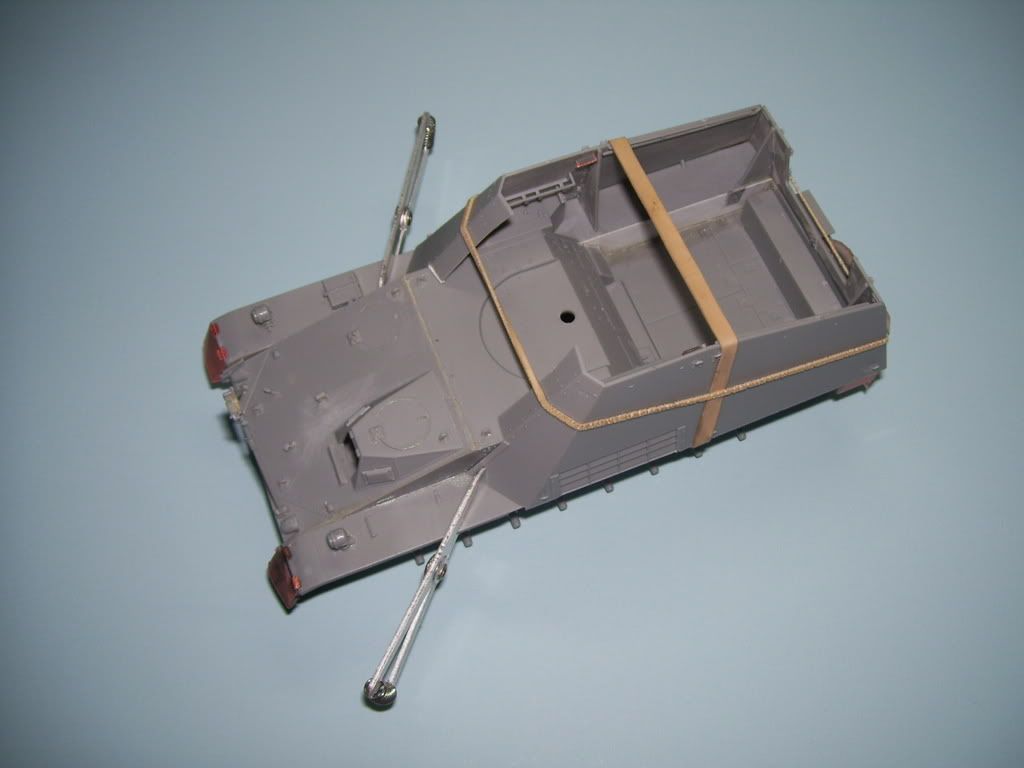
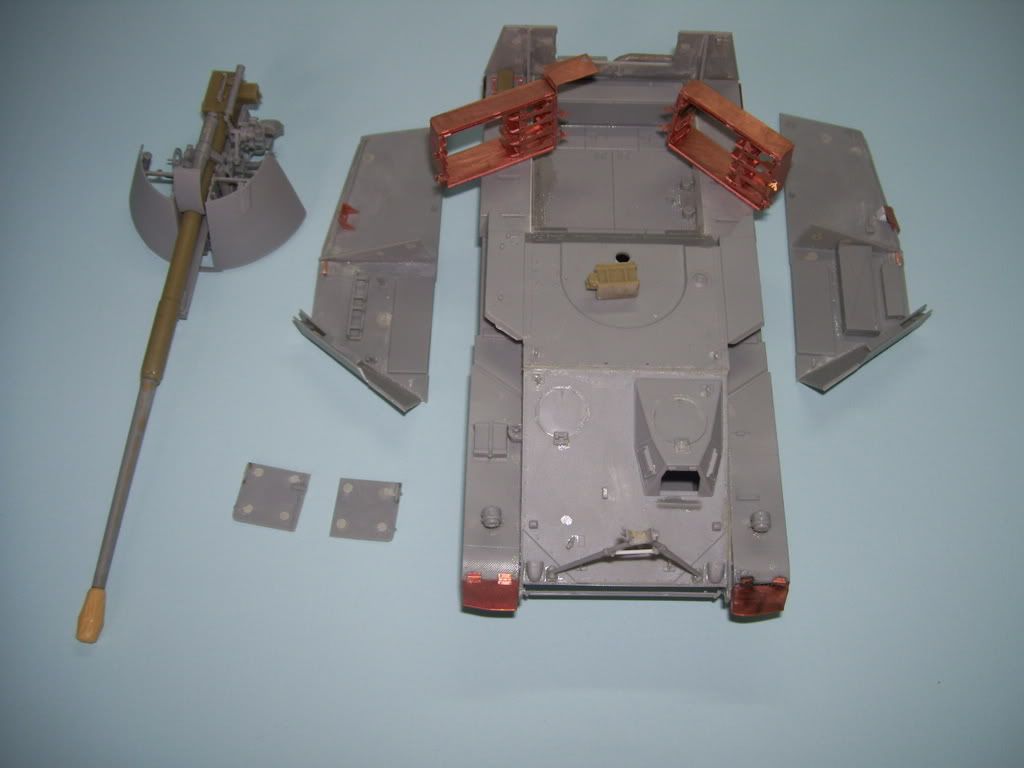
I'm going to say a bit about my method of using sub-assemblies to do open-top kits like this. On eof the daunting teasks to doing a kit like this is to be able to adequately paint all the interior details. I like to break the painting down like this--the sides are test-fitted to the sides. The rear panel there willl be glued to the hull. The sides panels and little front panels are glued to each other carefully, and held in place until they set--here, the panels are drying hard in place, so that they will fit perfectly after they are totally painted and weathered inside--only at that point willl the exterior be painted!
They come right off...
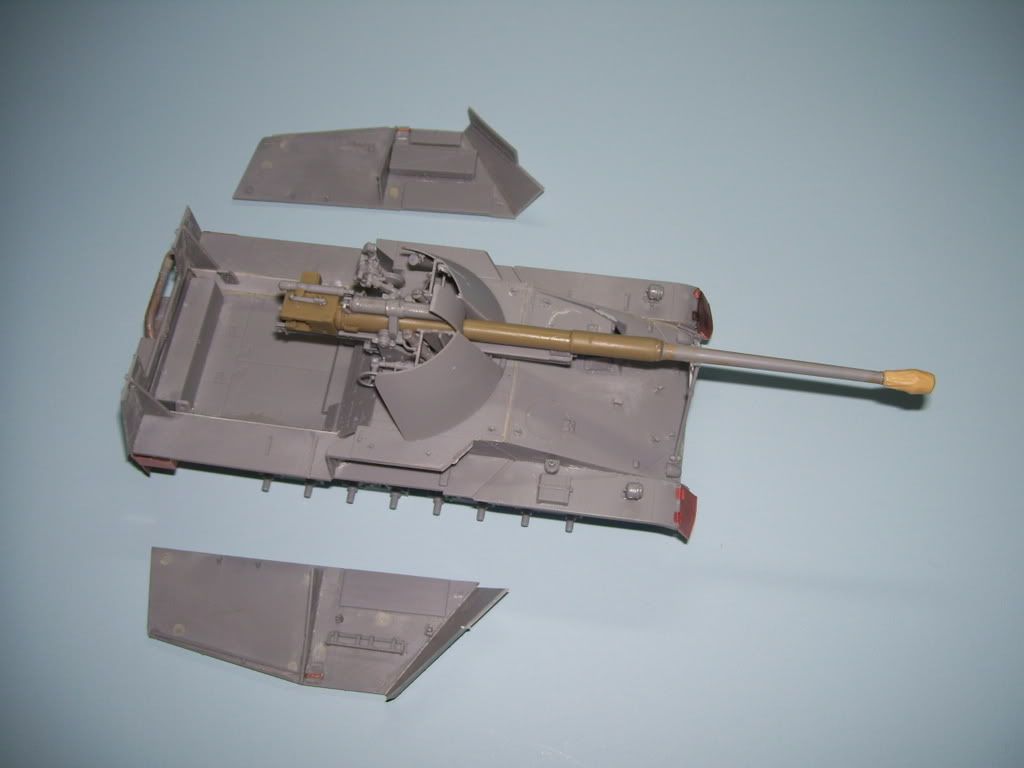
Here's the parts as I willbreak them down to paint them; the main hull, sides, gun assembly, rear doors, ammo racks, and radio. SOme small details will also be added later like MG's and crew fititings...
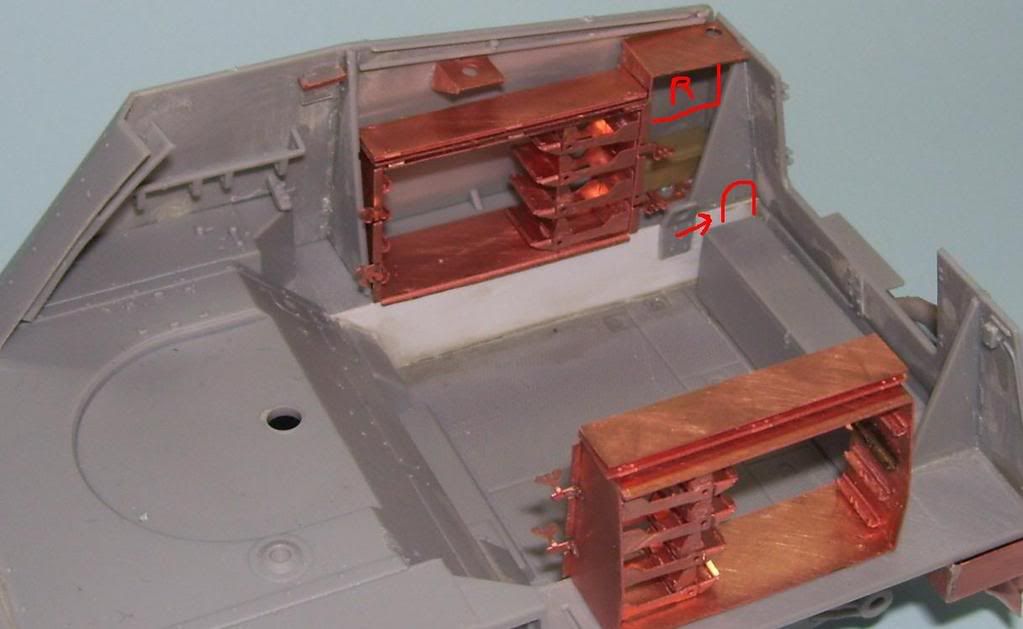
As you can see, it would be impractical to paint them in situ; you can see here where the radio would be ("R"). And here's one fix to be careful of--don't glue the hull lifting hooks against the rear bulkhead as they show--they should be in this position, NOT as indicated by the red position!
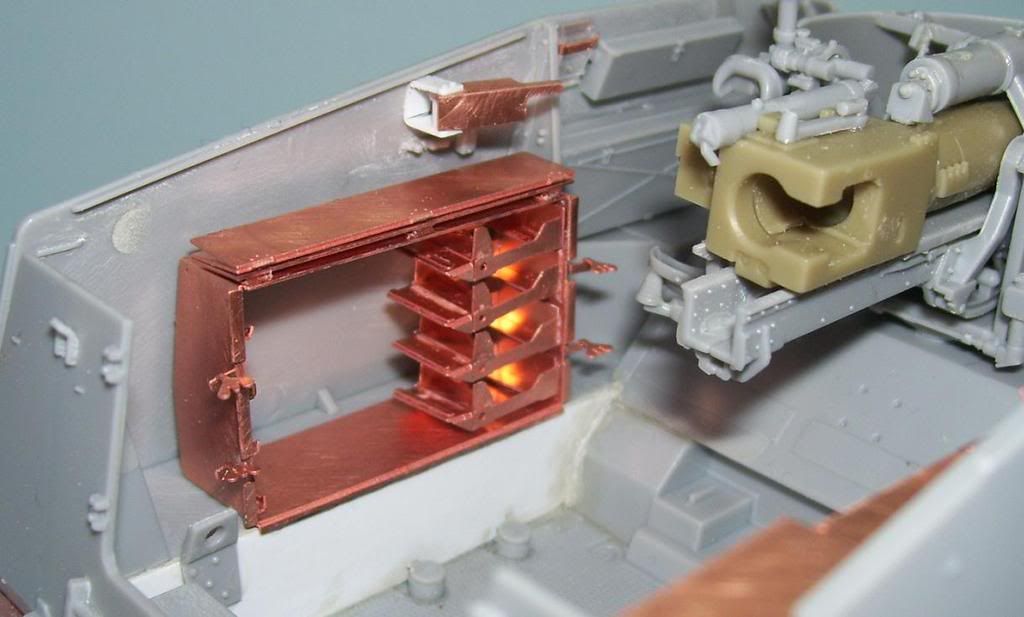
The other side. The scissors periscope mount there was scratched from plastic strip--the Verlinden set gives you a piece of PE, but it's way under-scale. 
Here's also the correct position of the travel lock. It should angle backward at an angle, to connect to the rear of the gun breech travel there...I have attached it at the bottom as per those damned guides, which I saved after I pried them out and used them to pencil in the positions of the mount bases. That traversing wheel also locks into the bottom of it there.
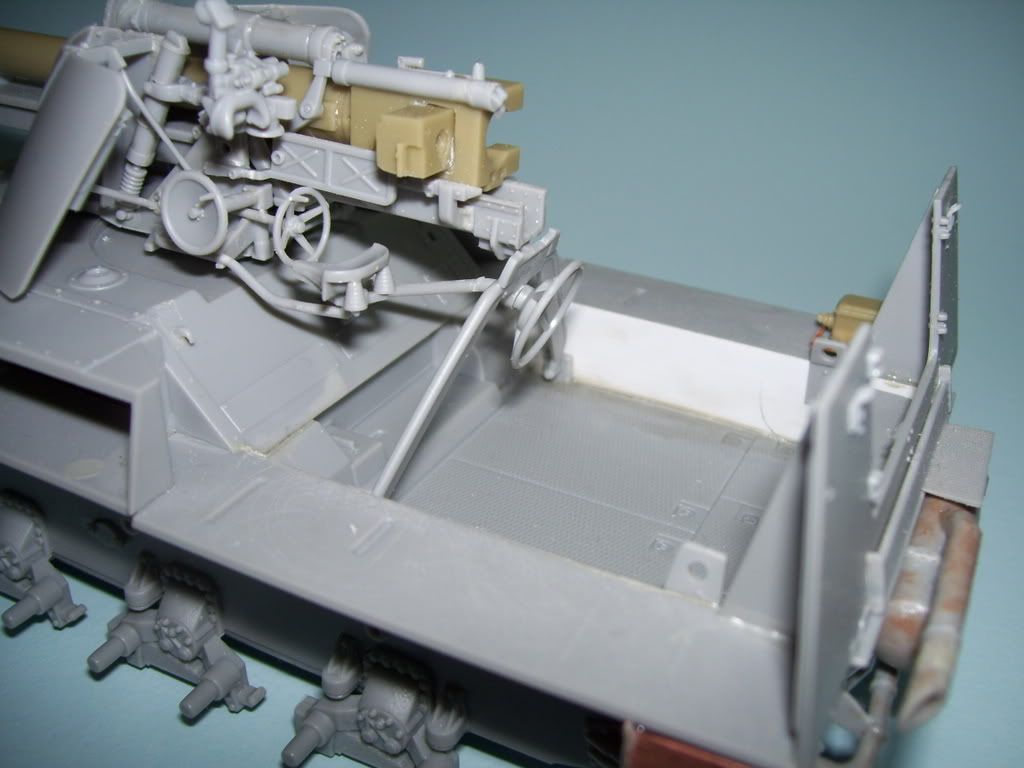
Hey, does anybody know what's supposed to go here? It looks like a bunch of locating tabs, but there's no call out for it in the direction?
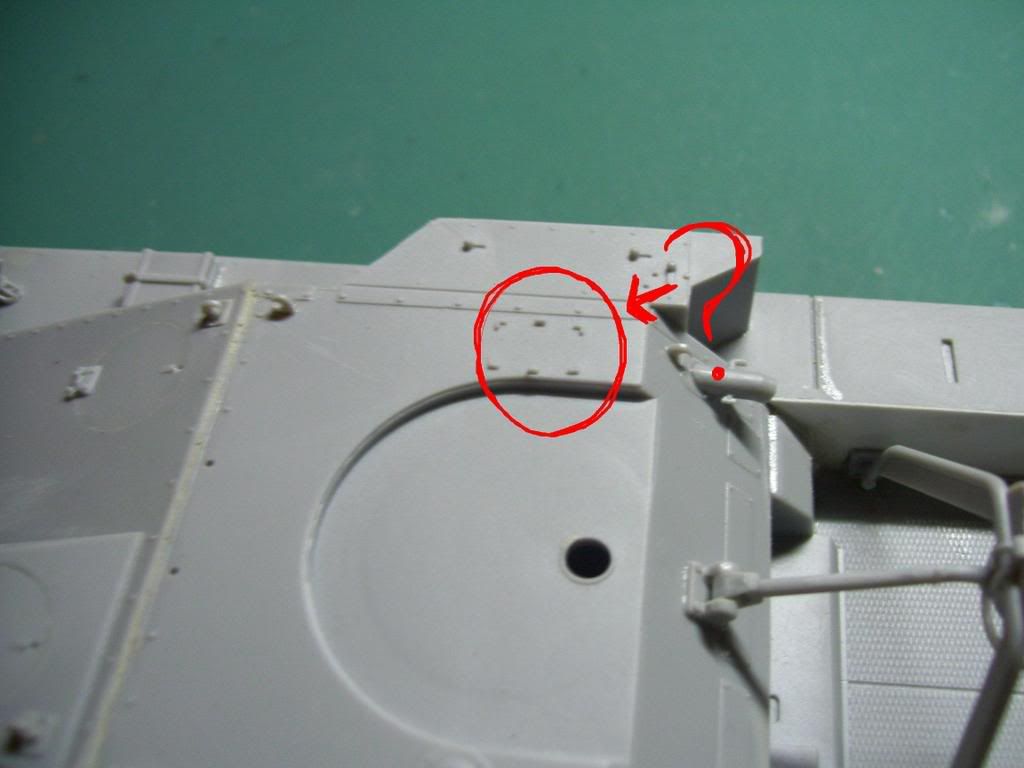
Well, I'll be going on to the painting next.I'll be using a slightly darker DY shade inside, to simulate the lack of fading inside--artistic license, interpretation, call it what you want.

A question to anyone who might know--who knows what the proper colors would be for the shells of this tank? There are two different shells--anyone have any dea of the colors used to paint them? The directions say just black tiops, but ref photos show white tips on the AP shells; anyone know what the HE shells looked like?

Thanks for looking in guys! Comments and info welcomed!!! Big Smile [:D]

  • Member since
    April 2008
  • From: Kristiansund, Norway
Posted by Huxy on Monday, January 5, 2009 6:54 PM

Just one thing from me...


Mein gott!!  Shock [:O] 

"Every War Starts And Ends With An Invasion".

  • Member since
    November 2005
  • From: USA
Posted by TOW gunner on Monday, January 5, 2009 7:06 PM

To re-iterate what everyone else has said:  A  M  A  Z  I  N  G!!!

So that's is how those fiddley bits in the newer kit are supposed to look like all folded up.  Great visual guide for fitting, partially glueing, then painting an open top critter.  As they say 1 picture and 1,000 words!

Can't wait to see the painted finished work of art!

TOW - 21" of penetration out to 3750 meters

  • Member since
    June 2006
  • From: Michigan
Posted by ps1scw on Monday, January 5, 2009 9:21 PM

Copper? 

Better not bring that to Detroit, I work for the phone company and we always have trouble reports about stolen copper cable!

  • Member since
    July 2004
  • From: Texas
Posted by wbill76 on Monday, January 5, 2009 10:09 PM

Very nice work on the shell racks Karl, given how much space they occupy in the interior they are really going to be a centerpiece! Your method of breaking down the interior of an open-topped vehicle is very similar to the way I've approached that same aspect on other builds. Looking forward to seeing this one painted but can't help you out on that mystery mounting point...looks like a box of some sort, maybe a med kit? Confused [%-)]

  • Member since
    December 2005
  • From: Syracuse, NY
Posted by lexesbenz on Monday, January 5, 2009 11:14 PM
Looking good Karl, what did you use to fill thise pin marks? aves?
The flying hamster of doom rains coconuts on your pitiful city!!!!
  • Member since
    January 2007
Posted by the doog on Monday, January 5, 2009 11:19 PM

Thanks, Huxy, and TOW gunner! Make sure you seek out some of wbill76's builds as well, if you're new to the site here--he has some great tutorials as well in full picture WIP's!

Thanks too, for commenting, psc1w--I'm not getting your reference to copper--do you mean the shells?

Thanks too, Bill-- yeah, I think I'll find a box of some sort to stick there--I might also check the directions for the "Nashorn"--perhaps it's a remnant of the shared hulls for the late version? 

Tony--Thanks, buddy! How'd that oil wash turn out? By the way, that's just Squadron White putty, sanded in the pin marks...

JOIN OUR COMMUNITY!

Our community is FREE to join. To participate you must either login or register for an account.

SEARCH FORUMS
FREE NEWSLETTER
By signing up you may also receive reader surveys and occasional special offers. We do not sell, rent or trade our email lists. View our Privacy Policy.