SEARCH FINESCALE.COM

Enter keywords or a search phrase below:

My Super 61 (Walcott's bird) in progress

57106 views
168 replies
1 rating 2 rating 3 rating 4 rating 5 rating
  • Member since
    November 2005
Posted by Anonymous on Wednesday, June 1, 2005 7:29 AM
I think Salbando meant by sag is the amount of droop of the MR blades as they sit., usually the droop is more exxagerated by the blade tiedowns pulling the tips further down. A good example is in the Operator's manual, showing the normal amount of droop of the blades as it would sit on the ramp.

As you are super detailing the Mast, to be fairly accurate, the Pitch change links (the thin vertical rods x 4) have a colored stripe somewhere in the bottom third of the rod. The colors are Red, Yellow, Blue and Black. Even on the real machine, they are hard to see. Also around the mast/swashplate area are tons of grease stains. The mast is a single piece of machine milled Titanium.

  • Member since
    November 2013
Posted by intruder_bass on Wednesday, June 1, 2005 7:46 AM
to mscottholt
QUOTE: Pitch change links (the thin vertical rods x 4) have a colored stripe somewhere in the bottom third of the rod. The colors are Red, Yellow, Blue and Black.

Thanks, I just noticed this looking through photosSmile [:)] Btw what this colors mean?
QUOTE: The mast is a single piece of machine milled Titanium


Yes but unfortunately I have no lathe (I’d love to make it solid) so I had to imitate relief on mast with different sized pipesSmile [:)]

  • Member since
    November 2005
Posted by Anonymous on Wednesday, June 1, 2005 7:59 AM
The blades have individual colors when it comes to track and balance of the blades. The Color on the PCL's just help with the identification.

Here are some more pictures to help you with accuracy.


  • Member since
    November 2005
Posted by Anonymous on Wednesday, June 1, 2005 8:17 AM
well when i did my Italeri AH-1 the rotors sagged until they were about 3 cm from the ground.... WAY too much.

My Revell AH-64 did the same, so maybe i'm just doing something wrong.

I DO NOT want them to sag, as in the DIO this will be a bird that has just landed, and will still be spinning.
  • Member since
    November 2005
Posted by Anonymous on Wednesday, June 1, 2005 11:38 PM
Scott knows what I meant concerning sag/droop.

DoWBaseball,
Yeah that's waaay to much droop.

By the way, the tail rotor blades and pitch links have the same 4 colors for ID, and we have a mix of Titanium and OD colored main rotor masts (some of both). And I'm talking USAF HH-60's here but I wouldn't think it would be much different for Army birds.
  • Member since
    November 2005
Posted by Anonymous on Thursday, June 2, 2005 9:31 AM
Alot of the Alpha models had CARC painted masts, wheras I've seen only one Lima with a painted Mast.. Also on one of the TR blades, there was a strip of reflective tape that ran from the Base of a Paddle to about 8-10 inches into the blade, I can't remember what color blade it was on.
  • Member since
    January 2004
  • From: atop a UH-60
Posted by Mogwa on Thursday, June 2, 2005 5:01 PM
The relective tape should have been removed after the T/R balance, But you see it out the sometimes. Almost all the M/R masts Ive seen are natural metal color. Ive seen a couple that are helo drab and one was black (apparently scored from task force).
Ive got pics only a modeller can love of UH-60 widgets, lemme know what you want to see and ill see what i have. Cant get the floor plates as theyre all in storage. Got a diagram of typical rotor droop for your enjoyment.


Actually after looking at the diagram thats not typical droop. At rest theyre about half that. You can also see how the M/R componants are color coded from the swashplate up to the spindles. Some M/R blade cuffs get a colored square also.
Personally I hate the Kit rotor head and hope Cobra or somebody does resin casts of the Main mod and rotor head.
HTH,
Mog
UH-60 Crewchief / Technical Inspector and Modelling Addict
  • Member since
    January 2004
  • From: atop a UH-60
Posted by Mogwa on Thursday, June 2, 2005 5:27 PM
More useless crap


Mog
UH-60 Crewchief / Technical Inspector and Modelling Addict
  • Member since
    November 2013
Posted by intruder_bass on Thursday, June 2, 2005 9:38 PM
wow!

Mscottholt and Mogwa - thanks for great pictures and info about the M/R and blades. According to Super 61 photos that I have the MR mast was of natural metal color but the rest stuff - black as on all Night stalker’s birds. I planned to "park" my helo on the airfield, but I don't think there where any RBF tags on it... What do you think guys?


About "More useless crap" posted by Mogwa. Love those pics! do you have more? I couldn't find something even close to them. Very useful! Thanks!

I marked with "question sign" some spots that I am interested in. I still can not find anything useful about them. Close photo or drawing will be appreciated.


are the searchlight and landing light holes where they soppose to be?


Have to make at least "something" inside this hole...


What are these small holes for? What's on sight in there?

Thanks
Andy


  • Member since
    January 2004
  • From: atop a UH-60
Posted by Mogwa on Thursday, June 2, 2005 10:59 PM
Well, the landing light and IR searchlight appear to me to be slightly to far outboard and aft, but I dont have any reference here so I'll get back to you on that one.
The hole in the M/R fairing is just a handhold.


This is the portion of the 5 pack that is visible. Its the top of the Input mod.


As far as the M/L/G that area is covered by a fairing and isnt really visible. The acft in this photo has this fairing removed for whatever reason. See the pic in my more useless crap post. Notice the fairings covering the ESSS lower strut mounts in my pics, but the mounts are exposed in your pic. It would be unusual for acft to operate without these fairings. Not that they are required, just they are rarely removed and are reinstalled after any maintenance in that area.

[img]http://i6.photobucket.com/albums/y211/intruder_bass/landinggear1.jpg[img]

Only the lower piston near the wheel rims would be exposed.
HTH,
Mog

UH-60 Crewchief / Technical Inspector and Modelling Addict
  • Member since
    November 2013
Posted by intruder_bass on Thursday, June 2, 2005 11:26 PM
OK, now i have the clue...Smile [:)]

about M/L/G I got the info from real participant of operation. Here is what he said:
- " The aircraft always flew with the cockpit doors off. Super 61 had a hoist mount, but no hoist was installed. It would be a U shaped piece of metal about a foot long and about a foot forward of the right hand engine air inlet.
One other thing, the fairings around the main landing gear
strut weren't installed on any of the Black hawks in D Company
Cargo Hooks weren't installed in the aircraft. There was a tube, about 3 inches in diameter installed in its place. The tube had 4 rings (in a clover leaf pattern) attached to it in the center. The system was installed in place of the cargo hook for securing the aircraft during fixed wing transport of the helicopter..." (Pat Powers crew chief Super 65)

So thats y I asked you about the "no fairing" photo....Smile [:)]
BTW have you ever encounter this "hook for securing the aircraft thing"? I did not find any info or photo of it on the web. Only what Pat mentioned...

Andy
  • Member since
    June 2003
  • From: Caput Mundi
Posted by Avus on Friday, June 3, 2005 2:12 AM
Wow! Now that's a HOT topic!
With all this reference it'll take me years to make my Pavehawk accurate!

Thanks Guys for all the pics and info.

Klaus

Thanks to ImageShack for Free Image Hosting

  • Member since
    November 2013
Posted by intruder_bass on Monday, June 6, 2005 11:15 AM
Hello guys!
I have couple of new questions to ALL, who is familiar to Black Hawks.

1. According to info that I have there where six M-134 ammo cans on board of Super 61- 3 for each minigun. Ammo cans were rather big - 1500 rounds each, so 4500 rounds per gun.
- "By the way I used all of mine and started to use one of the other gunners when we were shot down..." (Ray Dowdy. Crew chief of Super 61)
So the question is: how do those ammo cans look like? any photo or picture will be helpful. I had no luck to find any on web. As Heavy Arty suggested: maybe they used 40mm standard ammo boxes...?

2.Did anybody see CC miniguns? Are they better then kit's? Can somebody make a close photo of CC's - just need to know if they worth it.

Thanks
andy

  • Member since
    June 2003
  • From: Caput Mundi
Posted by Avus on Tuesday, June 7, 2005 1:59 AM
The ammo cans look like the standard M-60 ammo cans only much bigger and with the ammo feed mechanism.

CC's Miniguns are definitively better then the kit ones. BUT all the miniguns I've seen lack the "used-shell-thing" (i.e. where the used shells are ejected; It's a sort of conical cover).

I understand I haven't been very clear so I'll try to get some pics as soon as I get home.

OK here are some pics i found on the net:
"used-shell-thing" is that thing on the right with the hose attached


Ammo box without ammo feed mechanism

Klaus

Thanks to ImageShack for Free Image Hosting

  • Member since
    December 2002
  • From: Valrico, FL
Posted by HeavyArty on Tuesday, June 7, 2005 9:24 AM
Avus,
Above pic of ammo box is the type I am talking about, a 40mm ammo can. Nice pic of the chick...I mean spent shell thingie too.

Gino P. Quintiliani - Field Artillery - The KING of BATTLE!!!

Check out my Gallery: https://app.photobucket.com/u/HeavyArty

"People sleep peaceably in their beds at night only because rough men stand ready to do violence on their behalf." -- George Orwell

  • Member since
    November 2013
Posted by intruder_bass on Tuesday, June 7, 2005 7:05 PM
Oh, thanks guys, now I got it.

I wonder how these ammo cans where secured to floor if there was ballistic blancket all over it?
So the feeding mechanism included the electric engine or just the chute?

If it did, was the motor installed on each can?

To Avus: Do CC miniguns have this "used-shell-thing"?
To Heavy Arty: thanks for the file! i finally downloaded it Smile [:)]


Andy

  • Member since
    December 2002
  • From: Valrico, FL
Posted by HeavyArty on Wednesday, June 8, 2005 12:48 AM
My understanding is that the cans just had the ammo chutes attached. The motors on the miniguns would pull the rounds through the chute. The cans would most likely be strapped or bungi corded into place under the guns, doubt they would have the ballistic blankets on them either.

Gino P. Quintiliani - Field Artillery - The KING of BATTLE!!!

Check out my Gallery: https://app.photobucket.com/u/HeavyArty

"People sleep peaceably in their beds at night only because rough men stand ready to do violence on their behalf." -- George Orwell

  • Member since
    June 2003
  • From: Caput Mundi
Posted by Avus on Wednesday, June 8, 2005 2:37 AM
No intruder_bass the CC miniguns don't have the "used-shell-thing". I scratchbuilt one and added it to theirs.
As to the feeding mechanism I've seen pics of the whole mechanism attached to the ammo box. And CC sells thier miniguns with ammo boxes that have the feeding mechanism.
Again, at home I'll try to find those pics.

QUOTE: Nice pic of the chick...I mean spent shell thingie too.

Yeah I figured a pic with a chick would look better than only a minigun.Wink [;)]

Klaus

Thanks to ImageShack for Free Image Hosting

  • Member since
    November 2005
Posted by Anonymous on Thursday, June 9, 2005 8:13 PM
Avus,
Concerning the ammo boxes, don't worry about changing anything on the Pavehawk as we have the center mounted can's with the drivers installed whenever we're employing the GAU-2B (M-134 for you Army guys). With the new Block and SPS upgrades, these cans are now mounted externally below the gunner's windows. I'm not sure if the 160th or the Army in general will follow suite but they may. It really frees up space in the cabin.

Now, after thinking real hard (it's been around 12 years now) I'm pretty sure that the 160th Hawks had the big ammo cans and only had feed trays hooked up to them. Looking at the drivers, I don't see how they could have mounted them to the cans as they are a fairly intricate piece of gear and go hand in hand with the center mounted bins. All of our 7.62 linked comes in the big ammo cans (40mm cans) when we get it from the ammo dudes. Usually the gunners and FE's will upload the ammo into the center bins with the help of the ammo troops.
  • Member since
    June 2003
  • From: Caput Mundi
Posted by Avus on Saturday, June 11, 2005 5:27 AM
Thanks for the info Salbando.
Actually I wasn't thinking to change the ammo boxes on the Pavehawk, I was only providing info to intruder_bass.
What I have started to do is change the position of one ammo driver on the center box, in order to have both ammo chutes coming out of the same side of the box.
Picture might be clearer:

Klaus

Thanks to ImageShack for Free Image Hosting

  • Member since
    December 2002
  • From: Valrico, FL
Posted by HeavyArty on Saturday, June 11, 2005 11:03 AM
Avus,
I did the same thing on my MH-60L DAP model. I also cut the box down about 1/4 inch. It looked way too tall to me, it goes almost to the ceiling in the original Academy size.

Gino P. Quintiliani - Field Artillery - The KING of BATTLE!!!

Check out my Gallery: https://app.photobucket.com/u/HeavyArty

"People sleep peaceably in their beds at night only because rough men stand ready to do violence on their behalf." -- George Orwell

  • Member since
    November 2013
Posted by intruder_bass on Saturday, June 11, 2005 7:23 PM
Avus, the photo you sent me recently with M-134 on it is really nice...and not because of MinigunBig Smile [:D]

The M/L/G fairing is removed on this aircraft. Some wiring is exposed. Do you have some more pics of this Black Hawk?

Salbando, Avus,Heavy Arty: thanks again for the modern ammo magazine info... Its really helpful. For now I will use 40mm ammo cans that I have from some TAMYIA (or Verlinden) kit...

  • Member since
    June 2003
  • From: Caput Mundi
Posted by Avus on Sunday, June 12, 2005 3:20 AM
HeavyArty
Thanks for the hint on shortening the ammo box. I'll follow your suggestion.

intruder_bass
Glad the picture was useful. I'll have a look at my pics and see if I can find some more shots.
BTW I got those pics from Mr.Werner (the e-mail is on the pic). Try to mail him and see if he has more pics that cuold interest you.

Klaus

Thanks to ImageShack for Free Image Hosting

  • Member since
    November 2005
Posted by Anonymous on Tuesday, June 14, 2005 1:51 AM
Looks great,keep us posted.
  • Member since
    November 2005
Posted by Anonymous on Thursday, June 16, 2005 8:50 PM
Here's what the balistic "blankets" look like when installed. This shot was from Mog but the aircraft is a UH-60 armed mith M-60D's. The blankets on the MH's were installed the same.


Fox model Cobras and 58's down on the beach FARP at Mog. I thought they were 10th Mountains birds but can't remember. The 58's flew on the 3rd but the Cobra's were on stand-by. I think they flew on the 4th though.


Super 66 "Gun Slinger". You can see how they had the numbers on the main cabin windows and they DID have the cabin doors on. The only thing wrong with the text on the photo is that it's 2nd Squad, not 3rd Squad (Keni is on the left)


  • Member since
    November 2013
Posted by intruder_bass on Thursday, June 16, 2005 10:49 PM
Thanks Salbando...
I have these photos too from BHD93.com...
The first photo is correct for Super 6's but second one is not... I've drown basic plan of the blanket allocation and sent it to Ray Dowdy (crew chief on "Super 61"). I should say it was very kind of him to correct it and reply on my questions about the particular bird...
According to Ray - "there where 6 sheets of it on the floor. The sheets were touching each other. There was cutouts so the FWD facing seats, and the AFT facing seats could be attached to the floor"....
The ballistic blanket is done on my model already (if there is an interest I will post pics).
BTW - about the cabin doors... I didn't say the cabin doors were off - just the cockpit ones
here is one of most famous pics of "Super 61" for example:
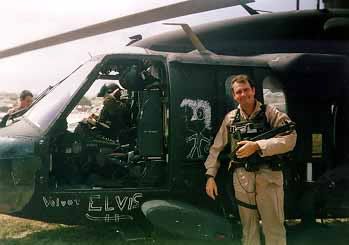

Right now I stuck for a bit cause have not enough time for finishing the intakes/exhaustsDead [xx(]… also there is a delay in “rivets production” - I ordered beading tools from Russia… Seems like it will take them a while to arrive here… That’s about it for now…Cool [8D]

I also have to say again that your help guys - Salbando, Mogwa, Heavy Arty, Avus, is REALLY APPRECIATED!Smile [:)]

Andy

  • Member since
    December 2002
  • From: Valrico, FL
Posted by HeavyArty on Friday, June 17, 2005 12:28 AM
Sure there is an interest. Always like looking at your progress. This is going to be one super-detailed model. Show more pics.

Gino P. Quintiliani - Field Artillery - The KING of BATTLE!!!

Check out my Gallery: https://app.photobucket.com/u/HeavyArty

"People sleep peaceably in their beds at night only because rough men stand ready to do violence on their behalf." -- George Orwell

  • Member since
    November 2005
Posted by Anonymous on Friday, June 17, 2005 1:41 AM
Andy,
I didn't know if you had seen the site or not. As I've told Grant, I've got photos taken from my time in Somalia, but I'm still digging stuff out of storage and figuring out where to put it in the new house Big Smile [:D]
When I find the pics I'll try to scan them and post them. For the time being I'm like a one legged man in an ****** kicking contest trying to finish up my Senior NCO PME (maybe someone will screw up and I'll make E-8), prepare for an upcoming UCI, and getting ready for another deployment to the land of little grass.

Oh and if that's not enough, the local fire department has really been pissing me off lately. 3 requests for assistance in 3 weeks (2 rescues and one medevac). All 3 called off once we stepped, launched and arrived on scene because their dispatch and incident commanders weren't sharing info.

(sorry guys....had to vent a little)

I will say that your MH-60 is one of the most comprehensive and detailed birds I've yet to see. Keep it up!!!!!Thumbs Up [tup]
  • Member since
    November 2013
Posted by intruder_bass on Friday, June 17, 2005 4:25 PM
Smile [:)] I'd like to see those pics of yours from Somalia, Salbando! thanks for compliment to my model... to say truth I am not on 7th sky of what I did (some parts turned out not as good as i could expect Big Smile [:D]) But that’s probably normal reaction when you look back on your first steps and say: "Damn! I should have done this part a little smoother" or "glue it other way".
Well, maybe thats what they call growing experience...

Here is what I made by now:
bulletproof blankets


main transmission and starboard intake


Andy
  • Member since
    February 2004
  • From: Ft. Bragg, NC
Posted by adrake2 on Saturday, June 18, 2005 11:23 AM
Wow, it's lookin' great. I look forward to these pictures every time I check the forums. They're definitely inspiring. I know what you mean about the growing experience. More than once have I wanted to scrape a project because I could have done something easier and better the next time around. Thanks for the pics, Andy, and keep up the excellent work.
-Aaron
JOIN OUR COMMUNITY!

Our community is FREE to join. To participate you must either login or register for an account.

SEARCH FORUMS
FREE NEWSLETTER
By signing up you may also receive reader surveys and occasional special offers. We do not sell, rent or trade our email lists. View our Privacy Policy.