SEARCH FINESCALE.COM

Enter keywords or a search phrase below:

My Super 61 (Walcott's bird) in progress

57106 views
168 replies
1 rating 2 rating 3 rating 4 rating 5 rating
  • Member since
    November 2013
Posted by intruder_bass on Saturday, June 18, 2005 9:38 PM
Hi guys!
Another quick question. Looking trough photoes like ~8356th timeTongue [:P] I've noticed couple of interesting things. I marked the "thing" with red question marks.
What is it? Why is it missing on Academy's DAP? Was this sort of "equipment" installed on h-60s back in 93'?


By the way: take a look at size of the pipe marked with green arrow on the first pic.... On Academy's kit this "hole" is allmost twice smaller!

Andy
  • Member since
    November 2005
Posted by Anonymous on Saturday, June 18, 2005 10:31 PM
It almost looks like a DIRCM mount, but I'm not sure.

I haven't looked at my Academy H-60 lately, but after what you've said I'll be checking out the APU exhaust. Might have to open it up a bit.
  • Member since
    November 2005
Posted by Anonymous on Saturday, June 18, 2005 11:22 PM
Looks like the 160th is still flying their MH-60L's without the main strut fairings. This was taken in Aug of 2003 during a CAPEX.

  • Member since
    November 2013
Posted by intruder_bass on Sunday, June 19, 2005 8:58 AM
Wow! what a nice shot!!!!!
thanks salbando! Great!

Andy
  • Member since
    November 2005
Posted by Anonymous on Sunday, June 19, 2005 12:39 PM
Great details..looks awsome!
  • Member since
    November 2005
Posted by Anonymous on Sunday, June 19, 2005 5:53 PM
That looks like the mount points for the AN/AVR-2A(V).
  • Member since
    November 2005
Posted by Anonymous on Sunday, June 19, 2005 9:40 PM
You can see the crew chief giving the two minute warning, the fast rope Hausers, and FRIES bar deployed, and pretty good detail of the M-134, and main gear strut.

Not sure why the 160th operates with the main strut fairings off. Never noticed it in Mog.

  • Member since
    November 2013
Posted by intruder_bass on Sunday, June 19, 2005 9:42 PM
QUOTE: Originally posted by salbando

For some reason the pic is not showing in the forum, but it shows when you click on it. You can see the crew chief giving the two minute warning, the fast rope Hausers, and FRIES bar deployed, and pretty good detail of the M-134, and main gear strut.


Oh ya i can see it! Great shot!
  • Member since
    November 2005
Posted by Anonymous on Monday, June 20, 2005 12:03 AM
Here's some detail pics of one of my squadron's HH-60G's showing the tail rotor gearbox detail, and tail rotor drive shaft and intermediate gearbox. Should be the same as any other H-60.


notice our Jolly Green mascot in the background.

Main rotor hub detail


Theres some H-3 and NSAWC SH-60F stuff that I posted as well.
http://photos.kitmaker.net/showgallery.php/cat/500/page/1/perpage/10/ppuser/6667/what/allfields
  • Member since
    November 2013
Posted by intruder_bass on Monday, June 20, 2005 7:54 AM
Holly Jesus! Where all this pics were before????Smile [:)] I love them!
did you take them by yourself? Can you take some more?????
The air intake is off on the 3rd pic! I'd love to take a look at this section. if only i could move the camera a little bit lower..... Gear boxes are awesome!
Thanks a lot!
  • Member since
    June 2003
  • From: Caput Mundi
Posted by Avus on Monday, June 20, 2005 1:29 PM
Seems I'm having problems with the .mil domains. I can't open any of the army, air force, navy or usmc pages, neither from home nor from work!
Angry [:(!]

Klaus

Thanks to ImageShack for Free Image Hosting

  • Member since
    February 2004
  • From: Moooooon River!
Posted by Trigger on Monday, June 20, 2005 7:35 PM
Avus

What is it you're looking for? Maybe I can help.
------------------------------------------------------------------ - Grant "Can't let that nest in there..."
  • Member since
    November 2005
Posted by Anonymous on Monday, June 20, 2005 9:22 PM
Andy,
Yeah, I took them over at our maintenance hangar. I'll take a look to see if i've got what you're looking for.

Avus,
I have the same thing at home when trying to access certain .mil sites. Some will only open when the user is on a .mil domain for security reasons. Usually they will have a second .mil site that is open to public domains.
  • Member since
    June 2003
  • From: Caput Mundi
Posted by Avus on Tuesday, June 21, 2005 2:12 PM
I'm looking for nothing in particular.
I just wanted to see the pic Sal posted (currently I have a mean red X) so I had a look at the HTML code and found out that it's on a . mil site. And I recalled that momentarily I don't have access to that kind of sites!

Klaus

Thanks to ImageShack for Free Image Hosting

  • Member since
    November 2013
Posted by intruder_bass on Tuesday, June 21, 2005 9:36 PM
Some more pics...


and new tool test - rivets (I will not be able to make exact ammount of themTongue [:P] but at least something) What do you guys think? Do they look better then whats given in Academy's kit? Of course its far from what Huey has (still can't understand y Academy made nice rivets on UH-1 and so bad on Black HawksAngry [:(!]


Andy
  • Member since
    December 2002
  • From: Valrico, FL
Posted by HeavyArty on Tuesday, June 21, 2005 9:55 PM
Rivets look good. How did you make them?

Gino P. Quintiliani - Field Artillery - The KING of BATTLE!!!

Check out my Gallery: https://app.photobucket.com/u/HeavyArty

"People sleep peaceably in their beds at night only because rough men stand ready to do violence on their behalf." -- George Orwell

  • Member since
    November 2013
Posted by intruder_bass on Tuesday, June 21, 2005 11:08 PM


I am testing beading tools designed to repair or making jewelry...


then there is a good info about rivet making here:
http://www.largescaleplanes.com/tips/RatoMarczak/riveting_1/riveting_1.html

Andy
  • Member since
    June 2003
  • From: Caput Mundi
Posted by Avus on Friday, June 24, 2005 2:27 AM
Wow, your rivets look great (as the rest does).

I read the article thoroughly, but which of the described methods did you use?
Look like you used the raised panel technique; if so you had to apply sheets of plasticard over the model, did I get that right?

Klaus

Thanks to ImageShack for Free Image Hosting

  • Member since
    November 2013
Posted by intruder_bass on Friday, June 24, 2005 7:43 AM
Avus
No I used recessed rivets method but instead of injection needles I took beading tools. Needles are good too but due to the softness or small diameter of the shaft - can't stand even a couple of dozen of rivets. The kit's plastic is too hard for them which leads to deformation of needle. Beading tool is much "stronger" comparing to needles and has all diameters from 0.3mm to 2mm. Its rather cheap and very helpful.

About rising panels - I thought about it but probably it's tooo early for meWink [;)] It is a hardcore! And if one day I decide to do it - I will use brass foil not a plasticSmile [:)]

Andy

  • Member since
    December 2002
  • From: Valrico, FL
Posted by HeavyArty on Friday, June 24, 2005 11:03 AM
QUOTE: Originally posted by intruder_bass

Avus
No I used recessed rivets method but instead of injection needles I took beading tools. Needles are good too but due to the softness or small diameter of the shaft - can't stand even a couple of dozen of rivets. The kit's plastic is too hard for them which leads to deformation of needle. Beading tool is much "stronger" comparing to needles and has all diameters from 0.3mm to 2mm. Its rather cheap and very helpful.

About rising panels - I thought about it but probably it's tooo early for meWink [;)] It is a hardcore! And if one day I decide to do it - I will use brass foil not a plasticSmile [:)]

Andy


Let me make sure I understand how you did it. Still a little fuzzy.

You punched each individual rivet out of thin sheet with a beeding tool, then placed each individually into the existing recessed rivets. Is that correct?

If so, that is way too tedious for me. I'll stick with the kit's recessed rivets.

Gino P. Quintiliani - Field Artillery - The KING of BATTLE!!!

Check out my Gallery: https://app.photobucket.com/u/HeavyArty

"People sleep peaceably in their beds at night only because rough men stand ready to do violence on their behalf." -- George Orwell

  • Member since
    November 2013
Posted by intruder_bass on Friday, June 24, 2005 10:18 PM
Smile [:)] LOL!!!!

Well I am little "crazy" about models but I am not insane to make about 2000 punched each individual rivet out of styreneSmile [:)] I hardly can even imagine how long it would take to glue them back on the hull....

Here is a simple drawing of the process:


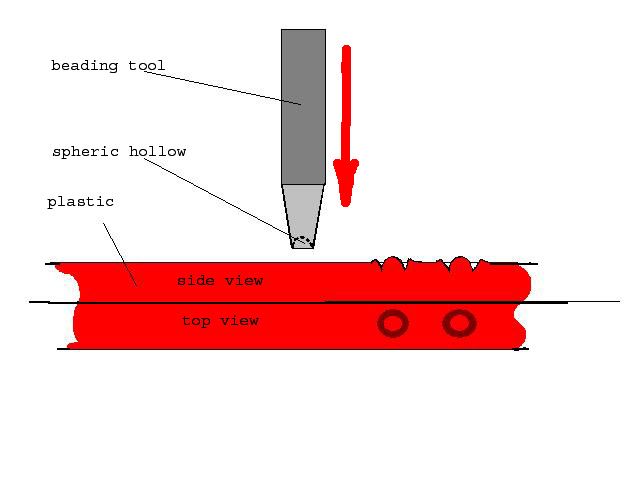
There are two main tricks in this method:
1. Its really hard to make the rivets lay on straight line (I suggest to draw guiding lines with a pencil right on the hull)
2. its hard to keep the pressure on the tool constant. Other ways it can effect the size and depth of the rivet...

If you have more questions please don’t hesitate to ask
Andy
  • Member since
    December 2002
  • From: Valrico, FL
Posted by HeavyArty on Saturday, June 25, 2005 12:45 AM
I see, so it is a mock raised rivet since there is still some recessed area. Very interresting. I think i'll still stick with the recessed kit rivets. Still looks way too tedious for me. Good job, it is coming out great.

Gino P. Quintiliani - Field Artillery - The KING of BATTLE!!!

Check out my Gallery: https://app.photobucket.com/u/HeavyArty

"People sleep peaceably in their beds at night only because rough men stand ready to do violence on their behalf." -- George Orwell

  • Member since
    June 2003
  • From: Caput Mundi
Posted by Avus on Saturday, June 25, 2005 3:54 AM
I have one more question:
What happened to the original recessed rivets?

I mean to model comes with recessed rivets, i.e. holes in the surface, did you sand the surface to make the holes disappear or did you punch over them?

Klaus

Thanks to ImageShack for Free Image Hosting

  • Member since
    November 2013
Posted by intruder_bass on Saturday, June 25, 2005 7:57 AM
QUOTE: Originally posted by Avus

did you sand the surface to make the holes disappear or did you punch over them?


Yes. I filled them with putty and sand the surface (it wasn't so hard because kit has only about 30% of suppose-to-be rivets)

Andy
  • Member since
    November 2005
Posted by Anonymous on Tuesday, June 28, 2005 2:49 AM
Looks great
  • Member since
    November 2013
Posted by intruder_bass on Sunday, July 3, 2005 5:07 PM
Salbando,
If you don't mind I will transfer our sensor conversation here cuz I am not sure Black Wizard is enjoying it under his topicSmile [:)]
If I understood correct they started to install these sensors on Paw Hawks first and then on ARMY helos but it was later then 93' I have many photos with the "horns" on 160th birds but they are dated 2002 and later... So in my particular case I should make only spiral antennas on the nose and no sensors even on the tail? Thats kinda in-time cuz I was about to glue them on my modelBig Smile [:D]

Andy
  • Member since
    November 2005
Posted by Anonymous on Monday, July 4, 2005 1:14 AM
Andy,
Concerning the Gothic Serpent era MH-60L you are correct. Spiral antennas only; no plume detectors.

In actuality, I believe the 160th birds got the plume detectors before our Pavehawks, but it was after 1993 (can't remember when I actually started seeing them on the MH-60L). Our (USAF) Pave Lows (MH-53J's now M's) actually have had plume detectors and spiral antennas for quite some time, but on the HH-60G it was part of the Block 152/162 upgrade and SPS mods started in the mid-late 90's. You'll even see some birds (HH-60G's) that still don't have the plume detectors, albeit most of them have gone down for the Mod and have them by now.

Bottom line on your MH-60L.....spiral antennas-yes......plume detectors-no.
  • Member since
    November 2013
Posted by intruder_bass on Monday, July 4, 2005 8:48 PM
Roger thatSmile [:)]

I have some more questions if you don't mind... I've got stuck a little making the bottom of the aircraft. On some photos of 160th birds you can see "equipment" not included in the DAP kit. Looks like antennas or something but the problem is that I have no idea what is it and (which is most important for me) was it installed on MH-60's back in 93'?
I marked these "antennas" with "question marks" on photos:


What is this bubble? Is there any chance it was there on Super 61?


You can see 3(three) antennas aft from FLIR... Should I build them too?

Thanks a lot for helping me on my research on Black Hawks!!!Smile [:)]

Andy
  • Member since
    November 2005
Posted by Anonymous on Tuesday, July 5, 2005 2:05 AM
The Two downward fins belong to the Pilot Locator System, the whitish oval/circle is the receiver or transmitter for the Radar altimeter and I have no idea about the two plugs behind the FLIR, looks like the female ends for a cannon plug?
  • Member since
    November 2005
Posted by Anonymous on Tuesday, July 5, 2005 2:08 AM
I think on the top picture pointing to the triangular looking thing is the lower IFF Antennae, I could be wrong, when I left I chucked all my -10's. Andy, if you have the operator's manual, all that you arelooking for should be in chapter 2.
JOIN OUR COMMUNITY!

Our community is FREE to join. To participate you must either login or register for an account.

SEARCH FORUMS
FREE NEWSLETTER
By signing up you may also receive reader surveys and occasional special offers. We do not sell, rent or trade our email lists. View our Privacy Policy.