SEARCH FINESCALE.COM

Enter keywords or a search phrase below:

1/48 Monogram B-17G Flying Fortress

234140 views
590 replies
1 rating 2 rating 3 rating 4 rating 5 rating
  • Member since
    March 2010
  • From: New Zealand
Posted by Scorpiomikey on Tuesday, September 27, 2011 2:21 PM

Thats cool, just didnt want you buttoning it up and then later finding out something that small is out of place. man that would bug me. 

"I am a leaf on the wind, watch how i soar"

Recite the litanies, fire up the Gellar field, a poo storm is coming Hmm 

My signature

Check out my blog here.

  • Member since
    January 2010
Posted by CrashTestDummy on Thursday, September 29, 2011 12:32 PM

Lancair IV

You guys are killing me!  Wink

Maybe I should make a set of Landing gear out of brass tubing and make the suspension really work!  Big Smile

How hard can it be?


That would be the logical next step!  But only after you finished the cut-away engines displaying the working internals!!! 

Gene Beaird,
Pearland, Texas


G. Beaird,

Pearland, Texas

  • Member since
    June 2005
  • From: Novi, Mi
Posted by Lancair IV on Saturday, October 1, 2011 4:32 PM

The fuselage is closed and I started cleaning up the seams.  Before I closed it, I wanted to take some last pictures of the Ball Turrent in place.  Good thing, because there is no way I would have been able to get it installed after I closed the fuselage.  I made a couple of supports to hold the fuselage while I detail with rivets and panel lines.

.

Cheers

Rob Byrnes

Novi, Mi

  • Member since
    June 2005
  • From: Novi, Mi
Posted by Lancair IV on Monday, October 3, 2011 7:13 PM

Priming the fuselage after seam work.  This is where the fun begins................  Ick!

Cheers

Rob Byrnes

Novi, Mi

  • Member since
    June 2005
  • From: Novi, Mi
Posted by Lancair IV on Sunday, October 23, 2011 3:48 PM

I'm still working on panel lines and seams.  It took me several nights to get the nose and cockpit glass to fit perfectly.  I did finish the chin turret today.

Cheers

Rob Byrnes

Novi, Mi

  • Member since
    April 2010
  • From: Green Bay, WI
Posted by redraider56 on Sunday, October 23, 2011 8:45 PM

Excellent work Rob!  May I ask how you did the covered gun slots in the chin turret?

-Matt

On The Bench: 1/48 HK B-17G "Man-O-War II"

On Deck: 1/48 Tamiya P-38H, 1/48 Revell PV-1


  • Member since
    June 2005
  • From: Novi, Mi
Posted by Lancair IV on Wednesday, October 26, 2011 4:39 PM

redraider56

Excellent work Rob!  May I ask how you did the covered gun slots in the chin turret?

Hi Redreaider,

     I applied micro crystal clear in the opening before any paint was applied.

I came home today to find two packages on my porch.  3 cans of Tamiya surface primer and the new engines that I will be putting into the wings.  One of them will be completely visible back to the firewall.  This SOB is never going to be done.  Bang Head  Big Smile  Bang Head


Thanks for looking


Rob Byrnes

Novi, Mi

  • Member since
    June 2005
  • From: Novi, Mi
Posted by Lancair IV on Saturday, October 29, 2011 5:38 PM

I decided to get one engine started.  Using a sacrificial wing, I removed the cowling and built a firewall.

I added the access door, Engine Mount studs, Carb Intake, and Exhaust cutouts.

Using the sacrificial wing with engine installed, and one of the Vector engines, I took all the measurements I needed to make a motor mount.

Using the measurements, I decided to build a jig in case I wanted to ever make more.......  You can see the motor mount top cross bar already installed and the mounting pads for the lower firewall attachments.  The aluminum center will hold the motor attach ring at the correct distance away from the firewall.

Sure hope this works.  If all goes as planned, I should be able to plug this right into my good wing......Hmm

Thanks for looking

Happy Halloween

Rob Byrnes

Novi, Mi

  • Member since
    June 2005
  • From: Novi, Mi
Posted by Lancair IV on Sunday, October 30, 2011 8:00 PM

Waiting for parts to dry, I fired up Catia and designed the motor mounts.  I'm going to have a jig made on the 3D printer, and also a plug for the fixed cowl piece so I can try something new and make a vacuum molded part.  Cool

Thanks for looking

Happy Halloweeen  Clown

Rob Byrnes

Novi, Mi

  • Member since
    November 2008
  • From: Crawfordsville, Indiana
Posted by Wabashwheels on Monday, October 31, 2011 11:13 AM

Rob, fabulous work .  I've been following along for quite a while.  You probably have photos, But I've got a couple nice detail shots of the restored engines from the Memphis Belle. 
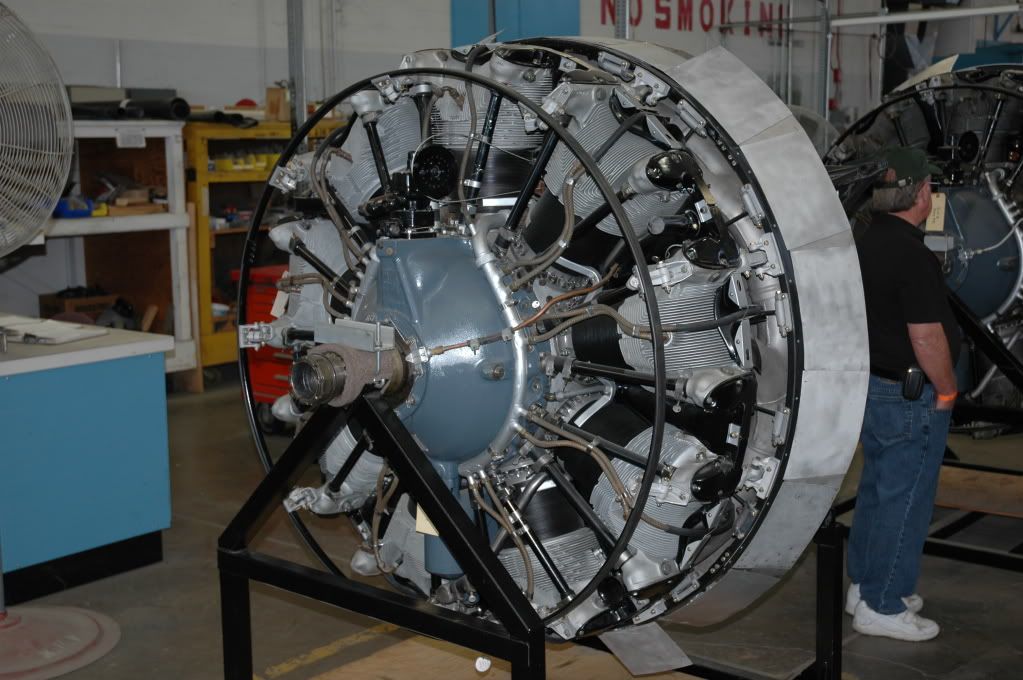
The "Belle" and the "Swoose" are coming along nicely.  Another couple years and they will both adorn the National Museum of the USAF at Dayton, OH.  Rick


  • Member since
    June 2005
  • From: Novi, Mi
Posted by Lancair IV on Monday, October 31, 2011 8:56 PM

Wabashwheels

Rob, fabulous work .  I've been following along for quite a while.  You probably have photos, But I've got a couple nice detail shots of the restored engines from the Memphis Belle. 
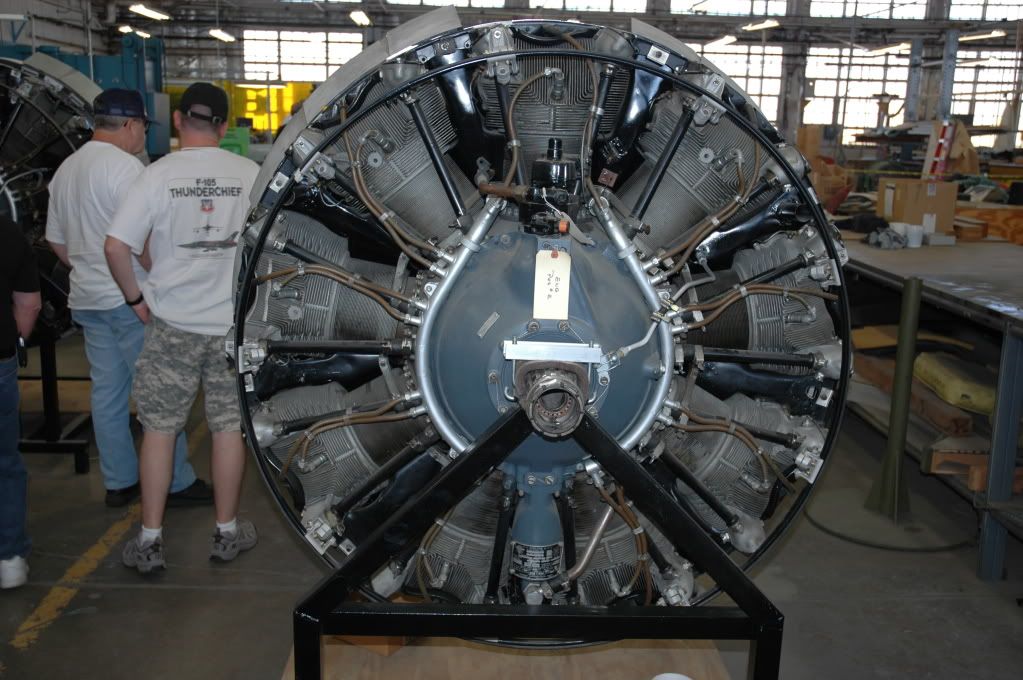
http://i745.photobucket.com/albums/xx92/wabashwheels/USAF%20Museum/USAFMuaseumRestorationFacility029.jpg

http://i745.photobucket.com/albums/xx92/wabashwheels/USAF%20Museum/USAFMuaseumRestorationFacility028.jpg

The "Belle" and the "Swoose" are coming along nicely.  Another couple years and they will both adorn the National Museum of the USAF at Dayton, OH.  Rick


Great pictures.  Thanks

Rob Byrnes

Novi, Mi

  • Member since
    December 2002
Posted by 7474 on Tuesday, November 1, 2011 1:16 PM

Too bad I didn't come across this thread earlier. If someone wants some great detail shots, look at this thread on another forum with a B-17 tear down.

http://warbirdinformationexchange.org/phpBB3/viewtopic.php?f=26&t=40406

  • Member since
    June 2005
  • From: Novi, Mi
Posted by Lancair IV on Tuesday, November 1, 2011 4:30 PM

7474

Too bad I didn't come across this thread earlier. If someone wants some great detail shots, look at this thread on another forum with a B-17 tear down.

http://warbirdinformationexchange.org/phpBB3/viewtopic.php?f=26&t=40406

Thanks.  Been to that sight several times during the build.


Rob Byrnes

Novi, Mi

  • Member since
    December 2002
  • From: Whidbey Island, Washington
Posted by chukw on Wednesday, November 2, 2011 10:00 AM

I am awestruck- this just gets better and better!   I can't wait to see more on that engine mount- cheers!

chuk

  • Member since
    March 2010
  • From: Democratic Peoples Republic of Illinois
Posted by Hercmech on Wednesday, November 2, 2011 10:16 AM

Coming along fantasticly!


13151015

  • Member since
    June 2005
  • From: Novi, Mi
Posted by Lancair IV on Wednesday, November 2, 2011 7:59 PM

Thanks for all the compliments.  Tonight I cut the firewall mounts and started applying the mount tubes.

This is going to take a while.

Thanks for looking


Rob Byrnes

Novi, Mi

  • Member since
    June 2005
  • From: Novi, Mi
Posted by Lancair IV on Thursday, November 3, 2011 8:30 PM

Continuing on the engine mount

Cheers

Rob Byrnes

Novi, Mi

  • Member since
    June 2005
  • From: Novi, Mi
Posted by Lancair IV on Friday, November 4, 2011 3:51 PM

Removed the motor mount from the jig.  Fits up to the fire wall perfectly.  Big Smile

Cheers

Rob Byrnes

Novi, Mi

  • Member since
    April 2010
  • From: Green Bay, WI
Posted by redraider56 on Friday, November 4, 2011 5:33 PM

You sir are a master Yes

-Matt

On The Bench: 1/48 HK B-17G "Man-O-War II"

On Deck: 1/48 Tamiya P-38H, 1/48 Revell PV-1


  • Member since
    August 2011
Posted by plasticutter on Saturday, November 5, 2011 10:34 AM

What would you charge to make a set?

  • Member since
    June 2005
  • From: Novi, Mi
Posted by Lancair IV on Sunday, November 6, 2011 7:50 AM

Hi Plasticutter,

      At this point, I just want to finish the Fort.  I'm trying to get he done by the end of the year.  Maybe sometime next year I can look at making a few sets.  Sorry


Rob Byrnes

Novi, Mi

  • Member since
    June 2005
  • From: Novi, Mi
Posted by Lancair IV on Tuesday, November 8, 2011 7:11 PM

Engine is coming along.  The wires from the motor will be routed through the carb box, carb intake, behind the firewall where it will connect to the system.

I should be getting the mold for the fixed cowling in a few days.  The vacuum molder ready to try.  Exhaust and plug wires are next.

Cheers

Rob Byrnes

Novi, Mi

  • Member since
    March 2010
  • From: New Zealand
Posted by Scorpiomikey on Tuesday, November 8, 2011 7:22 PM

I always get a little excited when i see you post in this thread.

"I am a leaf on the wind, watch how i soar"

Recite the litanies, fire up the Gellar field, a poo storm is coming Hmm 

My signature

Check out my blog here.

  • Member since
    July 2008
  • From: USA California
Posted by vetteman42 on Tuesday, November 8, 2011 11:22 PM

Man that motor mount is a work of art and very good eyes Rob YesYes

Randy So many to build.......So little time

  • Member since
    September 2009
  • From: Frisco, TX
Posted by B17Pilot on Wednesday, November 9, 2011 8:38 AM

Bow DownBow DownBow DownBow Down   Eats for more

If you decide to make a set of those engine mounts, let me know, I would love a set of those.


  • Member since
    August 2009
  • From: Toledo Area OH
Posted by Sparrowhyperion on Wednesday, November 9, 2011 8:50 AM

Hi folks.

Well, I have been offline for quite some time due to a move, but I finally got my system working again (why is it that even the shortest distance move will almost always mess up a computer?).  I don't have accessto 99% of my kit stash and about 85% of my paints and supplies, so I am going to jump in and do one of my B17-G Monogram kits.  They don't require a lot of oddball paint colors and I can do them in their non painted silver scheme.  It's going to be strictly OOB.  I'm going to have to substitute a couple of colors like Medium Green instead of Zinc Chromate Green, but I think I can get it to come out looking fairly good with what I have.  Now I just have to find my glue...

Rich

In the Hangar: 1/48 Hobby Boss F/A-18D RAAF Hornet,

On the Tarmac:  F4U-1D RNZAF Corsair 1/48 Scale.

  • Member since
    October 2008
  • From: italy
Posted by bsyamato on Friday, November 11, 2011 12:21 PM

Lancair , inverting the polarity of energy the fortress could be really an outstanding fan too Propeller

perfect work on the engines structure Yes

  • Member since
    June 2005
  • From: Novi, Mi
Posted by Lancair IV on Sunday, November 13, 2011 7:51 PM

It took awhile, and 3 attempts, but I finally have an exhaust ring that looks acceptable.  A little paint and weathering this week, and the engine will be complete.  I'll leave the tube going to the turbo long until I install it onto the airframe.

Cheers

Rob Byrnes

Novi, Mi

  • Member since
    March 2008
  • From: Ohio
Posted by B-17 Guy on Monday, November 14, 2011 2:48 PM

Bow Down

  • Member since
    July 2008
  • From: USA California
Posted by vetteman42 on Monday, November 14, 2011 4:18 PM

Next Rob will figure out a way to have exhaust coming from those stacks Propeller

Amazing work Rob Bow Down

Randy So many to build.......So little time

JOIN OUR COMMUNITY!

Our community is FREE to join. To participate you must either login or register for an account.

SEARCH FORUMS
FREE NEWSLETTER
By signing up you may also receive reader surveys and occasional special offers. We do not sell, rent or trade our email lists. View our Privacy Policy.