SEARCH FINESCALE.COM

Enter keywords or a search phrase below:

Improving the Revell 1:48 P-40B (Complete)

25407 views
109 replies
1 rating 2 rating 3 rating 4 rating 5 rating
  • Member since
    June 2013
Improving the Revell 1:48 P-40B (Complete)
Posted by bvallot on Tuesday, November 18, 2014 7:09 PM

I was originally going to wait until I had completed everything on this build, but I had just enough time to feel ancy about it and well...here I go.

Having just completed that P-40B AVG Flying Tiger that felt like an eternity, I really wanted that build that came together more simply so as to decompress like you hear so many others talk about.  I guess that's not exactly this one though.  After having finished Boyington's Flying Tiger, I really wanted a Pearl Harbor P-40.  So here I am again at it.  I still believe that the Revell/Monogram kit is best suited still at putting together a Hawk.  Lawdog just put together his Frankenstein Hawk from the Academy-Revell combo and admitted to the Revell having better shapes and more to work with in terms of "the bones" of the build.  Hopefully, you can find a kit without too many issues with regards to flash, pin marks, and the like....  Even without those issues there are a couple of challenging areas that will require some thought and a little patience, but rest assured you can get a very satisfying Warhawk out it.  =] I didn't want this post to be quite as in depth as the last one, but my aim is to address the major components of the build and a few extra easter eggs that you can do without too much fuss to help improve the building of this kit.

(edited...for ease I've included this LINK to jump to my previous P-40B post for all of you Flying Tiger enthusiasts out there.)

Here goes:  

 Revell/Monogram P-40B 1:48 by brittvallot, on Flickr

I went with the True Details cockpit again.  The kit parts are laughable at best and just need to go.  The TD resin parts are a nice pick me up, but they are for the Academy/Hobbycraft.  Not a big deal...they still go in with little fuss.  Just be patient....and don't be afraid of a little extra work.  =]

 image by brittvallot, on Flickr

 image by brittvallot, on Flickr

The interior was painted a Yellow-green zinc chromate color that I mixed based on original photos from reference materials...I won't make this post so much about color...but more about construction.  For the sake of chronology, I'll stop here and move on to the tail gear before the fitting together of the fuselage.

The Tail Gear:

I wanted to include this because the kit part wasn't suitable for my needs and I wanted the opportunity to build my own from scratch.  It's not as hard as you think.  Some things you'll need to make it easier: Albion slide tubes, various diameters of brass rod, Tamiya tape (or some other masking tape), and plastic card.

So, I first started with the rod that accepts the tire and it's adjoining assembly parts.  Here's a picture to give you an image of what you're working towards.

 P-40_Parts_50 by brittvallot, on Flickr

 Untitled by brittvallot, on Flickr

After some strategic bending and a little filing, I have the correct shape and size I want for the strut.  I've kept the actual tail wheel from the kit as I'll be using it still.  The bends in the rod work according to the wheel size.  More of an engineering standpoint and less mathematical for anybody who knows that joke.

 image by brittvallot, on Flickr

Be careful when making these bends that you don't over work the rod.  I've chosen to smash it flatter with my needle nose tool I'm bending it with and filing it down to something I prefer, but this can make your parts weak if you don't find the bend right the first time.  If it breaks, don't sweat it...just cut you another strip to work with and do it better. =]

 image by brittvallot, on Flickr

As I don't have enough of the sizes I'd prefer of the Albion slide tubes, I've made up the difference here with Tamiya tape cut into thin, small strips.  I find it works well over a small area such as this to build up a surface.  None of it acts as anything structural, so you really don't have to worry about something falling apart.  Purely cosmetic.  Here's skipping ahead to show the step-by-step parts to the tail gear assembly.

 image by brittvallot, on Flickr

 image by brittvallot, on Flickr

I seem to be having some problems adding more photos...so I'll post this and continue.  ;)

On the bench:  

Tamiya F4U-1  Kenneth Walsh


  • Member since
    September 2011
Posted by fightnjoe on Tuesday, November 18, 2014 7:26 PM

Very nice.  Nice work on the tail wheel.

Joe

Veterans,

Thank You For Your Sacrifices,

Never To Be Forgotten

Where you can find me:

Workbench on FaceBook  Google Plus  YouTube

  • Member since
    June 2013
Posted by bvallot on Tuesday, November 18, 2014 8:34 PM

So, taking it from the second to last pic...snip your plastic card to shape and sand down your edges so that it will be received by the main strut.  I've even CAed a piece of brass rod (0.10 -I think...it's very tiny...essentially wire) to act as a visual aid as a strengthening element that's present on the real thing.  The aluminum tube (that's just what I had lying around for the size I needed) I filed the end to bevel it so it is received by the rod surface that it will be glued to.  I used a thin strip of a brass sheet but plastic card would work just as well for the turnbuckle that accepts the pneumatic tube for lowering/raising the assembly.  Some tape takes the place of a slide tube since I didn't have the size and couldn't wait.  I built up the shape appropriately and left the tiny gaps you see just so that I can leave a small drop of wash to give it some visual weight when painting.  Otherwise you needn't bother with the extra cutting and what not.

The bulkhead that all of this goes into is visible up above.  This was cut to shape and sanded until it fit.  Again...more practical, less math. 
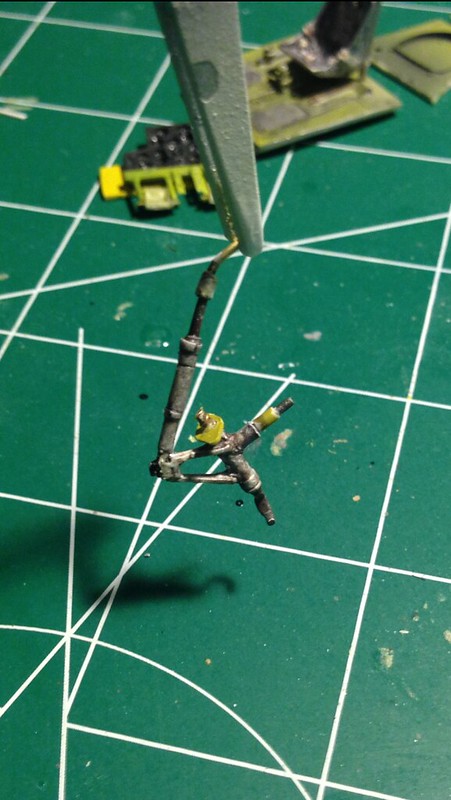
 image by brittvallot, on Flickr

 image by brittvallot, on Flickr
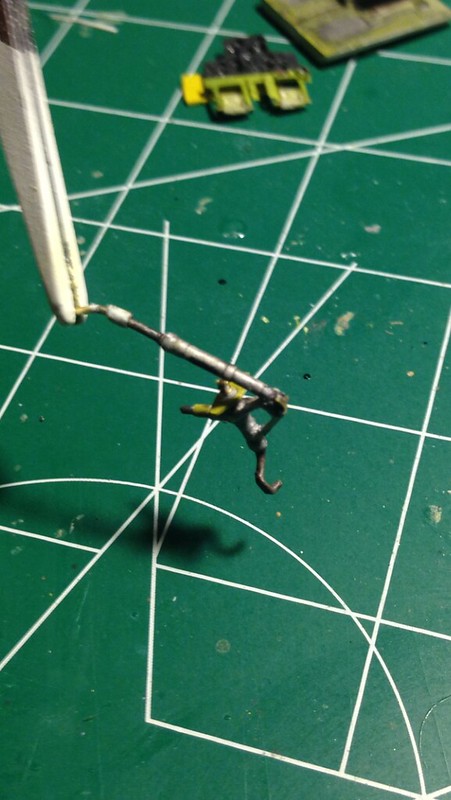
 image by brittvallot, on Flickr
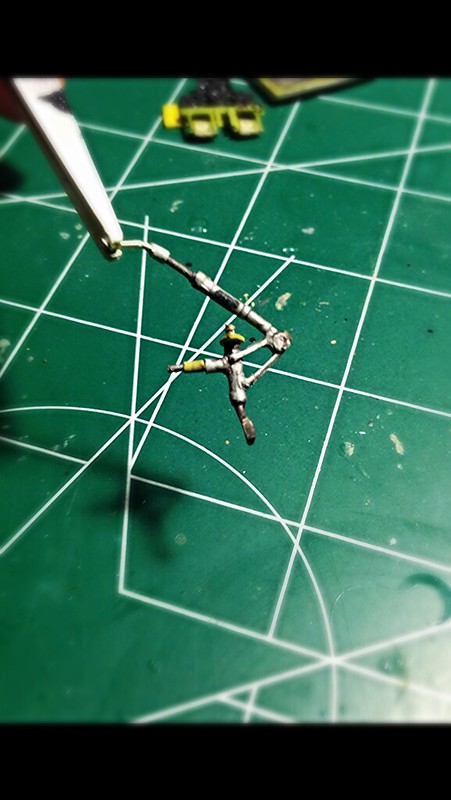
I've even gone and painted the placard for use on this bad boy.  Too bad it's now invisible.

Next, I built up the structural elements of this back end.  Most of this will not be visible by the time you're done...I found out later that practically none of it was.  =[  Which was part of the reason why I wanted it done...but anyhow...I now have one incredibly strong tail gear! =D
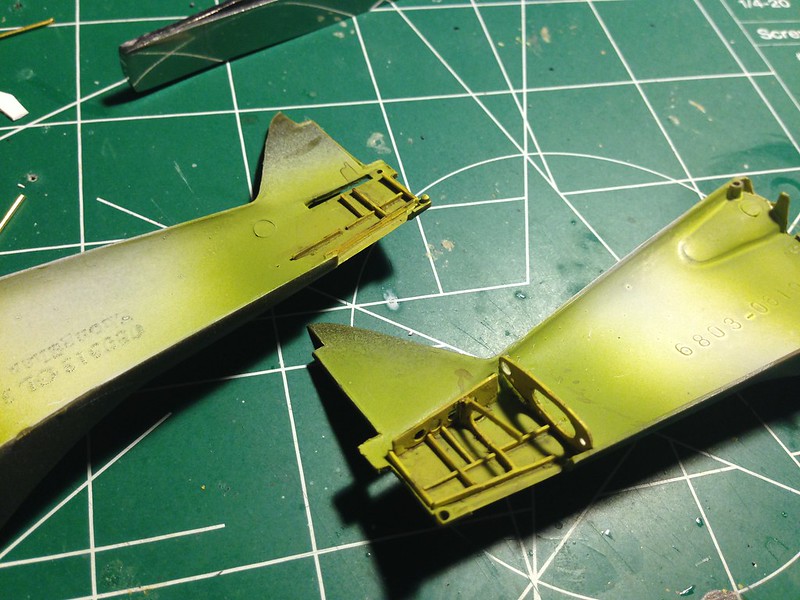
 image by brittvallot, on Flickr

 image by brittvallot, on Flickr

Quick view from the bottom to see how this will come together:
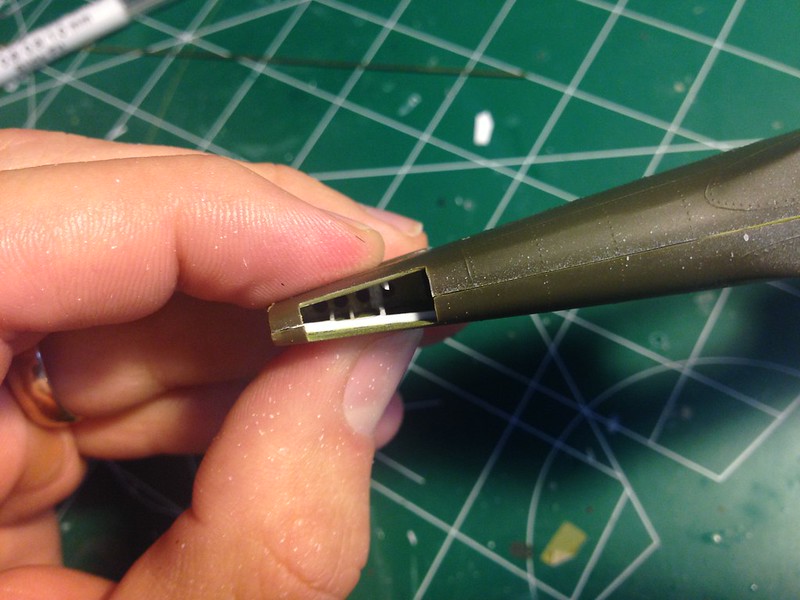
 image by brittvallot, on Flickr

This picture is just to give you a comparison of these two parts in relation of the cockpit items.  The part on the left will fit just below the space on the kit that accepts the elevator stabs.
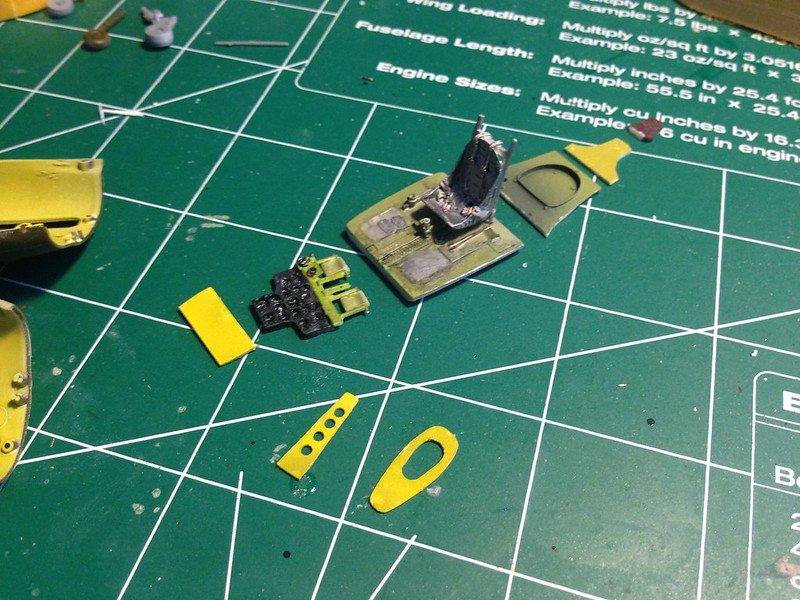
 image by brittvallot, on Flickr

When it's all said and done, I think it comes out nicely and will definitely help to add some eye candy in some unexpected places.  One nice thing you can do is to position your gear so that the tire is turned left-right if you're interested in showing the plane pivoting off a taxi lane.... just saying. =]

Moving on to the Cockpit:
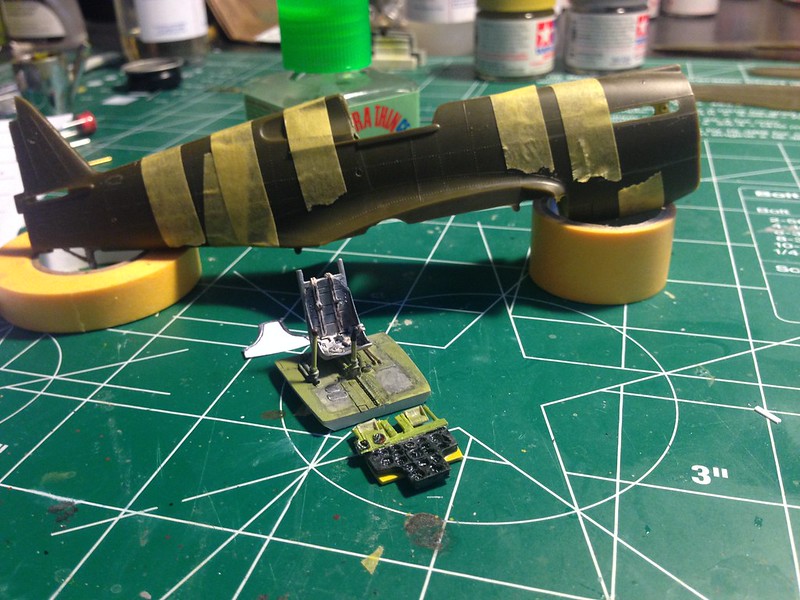
 image by brittvallot, on Flickr

[Edited]

There are a few extra parts needed to scratch out to get all this to fit inside the Revell fuselage.  When noting the bulkhead behind the seat, you'll find you need a piece above it to fit into the gap below the headrest area.  You'll have to first sand the kit headrest off.  Next, I've eyeballed the shape to cut in plastic but a better way might be to trace this shape out on a piece of paper and transfer it to the cockpit bulkhead and go from there.  When laziness fails me I often fall back onto this and make a paper pattern to use for cutting out my shapes. This piece will rest snugly between the top of the seat and kit part below the headrest.
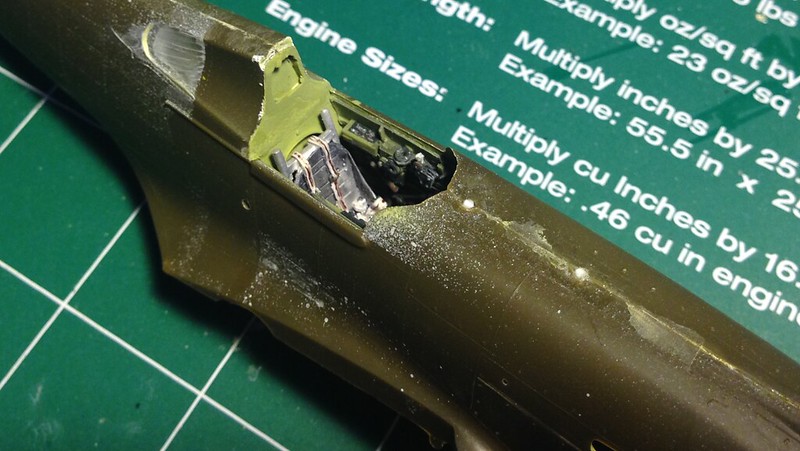
 image by brittvallot, on Flickr

Here it is from the back:
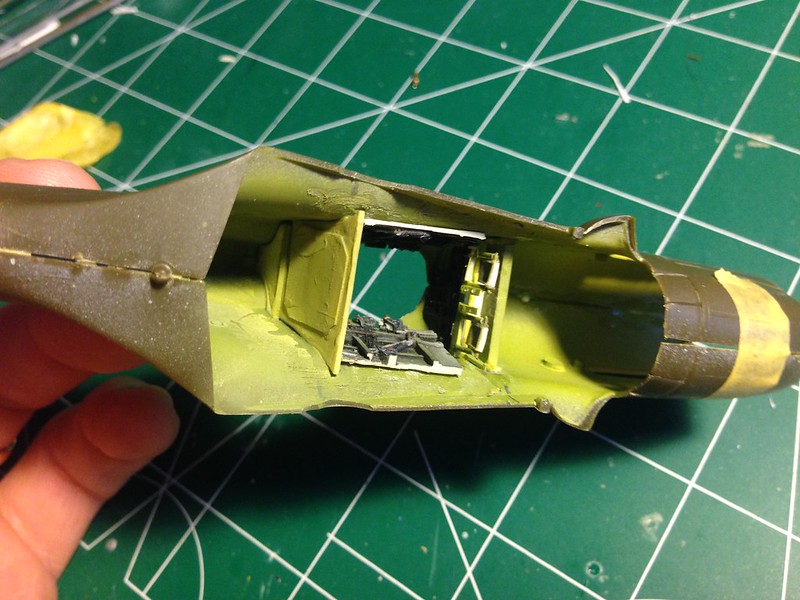
 image by brittvallot, on Flickr

That will take care of the gap behind all of this.  Some patient sanding will get it in there.  There is the matter of the part up front (which I'm pictureless of now it seems) that leaves the gap between the TD part behind the seat and the headrest part from the Revell kit.  Same thing...just measure you out the shape and carefully sand just enough to have it fit.  I primed this part and used CA to fill it in and take care of any gaps. 

For the IP, I've basically just made two "shoes" that fit vertically along the back piece of the IP that it rests upon. The "shoes" were sanded just enough to reinforce the fuselage and make it strong without pushing it out.  Be careful not to spread it.  This kit has enough issues as it is!   =D
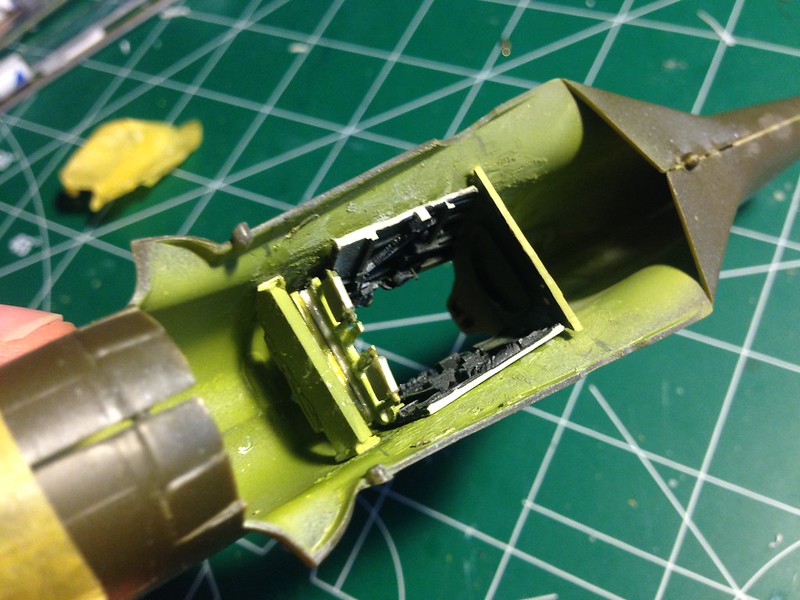
 image by brittvallot, on Flickr

Here's a couple of interior shots of what this all turns out like
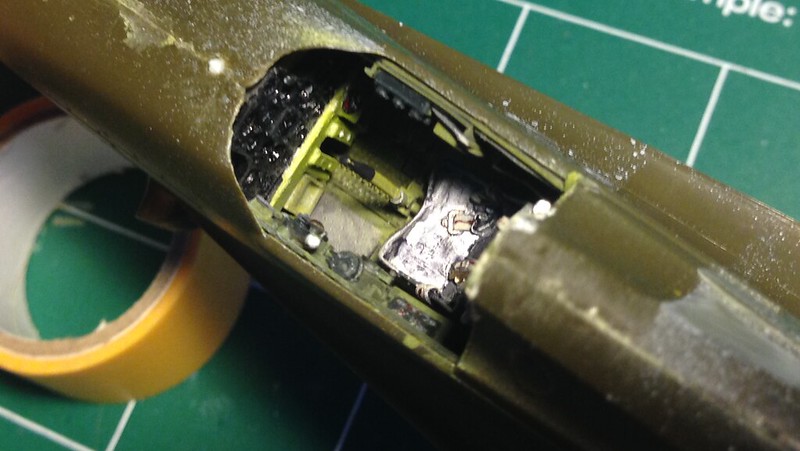
 image by brittvallot, on Flickr

 image by brittvallot, on Flickr
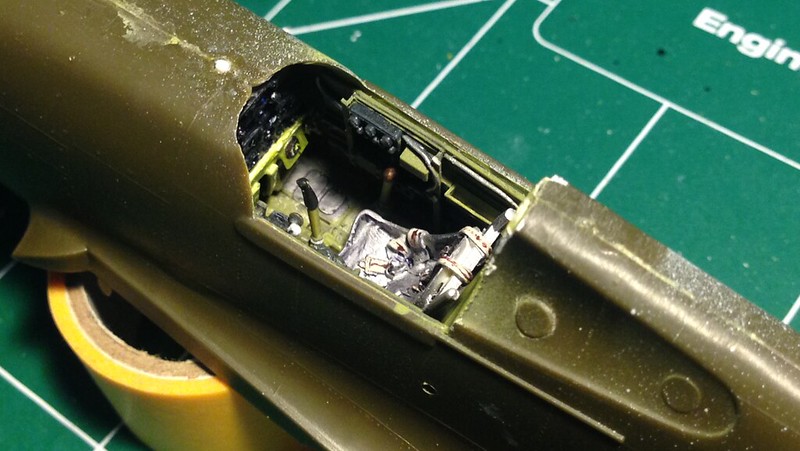
There's still the 50 cals to add...but that can come later.

Back to the Tail.  I wanted to get this part started and out of the way so it doesn't feel rushed later in the build when you are looking to get everything primed and painted.  I started with taking care of the ejector marks on the bottom of the stabilators/elevators.  CA sanded down and a needle tool to redo the rivets lost.  I've also taken a razor saw and cut the elevators off so I can position them how I want.  From photos it seems that the stick gets shoved forward a bit for the pilots to get out and most P-40 Bs seem to have the elevators pointed down.  The rudder has the trim tab cut to make it look more like a separate piece and a hole drilled to allow for a stronger actuating rod for the trim control.  The trim on the elevators are cut as well and will be dressed up also.
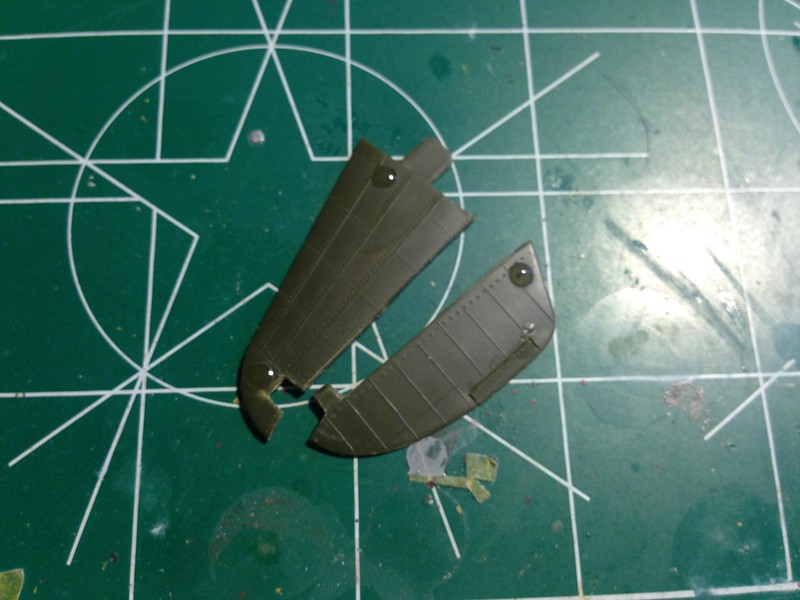
 image by brittvallot, on Flickr

 image by brittvallot, on Flickr
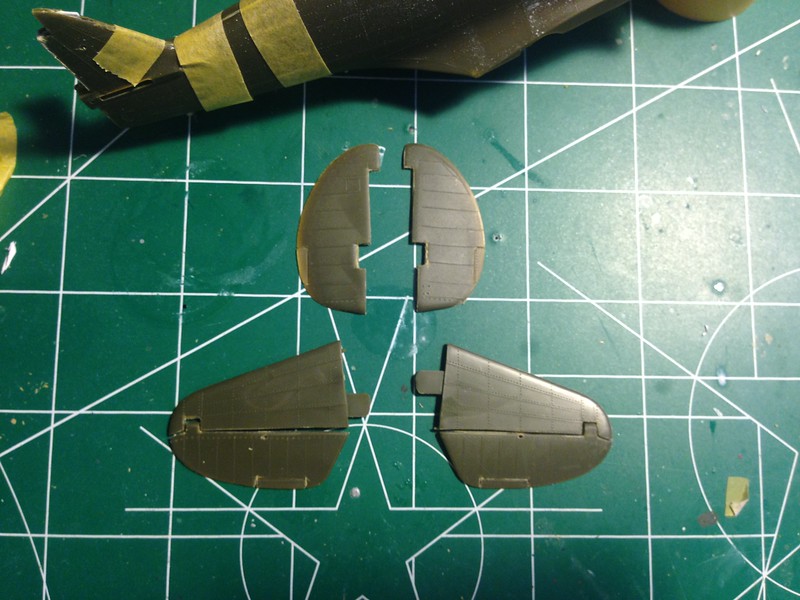
For some extra detailing, there's a hole (appearing to be an access point to view) for the rod working the controls for the elevators.  Drilling this hole horizontally all the way thru is ridiculous and next to impossible at this scale, soooo...I've opted for the "appearance" of what should be there. 
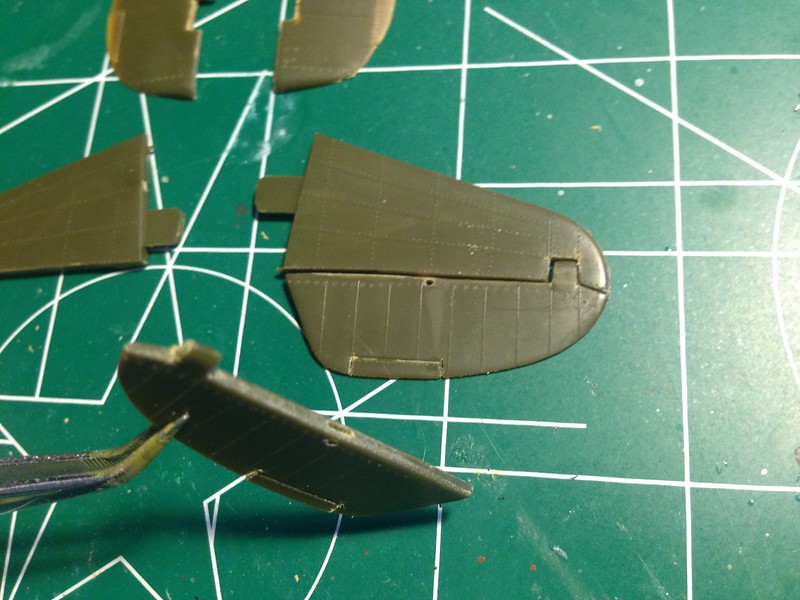
 image by brittvallot, on Flickr

Shaping the Rudder Horn: 

This is from a brass rod that is bent to shape and then flatten with the flat edge of my needle nose tool.  The same could be done by sanding with some metal files, but I imagine it'd take a LOT longer.
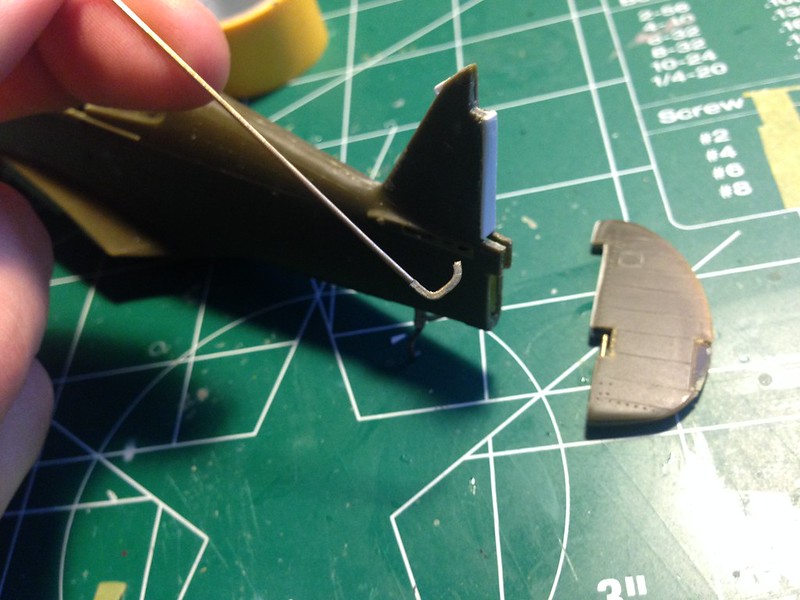
 Untitled by brittvallot, on Flickr

Trim tab control:

By drilling this hole first and fitting the tiny brass rod (basically wire) you get more rod inside and behind so that it can be CAed down more effectively without breaking.  Very handy bit of info right there.
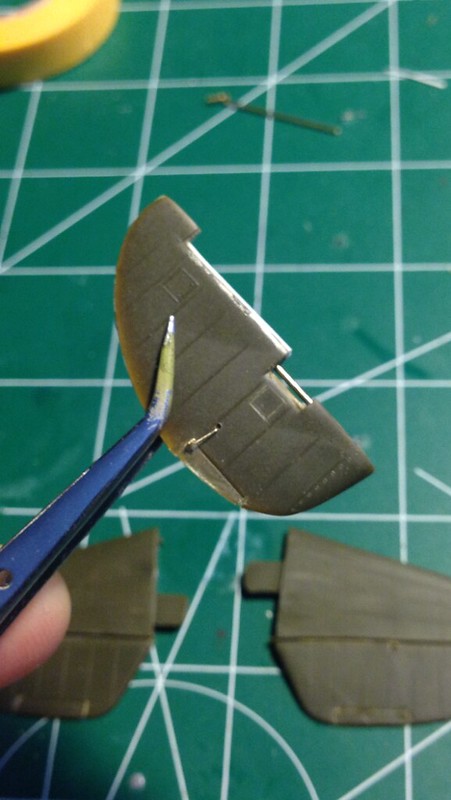
 Untitled by brittvallot, on Flickr

I also fixed up the backing so that matches up to the vertical stabilizer. 
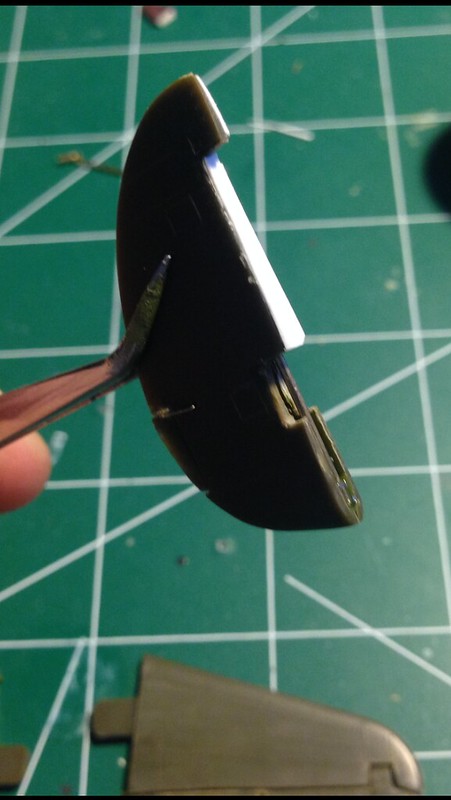
 Untitled by brittvallot, on Flickr

 Untitled by brittvallot, on Flickr
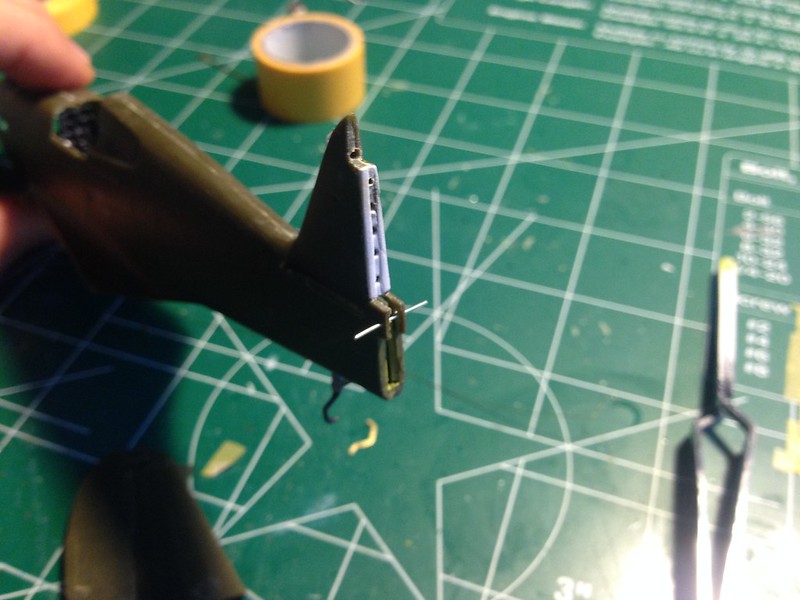
Here I've done the same with plastic card, except I've used a thicker piece so that I can sand down the middle to create the interior and drill my holes.  Just a simpler way with less glue and less fuss.  And less cutting!

The rod going across horizontally is to the elevators and as it happens it better supports them as well since I've cut them from the stabilators. 

[Edited]  I also went ahead and cut this rod after fixing it to the tail.  The vertical rod working the rudder will end up fitting just inside of this part.  Since I wanted to paint some of this before fixing it to the rest of the plane, I opted to snip the horizontal rod as they are short enough over themselves to remain strong and still support the elevators.
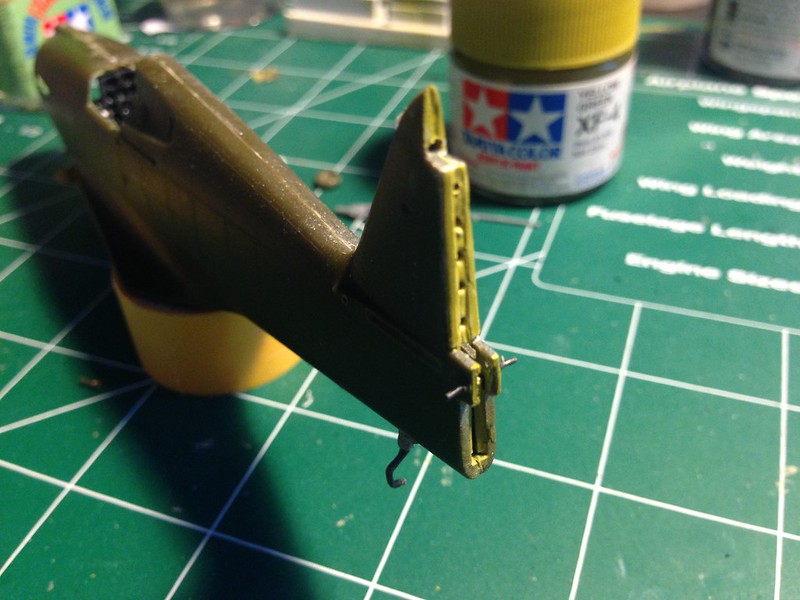
 Untitled by brittvallot, on Flickr

A little paint and...a test fit.
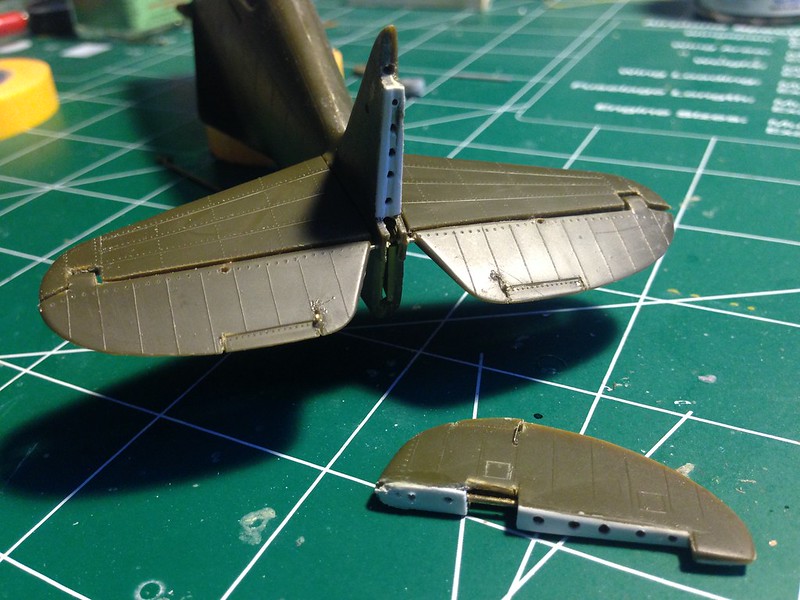
 Untitled by brittvallot, on Flickr

 Untitled by brittvallot, on Flickr
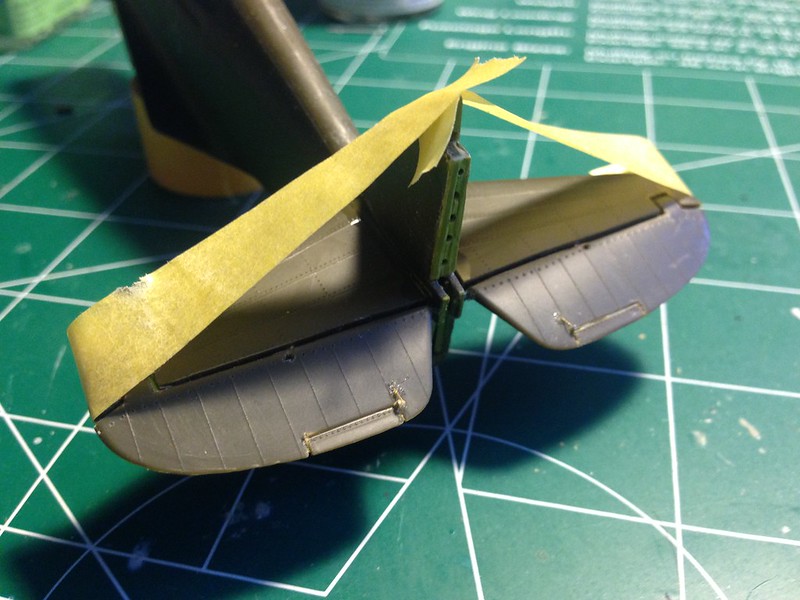
Taped to insure their fit.  The locating pins do some good at securing the stabilators onto the fuselage.  My first time around with this I believe I sanded these off by mistake.  I found a much tighter fit this time around.  Still, not taking any chances...I taped them up to keep them where they belong while the CA and Tamiya Extra Thin Cement set up.

Viola! 
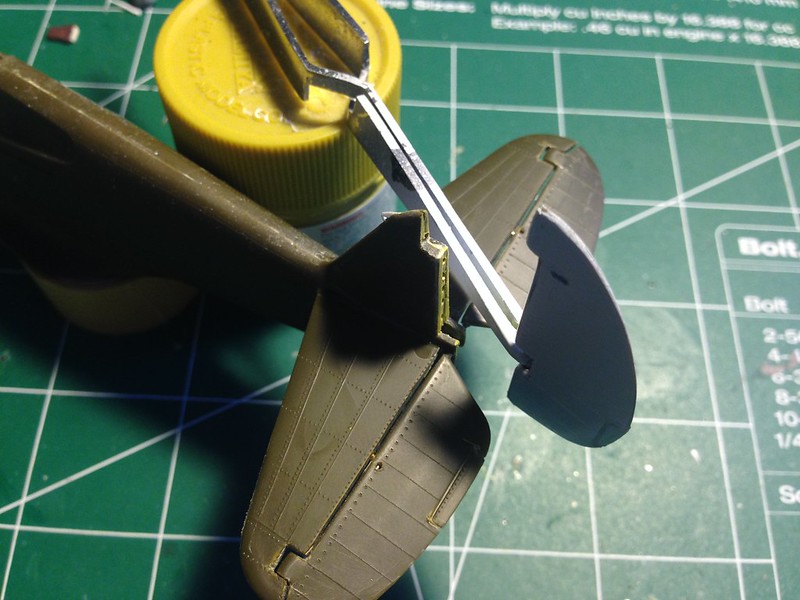
 Untitled by brittvallot, on Flickr

Back to the Rudder Horn:
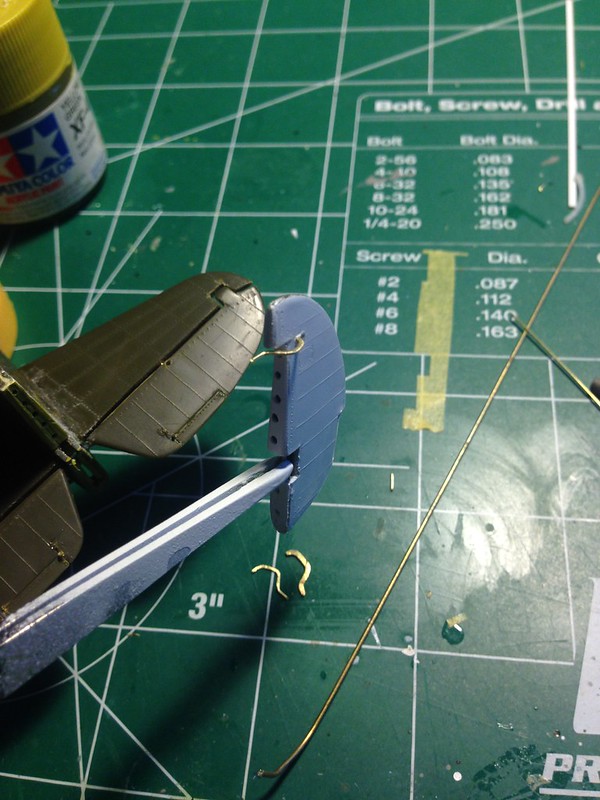
 Untitled by brittvallot, on Flickr

 Untitled by brittvallot, on Flickr
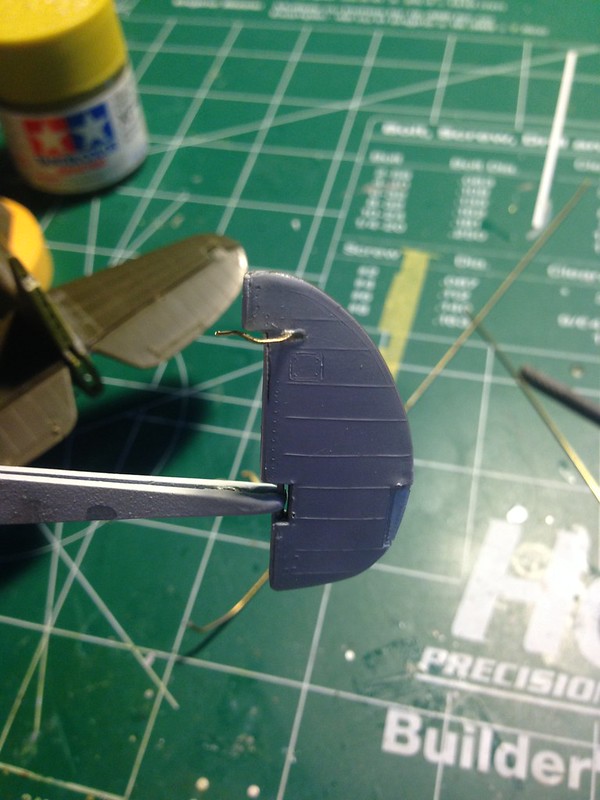
Take your time fitting this to the tail.  A small hole is necessary to drill into your plasticard patch up.  Double check your dry fitting before committing.

That's that for now.  I realize I've glossed over quite a lot for some.  If you have any questions about a specific step, please don't hesitate to ask or PM me about it.

=]

On the bench:  

Tamiya F4U-1  Kenneth Walsh


  • Member since
    June 2013
Posted by bvallot on Tuesday, November 18, 2014 8:37 PM

Thanks Joe!  I was inspired by you to give that part a go. =]

On the bench:  

Tamiya F4U-1  Kenneth Walsh


  • Member since
    November 2003
  • From: State of Mississippi. State motto: Virtute et armis (By valor and arms)
Posted by mississippivol on Tuesday, November 18, 2014 8:45 PM

At it again, eh?!

  • Member since
    June 2013
Posted by bvallot on Tuesday, November 18, 2014 10:37 PM

Yeaaaah.  What can I say...I'm a glutton for punishment.  I mean...I'm Catholic.  So, there's that.  =]

On the bench:  

Tamiya F4U-1  Kenneth Walsh


  • Member since
    February 2012
  • From: Olmsted Township, Ohio
Posted by lawdog114 on Wednesday, November 19, 2014 12:53 AM

bvallot

Yeaaaah.  What can I say...I'm a glutton for punishment. 

Thats what I was going to ask you....LOL.  Two portions of Monogram P-40's...ouch!  That aside.....looks great so far.  Starfighter makes beautiful decals for Taylor and Welch's planes should you be going that route. I have a Trumpy kit in the stash that will get my left over Taylor markings eventually. 

Joe    

 "Can you fly this plane and land it?...Surely you can't be serious....I am serious, and don't call me Shirley"


  • Member since
    August 2013
Posted by Jay Jay on Wednesday, November 19, 2014 10:14 AM

many thanks for posting this WIP.   I just happen to be building the 1/48 Academy kit right now and am at the right stage to do the tail work you so generously shared.  Wish me luck, lol


 I'm finally retired. Now time I got, money I don't.

  • Member since
    August 2013
Posted by Jay Jay on Wednesday, November 19, 2014 10:17 AM

My Academy kit came with a resin office in an unmarked little plastic bag,  and thanks to your post, I now know that it is a True details set because it's identical to yours in the pics


 I'm finally retired. Now time I got, money I don't.

  • Member since
    September 2006
  • From: Bethlehem PA
Posted by the Baron on Wednesday, November 19, 2014 11:45 AM

Excellent scratching!  I'm hoping to remember these lessons.  And it's nice to see you giving so much care to this kit, it's one of my favorites and a classic.

The bigger the government, the smaller the citizen.


  • Member since
    February 2003
  • From: Cameron, Texas
Posted by Texgunner on Wednesday, November 19, 2014 1:22 PM

Britt, that is some killer scratch-building!   That's going to be a great P-40 when you're done with it.  Twenty-two or three years ago, I built the same kit.  It was basically OOB, with just a few added details.  Here's a link to my "Flying Tiger".Big Smile

http://cs.finescale.com/fsm/modeling_subjects/f/2/t/143417.aspx?sort=ASC&pi240=1

Gary


"All you mugs need to get busy building, and post pics!"

  • Member since
    June 2013
Posted by bvallot on Wednesday, November 19, 2014 6:31 PM

Thanks everyone.

Jay, I'm glad it's of some use to you.  I've been away from the forum for awhile now since work has me tied up.  I just saw your mention of the Academy Hawk.  If you're interested, you can look at the previous post I did on the AVG Flying Tigers Hawk I just finished.  In it I've outlined a lot of what you'll see here only I got a little sidetracked on putting an engine in it as well.  It's also a little weathering/color heavy on painting it accurately.  But thumb through it and you might find some parts I haven't gotten to on here yet if you're getting passed where I am currently.

http://cs.finescale.com/fsm/modeling_subjects/f/2/t/158668.aspx

On this post, I want to tackle a pretty straight forward build while improving some of the kits drawbacks.  So I'll touch on some more moderate fixes (i.e. the tail section, air intake, landing gear, flaps) and some little things as well like you've seen above. 

I'll likely have some more up by the weekend.  =]

On the bench:  

Tamiya F4U-1  Kenneth Walsh


  • Member since
    June 2013
Posted by bvallot on Wednesday, November 19, 2014 6:41 PM

lawdog114

bvallot

Yeaaaah.  What can I say...I'm a glutton for punishment. 

Starfighter makes beautiful decals for Taylor and Welch's planes should you be going that route.

Joe    

That's good to know.  I may be painting some of this on, but I'll definitely look into it.  I'll likely be doing Lt. Taylor's plane as you've already done Welch's.  I'm actually looking forward to finally jumping on my Dauntless after this.  I've still never come up with John J Powers' BuNo or a photo of the plane.  =/  Might just have to take some artistic license....

On the bench:  

Tamiya F4U-1  Kenneth Walsh


  • Member since
    August 2013
Posted by Jay Jay on Thursday, November 20, 2014 9:10 AM

^Thanks BV....no I'm not passed this point,I just cut out the controls surfaces last night and am working up the courage to attempt the scratch stuff in your posts.


 I'm finally retired. Now time I got, money I don't.

  • Member since
    June 2013
Posted by bvallot on Thursday, November 20, 2014 5:26 PM

Don't worry.  Just keep it simple.  This scale is just small enough that for this plane it shouldn't cause you too much headache.  For the trim tab controls, just cut one piece for the tab that would "move" the trim.  Make a little notch for it to rest.  It's sturdier and part of it will be hidden and appear as two.  Less glue, less mess, less fuss.  Think Egyptian sculpture (sturdy-lasting) vs. France's Eiffel Tower (many joints).  Poke a small hole for the actuator rod that goes to the tab (it just has to be deep enough for it to set into) and place a small drop of CA on it...and with some fine tipped tweezers drop it in place.  That's all it takes.

=]

I need to go back and edit some of the above.  There are a few things I can clean up to better explain some of what's going on here.

On the bench:  

Tamiya F4U-1  Kenneth Walsh


  • Member since
    June 2013
Posted by bvallot on Friday, November 21, 2014 5:44 PM

Moving along... I'm looking to hurry up and close this cockpit so that when I putty up everything I can just do it all at once. One thing I needed to address is the area behind the exhaust stacks.  I plan to replace the kit parts with the MUCH nicer Ultracast exhausts.  I even took a tiny drill to deepen those holes in the resin exhausts a bit more though it really isn't needed at all.  (Just something I did while I was waiting for primer to dry.) What I planned to do was going to be a bit more complicated than what was needed.  In the end, I borrowed the idea from Revell and used their locating holes on the fuselage for the pins from the kit exhausts to size up my own scratch built part to mount it onto.  I didn't want any gap between the exhaust to reveal an empty, engine-less interior, so I made my part stretch enough to cover the opening as seen below.

 Untitled by brittvallot, on Flickr

To make the holes for the brass rod parts I cut, I used the kit exhausts to measure.  =]  Simple. This was primed and painted Tamiya Black [X-1] to resemble the color of the engine block they come off of.

The front end to this cowl will receive the prop...which I have a special trick that will come shortly...but the original kit parts define an intake that leaves one desiring a little more.  I drilled these holes out, sanded them down appropriately and built up the scoops from some thin brass sheet.  A larger plastic tube is cut to make an end that will help 1. hold your scoop in place and keep it as a circle and 2. allow another flat surface to place whatever mesh you're looking to put in place of the kit part.  This takes some trimming and bending to get the front shape to match the intake, but it isn't too difficult.  Just don't overwork it.  If your piece is getting too troublesome...just start over.  It'll be worth it. =] 

 Untitled by brittvallot, on Flickr

The grill you see came from a very old Eduard PE set for this particular P-40.  I found it on Ebay without a better description and was just going to modify it to fit one way or the other, but learned that it was for Revell.  It doesn't appear that they still make this set.  so....womp, womp.  But you can get creative and use just about anything here for this part.

I left the middle bottom scoop I left stick out just a bit further for a more practical purpose.  I could have sanded all the plastic tube ends flush so that they fit snugly together, but I was in a bit of a rush when working on it.  It's just long enough to keep the scoops from bumping into themselves.  I cut out a plastic piece to make up the mesh backing using shallow cuts into the plastic.  Worked out pretty well too! =]  Primed and painted with Tamiya Flat Aluminum [XF-16], clear coated, and dressed up with The Detailer--Black for some contrast, and sealed with Alclad's Flat coat.  It was set on the middle scoop with CA.  Synch!

 Untitled by brittvallot, on Flickr

Here's what I'll be fixing up with the Milliput later.  Not too bad... =/

 Untitled by brittvallot, on Flickr

This @ssho!e here:

 by brittvallot, on Flickr

They can't even spell their own country right...good grief....although I'm sure it's more the faulty mold... 

One thing I meant to mention earlier before closing too much of the fuselage up: 

 Untitled by brittvallot, on Flickr

This will better secure your radio aerials.  Cutting out a small triangular piece such as this one (something thin) and sneaking it inside the tail works better early on.  I did it when I was building up this area...somewhere just before scratching the framework for the tail.  A little Extra Thin Cement and it fits right in.  Drill your hole first before installation. =]

On the bench:  

Tamiya F4U-1  Kenneth Walsh


  • Member since
    June 2013
Posted by bvallot on Tuesday, December 2, 2014 1:31 PM

Back for another installment.

This one will be brief as I've been on the road traveling for work and I haven't gotten as far as I'd like with this.  So...picking it up back from the kit part that represents the front cowl for the prop... I cut two pieces of aluminum tube to make up the parts to fit onto the propeller.  I believe they were 1/8 in and 3/32 in, but I will have to go back and double check. (I'll edit this later once I've confirmed it as I'm not at my work bench.) For some reason there wasn't a piece in the kit for this.  It didn't bother me none anyhow since I was going to make my own. 

 Untitled by brittvallot, on Flickr

With a tube cutter (great tool to have), I cut the two lengths of tube and placed them as you see in the photo above.  One on the prop and one to receive it on the other side of the kit part where the prop reduction box would appear.  These were held in place with CA. On the inside part of the front cowl, I did need to sand the inside of the hole to widen it for the larger tube.  Nothing substantial.  Now I have a smoothly spinning prop blade! 

Now while I'm right here, I want to elaborate on the kit propeller.  Something I don't recall noticing on the Flying Tiger build, but I'm seeing here is the flat surface of the blade on the posterior side.  My first thoughts initially were to look into AM parts that could replace virtually the whole assembly, but then I got to thinking how I could modify the blades.  What I first thought up was just too complicated to even bother with sharing...but eventually I did come back to just keeping it simple.

So here I've lightly sanded the sides and back surface to round off all these flat edges while maintaining the correct shape of the blades.  A little patience goes a long way with this especially around the base where it's thin and weak.  The part to focus on to really make this pop is down by the base.  Getting a nice, rounded oval shape here will help this old kit part out tremendously.  One other thing is to carve a small recess into the spinner around the base of the prop blade and to carve a small gap on the right side of where the propeller matches up to its backing.  I don't have a picture of this currently, but I will update it as soon as I do. This helps to create the illusion that there is a hole here where the propeller blade attaches.  A little dark wash in there and you'll be golden. =]

 Untitled by brittvallot, on Flickr

The blade being held by the tweezers in the top left hand side of the photo is the unchanged flat blade.  The others have been worked over.

 Untitled by brittvallot, on Flickr

Here's a closer look.

Next, I moved my attention to the landing gear well.  This area of the kit needs a lot of love.  A lot.  So break out your stash of plastic sheets and such! =]  To start I've closed off this top area and cut it to fit the gaps of the kit part for the lower wings.  The holes that accept the landing gear folding mechanism were first drilled out and then cut into shape. Rosie the Riveter was brought in to apply some rivets to the top of this piece which allow them to protrude underneath to appear more like actual rivets.  A little Tamiya Extra Thin Cement and this piece gets secured into place. 

 Untitled by brittvallot, on Flickr

Don't worry about the gaps at the top.  This will all be covered by the fairing that fits over this part. That will come after the wings are fitted together. 

That's where I'll end it for now.  I have a few other things completed, but I'm waiting to conclude one last step before getting ahead of myself on this.

Comments and questions are welcomed.  =]

On the bench:  

Tamiya F4U-1  Kenneth Walsh


  • Member since
    December 2013
  • From: Greenville, TX.
Posted by Raymond G on Tuesday, December 2, 2014 8:12 PM

Looking great Britt.  I'll be using this as a guide in a few months...  Raymond

On the Bench:

U.S.S. Arizona (Revell)

P-51D Tribute (Revell)

57 Chevy Bel Air


  • Member since
    February 2012
  • From: Olmsted Township, Ohio
Posted by lawdog114 on Wednesday, December 3, 2014 4:02 AM

Coming along nice.  I like the way your dealing with the gear by issues.  I'll have to remember that should I ever have a hand at this kit.  You should make a pattern for that insert and save it for future use.

Joe

 "Can you fly this plane and land it?...Surely you can't be serious....I am serious, and don't call me Shirley"


  • Member since
    June 2014
Posted by BrandonK on Wednesday, December 3, 2014 9:09 AM

It's just amazing how much I learn about the various kit issues with these planes from you guys while you build up these beautiful builds. Makes me look like a genius to my wife when I point them out and then attempt to correct them. Amazing work. 

On the bench:

A lot !! And I mean A LOT!!

2024 Kits on deck / in process / completed   

                         14 / 5 / 2  

                              Tongue Tied

  • Member since
    June 2013
Posted by bvallot on Wednesday, December 3, 2014 2:30 PM

Thanks guys.  I look forward to seeing what you come up with Ray. =]  Brandon, I do the same thing with my wife except she usually just nods and smiles at me... =] That's about the most I get from her.  At least it's a warm smile lol.

Joe, I'm already ahead of you there. I figured I might one day be revisiting this kit again and if I do, I certainly want to speed through some of this BS right here.  So I started making patterns on a sheet of paper that I can transfer to plastic sheet when the time comes.  I just mark off an area, tack the piece down with a little tape, and quickly blast it with some Tamiya Flat Black.  Presto! It leaves the actual shape and not the negative space of it.  I hope to save quite a bit of time with having all that saved and put away.  =]

On the bench:  

Tamiya F4U-1  Kenneth Walsh


  • Member since
    June 2013
Posted by bvallot on Wednesday, December 3, 2014 4:13 PM

Okay!  Lots to show here.  Finally! 

I finally got this pieced together here in order to move on with some sort of continuity. =]  This next part shows the outboard ribbing for the wheel well of the landing gear.  You'll note the cut-away that includes the space for the tire.  If you feel like skipping that part, I suppose you could since most of this will be largely unseen.  But if you're anything like me...it just has to be there.  I carefully cut out a section of the plastic and used to cut out to make as a guide for cutting the actual piece I'll be using.  It'll need to be a little bigger since we're curving and bending it.  For more help why just ask Euclid. ;)  Once I completed this part, I used this piece as a template and cut a second one for the other wing. (I'll continue to do this for all parts with two of something.)  Once this is glued in place [Tamiya EThin Cement], I laid out two strips of tape across parallel to each other to set up the opposite hub on the fuselage adjoining part. In the picture you can see where I temporarily glued a strip of plastic to know exactly where that fuselage part was going to line up with the lower portion of the wing. This will get covered so it's no worry. 

 Untitled by brittvallot, on Flickr

Once I've lined up my marks on the fuselage parts, I make my cuts to remove the space for the wheel just like before.  A somewhat larger piece is required here since there is a gap underneath where the fuselage will join with the wing.  So this part just needs to be left taller....sand to fit once it's all done.  =]  We'll fix the gap next. You may also notice a similar curved section missing on your wing join on the fuselage part just behind what was just modified.  It may be meant as the wheel hub or could just be the by product of some mold...in any case it will not be seen so it's of no consequence.

 Untitled by brittvallot, on Flickr

The next part that makes up the back of the gear bay and joins the ribbing...it gets a little tricky.  When cutting the side that is inboard and matching up to the fuselage, you'll have to cut it at an angle to accommodate the wing dihedral otherwise this part will be bunched up and block you from effectively creating it.  I'll let the reader decide how precise he or she wants to go about finding it, but if you use the picture below as a guide you'll be in the right neighborhood. ;) Each kit will be a little different as some of us are finding out and you'll need to cut yours specific to "your" model.  A little sanding here and there and it'll be fine. =]

 Untitled by brittvallot, on Flickr

 Untitled by brittvallot, on Flickr

Here you can see everything closed up and begin to imagine what it'll all look like once completed.  The inboard scratched piece I have placed just behind the fuselage part.  I plan to putty this gap later.  If you're inclined to try to measure out the length and the slope it sits at to make this one seamless piece on its own...by all means. =]  I don't think it's worth the time or effort.  My answer is:  It's not a real plane that I will climb into and fly...so...putty.  =]

Below is the difference with and without the fuselage present.

 Untitled by brittvallot, on Flickr

That about takes care of gear bay for now.  All the cables and hoses and what not will come shortly before closing this up.  Before moving onto the upper wing, I began to dress up the landing gear itself since I'll be posing this one on the ground for a change.  I first sanded down the slight seam that appears and removed the poor attempt at the arm that brings it up into the bay.  I've elected to place the brake line in now so I can attach the little retaining clips and have them primed and painted all in one step and not bother with making a mistake painting them later.  Also, I wanted to dress up the joint of the torque scissors. I drilled a hole with the smallest drill bit for my pin vise set and passed some Albion tube through it.  Found the length I wanted and pulled it out to make my cuts with my exacto blade.  A tip on cutting these: push your blade across it a little at a time and rotate the tube.  This will help prevent you from pinching the ends down. Took my length of tube and CAed it into place carefully.  A few strips of Tamiya tape and some primer and I'm on my way to making a more believable landing gear. =D

 Untitled by brittvallot, on Flickr

It seems that there is some variation in the P-36/P-40 family of landing gear.  I went with this scheme as it's the one I saw most.  The nubs on the bottom that are opposite of where the wheel inserts are cut off and drilled out.  An eyelet clip will replace them.  I'll find a photo to put up to help you picture this.

That's that for now.  Next up will be the upper surface of the gear bay and the gear bay doors. =]

Comments and questions guys...just ask. 

On the bench:  

Tamiya F4U-1  Kenneth Walsh


  • Member since
    September 2006
  • From: Bethlehem PA
Posted by the Baron on Thursday, December 4, 2014 11:52 AM

Your detailing is outstanding!

Do you find that the front edge of the fuselage doesn't quite fit to the nose piece, that is, it could use a spacer to push the sides out and make the join more flush?

The bigger the government, the smaller the citizen.


  • Member since
    June 2013
Posted by bvallot on Thursday, December 4, 2014 1:47 PM

Well Baron, this is the second one I've done.  The first one didn't really give me any problems. This time around I do seem to think the bottom portion needs a little attention to keep it flush with the fuselage.  From what I'm hearing around the forum, it sounds as if this particular kit is being reproduced somewhat haphazardly.  I've already had a lot more flash and such on this kit as opposed to the first one.

I think it's still the best suited for the job for now, but it's definitely going to take some measure of scratch-building skills to do her justice. I think any modeler with a grasp of the bare necessities can take it on though.  As far as the kit part goes, I'm going take a play out of your book to deal with it.  Any gap or step that pokes its ugly head out is going to have to contend with the Milliput.  =]  In fact, the entire cowling area is getting a bath in that stuff.  It is certainly a miracle worker!! =]    

And thank you for suggesting it.

On the bench:  

Tamiya F4U-1  Kenneth Walsh


  • Member since
    September 2011
Posted by fightnjoe on Thursday, December 4, 2014 2:28 PM

Looks very very good with every update.  I may need to pull one of these out again and have some fun.  

Joe

Veterans,

Thank You For Your Sacrifices,

Never To Be Forgotten

Where you can find me:

Workbench on FaceBook  Google Plus  YouTube

  • Member since
    June 2013
Posted by bvallot on Monday, December 8, 2014 6:40 PM

Thanks Joe.  I'd love to see what you could do with one of these.  The closer I look at some of the subtleties, the more I realize how well they nailed this kit from 40 years ago.  Of course the obvious hang ups speak for themselves, but every now and then I see something that just wouldn't likely be present on a kit from the last 10 years.

Quick update:

Here I have ribbing present on the upper portion of the wings on the interior.  To save on material and time, I opted to just build what will be seen.  This also saves on something going wrong later and finding that parts will not fit anymore like they were supposed to.

To identify precisely where this would appear on the upper surface, I placed both wings together and lightly traced along the edges of the box I've built up...measured out my lengths of brass L strips (approximately 5/8 in.  this will vary some based on the dimensions of your box) and CAed them into place.

 Untitled by brittvallot, on Flickr

Be sure to keep the inboard side matching up with the fuselage flush with the edge of the wing.  This will jam up against the fuselage otherwise.  You could drill holes into the side of the fuselage at the wing root to match up with....but don't do that to yourself.  This kit is troublesome enough!! =]

Next, I took care of the landing light.  To keep things simple, I left it up in the wing.  One thing I did different from before is I placed a plastic ring around the hole I've drilled to designate the border of the housing for the lamp.  It's the same plastic tube used to fashion the intakes (I believe it's about 1/4 in.)  This was primed and painted Tamiya Flat Aluminum [XF-16].  the .5 mm Albion tube was used as the bulb unit and three tiny brass rods ( 0.10 mm I believe) were used as the arms to hold it in place. CA to put this together ...very carefully I might add.  This was matched up to the hole and glued in place with Tamiya Extra Thin Cement [Tamiya ETC].  The reflective housing was from thin Brass sheet.  I cut a tiny square of it and made a small cut on one side and tucked the sides together making the curved dome shape. CA to glue it.  The square shape was matched to the wing underside area and it was here that I made use of the kit's wing internal rib for strength to hold my brass sheet in place.  I made two quick notches into the rib and cut them away leaving just enough gap for my sheet to fit into.  Voila! =]

 Untitled by brittvallot, on Flickr

 by brittvallot, on Flickr

Detail of Landing Light

 Untitled by brittvallot, on Flickr

I'll have a better view once this entire wing is complete.  It's sort of difficult to view it like this for now.  This is by far the best I've done for representing the reflective quality of the lamp housing and all without paint.  A clear acetate circle will be cut and used as the lens cover once everything is wrapped up.

That's it for now.  Next up will be mating the wings to the fuselage and building the flaps.

On the bench:  

Tamiya F4U-1  Kenneth Walsh


  • Member since
    February 2012
  • From: Olmsted Township, Ohio
Posted by lawdog114 on Thursday, December 11, 2014 12:05 AM

Killer work so far.  Your scratchbuilding is top notch.  I love what you did with those gear bays.  

Joe

 "Can you fly this plane and land it?...Surely you can't be serious....I am serious, and don't call me Shirley"


  • Member since
    September 2006
  • From: Bethlehem PA
Posted by the Baron on Thursday, December 11, 2014 11:51 AM

Holy crap!  

The bigger the government, the smaller the citizen.


  • Member since
    June 2014
Posted by BrandonK on Thursday, December 11, 2014 3:49 PM

I learn something new everytime you do another kit. Very nicely done indeed!!

On the bench:

A lot !! And I mean A LOT!!

2024 Kits on deck / in process / completed   

                         14 / 5 / 2  

                              Tongue Tied

  • Member since
    September 2011
Posted by fightnjoe on Thursday, December 11, 2014 4:12 PM

Really like how you did the light.  Gonna have to give that a try.

Joe

Veterans,

Thank You For Your Sacrifices,

Never To Be Forgotten

Where you can find me:

Workbench on FaceBook  Google Plus  YouTube

JOIN OUR COMMUNITY!

Our community is FREE to join. To participate you must either login or register for an account.

SEARCH FORUMS
FREE NEWSLETTER
By signing up you may also receive reader surveys and occasional special offers. We do not sell, rent or trade our email lists. View our Privacy Policy.