SEARCH FINESCALE.COM

Enter keywords or a search phrase below:

The OFFICIAL Panzer III and Its Variants GB

298247 views
2308 replies
1 rating 2 rating 3 rating 4 rating 5 rating
  • Member since
    March 2006
  • From: Right Side of a Left State
Posted by Shellback on Thursday, August 18, 2011 9:02 PM

Good looking weathering on the lower hull and running gear Rob . Yes

  • Member since
    March 2006
  • From: Right Side of a Left State
Posted by Shellback on Friday, August 19, 2011 8:00 PM

I was here ............................

  • Member since
    October 2009
Posted by PANZERWAFFE on Friday, August 19, 2011 8:24 PM

and now......................

Rob

  • Member since
    February 2003
  • From: Allentown, PA
Posted by BaBill212 on Friday, August 19, 2011 8:31 PM

,,,,,,,,,,,,,,    yes?  ,,,,,,,,,,,,,,,,

Enjoy the ride!


  • Member since
    April 2009
  • From: Carmel, IN
Posted by deafpanzer on Friday, August 19, 2011 8:32 PM

PANZERWAFFE

and now......................

Ditto Beer

Andy

  • Member since
    March 2006
  • From: Right Side of a Left State
Posted by Shellback on Friday, August 19, 2011 11:04 PM

here again .....................Hmm

  • Member since
    February 2003
  • From: Allentown, PA
Posted by BaBill212 on Saturday, August 20, 2011 4:11 AM

((( good one )))

Enjoy the ride!


  • Member since
    September 2009
  • From: Rugby, England
Posted by Hinksy on Saturday, August 20, 2011 10:32 AM

Hi guys!

It's been a long old week at work so it's nice to get back on here! Yes

As you know I've finished my first entry, the SIG 33, so I thought I'd get stuck straight into my next build which I've been looking forward to for ages:

My first completed Pz III GB entry - the SIG 33 from Cyber-Hobby (a great kit)!

Here's my second entry - Tamiya's relatively new Panzer III Ausf. N:

http://i806.photobucket.com/albums/yy343/Hinksy1/GBPzIII160711003.jpg 

I decided on the 'N' as I love the stumpy little 75mm KwK barrel and being a newer kit it's well detailed and comes with a metal barrel (rifled) and PE for the intakes etc (see below photo):

http://i806.photobucket.com/albums/yy343/Hinksy1/GBPzIII160711002.jpg

Sprues: 

http://i806.photobucket.com/albums/yy343/Hinksy1/GBPzIII160711001.jpg

Onto the build itself:

I'm planning on building it mainly OOB but I will be using Friul tracks as the Tamiya ones are pretty basic to say the least. I always like to replace my barrels but obviously I don't have to with this kit and the PE is there too so that base is also covered - another reason why I chose this kit. I'll be adding extra detailing like wiring to the smoke candle holders and I'll be replacing the plastic grab handles with fine Brass rod. I may also scratch a Jerry Can Rack for the rear like in the *picture.

I couldn't decide on the Kursk 'Summer Scheme' which is a DY basecoat with randon Rotbraun and Olivgrun Stripes or the Leningrad 'Winter Scheme' which is a Panzer Grey basecoat with 'Blocks' of Flat White over the basecoat. See below photo and note the *rack at the rear: 

Photo taken from wbill's site (bpmodels)- I hope you don't mind bill. Photo for discussion purposes only:

http://www.bpmodels.net/Model/Album/phpBB2/viewtopic.php?t=49

- Leningrad, winter 1942-43

I've decided to go with the Leningrad scheme and I'm going to add Friul Winterketten Cool

wbill built this exact same Panzer but he built the Dragon offering with Magic Track Winterketten and has a great blog for me to follow on his site. His work also appeared in a magazine I have which again is the same Leningrad build but in print so I won't need to print his blog out! It looks tricky but I need to advance my work and never stand still, less step backwards - I want to push myself to see what I can really do!

My last build went very quickly - I'm going to really take my time with this one and get it perfect!

My first WIP update will follow very shortly Toast

Finally, my thanks to my very good friend Andy for hosting this GB which has proved to be absolutely brilliant! I love my Panzer III's and as most of my work is centred around the European theatre of war and the Eastern front it's perfect for me Toast

Many thanks guys,

Ben Cool

On the Bench - Dragon Pz. IV Ausf. G (L.A.H.) Yes

Your image is loading...


  • Member since
    February 2003
  • From: Allentown, PA
Posted by BaBill212 on Saturday, August 20, 2011 10:57 AM

Glad to see you Ben

Great looking kit too....      so many possibilities!           Will be looking for your WIP postings!


Bill

Enjoy the ride!


  • Member since
    March 2006
  • From: Right Side of a Left State
Posted by Shellback on Saturday, August 20, 2011 12:11 PM

Looks like a nice kit Ben . the winter camo will be cool . Are going to add the racks ?

  • Member since
    September 2009
  • From: Rugby, England
Posted by Hinksy on Saturday, August 20, 2011 12:48 PM

Shellback

Looks like a nice kit Ben . the winter camo will be cool . Are going to add the racks ?

Hey Shellback,

I've some Styrene card stock which is the perfect thickness for making a racking like the one seen on the Panzer that has gone through the ice in the photo so I'll have a good go - I've never done anything like that before so it should be fun!

I've found the code for the Winterketten Friuls that I need so they are sorted. I have a buddy here in England who has a little company called Armour Models so I'll go to him as he is cheap and always has stock so this is what I'll be using:

http://www.jbmodel.eu/product_info.php/products_id/887

It's a great kit. The inclusion of the Metal turned barrel is a bonus and the PE grilles are brilliant as most Tamiya kits like this don't have PE (as you no doubt know) and leave the intakes uncovered which just doesn't work for me!

Looking forward to this - lots of detailing to be added!

All the best,

Ben Toast

On the Bench - Dragon Pz. IV Ausf. G (L.A.H.) Yes

Your image is loading...


  • Member since
    March 2006
  • From: Right Side of a Left State
Posted by Shellback on Saturday, August 20, 2011 6:40 PM

Thanks for the link to your friends site . I'll look it over later and see what his shipping charges are here to the colonies .Beer

  • Member since
    September 2009
  • From: Rugby, England
Posted by Hinksy on Sunday, August 21, 2011 6:25 AM

Hi Carl,

Sorry to cause confusion - here is my friends site and very good it is too. Check it out:

http://www.armour-models.co.uk/

I just used the JB Models link to show the Winterkettens I'd be using.

ATVB

Ben Toast

On the Bench - Dragon Pz. IV Ausf. G (L.A.H.) Yes

Your image is loading...


  • Member since
    April 2009
  • From: Carmel, IN
Posted by deafpanzer on Sunday, August 21, 2011 9:16 AM

Ben- Can't wait to see how your Tamiya kit comes out.  According to Perth website, its another shake n bake kit unless you challenge yourself to scratch build the racks. That would be awesome!

http://www.perthmilitarymodelling.com/reviews/vehicles/tamiya/tam35290.html

I am surprised Tamiya is not offering indy tracks since this is relatively recent release unless they know serious modelers would rather to use aftermarket tracks to keep the pricing lower. 

I really dig this winter camo...

http://i716.photobucket.com/albums/ww164/earlofgrey/Color%20Profiles/Panzer%20III/pzIII_15.jpg

Be sure to send Bill a case of Beer... he would appreciate that. Big Smile

Andy

  • Member since
    September 2009
  • From: Rugby, England
Posted by Hinksy on Sunday, August 21, 2011 10:05 AM

Hey Andy,

Nice to hear from you buddy!

It's a shake n bake kit yes, but I'll be super detailing and using Friul Winterketten and will really be going all out on the stowage. I'm planning to really go to town on this i.e. maybe a base a figure and I'm giving myself all the time I need.

I've just been looking at other Pz III models and real deals for ideas on racks/stowage:

The below photos are for discussion purposes only - the models shown are not my work:

I love this build - wow!

I'm looking into making Wink something similar to the one above or with 'wooden' boards maybe?

Seeing as I've decided on the winter scheme I'm DEFINATELY using Winterketten. It looks like I will have to buy Friuls which are £28 posted here in the UK.

I'd happily use Magics but I reckon they will be tricky to come across but I'll ask about. 

I'm just doing some clean up today and getting the bits ready for a proper start tomorrow as I'm on holiday i.e. NO WORK! Cool

Bill has done a great blog and as his blog appears in a magazine I have too it's all there for me. I'm just going to be following his painting and washes on the grey and white sections - after that I'm going to try and make her a bit different to all the other Winter Scheme 'N's' that are about!

I'll start posting updates tomorrow as I'm sure you know what hull tubs and wheels look like when they are being cleaned up!

How are you getting on with your build now?

ATVB

Ben Toast

On the Bench - Dragon Pz. IV Ausf. G (L.A.H.) Yes

Your image is loading...


  • Member since
    March 2006
  • From: Right Side of a Left State
Posted by Shellback on Sunday, August 21, 2011 1:51 PM

Hinksy

Hi Carl,

Sorry to cause confusion - here is my friends site and very good it is too. Check it out:

http://www.armour-models.co.uk/

I just used the JB Models link to show the Winterkettens I'd be using.

ATVB

Ben Toast

Ok , thanks Ben . I saved both sites anyway so i can research both . Beer

  • Member since
    March 2006
  • From: Right Side of a Left State
Posted by Shellback on Sunday, August 21, 2011 3:39 PM

Update .

Finally spayed some color on the turret .

  • Member since
    August 2006
  • From: Cygnus X-1
Posted by ogrejohn on Sunday, August 21, 2011 5:30 PM

There sure is some dang fine work going on here! I guess it's time I jumped in with my Sturm 33. Not much to show at this point. Typical Pz III/IV start with cleaning up the wheels, return rollers, drive sprocket and idler. Got the suspension stuff on. I'm going to use some of the Eduard set, an Aber barrel and Friul Winterketten tracks. Yes, the box says Ostketten but they are actually Winterketten. Going with a panzer gray and might even try the hairspray whitewash. I've only done it once so we'll see what happens.

  • Member since
    February 2003
  • From: Allentown, PA
Posted by BaBill212 on Sunday, August 21, 2011 7:13 PM

Super looking turret Carl............    very nice!

Enjoy the ride!


  • Member since
    April 2009
  • From: Carmel, IN
Posted by deafpanzer on Sunday, August 21, 2011 7:29 PM

Ben- Those aftermarket racks you posted earlier didn't match the one you liked.  I would just scratch build one... it isn't that hard you'd be surprised if you try.  I dare you to make one! Big Smile  Just use one of those styrene rods... many hobby shops sell those.  I brought a set that comes in ten different sizes or so for only $5-6. 

Carl- Yes, it has paint now... its looking real good!  I really like the unpainted area showing the primer behind the skirt, are you planning that way?

John- You got lots of aftermarkets?!?!?! This is going to be fun to watch... remember I am only an hour and half drive away so just holler if you need my help.  Are you doing for the camo scheme shown on the box?

We couldn't have asked for better timing... Ben just finished his Sig 33 and John is going to build his now.


Andy

  • Member since
    March 2006
  • From: Right Side of a Left State
Posted by Shellback on Sunday, August 21, 2011 7:30 PM

John , i have that kit in my stash . I don't have the p.e. for it though .I'll see how yours builds up .Yes

Thanks Bill . i'm trying to let the red primer show through on this one . Will see how it looks later .Beer

  • Member since
    March 2006
  • From: Right Side of a Left State
Posted by Shellback on Sunday, August 21, 2011 7:34 PM

Andy , posting whilst i was i see Geeked. Yes , paint indeed ! Stick out tongue The primer , I'll see how i like it later .............Beer

  • Member since
    February 2003
  • From: Allentown, PA
Posted by BaBill212 on Sunday, August 21, 2011 7:57 PM

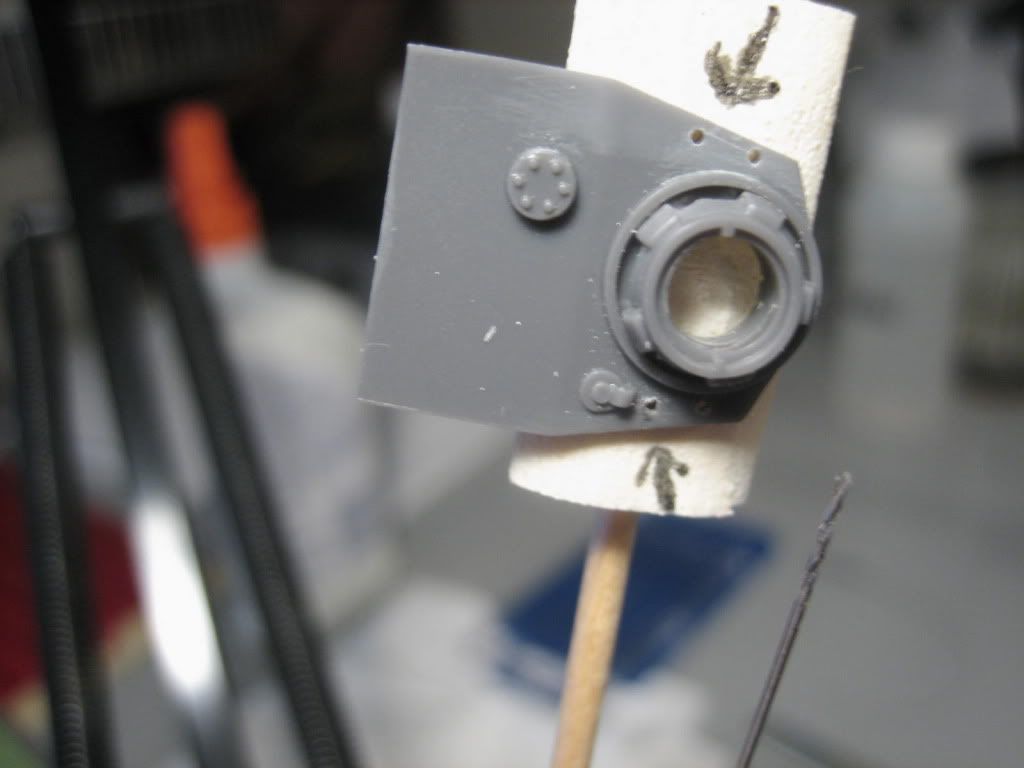
And speaking of turrets,,   here is an update on the micro pz III


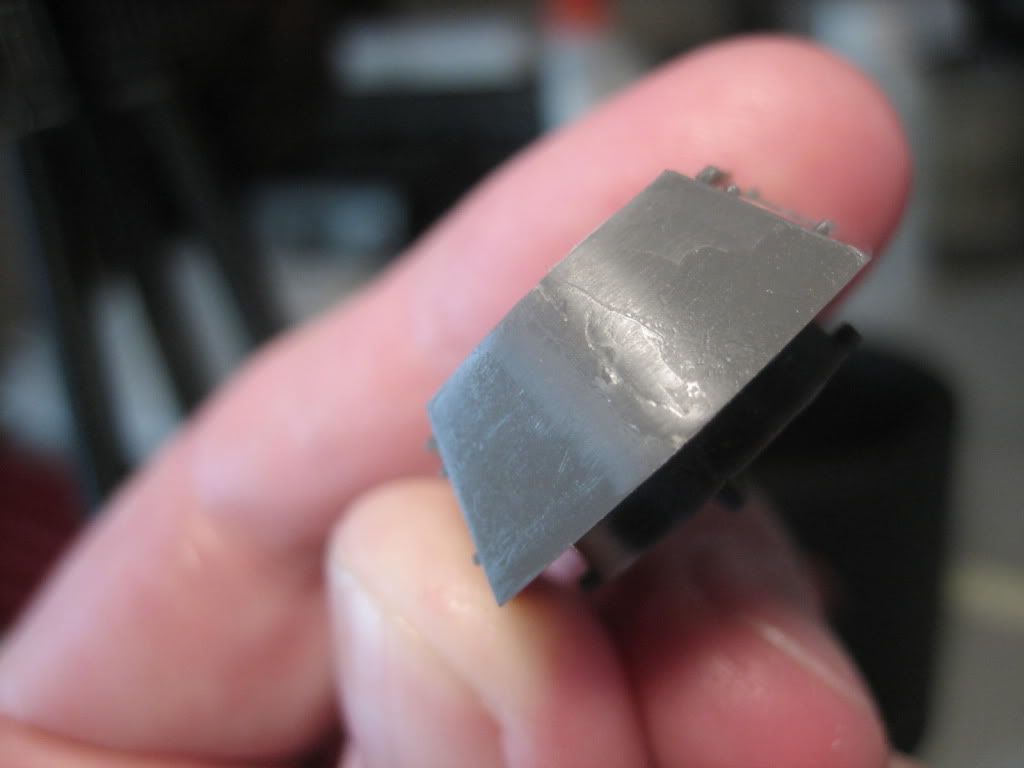
As you can see there is not an overabundance of detail,,,,  but I did find a piece that was lacking some essentials..

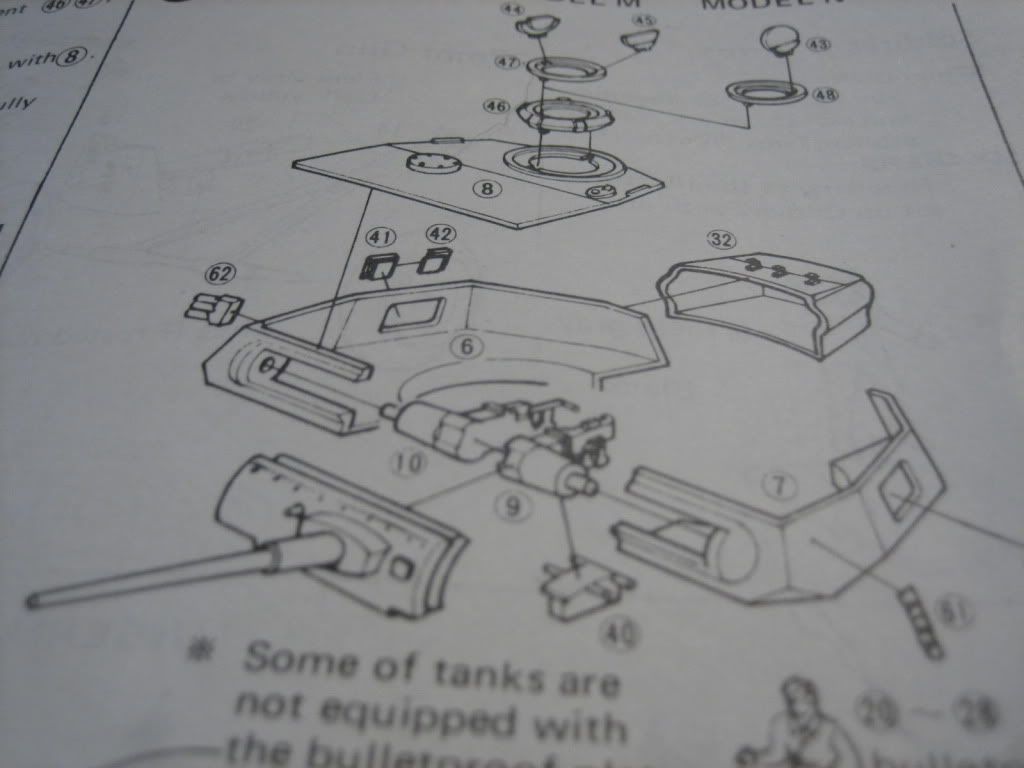
The entire upper left (right as it is viewed straight on) of the turret is missing,, a big mis-mold (son-of-a-*&#^!)

So, I found a piece of "L" stock in an appropriate size, measured, cut and glued into place.

A little sanding, putty, more sanding, super glue overcoat, more sanding, tweaking,, and it will be fine....

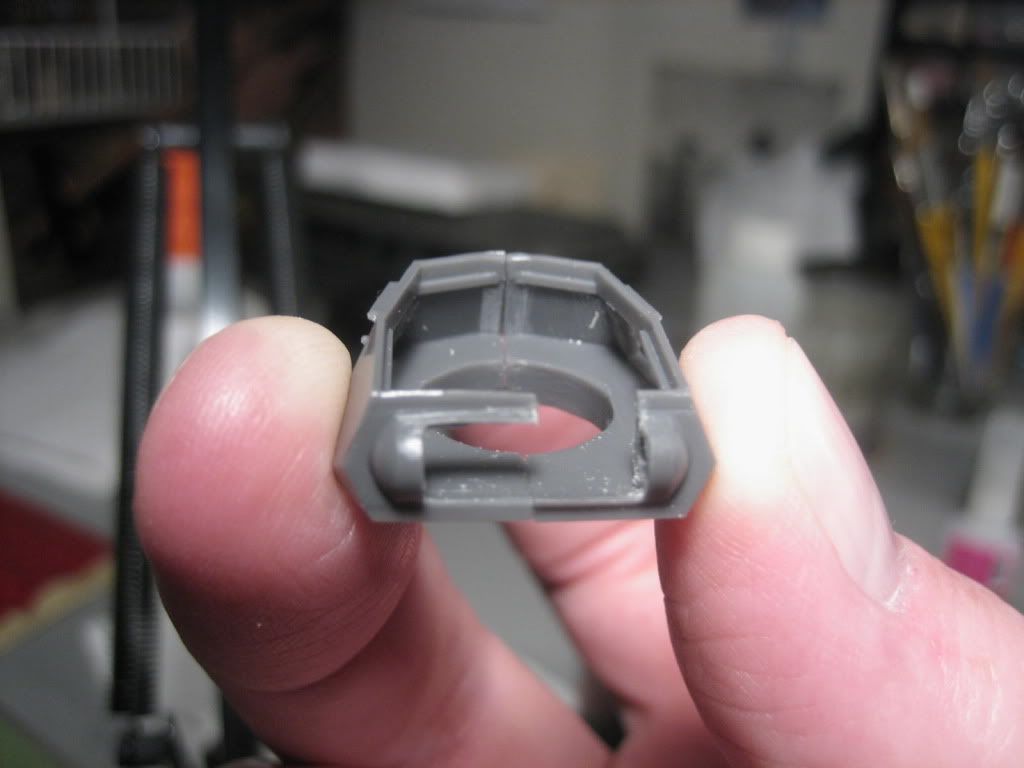
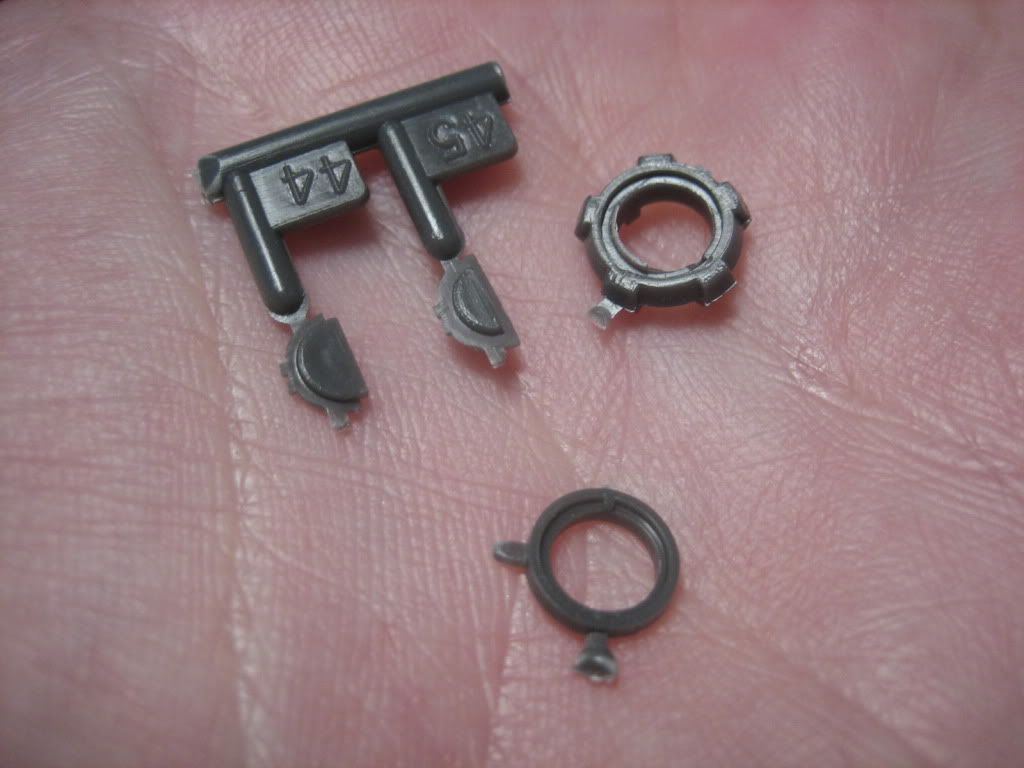
The butt end of the turret is in need of a little work too (still working on this)...

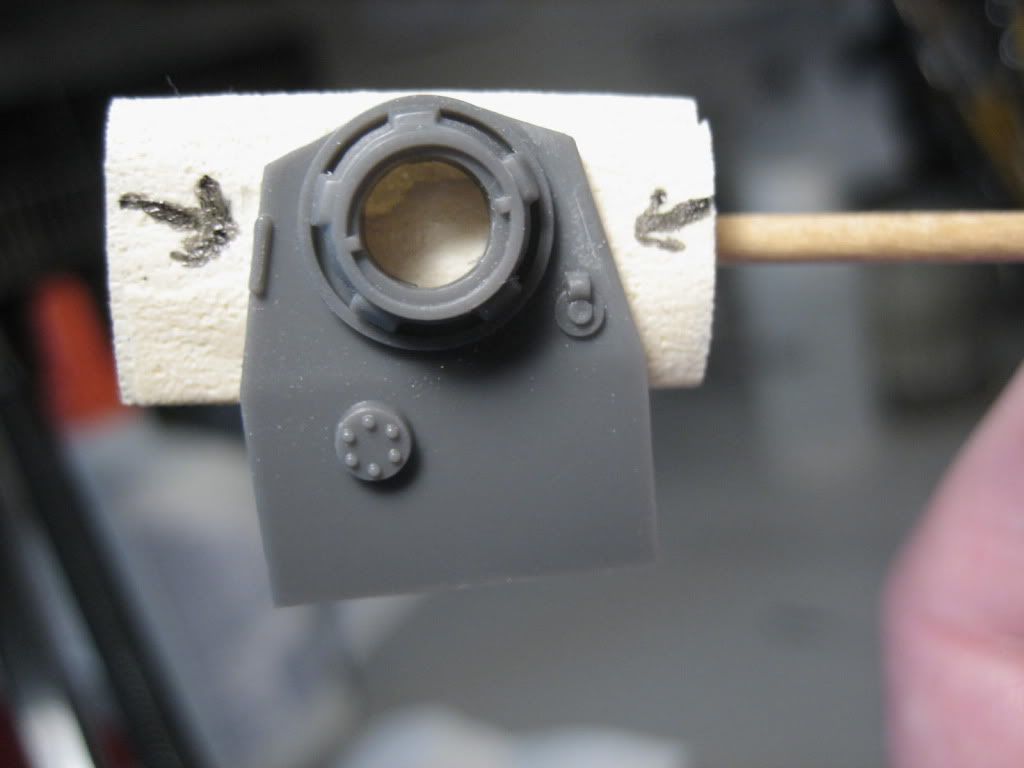
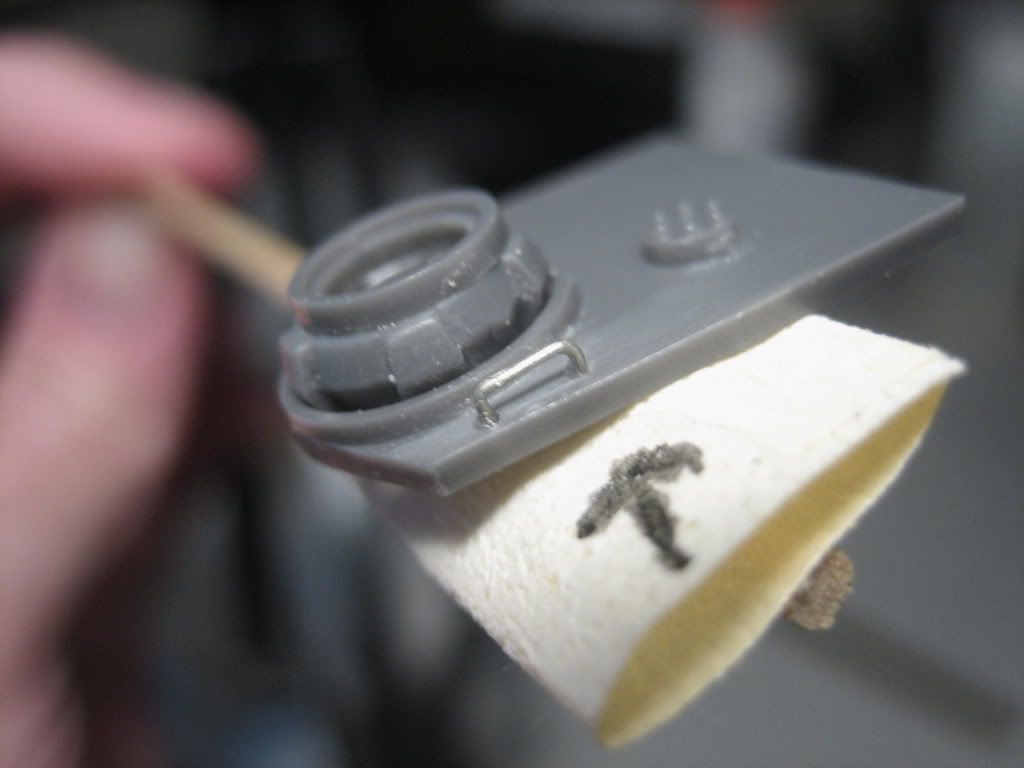
On to the top of the turret...     cupola details


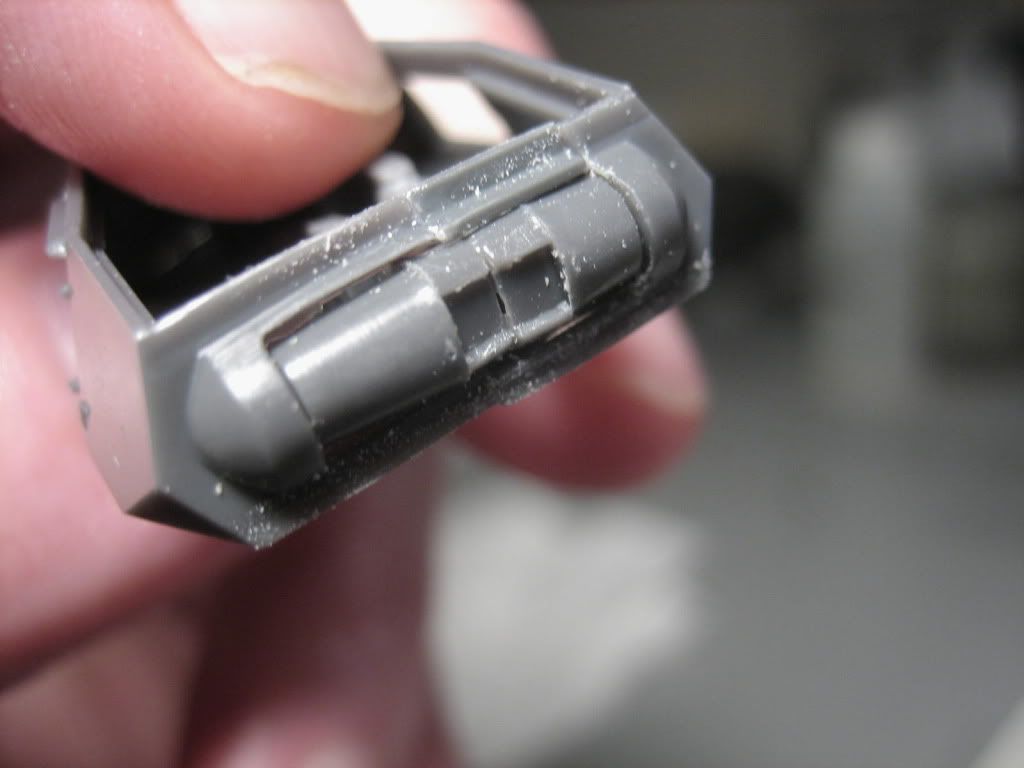
Cupola cleaned up put into place,, and now looking at the grab handles....  these have to go...  sand them off,,, carefully (not much room for mistakes)

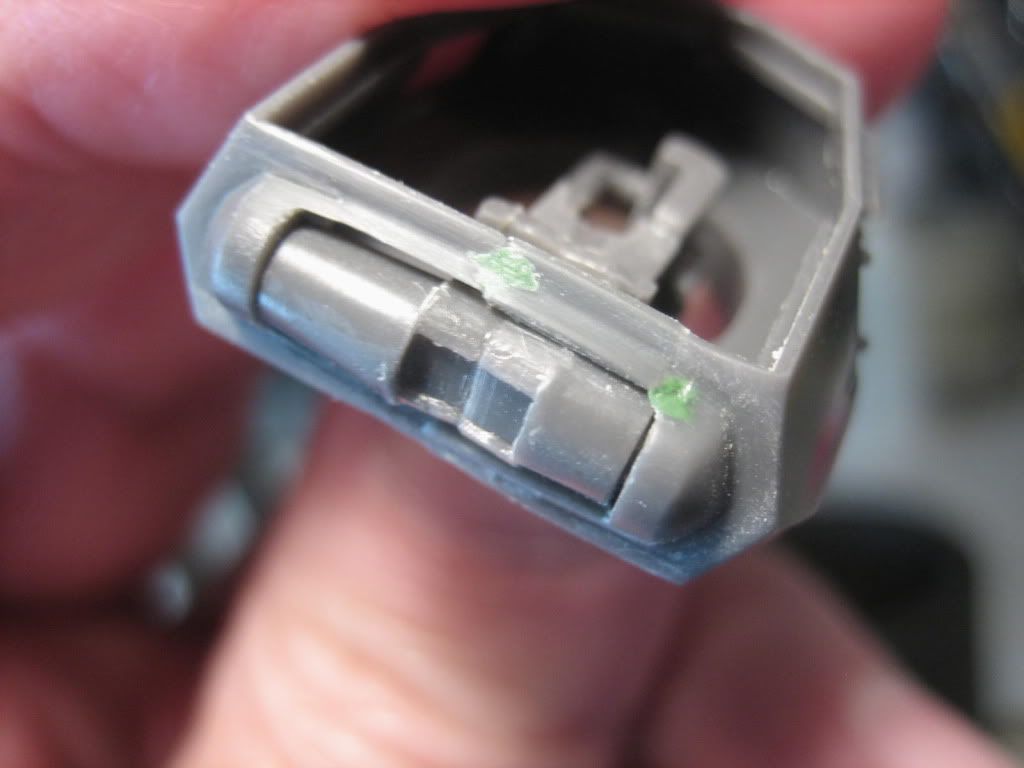
Measure up some to-scale wire....

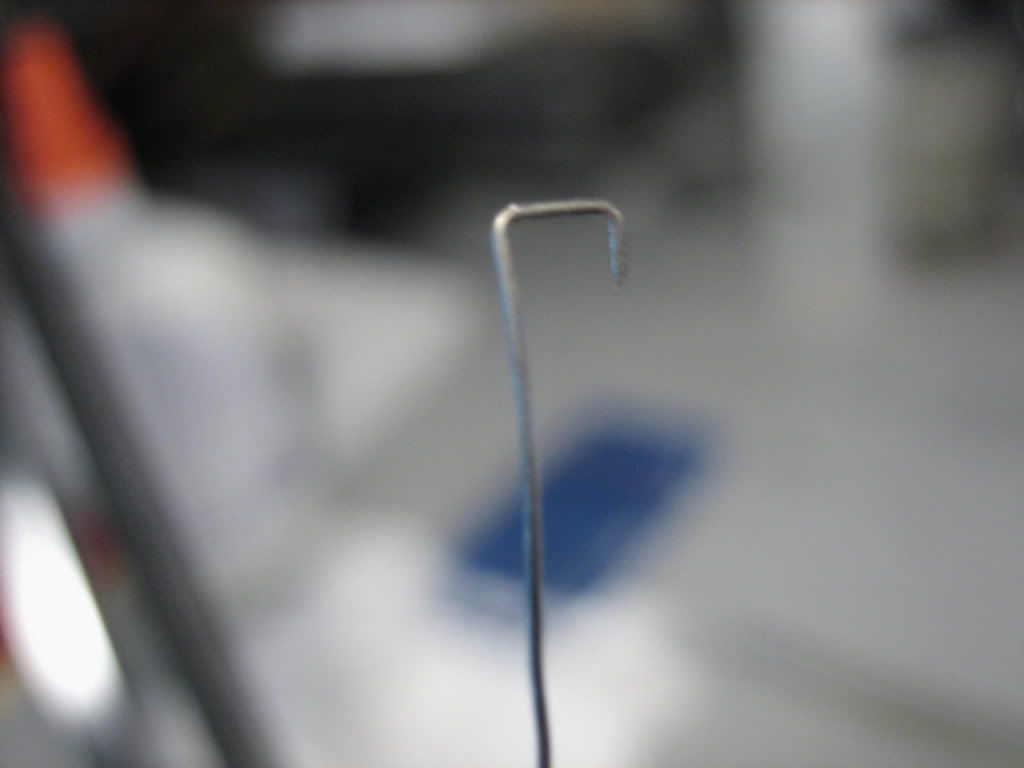
Drill the appropriate seating holes.....

Insert, glue and viola... new handles

..........   still plugging away on it. I am trying to keep the scratchbuilding to a minimum. There are just some things I can't let slide by.

Hope you like.....


Bill


Enjoy the ride!


  • Member since
    February 2003
  • From: Allentown, PA
Posted by BaBill212 on Sunday, August 21, 2011 8:06 PM

John,,, that is a bad looking boy there,,,  will be waiting to see the WIP pics....    


http://i117.photobucket.com/albums/o75/JShown/WIP%20models/Sig33.jpg

Enjoy the ride!


  • Member since
    April 2009
  • From: Carmel, IN
Posted by deafpanzer on Sunday, August 21, 2011 8:16 PM

Bill- Jeez, did I ever tell you my eyes and head hurts every time I look at your WIP?  Great save getting the turret fixed and the handles look far better too.  Off to drink a Beer because my head is hurting... thanks alot!

Andy

  • Member since
    February 2003
  • From: Allentown, PA
Posted by BaBill212 on Sunday, August 21, 2011 8:32 PM

Andy,,  my eyes and head hurt too !!,,    so I will join you in a libation...  .    There are a couple of the klt areas that I am bypassing (scratchbuilding) because I fear insanity would soon follow..... 

Glad I can give you a reason to tip a few back my friend........

Enjoy the ride!


  • Member since
    March 2006
  • From: Right Side of a Left State
Posted by Shellback on Sunday, August 21, 2011 8:37 PM

Bill , thats a great fix on the front of the turret . The grab handles , now thats so much better than the molded blob !Yes

  • Member since
    February 2003
  • From: Allentown, PA
Posted by BaBill212 on Sunday, August 21, 2011 8:57 PM

Thanks Carl,,   appreciate the kind words.    

Enjoy the ride!


  • Member since
    March 2003
  • From: Rain USA, Vancouver WA
Posted by tigerman on Monday, August 22, 2011 1:23 AM

Ingenious fix, I probably would have tossed it. LOL

   http://i7.photobucket.com/albums/y269/wing_nut_5o/PANZERJAGERGB.jpg

 Eric 

  • Member since
    August 2006
  • From: Cygnus X-1
Posted by ogrejohn on Monday, August 22, 2011 3:37 AM

Thanks guys!

Andy, I'm going with a Panzer Gray color and going to attempt a worn whitewash with the hairspray. Ben did an excellent job on his Sturm and I hope mine turns out half as good. If I run into trouble I'll be sure to give you a call.

Carl, that is one fine looking turret! Can't wait to see the rest and how you work your magic on it.

Bill, good lord man! That sure is a nice save on the turret. Nice work on the hand rails too.

JOIN OUR COMMUNITY!

Our community is FREE to join. To participate you must either login or register for an account.

SEARCH FORUMS
FREE NEWSLETTER
By signing up you may also receive reader surveys and occasional special offers. We do not sell, rent or trade our email lists. View our Privacy Policy.