SEARCH FINESCALE.COM

Enter keywords or a search phrase below:

The OFFICIAL Panzer III and Its Variants GB

298254 views
2308 replies
1 rating 2 rating 3 rating 4 rating 5 rating
  • Member since
    October 2009
Posted by PANZERWAFFE on Tuesday, August 23, 2011 6:58 PM

Hey John, think your right.  I too have seen pictures with the wire coming out of the light but not going anywhere so guess its like you said, right under the mount?  Thats what I think I will do.  Thanks Yes

Rob

  • Member since
    April 2009
  • From: Carmel, IN
Posted by deafpanzer on Tuesday, August 23, 2011 6:59 PM

Carl- My mistake... Doogs mentioned about using acrylic so I thought you did too. Stick out tongue

Rob- I agree with John... my reference books show no wiring visible outside or around the Notek lamp so it has to be that the wiring goes into a hole right under and inside the bracket. 


Andy

  • Member since
    March 2006
  • From: Right Side of a Left State
Posted by Shellback on Tuesday, August 23, 2011 7:10 PM

deafpanzer

Carl- My mistake... Doogs mentioned about using acrylic so I thought you did too. Stick out tongue  

AHHA !  Set up another one . Beer

  • Member since
    June 2010
  • From: Austin, TX
Posted by DoogsATX on Wednesday, August 24, 2011 2:15 AM

Well, I'm still on the verge of priming. But this time for real! The tank itself, at least, is ready to go under the gun. Still have to prep a number of the pioneer tools and such, but that's small potatoes.

Not much to look at next to what some of you guys are doing, but here she is:

And the wheels with Dark Rubber. Which dries so much darker than it looks in the bottle...


On the Bench: 1/32 Trumpeter P-47 | 1/32 Hasegawa Bf 109G | 1/144 Eduard MiG-21MF x2

On Deck:  1/350 HMS Dreadnought

Blog/Completed Builds: doogsmodels.com


  • Member since
    May 2011
  • From: Bedford, Indiana
Posted by AceHawkDriver on Wednesday, August 24, 2011 9:02 AM

BaBill212:  Thanks for the comments! 

Rob:  I didn't have a chance to get on here last night at home.  I'll scan the instructions and post them later this afternoon or evening.  Hope it helps!

Carl:  Thanks for the info on how you went about painting your turret.  Looks really good.  I mostly use Tamiya acrylics but since they're in short supply I'm always looking for other options.  May have to check it out.

Peace through superior firepower.

Brian


  • Member since
    April 2009
  • From: Carmel, IN
Posted by deafpanzer on Wednesday, August 24, 2011 9:13 AM

Doogs- Looking real good! Yes  Always liked the look of longer barrel on a Pazer III.  Looking forward to see it primed...

Andy

  • Member since
    March 2006
  • From: Right Side of a Left State
Posted by Shellback on Wednesday, August 24, 2011 10:10 AM

Brian , I've heard about Tamiya paints being in short supply . Is that related to the disaster's there ?

  • Member since
    May 2011
  • From: Bedford, Indiana
Posted by AceHawkDriver on Wednesday, August 24, 2011 11:05 AM

Shellback

Brian , I've heard about Tamiya paints being in short supply . Is that related to the disaster's there ?

From my understanding from the folks on here, it has to do with a re-labling issue in order to meet the governments standards for warning lables.  I would suspect that the events in Japan didn't help speed the process up.  The hobby shop in the town north of ours is saying that they've heard sometime this fall they should be able to order them.  In the meantime, I've experimented with Vallejo and am absolutely in love with them for brush painting.  Haven't airbrushed them but am about to order some from spruebrothers. 

Peace through superior firepower.

Brian


  • Member since
    May 2011
  • From: Bedford, Indiana
Posted by AceHawkDriver on Wednesday, August 24, 2011 3:44 PM

Rob:  As promised here is the loader's hatch detail.  It's from the Voyager PE detail set instructions and is for discussion purposes only.

Hope it helps!

Peace through superior firepower.

Brian


  • Member since
    March 2006
  • From: Right Side of a Left State
Posted by Shellback on Wednesday, August 24, 2011 3:58 PM

Brian thanks Beer

  • Member since
    October 2009
Posted by PANZERWAFFE on Wednesday, August 24, 2011 5:12 PM

BRIAN - Ditto Thanks, will be useful Beer

DOOGS - She sure is a nice clean build!  Going to be nice to see her with some color on her.  How you going to paint it? 

Looking through the newsletter FS emailed, it mentioned this GB and Doogs spitfire as something to watch (popular posts)

Rob

  • Member since
    October 2009
Posted by PANZERWAFFE on Wednesday, August 24, 2011 6:57 PM

A word to the wise.....Being so concerned with fitting the casemate onto the hull because of complacations from the interior I had failed to notice and fit the gun mantle!  After attaching the casemate and letting dry overnight today tried fitting the gun mantle into place.  The mantle will not go!  Because of the front armor sloping inwards towards itself, the space is WAY too small to allow the mantle in!  This caused much concern with me.  Something HAD to be moved to get the gun on.  If I removed the casemate the interior, casemate and other pieces would have been distroyed.  So took out the trusty dremel tool and ground down the chamber / barrel until there was enough room to twist and turn the mantle into place.  PHEW!  All is good again.

 Built but space to small for mantle

Dremel away

PHEW!!

Believe all of you that are building this is past this point but just in case:  Insure to put the mantle in place then the gun through from inside the casemate then casemate onto the hull!

Rob

  • Member since
    April 2009
  • From: Carmel, IN
Posted by deafpanzer on Wednesday, August 24, 2011 7:22 PM

Rob- This is great news... I had the chance to check the FSM newsletter and we were listed.  Congrats to Doogs too!  Looks like I owe y'all another Beer  Cheers!

This looks friggin' awesome!  I would have been a nervous wreck if I had to use Dremel on a great kit. 

http://i951.photobucket.com/albums/ad352/PANZERI/STUG%2042%20AUSF%20G/DSC00185.jpg

Can't wait to see more of this...

Andy

  • Member since
    August 2006
  • From: Cygnus X-1
Posted by ogrejohn on Wednesday, August 24, 2011 7:23 PM

Nice save Rob!


  • Member since
    February 2003
  • From: Allentown, PA
Posted by BaBill212 on Wednesday, August 24, 2011 7:26 PM

Rob,,,    WHEW,,  wow,  great save!        That's thinking on your feet, for sure.

Doogs,,,   very nice "start"           You're a machine!,, when did you start this guy??      I feel like I am in slow motion,,,     looking good!

Enjoy the ride!


  • Member since
    March 2003
  • From: Rain USA, Vancouver WA
Posted by tigerman on Wednesday, August 24, 2011 8:12 PM

ogrejohn

Nice save Rob!


Ditto Beer

   http://i7.photobucket.com/albums/y269/wing_nut_5o/PANZERJAGERGB.jpg

 Eric 

  • Member since
    March 2006
  • From: Right Side of a Left State
Posted by Shellback on Wednesday, August 24, 2011 10:12 PM

Rob ................Yes

  • Member since
    June 2010
  • From: Austin, TX
Posted by DoogsATX on Wednesday, August 24, 2011 10:39 PM

PANZERWAFFE

DOOGS - She sure is a nice clean build!  Going to be nice to see her with some color on her.  How you going to paint it? 

I'm going to be tackling the one on the box art:

Though I came REALLY close to opting for a DAK scheme. Painted my Panzer IV a shaded dunky before whitewashing it, was thrilled with the look, but I've never done a Panzer Gray anything before, so the Leningrad scheme it is!

On the Bench: 1/32 Trumpeter P-47 | 1/32 Hasegawa Bf 109G | 1/144 Eduard MiG-21MF x2

On Deck:  1/350 HMS Dreadnought

Blog/Completed Builds: doogsmodels.com


  • Member since
    June 2010
  • From: Austin, TX
Posted by DoogsATX on Thursday, August 25, 2011 2:36 AM

All primed up!

On the Bench: 1/32 Trumpeter P-47 | 1/32 Hasegawa Bf 109G | 1/144 Eduard MiG-21MF x2

On Deck:  1/350 HMS Dreadnought

Blog/Completed Builds: doogsmodels.com


  • Member since
    March 2006
  • From: Right Side of a Left State
Posted by Shellback on Thursday, August 25, 2011 6:02 AM

Looks likeyou were up late Doogs .

  • Member since
    September 2009
  • From: Rugby, England
Posted by Hinksy on Thursday, August 25, 2011 6:39 AM

DoogsATX

 PANZERWAFFE:

DOOGS - She sure is a nice clean build!  Going to be nice to see her with some color on her.  How you going to paint it? 


I'm going to be tackling the one on the box art:

http://doogsmodelsdotcom.files.wordpress.com/2011/06/pziii-ch.jpg?w=600&h=386

Though I came REALLY close to opting for a DAK scheme. Painted my Panzer IV a shaded dunky before whitewashing it, was thrilled with the look, but I've never done a Panzer Gray anything before, so the Leningrad scheme it is!

http://i780.photobucket.com/albums/yy86/doogsatx/Dragon%20PzKpfw%20IV%20Ausf%20G/file-6.jpg

Nice one Doogs,

If you've read my intro post to next GB wip on page 31 (Panzer III Ausf. N) I'm also opting for the Leningrad Winter scheme as on my box art too.

- Leningrad, winter 1942-43

It's certainly different and if you check out my post a few links previous you'll see some handy photos and links - wbills site (bpmodels-link in his sig) is a goldmine and he's opted for this scheme on a couple of his builds.

I'm glad you are ahead of me so you can make the mistakes and I'll learn from them Stick out tongue Wink

Good luck buddy,

Ben Toast

On the Bench - Dragon Pz. IV Ausf. G (L.A.H.) Yes

Your image is loading...


  • Member since
    December 2006
  • From: t.r.f. mn.
Posted by detailfreak on Thursday, August 25, 2011 11:06 AM

                            Great work by everyone !

                            Well the way I figure the Bergepanzer should be displayed doing its job so I also got this project off and running.

                              This is he Ausf.N that I picked up through the Facebook friends deal for 24.00 and change,quite a deal I figure. I have completed the majority off the lower hull and I must confes the temptation to use the N for the Bergepanzer conversion.I left the suspension so that it articulates,as usual,and the lower hull will soon be in primer.


                                 I have to ask if anyone has a pic of the tow bar tha was used by these recovery vehicles.otherwise I will have to use the cables. Also my refs do not show where the jib crane is stowed,any help there? Thanks for looking.


                                               Greg"Detailfreak"RowleyYes

[View:http://s172.photobucket.com/albums/w1/g-earl828/]  http://i158.photobucket.com/albums/t104/cycledupes/1000Roadwheels4BuildBadge.jpg

  • Member since
    June 2010
  • From: Austin, TX
Posted by DoogsATX on Thursday, August 25, 2011 2:03 PM

Hinksy

I'm glad you are ahead of me so you can make the mistakes and I'll learn from them Stick out tongue Wink

Good luck buddy,

Ben Toast

I'm sure I'll be making mistakes aplenty! 

Just for giggles, I painted one of the wheel hubs with Lifecolor Panzer Gray last night. It's dark! Looks cool, but really, really dark. Thinking now that I may use the straight color as a base, then lighten it down with white for some successive coats. 


On the Bench: 1/32 Trumpeter P-47 | 1/32 Hasegawa Bf 109G | 1/144 Eduard MiG-21MF x2

On Deck:  1/350 HMS Dreadnought

Blog/Completed Builds: doogsmodels.com


  • Member since
    April 2009
  • From: Carmel, IN
Posted by deafpanzer on Thursday, August 25, 2011 2:13 PM

Doogs-  Looking good primed up!  It looks darker than your usual Mr Surfacer so you didn't use it, am I correct? 

Greg-  I almost got this kit thru Facebook too but I have one too many kits in the stash so I didn't.  I dig the look of short barrel and schurzen on that Pz III.   Great process on your Ausf N! Yes

Andy

  • Member since
    June 2010
  • From: Austin, TX
Posted by DoogsATX on Thursday, August 25, 2011 2:22 PM

deafpanzer

Doogs-  Looking good primed up!  It looks darker than your usual Mr Surfacer so you didn't use it, am I correct? 

Correct. Dusting's been really bad with Gunze stuff lately (heat), so I'm using Model Master enamel primer. It's actually my favorite primer, probably. 

On the Bench: 1/32 Trumpeter P-47 | 1/32 Hasegawa Bf 109G | 1/144 Eduard MiG-21MF x2

On Deck:  1/350 HMS Dreadnought

Blog/Completed Builds: doogsmodels.com


  • Member since
    June 2010
  • From: Austin, TX
Posted by DoogsATX on Thursday, August 25, 2011 2:43 PM

For anyone interested, here's a look at how dark both Vallejo Dark Rubber (which looks rather lighter in the bottle) and Lifecolor Panzer Gray turn out. The wheel on the right is VDR, with the left side of the hub painted with a bit of the Lifecolor. Wheel on the left is MM enamel primer, for a reference point (both for anyone looking, and especially for the camera, so the metering wouldn't flip out).


On the Bench: 1/32 Trumpeter P-47 | 1/32 Hasegawa Bf 109G | 1/144 Eduard MiG-21MF x2

On Deck:  1/350 HMS Dreadnought

Blog/Completed Builds: doogsmodels.com


  • Member since
    March 2006
  • From: Right Side of a Left State
Posted by Shellback on Thursday, August 25, 2011 4:18 PM


i see a slight difference , the left half looks a bit darker , or is it a shadow ?

  • Member since
    September 2009
  • From: Spring Branch, TX
Posted by satch_ip on Thursday, August 25, 2011 4:39 PM

Did you use Vallejo pirmer?


  • Member since
    February 2003
  • From: Allentown, PA
Posted by BaBill212 on Thursday, August 25, 2011 8:00 PM

Greg,,  will be watching the progress...  nice start

Doogs,, thanks for the nice color reference...   a difference for sure


Here is a quick update on the micro pz III   - - -

After cleaning up the rear (cleaned up not shown),, I thought a little extra detail would be good

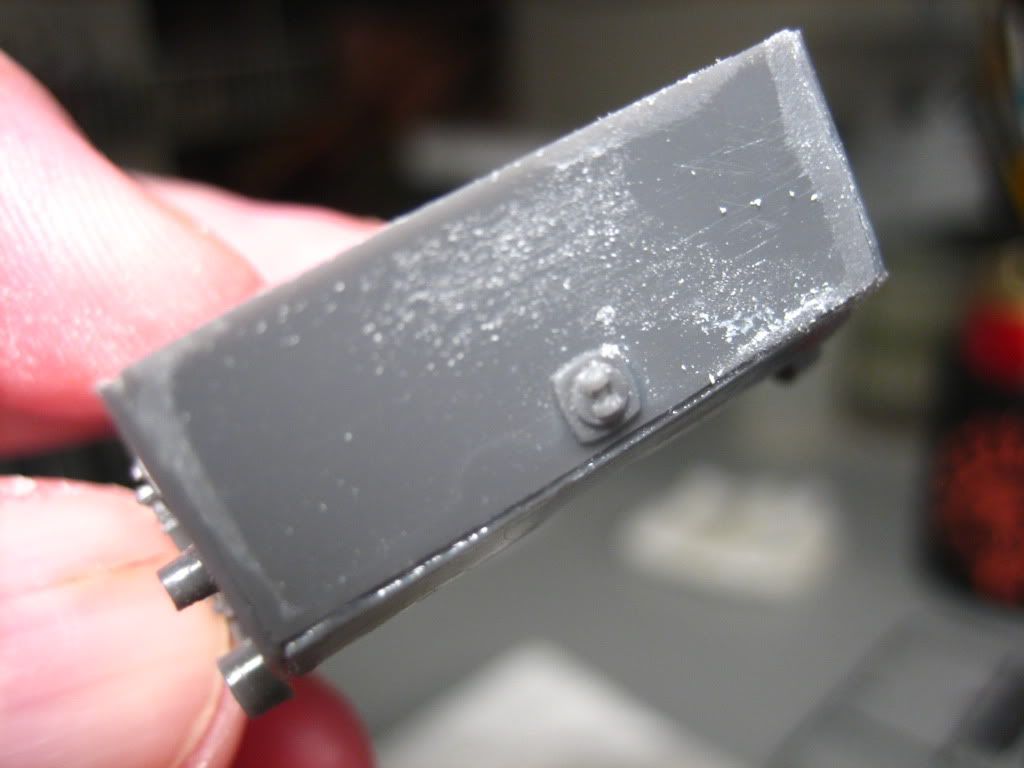
So,, how to do it?....     I used some of the thinner sprue round-cornered parts designators (part 6, 24, etc.)

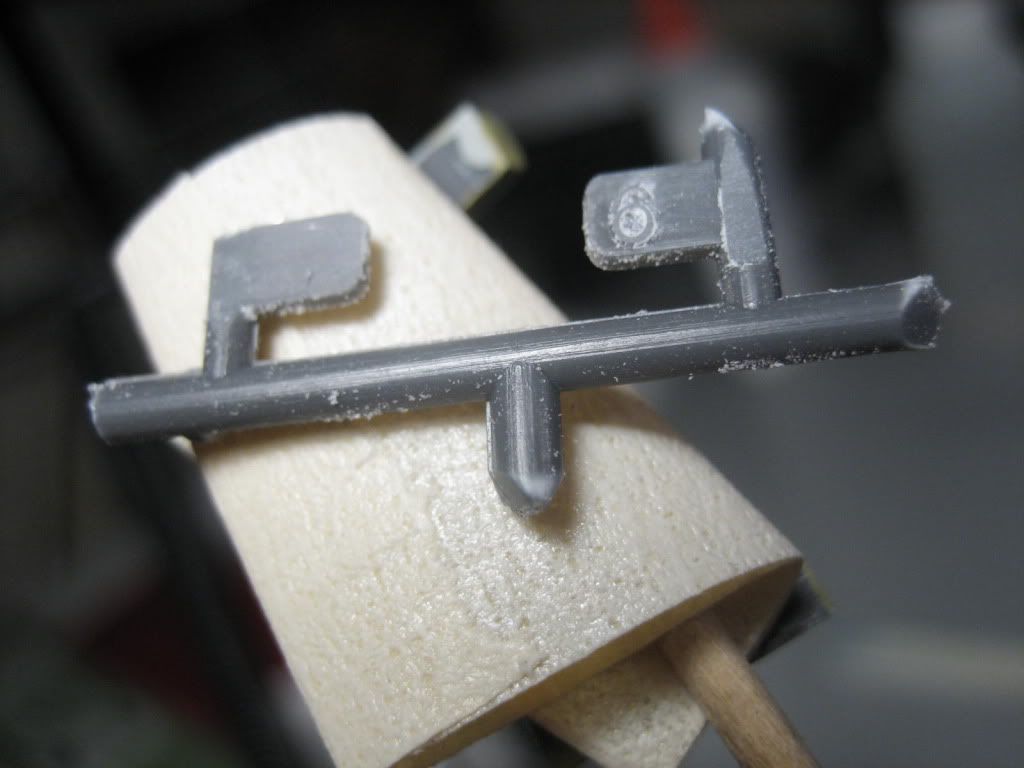
Then sanding the numbers off, cutting the sanded piece from the sprue,,,  I cut and sanded some more to make 4 like pieces,,


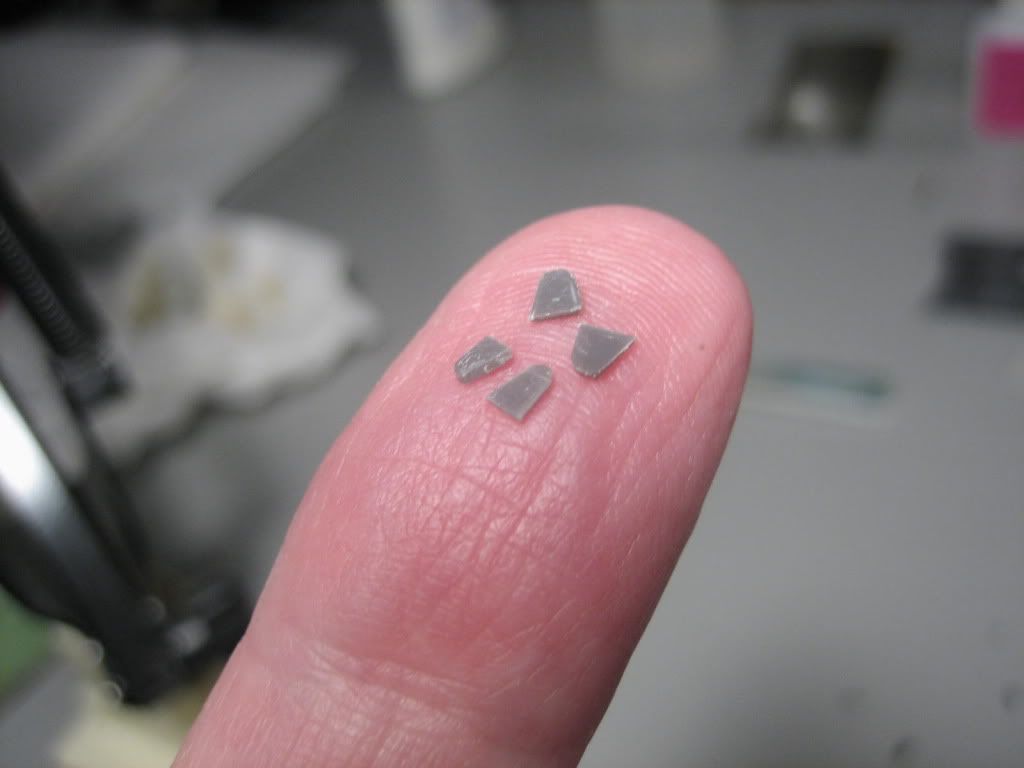
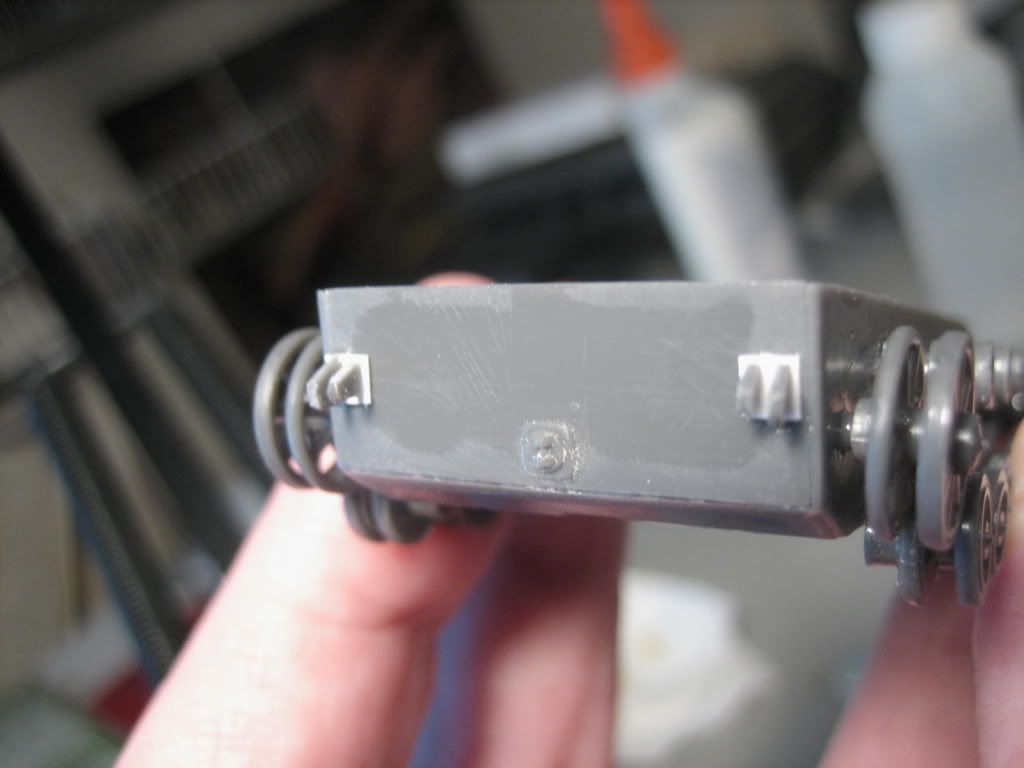
I cut some thin Evergreen (.010 x .100) to make the square base plates which I glued to the rear. I then carefully attached the 4 cut / sanded mounts.   I didn't drill them out, or add the pins....  I just needed a little detail to the butt-end.          Not that it is much, but it will add a little character to the rear.


I know,,,  very small indeed!


Hope you enjoy...........

Bill


Enjoy the ride!


  • Member since
    May 2011
  • From: Bedford, Indiana
Posted by AceHawkDriver on Thursday, August 25, 2011 9:13 PM

Bill:  Good grief!  And people think I'm nuts with all the PE stuff.  After working on the tool clasps I think I might go crazy in that small a scale.  My wife would probably find me huddled in the corner under my workbench with my optivisor on chewing on the parts tree!  Looks good!

DoogsATX:  Thanks for the reference.  This will be my first time using Vallejo paints so the reference is needed.  I like the stuff really well so far.  I've tried the MM primer (rattlecan) but didn't have much luck with it.  It turned out glossy for some reason (too heavy a coat maybe?). 

Anyone used Mr. Surfacer 1000 for priming?  Since Tamiya's Fine Grey primer is what I'm used and can't find I thought I might try it out instead.  I realize that 1200 is probably the best for it, but I have the 1000 and wondered if there would be any drawbacks?

Peace through superior firepower.

Brian


JOIN OUR COMMUNITY!

Our community is FREE to join. To participate you must either login or register for an account.

SEARCH FORUMS
FREE NEWSLETTER
By signing up you may also receive reader surveys and occasional special offers. We do not sell, rent or trade our email lists. View our Privacy Policy.