SEARCH FINESCALE.COM

Enter keywords or a search phrase below:

Eye in the Sky GB

24464 views
507 replies
1 rating 2 rating 3 rating 4 rating 5 rating
  • Member since
    April 2003
  • From: USA
Posted by keavdog on Friday, January 4, 2019 10:00 PM

So... no sausage mask disaster.  I have a bit of overspray underneath and what I would call underspray where I didn't cover enough with the brown so a bit of black base peaking through.  All correctable.  Also, a couple hard angles with the masks I'll need to smooth out but overall pretty pleased at this scale.  Bit of touch-up and on to clearcoat, weathering and a filter coat.


Thanks,

John

  • Member since
    June 2014
Posted by BrandonK on Saturday, January 5, 2019 1:05 PM

Keavdog, that camo looks fantastic. Such a cool looking build.


I've managed to finally tackle the fuselage closing and what a fight that was. I literally had to glue about one inch at a time and wait a day and do it again to get the seams to come close to aligning. I still has to sand and fill every inch of the seam on the kit. The worst spot was at the front upper where it meets the windscreen piece. The two halves met but the right side was about 1/4 inch taller than the left. I had to wrap the area in tight rubber bands and then heat the area slowly for several minutes until the plastic relaxed and settled into place. If I had glued that area it would have broken free in short order, heat was the only option and it worked perfect.

Now I have the center upper wing installed and as you can see by the pics there are gaps to shim and fill as well as another area that is not willing to lay down where it needs to and it takes way too much force to put it in place to glue it that it simply won't hold. So, I again wrapped it tight and applied some gentle heat to relax the area. I have it cooling down now and will post an updated pic for that later today. This kit will turn out pretty sweet, but not without some significant effort. This is not a kit that falls together. And from what I've read on reviews of this kit, my troubles here are not singular.

BK

On the bench:

A lot !! And I mean A LOT!!

2024 Kits on deck / in process / completed   

                         14 / 5 / 2  

                              Tongue Tied

  • Member since
    April 2003
  • From: USA
Posted by keavdog on Sunday, January 6, 2019 4:20 AM

I think I'm calling this one done.  This is an EC-121R from the Batcat 553rd Reconnaissance wing stationed at Korat during the Vietnam war.  They were running a top-secret mission dropping listening devices along the ho chi minh trail and these birds would circle on station listening for activity.  My dad was a senior master sergeant in avionics with this squadron.

Thanks,

John

  • Member since
    December 2002
  • From: Bury St Edmunds, Suffolk, England
Posted by Bish on Sunday, January 6, 2019 6:18 AM

Nicely done John, she has come out realy well. Love that scheme.

I am a Norfolk man and i glory in being so


On the bench: Airfix 1/72nd Harrier GR.3/Fujimi 1/72nd Ju 87D-3

  • Member since
    December 2002
  • From: Bury St Edmunds, Suffolk, England
Posted by Bish on Sunday, January 6, 2019 6:20 AM

Lots of extra work going into that BK.

I am a Norfolk man and i glory in being so


On the bench: Airfix 1/72nd Harrier GR.3/Fujimi 1/72nd Ju 87D-3

  • Member since
    April 2010
Posted by Theuns on Sunday, January 6, 2019 9:39 AM

I do like that Conny :-)


Theuns

  • Member since
    June 2014
Posted by BrandonK on Sunday, January 6, 2019 11:17 AM

John, well done on the 121. I really like the mouth, I wasn't expecting that, very cool. 

BK

On the bench:

A lot !! And I mean A LOT!!

2024 Kits on deck / in process / completed   

                         14 / 5 / 2  

                              Tongue Tied

  • Member since
    December 2002
  • From: Bury St Edmunds, Suffolk, England
Posted by Bish on Sunday, January 6, 2019 11:19 AM

I have been meaning to build an Ar 234 for a few years. It keeps getting on the build pile but then somthing else goes up and it goes back to the stash. This time it has finally made it to the bench.

The cockpit is rather nice as it is, i have added PE foot peddles but still have to add some instrument panels and wire up and fit the main IP as well as the seat.

The Eduard PE set i am useing includes hatches for the top of the camera bay and this is idal for the dio i want to do. But while the kit comes with cameras to be fitted in the fuselage, this are not sutable for what i want. The only pic i could find of the camera mounts was of a build of the 48th hase kit, i have no idea what that is based on. But it was the best i had so i scratch built one based on that. It doesn't need to be perfect but just to represent somthing there through the open hatch. For the cameras i have a set of resin Owl ones on order. But as these are not being fitted in, i can proceed without them.

With the wheel wells also fited, i could close up the fuselage.

Just a little clean up needed and finish off the pit before i put the 2 together.


I am a Norfolk man and i glory in being so


On the bench: Airfix 1/72nd Harrier GR.3/Fujimi 1/72nd Ju 87D-3

  • Member since
    June 2014
Posted by BrandonK on Sunday, January 6, 2019 5:53 PM

Interesting, I did not know that the 234 was ever used for recon. This is cool.

BK

On the bench:

A lot !! And I mean A LOT!!

2024 Kits on deck / in process / completed   

                         14 / 5 / 2  

                              Tongue Tied

  • Member since
    April 2003
  • From: USA
Posted by keavdog on Sunday, January 6, 2019 7:03 PM

Thanks Bish, Theuns BK

BK - whose kit is that?  That is a monster fit issue.

Bish - I too had no idea they used that bird for recon. 

Thanks,

John

  • Member since
    December 2002
  • From: Bury St Edmunds, Suffolk, England
Posted by Bish on Monday, January 7, 2019 2:23 AM

Thanks guys, and yes, the recon version as well as the bomber did both enter service.

I am a Norfolk man and i glory in being so


On the bench: Airfix 1/72nd Harrier GR.3/Fujimi 1/72nd Ju 87D-3

  • Member since
    June 2014
Posted by BrandonK on Monday, January 7, 2019 9:23 AM

John, the kit is by Kinetics. The issues are not incermountable, but I would expect far better from a kit tooled in the last decade.

BK

On the bench:

A lot !! And I mean A LOT!!

2024 Kits on deck / in process / completed   

                         14 / 5 / 2  

                              Tongue Tied

  • Member since
    February 2014
  • From: Michigan
Posted by silentbob33 on Monday, January 7, 2019 7:29 PM

Brandon your Hawkeye is looking good even with the difficulties.  I'm kind of surprised there are those kinds of fit issues with a kit that relatively new.

John that is awesome! The camo looks great, and the sharkmouth on a spyplane is really cool.  I have you updated on the front page.

Bish that is looking pretty nice.  I had to double check that it's a 1/72 kit with the amount of detail in the cockpit.  I can't wait to see what you do with the dio.

On my bench: Academy 1/35 UH-60L Black Hawk

  • Member since
    December 2002
  • From: Bury St Edmunds, Suffolk, England
Posted by Bish on Tuesday, January 8, 2019 2:35 AM

Thanks Bob. The pit is quite nice as it is. In that pic, the only PE is the foot peddles and the panel on the back. The rest is kit.

I am a Norfolk man and i glory in being so


On the bench: Airfix 1/72nd Harrier GR.3/Fujimi 1/72nd Ju 87D-3

  • Member since
    December 2002
  • From: Bury St Edmunds, Suffolk, England
Posted by Bish on Sunday, January 13, 2019 2:45 PM

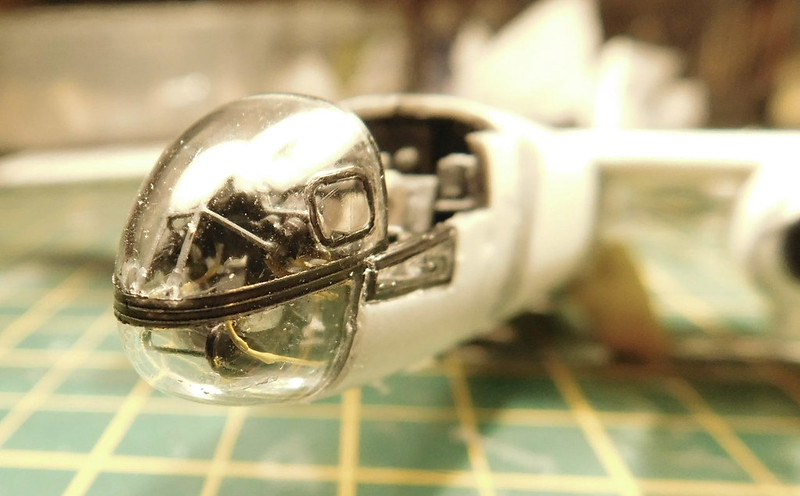
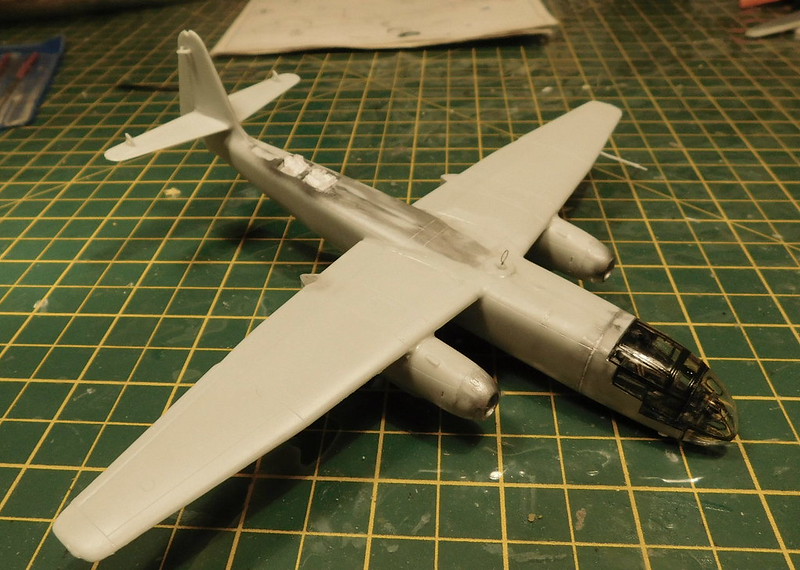
So after a slight delay, the canopy is fitted and i am almost ready to paint. The delay was caused by somthing i had not thought about and was mentioned on my WiP thread just in time. For those who don't know, the Ar 234 canopy has the framing on the inside, so the clear panels go over it and are riveted in place. At a gues, this is to help with streamlining. So i had 2 ideas on how to replicate this. First was to mask and paint the inside of the clear pieces. But the Eduard set is not designed that way and masking the front nose section would be prety tricky. So i went for plan B.

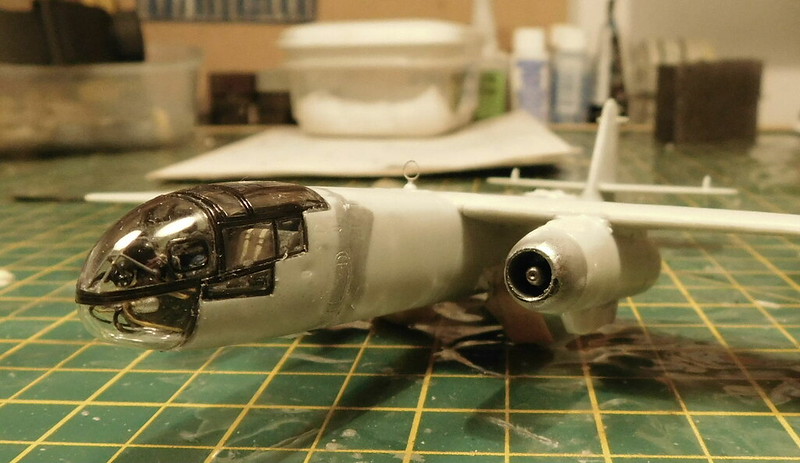
The canopy framing is on the outside on the kit pieces, but fortunatly it just very fine raised lines. So i masked as normal and aplied a coat of black primer and left it at that to avoid a build up of paint. Once dry and with masks removed, i dipped the clear pieces in future 3 times, allowing to dry each time. This was i hoped the framing would have the same shiny look as the clear pieces and it might also level it out. Once that was done, time to get the clear parts fitted.

The front piece was first with the IP in place. The wiring i added did make the fit a bit tricky and it did put the IP, which is only attached by a piece of PE with 2 anchor points on the canopy, out of place slightly, but nothing i am to worried about.

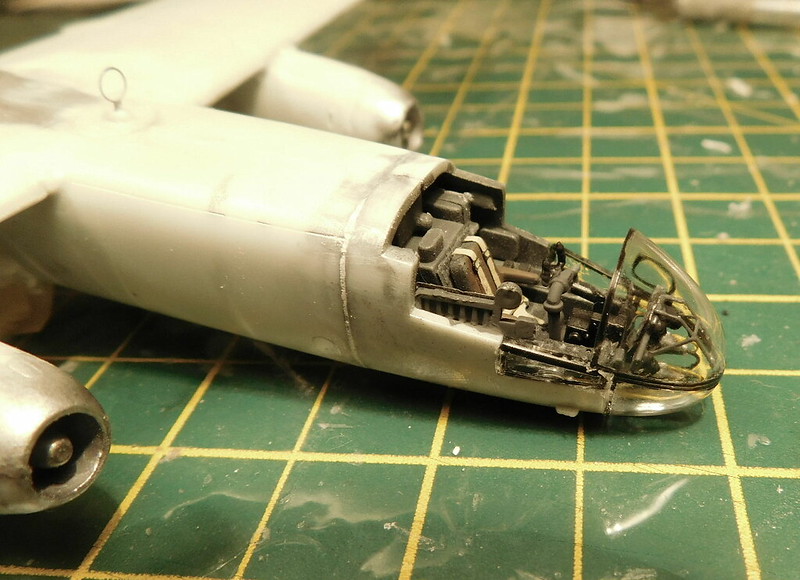
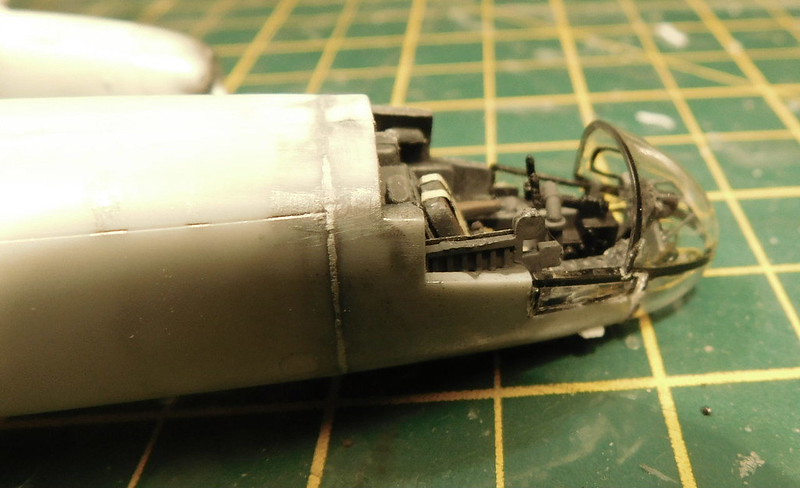
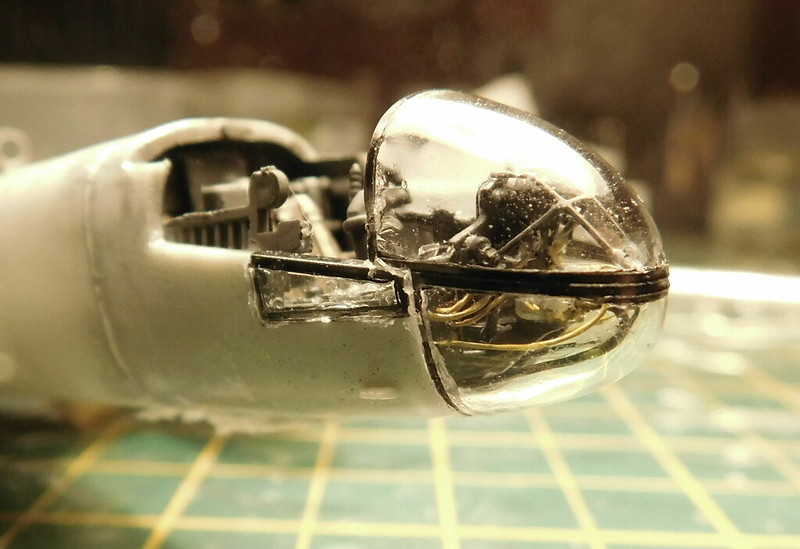
I had to use a bar clamp to keep the front in place while it dried and theres a bit of white glue to clean up. Once that was set, i added the top piece.

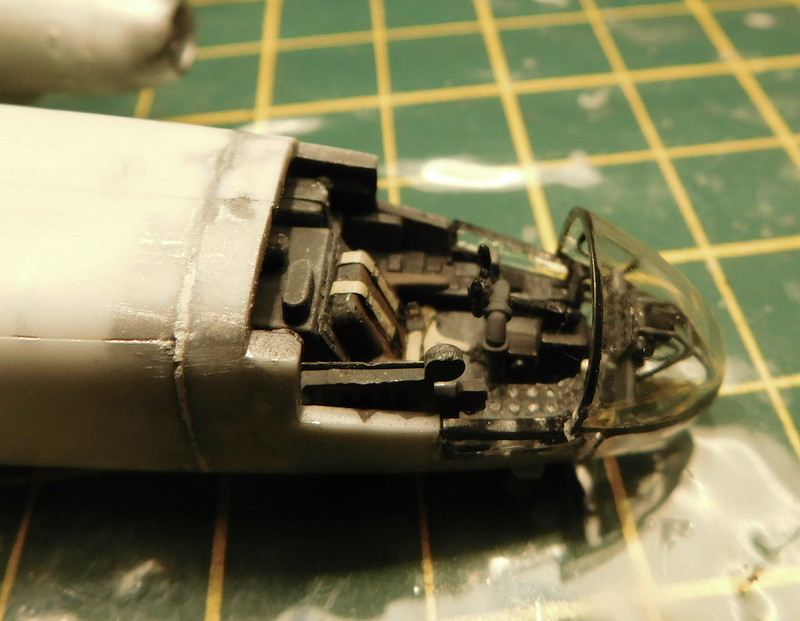
In the close up you can see the raised lines of the canopy framing, of clourse to the naked eye they are not that apparent. I do have 4 more Dragon 234's of different variants in the stash. And i have some ideas on how to do things different next tie, especially for the wiring and canopy.

And yes, i have missed off the rear view periscope in my haste to fit the canopy. So i am in the process of fixing that error.

I am a Norfolk man and i glory in being so


On the bench: Airfix 1/72nd Harrier GR.3/Fujimi 1/72nd Ju 87D-3

  • Member since
    June 2014
Posted by BrandonK on Monday, January 14, 2019 3:33 PM

Bish, that is quite a tricky canopy indeed. I like your solution and the added bits to give it some life. Well done, Sir, it looks great.

BK

On the bench:

A lot !! And I mean A LOT!!

2024 Kits on deck / in process / completed   

                         14 / 5 / 2  

                              Tongue Tied

  • Member since
    February 2014
  • From: Michigan
Posted by silentbob33 on Saturday, January 19, 2019 11:04 AM
That's interesting to know about that canopy Bish. I think you did a great job tackling it the way you did

On my bench: Academy 1/35 UH-60L Black Hawk

  • Member since
    January 2015
Posted by TheMongoose on Saturday, January 19, 2019 7:08 PM

That canopy looks like it must be one of the most complicated assemblies in canopy history! 

I know it’s a close up so I’m assuming you can see way more than with naked eye. Is that dust or tiny bits of plastic i see inside the ‘glass‘? I ask because I just found out about these ‘kimwipes’ which take the static off the canopy plastic so *** doesn’t stick to it due to static that builds up. I found out about them because my Hornet had some huge chunks of junk inside I wasn’t expecting stuck to the canopy after i unmasked it lol anyway, if it’s of value check them out :-)

In the pattern: Scale Shipyard's 1/48 Balao Class Sub! leaning out the list...NOT! Ha, added to it again - Viper MkVii, 1/32 THUD & F-15J plus a weekend madness build!

  • Member since
    April 2003
  • From: USA
Posted by keavdog on Saturday, January 19, 2019 8:29 PM

That's a lot of work Bish.  You pulled it off nicely. 

Thanks,

John

  • Member since
    August 2012
  • From: Parker City, IN.
Posted by Rambo on Sunday, January 20, 2019 2:39 AM

Opened the box on my build today. It's the Tamiya 1/48 Fieseler Fi156C Storch I'm going to finish it in one of Rommels markings. I've got the small Eduard Zoom set for this, the kit really doesn't need it but I like Eduards panels. To help me with the build I have Wings and Wheels no.12 Storch in detail and just ordered Schiffer Military History Fieselr Fi 156 Storch for $5 on Amazon for that price you can't go wrong here's a link if anyone else is interested https://www.amazon.com/gp/product/076430299X/ref=ppx_yo_dt_b_asin_title_o00__o00_s01?ie=UTF8&psc=1

Started working on the engine it's beautiful and will have it displayed on the finish build


Storch 1

Clint

  • Member since
    December 2002
  • From: Bury St Edmunds, Suffolk, England
Posted by Bish on Sunday, January 20, 2019 12:37 PM

TheMongoose

That canopy looks like it must be one of the most complicated assemblies in canopy history! 

I know it’s a close up so I’m assuming you can see way more than with naked eye. Is that dust or tiny bits of plastic i see inside the ‘glass‘? I ask because I just found out about these ‘kimwipes’ which take the static off the canopy plastic so *** doesn’t stick to it due to static that builds up. I found out about them because my Hornet had some huge chunks of junk inside I wasn’t expecting stuck to the canopy after i unmasked it lol anyway, if it’s of value check them out :-)


The canopy itself is not to bad, its just trying to fit it with the IP in place which is made more tricky by me wiring it up.

Ye, that is dust, one of the down sides of close up ohoto's, i had not noticed it until i took the pic. I'll have to see how it looks once i de mask, but i am hoping the worst is on the out side. And thanks, i will. I do find thats often a problem with canopies. And with closed canopies like this, even more so. Thanks.

I am a Norfolk man and i glory in being so


On the bench: Airfix 1/72nd Harrier GR.3/Fujimi 1/72nd Ju 87D-3

  • Member since
    December 2002
  • From: Bury St Edmunds, Suffolk, England
Posted by Bish on Sunday, January 20, 2019 12:40 PM

BK, Bob, thanks guys, i am pretty plesed with it. I am hoping i can paint on some rivets to the putside once i un mask. Got the 2 top colours on, just got the light blue to add.

I am a Norfolk man and i glory in being so


On the bench: Airfix 1/72nd Harrier GR.3/Fujimi 1/72nd Ju 87D-3

  • Member since
    December 2002
  • From: Bury St Edmunds, Suffolk, England
Posted by Bish on Sunday, January 20, 2019 12:53 PM

keavdog

That's a lot of work Bish.  You pulled it off nicely. 


Thanks John. It was more than i had expected, but its a little different from more subjects.

I am a Norfolk man and i glory in being so


On the bench: Airfix 1/72nd Harrier GR.3/Fujimi 1/72nd Ju 87D-3

  • Member since
    August 2012
  • From: Parker City, IN.
Posted by Rambo on Monday, January 21, 2019 6:59 PM

Got some more done on the engine got some putty work to do in just a few places due to the way Tamiya has you join some parts but really not visible but I'm going to fill them anyway.

Storch 3

Storch 4

Been looking through photos trying to find a good shot of the underside of the exhaust to see how the opening is. Storch 5

Storch 6

That's all for now thanks for looking

Clint

  • Member since
    February 2014
  • From: Michigan
Posted by silentbob33 on Tuesday, January 22, 2019 6:52 PM

That engine looks really nice Clint!  How much of it will be seen on the finished kit?

I finally have paint on.  The bottom had some kind of strange wrinkling on it, I'm not really sure what was going on there but I've fixed it the best I could.  At least it's on the bottom where not too many people will be looking at it.  I primed with flat black, then sprayed Testor's silver out of a rattlecan.  After that dried I picked out a few panels with a couple shades of silver and aluminum.  Since this plane was in the South Pacific at the end of WWII, I'm chipping a bit more paint than I usually do since those birds really took a beating from the elements.  

I also got the props done as well.  There's still a little bit of touching up to do here and there.

On my bench: Academy 1/35 UH-60L Black Hawk

  • Member since
    August 2012
  • From: Parker City, IN.
Posted by Rambo on Tuesday, January 22, 2019 7:46 PM
That's looking great SB for being a rattle can it looks like it came out pretty good. I'm going to have the engine panels off on the completed build so most of the engine will be visible.

Clint

  • Member since
    January 2015
Posted by TheMongoose on Wednesday, January 23, 2019 5:33 AM

Silentbob i pulled a closeup and your seams look really nice! Made for a Good paint job. I think rattle cans get a bad rap cause people spray it on to thick Wink 

In the pattern: Scale Shipyard's 1/48 Balao Class Sub! leaning out the list...NOT! Ha, added to it again - Viper MkVii, 1/32 THUD & F-15J plus a weekend madness build!

  • Member since
    June 2014
Posted by BrandonK on Wednesday, January 23, 2019 9:19 AM

SB, that looks really good. Well done on the rattlecan paint. You said you had a wrinkle issue is some places. Was the base acrylic or not? If it was acrylic it may have reacted with the rattlecan paint. Either way I think it looks really nice.

BK

On the bench:

A lot !! And I mean A LOT!!

2024 Kits on deck / in process / completed   

                         14 / 5 / 2  

                              Tongue Tied

  • Member since
    December 2002
  • From: Bury St Edmunds, Suffolk, England
Posted by Bish on Thursday, January 24, 2019 10:12 AM

For a change, this one was painted the darker top colours first. I used Xtracolur RLM 83 and Colourcoats 81.

Then the blue. Even though this variant did enter service, i am doing a what if build as the unit i am assigning it to never operated the type. So for the scheme i was inspired by the Hasegawa 72nd Ju 188A kit which i happen to be building after this. But then when i got the kagero book on the 234 there was a B-2b in there which had a similar scheme. So while its not to far fetched, its my own pattern and doesn't replicate an exact aircraft.

After masking, the RLM 76 was sprayed underneath as well as partly ove rthe top.

Then the decals. I used the kit decals for the foot and hand holds as well as the work number on the tail though i made up my own. All the rest are from the decal stash.

I just have to get a few bits finished and fitted. Weathering will be minimal, possable just some grime underneath.

I am a Norfolk man and i glory in being so


On the bench: Airfix 1/72nd Harrier GR.3/Fujimi 1/72nd Ju 87D-3

  • Member since
    June 2014
Posted by BrandonK on Thursday, January 24, 2019 5:59 PM

Well now, Bish, that is quite interesting. I really like it and if you hadn't said it was a what if I never would have guessed. Very nice and very cool.

BK

On the bench:

A lot !! And I mean A LOT!!

2024 Kits on deck / in process / completed   

                         14 / 5 / 2  

                              Tongue Tied

JOIN OUR COMMUNITY!

Our community is FREE to join. To participate you must either login or register for an account.

SEARCH FORUMS
FREE NEWSLETTER
By signing up you may also receive reader surveys and occasional special offers. We do not sell, rent or trade our email lists. View our Privacy Policy.