SEARCH FINESCALE.COM

Enter keywords or a search phrase below:

Eye in the Sky GB

24448 views
507 replies
1 rating 2 rating 3 rating 4 rating 5 rating
  • Member since
    July 2014
Posted by modelcrazy on Saturday, November 3, 2018 9:43 PM

Bob, hang in there, I'm 7 months out of a double lung transplant and am doing great. You'll do fine. I'm sorry about your moter in law.

Steve

Building a kit from your stash is like cutting a head off a Hydra, two more take it's place.


http://www.spamodeler.com/forum/

  • Member since
    April 2010
Posted by Theuns on Tuesday, November 6, 2018 7:29 AM

I have started on my Shackleton and this is an ancient kit with raised rivet and pannel detal but almost no cockpit or wheelwell detail.

As an experiment I lightly sanded the detail on the surface to see if I can tone it down however to get a nice equal look doesnt work for me so I will re'scribe some of the detail and sand smooth.


Theuns

  • Member since
    April 2010
Posted by Theuns on Tuesday, November 6, 2018 11:23 PM

Here is the result sofar

 IMG_20181106_161037 by Theunis van Vuuren, on Flickr


Theuns

  • Member since
    June 2014
Posted by BrandonK on Wednesday, November 7, 2018 10:19 PM

Theuns, that is a big improvement. I can see why you wanted to go through the trouble. Your version is much better.

BK

On the bench:

A lot !! And I mean A LOT!!

2024 Kits on deck / in process / completed   

                         14 / 5 / 2  

                              Tongue Tied

  • Member since
    October 2009
Posted by JacknewbIII on Thursday, November 8, 2018 12:40 PM

I agree with BK that looks really good Theuns. Do you mind sharing what your prefered tool for getting these results is? I have never tried this for fear of butchering it - pun intended..


Nice work for sure!

  • Member since
    February 2014
  • From: Michigan
Posted by silentbob33 on Friday, November 9, 2018 7:21 PM

modelcrazy

Bob, hang in there, I'm 7 months out of a double lung transplant and am doing great. You'll do fine. I'm sorry about your moter in law.


Thanks Steve, I'm really glad you're doing well.  I had my appointment with the transplant team on Tuesday and they think I'll be a good candidate for transplant, but I'll find out for sure next week.  It's been rough on the family losing her, but I think we're doing as good as we can.

On my bench: Academy 1/35 UH-60L Black Hawk

  • Member since
    February 2014
  • From: Michigan
Posted by silentbob33 on Friday, November 9, 2018 7:22 PM

I've got to agree with the others Theuns, that looks really nice.  Night and day difference.

On my bench: Academy 1/35 UH-60L Black Hawk

  • Member since
    June 2014
Posted by BrandonK on Monday, November 12, 2018 9:34 AM

I know I can speak for many others when I say we've been pulling for Steve, and the same can be said for you SB. We are all pulling for you.

BK

On the bench:

A lot !! And I mean A LOT!!

2024 Kits on deck / in process / completed   

                         14 / 5 / 2  

                              Tongue Tied

  • Member since
    April 2010
Posted by Theuns on Monday, November 12, 2018 10:09 AM

I use a standard tamya scriber, for the straight edge I use a thin strip og litho plate that shapes well around corners.


I actually need another new blade for my scriber as the one I now have is getting dull, when it is new it really gives exelent sharp fine detail, a must have tool together with my trumpeter rivet tool....I cant go without them :)


Theuns

  • Member since
    December 2002
  • From: Bury St Edmunds, Suffolk, England
Posted by Bish on Monday, November 12, 2018 10:27 AM

Very nicely done there Theuns.

I am a Norfolk man and i glory in being so


On the bench: Airfix 1/72nd Harrier GR.3/Fujimi 1/72nd Ju 87D-3

  • Member since
    April 2010
Posted by Theuns on Thursday, November 22, 2018 10:24 PM

The scribing and sanding on the wings is complete, I however need to make a few parts as they are not in the bag in the box :-(

1 front spinner and the 1/2 upper section of the #4 necell /cowl broke off and is MIA.


The fuselage has been wrangled into place, it was warped like mad and I had to do small sections at a time by wraping it with tine and cementing.


Now I recall why I dont build  these old kits LOL


Theuns

  • Member since
    April 2010
Posted by Theuns on Sunday, November 25, 2018 8:57 AM

Here is the fuselage with the old detail.

 IMG_20181123_143842 by Theunis van Vuuren, on Flickr


I have sanded the one side smooth and will do other side soon ,then I need to mark out and scribe the new detail.


Theuns

  • Member since
    June 2014
Posted by BrandonK on Monday, November 26, 2018 11:47 AM

I haven't been making too much progress on the Hawkeye as I have been busy with other things in life. I did complete the cockpit and I can live with it. I decided, after carefully examining the kit, to not pimp out the cockpit as you won't be able to see it hardly at all once completed. The windows on the pit are small and similar to a B-17 so all that hard work and detail would be lost inside. 

I used a Sharpie marker to paint the panels and instruments and I have to say I am very pleased with the speed I was able to do it and the outcome is pretty decent. They do make PE set for the cockpit on this kit and if you want to doll your's up I would go that route. I just didn't want to spend the extra money and not be able to see it anyway.

This kit is VERY tail heavy and I will be adding 100 grams of weight to the nose to keep it from tail sitting. I will take some photos of the fuselage as I close it up because it has one of the worst alignments I have ever dealt with. The panel lines will all line up, but the shape is all over the place and not one section allows alignment with another. I will have to align and glue one section at a time and let it dry overnight before moving to the next section to make it align well, and I'll still have seem work to do. It's a shame it is this poor on such a nicely detailed kit. I will post plenty of shots of this for you.

As far as size of AC this is, just to give you some reference on its scale, it is nearly as long, tall and wide as a 1/48 B-17, just skinnier. It's not a small kit.

BK

On the bench:

A lot !! And I mean A LOT!!

2024 Kits on deck / in process / completed   

                         14 / 5 / 2  

                              Tongue Tied

  • Member since
    February 2014
  • From: Michigan
Posted by silentbob33 on Monday, November 26, 2018 5:10 PM

Can't wait to see what you do with it Theuns.

That pit looks pretty good Brandon!  Hopefully you'll be able to wrestle the fuselage into the right shape.

I can't believe it's been two months since I've posted any progress.  The last couple months have been kind of tough.  I found out that my kidney function is dropping again so now they're looking at a transplant.  I went through the whole evaluation process and they determined I'd be a good recipient, and a few people have come forward that are willing to donate.  Between being tired all the time and appointments, I hadn't had much time for the bench.  Then at the end of last month my mother in law passed away kind of suddenly and we've been driving half-way across the state a lot lately. 

Anways, she's starting to look like an airplane now.  Still have some filling and sanding to do.  I also found some bits to use for the cameras in the nose, I just need to figure out how to get them attached.

On my bench: Academy 1/35 UH-60L Black Hawk

  • Member since
    April 2015
Posted by Mopar Madness on Monday, November 26, 2018 7:11 PM

Some quiet bench time can be pretty therapeutic in times likes these.  She’s looking great.

Chad

God, Family, Models...

At the plate: 1/48 Airfix Bf109 & 1/35 Tamiya Famo

On deck: Who knows!

  • Member since
    June 2014
Posted by BrandonK on Monday, November 26, 2018 11:23 PM

Mopar Madness

Some quiet bench time can be pretty therapeutic in times likes these.  She’s looking great.


I agree with both statements. Looks good.

BK

On the bench:

A lot !! And I mean A LOT!!

2024 Kits on deck / in process / completed   

                         14 / 5 / 2  

                              Tongue Tied

  • Member since
    December 2002
  • From: Bury St Edmunds, Suffolk, England
Posted by Bish on Tuesday, November 27, 2018 2:07 AM

Some very nice work there guys.

I am a Norfolk man and i glory in being so


On the bench: Airfix 1/72nd Harrier GR.3/Fujimi 1/72nd Ju 87D-3

  • Member since
    January 2015
Posted by TheMongoose on Tuesday, November 27, 2018 10:56 AM

BrandonK


Brandon that IP is looking smart! I have a set of paint pens that I really haven't taken advantage of. THis motivates me to break them out and give it a thorough try instead of just using them for an occasional highlight or two.

In the pattern: Scale Shipyard's 1/48 Balao Class Sub! leaning out the list...NOT! Ha, added to it again - Viper MkVii, 1/32 THUD & F-15J plus a weekend madness build!

  • Member since
    April 2010
Posted by Theuns on Tuesday, November 27, 2018 10:22 PM

I have completed 1/2 the scribing on this Shack, still need to do the whole fuse.


Theuns

  • Member since
    June 2014
Posted by BrandonK on Wednesday, November 28, 2018 9:31 AM

Man, it is a ton of work rescribing a kit, but it looks so good when done.

BK

On the bench:

A lot !! And I mean A LOT!!

2024 Kits on deck / in process / completed   

                         14 / 5 / 2  

                              Tongue Tied

  • Member since
    April 2003
  • From: USA
Posted by keavdog on Tuesday, December 4, 2018 1:22 AM

EC-121 cleaned up, black based and ready for camo

Thanks,

John

  • Member since
    August 2012
  • From: Parker City, IN.
Posted by Rambo on Tuesday, December 4, 2018 1:47 AM
Haven't commented on this GB for awhile everything is looking great, I plan to start my Storch the first of the year. SB hope things start to look up for you soon.

Clint

  • Member since
    December 2002
  • From: Bury St Edmunds, Suffolk, England
Posted by Bish on Tuesday, December 4, 2018 2:17 AM

John, thats an impressive looking aircraft there. Nice work.

I am a Norfolk man and i glory in being so


On the bench: Airfix 1/72nd Harrier GR.3/Fujimi 1/72nd Ju 87D-3

  • Member since
    April 2003
  • From: USA
Posted by keavdog on Tuesday, December 4, 2018 2:29 AM

Thanks Bish - looking forward to doing the camo - 4 colors.  And hoping I put enough weight in the nose.

Thanks,

John

  • Member since
    January 2015
Posted by BrandonD on Wednesday, December 5, 2018 12:43 PM

Well, guys, this one has been done for a while, but I was trying to take some better photos. That hasn't happened, so I'll post these before I forget entirely.

To recap, this is the 1/48 Eduard MiG-21R in Cuban markings. Paints are Mr. Paint SU-27 blue and Tamiya RAF dark green on top, and some gray on the bottom. I want to say Tamiya light gray, but it might be Mr. Paint or Tamiya royal gray. You get the gist.

Lenses for the recce pod and the Atoll missile seeker heads are from Bondic, which I'd never used before, but which I think is perfect for this sort of thing.


MiG-21R 01

MiG-21R 02

MiG-21R 03

MiG-21R 04

MiG-21R 05

MiG-21R 06_1

MiG-21R 07

Want to know what's annoying? When you buy two MiG-21s and then think it's perfect and buy two aftermarket bang seats for them, but you put the package of seats in one box, then build the other kit and forget about them, so you use the kit seat, which is fine, but not nearly as nice.

So maybe I need another MiG-21 now?

Anyway, this kit is one of Eduard's best. The only hiccup was in the 0.5mm gap running perpendicular to the fuselage where the wings piece isn't long enough. I'm told this is ONLY a factor on the MiG-21R, which has different wings than the other kits. Anyway, it was an easy enough fix with sheet styrene.

Thanks for having me, and sorry it took so long to get this thing posted!

-BD-


  • Member since
    January 2015
Posted by BrandonD on Wednesday, December 5, 2018 12:44 PM

Let's use the first pic for the front. It seems the most accurate color-wise.

-BD-

  • Member since
    February 2014
  • From: Michigan
Posted by silentbob33 on Thursday, December 6, 2018 6:43 PM

Looking really good John!  Can't wait to see some paint on her.

Thanks for the kind words Clint, I'm in the process of seeing if a potential donor is a match.  Fingers are crossed...

Brandon, great finish, I love the colors!  Especially since you don't usually see a Cuban bird.  I got the front page updated.  Thanks for participating!

On my bench: Academy 1/35 UH-60L Black Hawk

  • Member since
    April 2003
  • From: USA
Posted by keavdog on Thursday, December 6, 2018 8:59 PM
Thanks SB. Brandon, that looks really cool.

Thanks,

John

  • Member since
    June 2014
Posted by BrandonK on Friday, December 7, 2018 9:23 AM

Wow, Brandon. You nailed that kit. The look, color and weathering are spot on. I am totally jelly of that kit. Very nice.

BK

On the bench:

A lot !! And I mean A LOT!!

2024 Kits on deck / in process / completed   

                         14 / 5 / 2  

                              Tongue Tied

  • Member since
    June 2008
Posted by lewbud on Saturday, December 15, 2018 2:14 PM

Brandon,

Nice job on the Mig! You're right, don't see a Cuban bird every day.

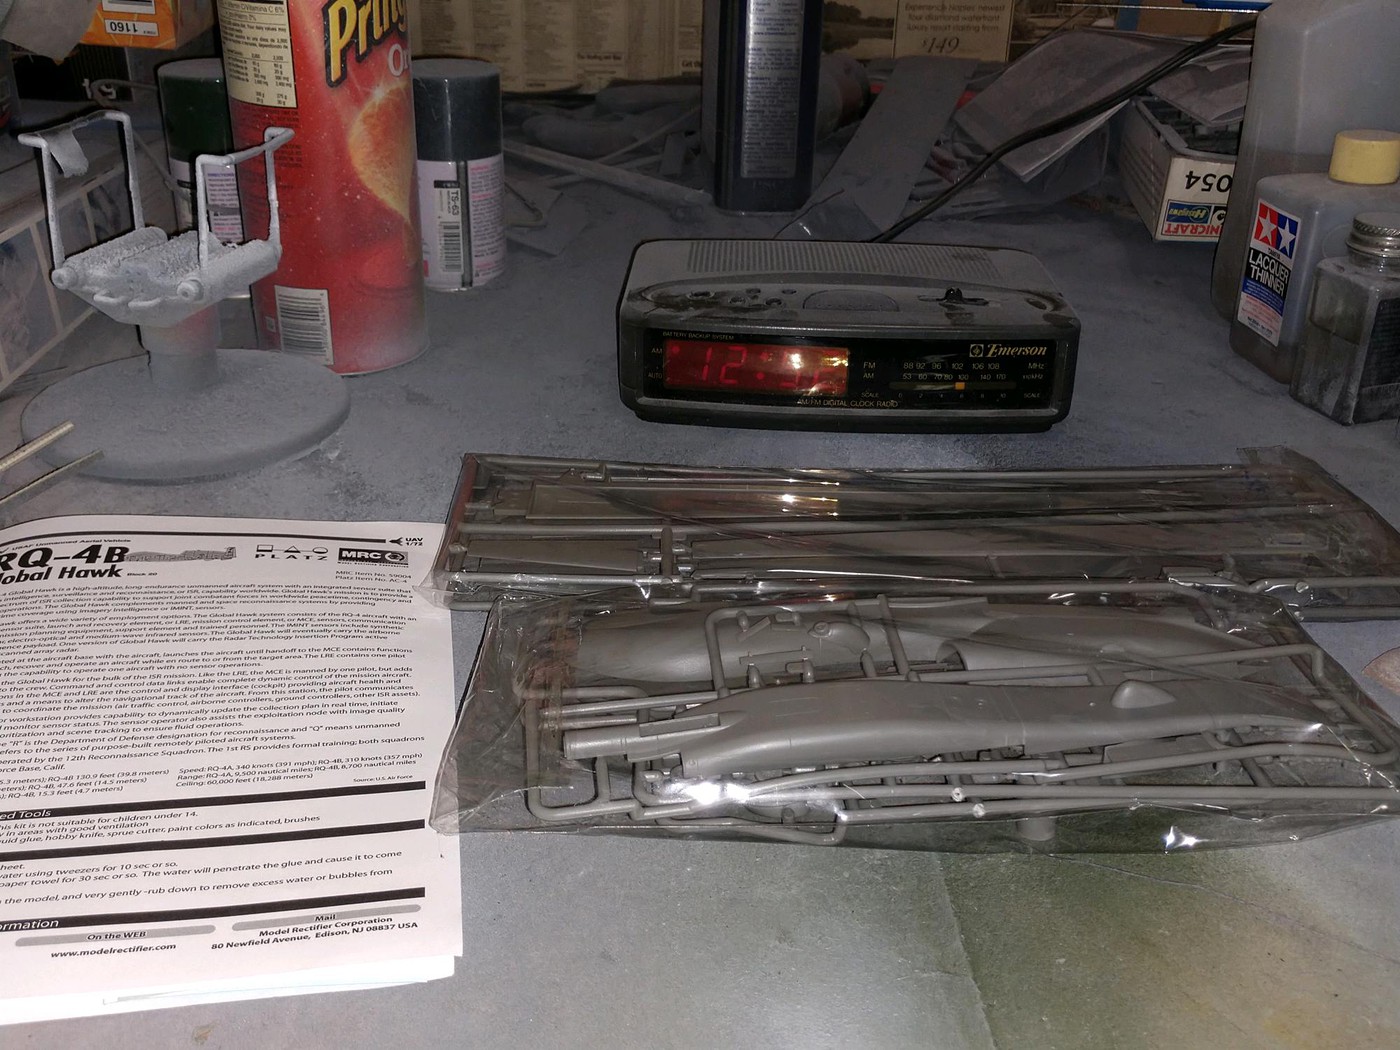
Well, here's my status so far on the Global Hawk.  I started on Thursday 12/6/18 in an attempt to build this for the infamous Weekend GB. I thought it's a kit with 36 parts, all the reviews I'd read said it fit pretty good, what on earth could go wrong? When somebody asks me that question, my response is why would you want an answer to that question? Well, I got the answer and it wasn't the answer I was looking for. Needless to say, I missed the goal and here is where she's at now.

The proof of unstartedness pic:

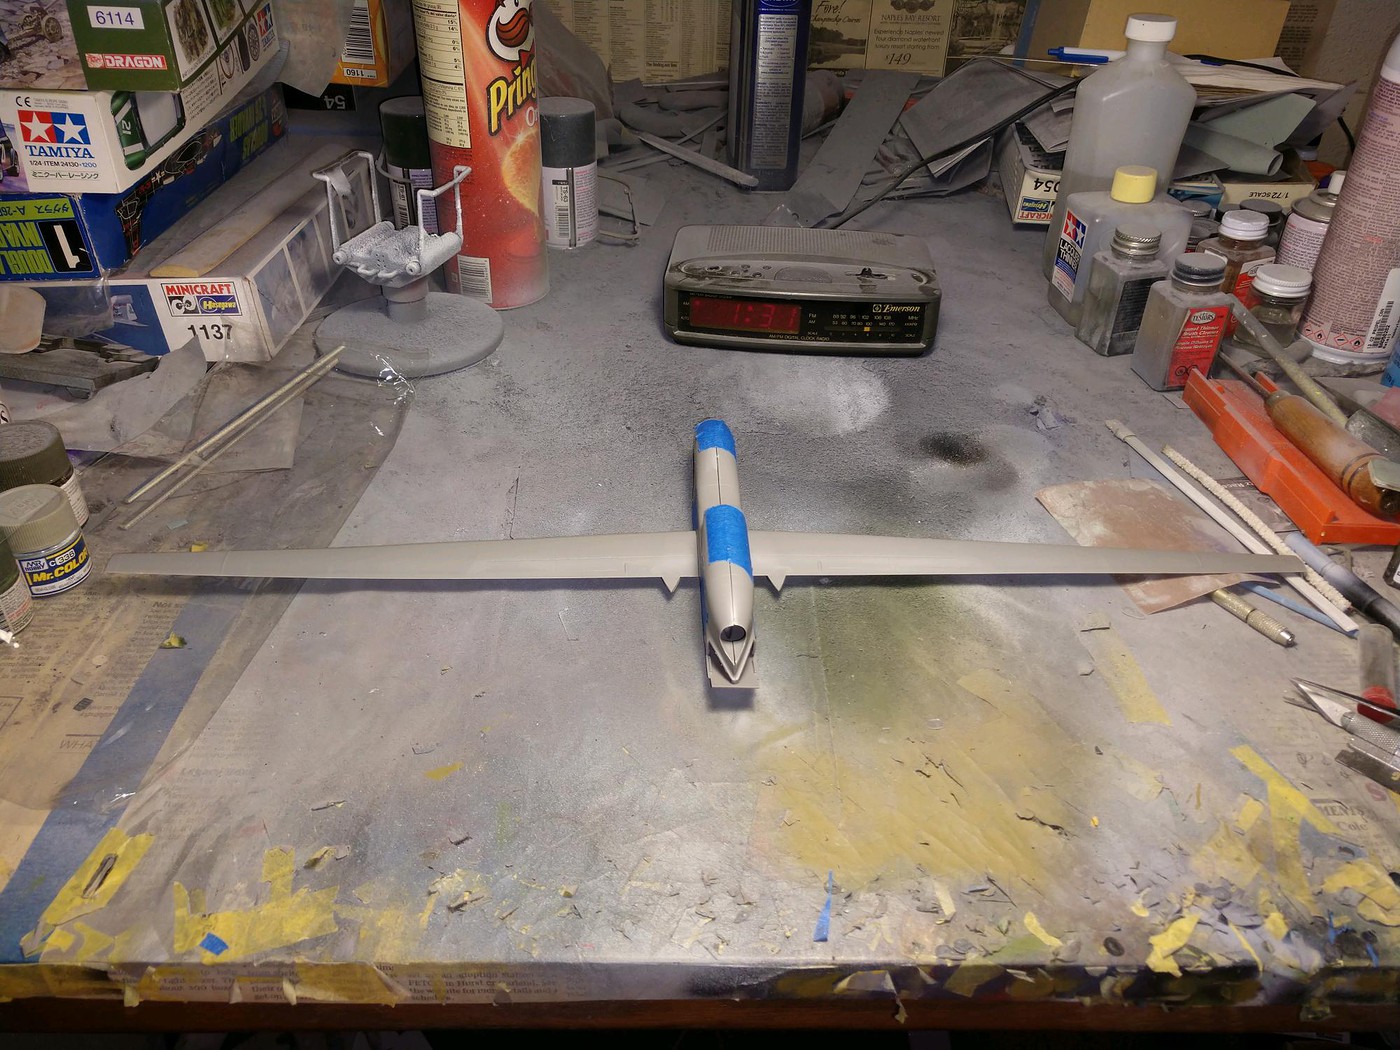
Wings assembled and mocked up. This thing is huge!:

At one point I thought I'd lost one of the wings. Now I've lost a golf ball in the middle of the fairway after watching it land, but I thought how in the heck do you lose a 13 inch long piece of plastic? Found it in the box after 15 minutes of frantic searching, standing on the leading edge up against the side of the box.

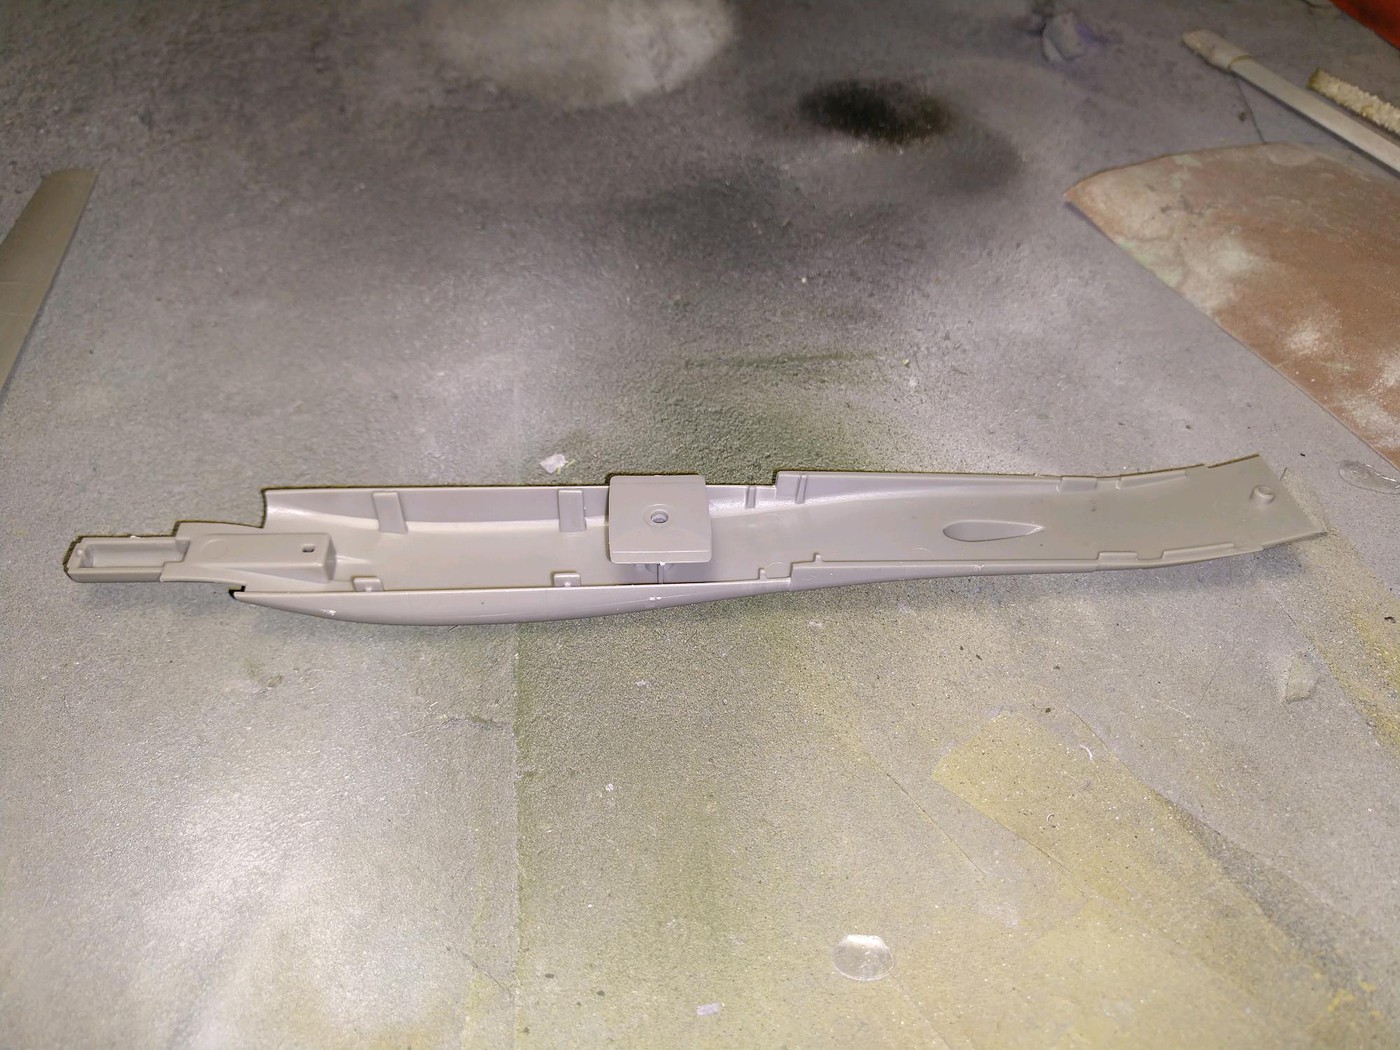
The bottom of the fuselage. The square piece is important as it not only helps align the wings, but the four bumps on the bottom (two on each side, not shown in pic) allows the wing to snap in place. The gap is a little larger than most would like on a contest model,but perfectly adequate for a build that's going on the shelf.

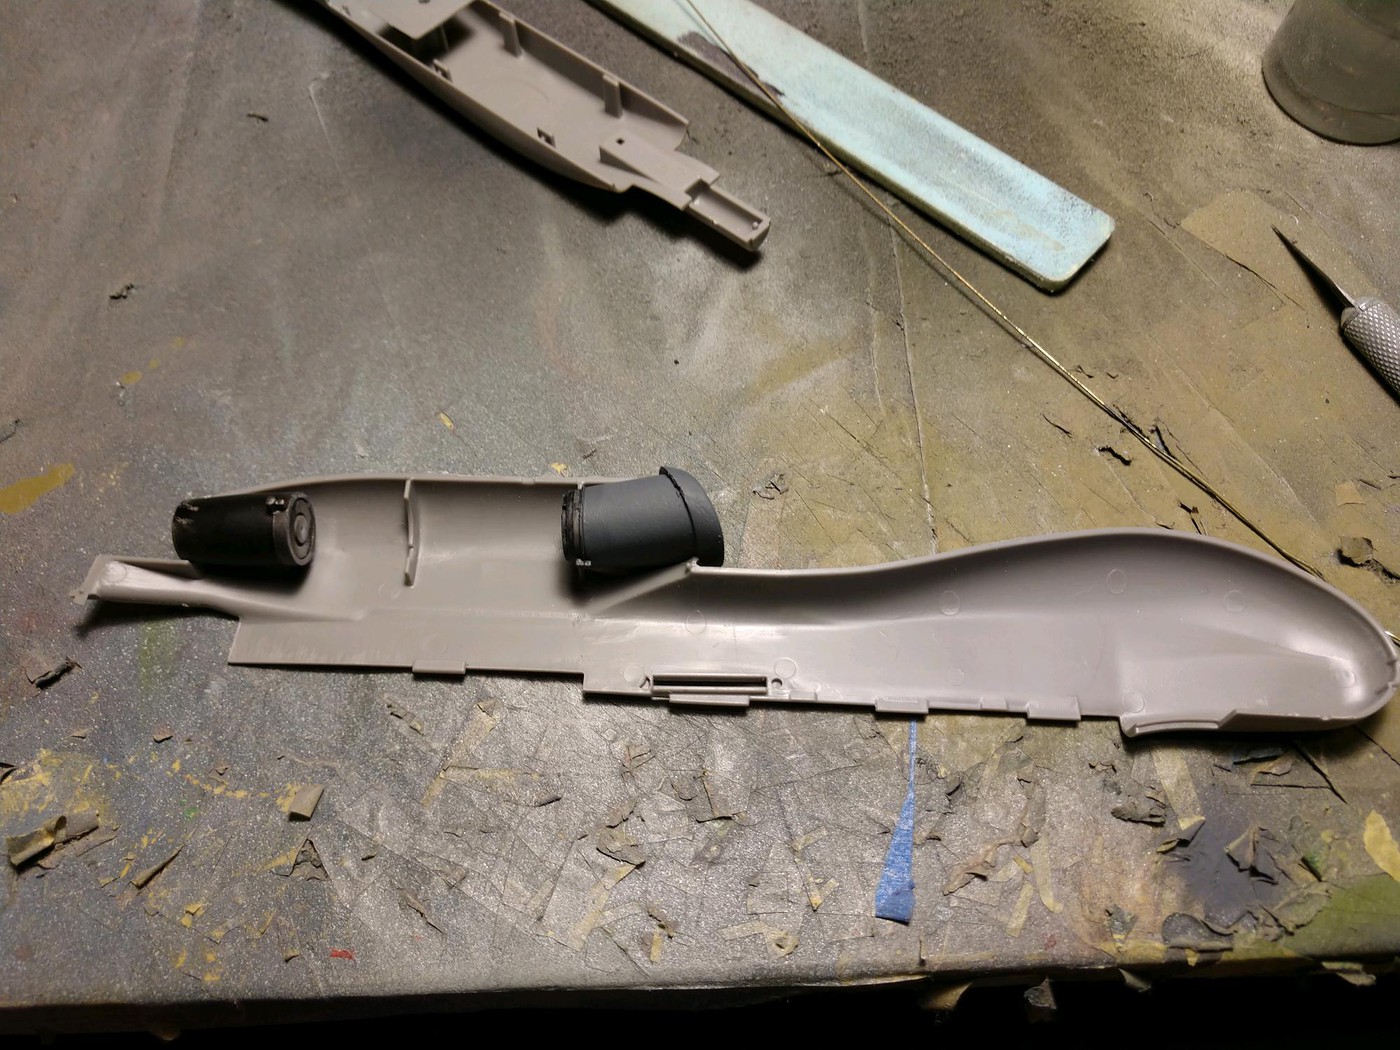
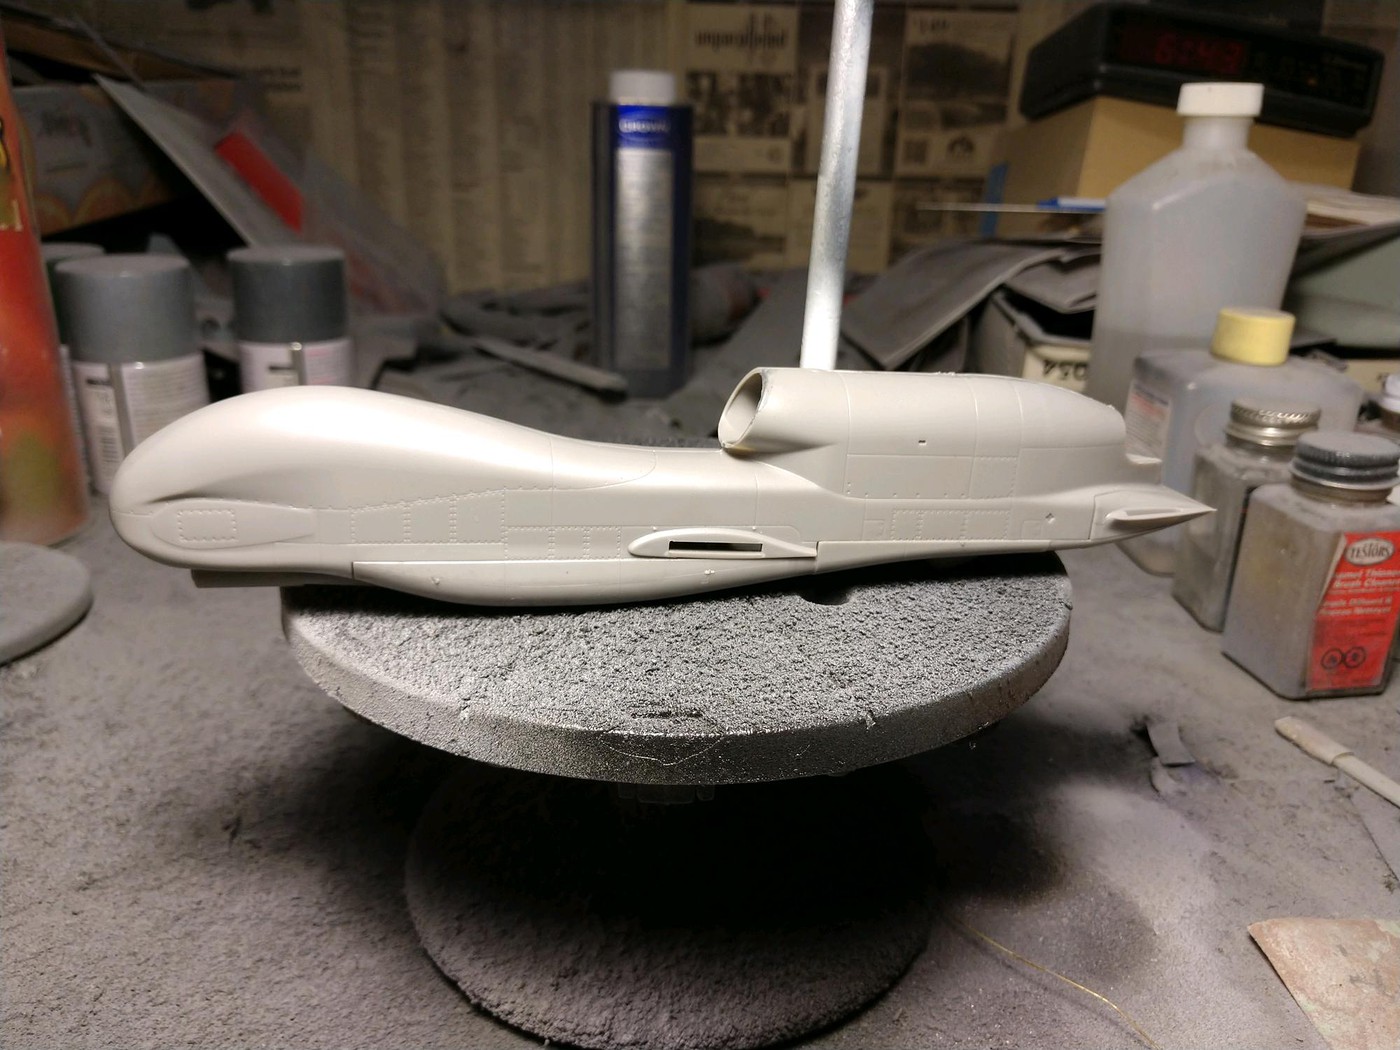
The port side of the fuselage, ready to be glued together. The instructions call for 10g of weight to be put in the nose. Where you're going to put it? I have no idea. As it turned out, I forgot to put it in before I glued the halves together and put in the fuselage bottom piece.

The fuselage is together. While the fit is okay, it wasn't as good as I was led to believe. There is a need for a spreader bar aft of the wings and there is some serious gapage where the beaver tail joins the rear of the fuselage. Not to mention a nasty seam on top of the engine fairing. Normally I would have run a bead of superglue from the underside of the engine fairing to give the putty something to stop against, but I didn't find my superglue until I'd applied the second coat of putty.

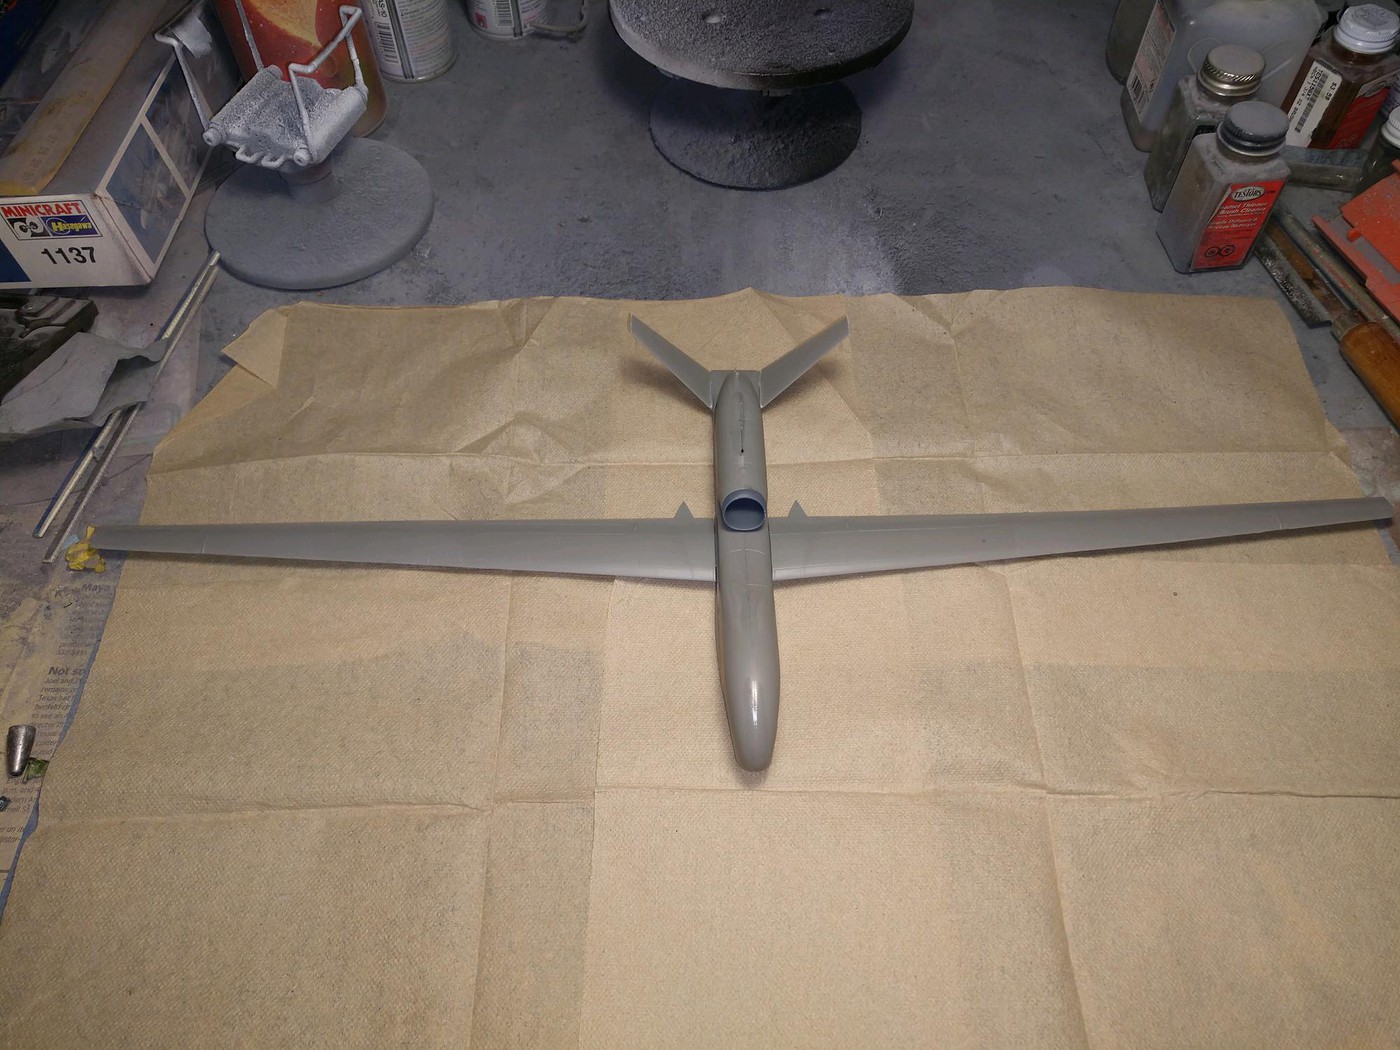
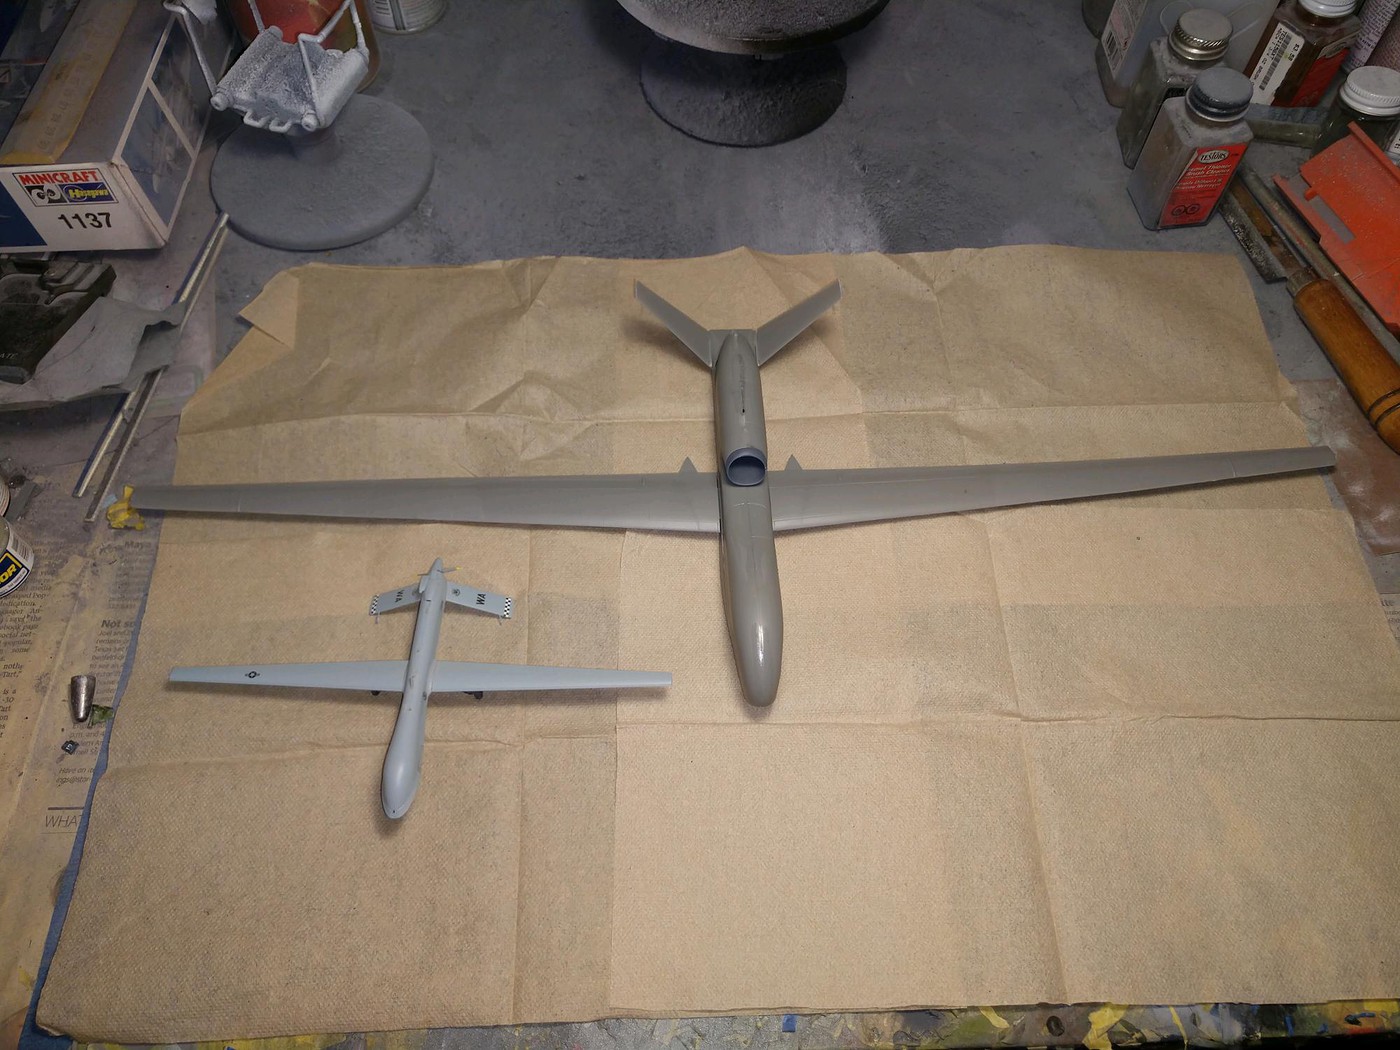
The assembled fuselage with wings attached (not glued).

For a sense of scale, that is a Platz 1/72 Predator shown with it. The Predator (not a small aircraft itself) is about the size of a P-51.

Since these pics have been taken, I filled and sanded the more egregious seams on the fuselage and primered it. I've also painted the bottoms of the wings gunship gray (the tops will be white (Tamiya rattlecan).  The fuseelage will be overall gunship gray as well. To break up the some of the monotony, the radome will be painted a different shade of gray to simulate the discoloration from the sun. Visible in an earlier picture, there is a teardrop shaped fairing on each side of the front fuselage that will be painted a very dark gray as well. I've seen it in pictures of various airframes, but don't know if this particular bird ever had them painted. We'll call it artistic license.

Buddy- Those who say there are no stupid questions have never worked in customer service.

JOIN OUR COMMUNITY!

Our community is FREE to join. To participate you must either login or register for an account.

SEARCH FORUMS
FREE NEWSLETTER
By signing up you may also receive reader surveys and occasional special offers. We do not sell, rent or trade our email lists. View our Privacy Policy.