SEARCH FINESCALE.COM

Enter keywords or a search phrase below:

No More Excuses GB....end date extended

108850 views
763 replies
1 rating 2 rating 3 rating 4 rating 5 rating
  • Member since
    July 2004
  • From: Sonora Desert
Posted by stikpusher on Sunday, May 3, 2009 7:34 PM
I did a bit of painting this weekend on three kits I have for this GB, Mirage 2000, F-8, and T-34, but nothing worth taking any pics to post of progress yet. Still plodding along here....


F is for FIRE, That burns down the whole town!

U is for URANIUM... BOMBS!

N is for NO SURVIVORS...

       - Plankton

LSM


  • Member since
    July 2004
  • From: Austin, Texas
Posted by Lt. Zogg on Tuesday, May 5, 2009 3:17 PM

Bufflehead, Thumbs Up [tup]Thumbs Up [tup] on your Sherman.  That thing is beautiful.

I've managed to finish my Stuka G-2, I'll post some pics later this week.   Work is progressing slowly on the M13/40, since I lost a part (grrr). 

Jeff

  • Member since
    July 2004
  • From: Sonora Desert
Posted by stikpusher on Saturday, May 9, 2009 3:02 PM

Some progrees worth photgraphing to report. On my T-34 all major assembly complete (still need to add some stowage items the headlight lens) and finally got the whole beast painted in its' base color- Gunze Mr Color Russian Green 1. 

And some progress on my F-8. I started painting the white undersides, but have not been having much luck...paint either too thin or too thick... the wings and stabilators are just in place for the pics, not glued in place yet. Still got quite a ways to go yet...


F is for FIRE, That burns down the whole town!

U is for URANIUM... BOMBS!

N is for NO SURVIVORS...

       - Plankton

LSM


  • Member since
    September 2006
  • From: Dripping Springs, TX, USA
Posted by RBaer on Monday, May 11, 2009 12:46 PM

That's a green T34......looking forward to seeing it weathered up.

Some progress on the KV to report. Basic washes, dusting and a little chipping done. I grabbed soem big Russian-looking numbers from the decal spares box and put them on the turret, based on pics of T34s on the Leningrad front. I did verify that there was one unit equipped with a mixture of KV-1s and KV-85s in action at that place and time, so the markings are at least within the realm of possibility......I will probably add some more dirt and grime, maybe.

Remaining is a broken headlight lens, a commander figgie and his hatch, then possibly some junky-looking stowage.

I'm almost done with this one, so the M4A3E8 is next on the list.....I think.

Apprentice rivet counter.

  • Member since
    July 2004
  • From: Austin, Texas
Posted by Lt. Zogg on Tuesday, May 12, 2009 10:51 AM

RBaer,

 I'm digging the KV-1, mine's been pretty close to that stage for a while, I don't know why I can't get motivated to finish, but your post is helping.  Nice weathering job.  What kind of figgie are you going to use for your TC? 

Stikpusher, that T-34 is looking really green, like tractor green.   I'm thinking that might be an aircraft camo color you've used?  On the other hand, I've heard of the Russians using whatever paint was available at the time, so you can get away with pretty much any shade of green for Russian armor.

Jeff

  • Member since
    July 2004
  • From: Sonora Desert
Posted by stikpusher on Tuesday, May 12, 2009 2:02 PM
Lt, yes it is a very stark green shade... not quite so bright to the eye a it looks in the pics. I am presuming that it is the so called "tractor green". Since I am building this as a Stalingrad Tractor Factory (STZ) built T-34, that would seem appropriate. Gunze Mr Color makes it as "Russian Green 1" Their "Russian Green 2" is in line with the Testor MM shade. A wash of Raw Umber should tone down the brightness of this one when I start the weathering in a day or two...


F is for FIRE, That burns down the whole town!

U is for URANIUM... BOMBS!

N is for NO SURVIVORS...

       - Plankton

LSM


  • Member since
    September 2006
  • From: Dripping Springs, TX, USA
Posted by RBaer on Tuesday, May 12, 2009 2:10 PM
Thanks, Lt. I'd like to find a MIG figgie, they do a guy that looks really "tired", well-posed. Otherwise, I'll use a Tamiya guy and try and wrap him around the open hatch, make him look worn out.

Apprentice rivet counter.

  • Member since
    September 2003
  • From: Northern hemisphere - most of the time-
Posted by blkhwkmatt on Sunday, May 17, 2009 11:07 PM

All,

I'm still here, been watching all the great progress.  Just havent had the motivation to pick up any more of my shelf queens, guess that is why they were there in the first place.

matt

Quidquid latine dictum sit, altum videtur!!! - Anything said in Latin sounds profound!


  • Member since
    January 2006
  • From: Nevada, IA
Posted by LeopardMan on Thursday, May 28, 2009 11:11 PM

OK. Well as self acclaimed procastinator I decided enough of that and a few pics. The Leo has is pretty much assembled except tools and MG and then ready for the final touches. The Shinden is mask and ready for the upper surface paint and the Seawold is getting ready to be painted after I filled the longest seams in my life (the seams probably total close to 6ft).The Hull of the seawolf had some major fit issues meaning that there was a length difference between the 2 hull halves of about .080". That and the the thin material caused me quite some headaches and a significant amout of putty and sanding. Anyway, here they are.

Italeri 1/35 Leopard 1A4

Hasegawa 1/72 Shinden

Trumpeter 1/144 Seawolf


Never believe a statistic you haven't done yourself - Winston Churchill Member IMPS Pastic-Surgeons, West Des Moines, IA
  • Member since
    January 2006
  • From: Nevada, IA
Posted by LeopardMan on Wednesday, June 17, 2009 8:48 PM

BOOYA!!!!! One down, five more to go. Here she is the Hasegawa 1/72 Kyushu Shinden. Since this was just my 3rd plane I finished I am still going through a very steep learning curve. And lessons I learned. lesson 1: Mask, Mask and then mask some more; lesson 2: Never use Superglue for filling gaps again and lesson 3: I hate masking canopies. Anyway here she is in all her beauty and I am pretty happy i got her looking the way she does. She aint perfect thats for sure and once u get closer than 6 ft you will see. But what the heck we are here for the fun of it. I built her OOB and only added some magic thread or the aerial. She is painted in Tamiya acrylics and I tried my luck with some oil washes. She is definitly dirtier than a prototype would be after 45 minutes total in the air. As always critique is welcome.


Never believe a statistic you haven't done yourself - Winston Churchill Member IMPS Pastic-Surgeons, West Des Moines, IA
  • Member since
    September 2006
  • From: Dripping Springs, TX, USA
Posted by RBaer on Thursday, June 18, 2009 2:39 PM

Nice work, LeopardMan.Thumbs Up [tup]

I've got a plane thingie in the works, I'll take your lesson to heart. Otherwise, I got nuthin'. Hope to hit the bench next week.

Apprentice rivet counter.

  • Member since
    July 2004
  • From: Sonora Desert
Posted by stikpusher on Friday, June 19, 2009 6:28 PM
It's beautiful Leopard Man! I just love the looks of this unique bird. I have the Hasegawa 1/48 kit in my stash and will tackle it one day.... what problems did you have with the superglue for your gap filling?


F is for FIRE, That burns down the whole town!

U is for URANIUM... BOMBS!

N is for NO SURVIVORS...

       - Plankton

LSM


  • Member since
    January 2006
  • From: Nevada, IA
Posted by LeopardMan on Friday, June 19, 2009 11:34 PM

thanks guys.

Stikpusher: I tried Super Glue for the first time but it got so rock hard that I had a very hard time sanding. Resulting in more plastic taken of then glue. I might have used the wrong glue too. It was the of the shelf Loctite stuff.

Never believe a statistic you haven't done yourself - Winston Churchill Member IMPS Pastic-Surgeons, West Des Moines, IA
  • Member since
    January 2006
  • From: Nevada, IA
Posted by LeopardMan on Saturday, June 20, 2009 5:19 PM

Second one done....four more to go. Here is the Italeri Leopard 1A4 OOB. I won this kit a cpl years back at a contest raffle. Unfortunately it must have had some water damage because most of the decals were useless and I only used what I could. So there a few decals missing. It was a very enjoyable build I must say. The amount of detail for a kit thats almost 30 years old is just amazing. This kit comes in excess of 300 parts. Since I couldnt find yellow oliv paint I just used Tamiya XF-58 Olive Green. Olive drab might have been a better choice. Anyway, After a coat of future I gave it a little pin wash, decals, flat coat, some dry brushing with mint green and some Bragdon powder and call it good. If things go as planned I should have The Trumpeter USS Seawolf and the JGSDF Type-82 Command Vehicle done this week as well.

Joe

Never believe a statistic you haven't done yourself - Winston Churchill Member IMPS Pastic-Surgeons, West Des Moines, IA
  • Member since
    September 2007
  • From: galt, ca.
Posted by dirtball on Saturday, June 20, 2009 6:56 PM

  Well...uh....finaly have an update. First one since theis GB started. Was going to AB some flat black on my F-86 and found the paint was completly dried up! No were to get it today either. So I found my yellow was still good and did some work on the F-105. Well bombs anyway. So here is a couple of pics to prove I havent abanded you all. Do I win a prize for being the worst procastinator??.........Harv

 100_1196.jpg picture by dirtball_photo

and the F-86

 100_1048.jpg picture by dirtball_photo

"I once shot an elephant in my pajamas. How he got in my pajamas, I`ll never know!"
  • Member since
    January 2006
  • From: Nevada, IA
Posted by LeopardMan on Tuesday, June 23, 2009 8:15 PM

And there were only 3 left. Here is my first submarine ever. The Trumpeter 1/144 Seawolf. Never thought that such a big model could have so few pcs, I think it totalled out at about 45. well 45 pcs just gonna be a walk in the park I thought. yeah right. This wonderful model contains approx 6ft in seams that need to be filled and sanded thanks to the .080" length difference in the hull halves. I also had some problems with the decals, even so they were printed very nice and were thin, I have problems with silvering even so I used Solvaset. Also the decals around the periscope and radar mast were a pain in theCensored [censored]. But I got her done and that counts. I teid a full oil wash and since I never did a wash on an almost house sized object that leaves plenty of room for improvement for me as well. Anyway here she is, enjoy and as always cirtique is welcome. (btw my large tripod gave out on me so i had to make do with the little one).

Dirtball, better late than never. you still got 6 weeks to procastinate. I am not sure about a prize though. And I am sure there are more contenders in the race since I still have 3 more to finish. Anyway how did you attach the tooth picks?


Never believe a statistic you haven't done yourself - Winston Churchill Member IMPS Pastic-Surgeons, West Des Moines, IA
  • Member since
    October 2004
  • From: Northern Virginia
Posted by ygmodeler4 on Tuesday, June 23, 2009 8:36 PM

Hey guys, all your builds are looking fantastic.

I was hoping to get in on this one with a couple models. I recently had surgery on my shoulder, so I can't be as active as I wanted to be...can't get a job for the summer now, so I want to focus on finishing some of my already started builds. The builds I'm hoping to finish for this GB are:

Academy 1/35 M113 Fitter IDF

This was started A LONG time ago

Revell's F-14A

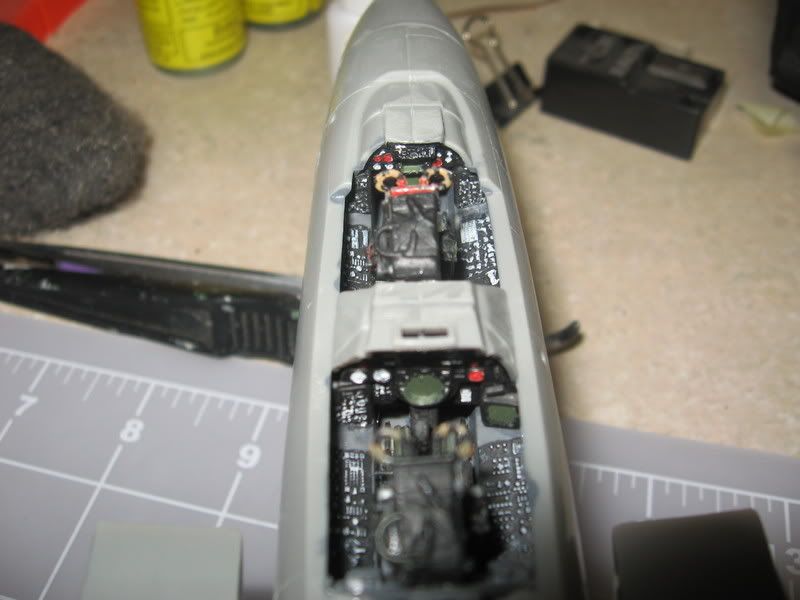
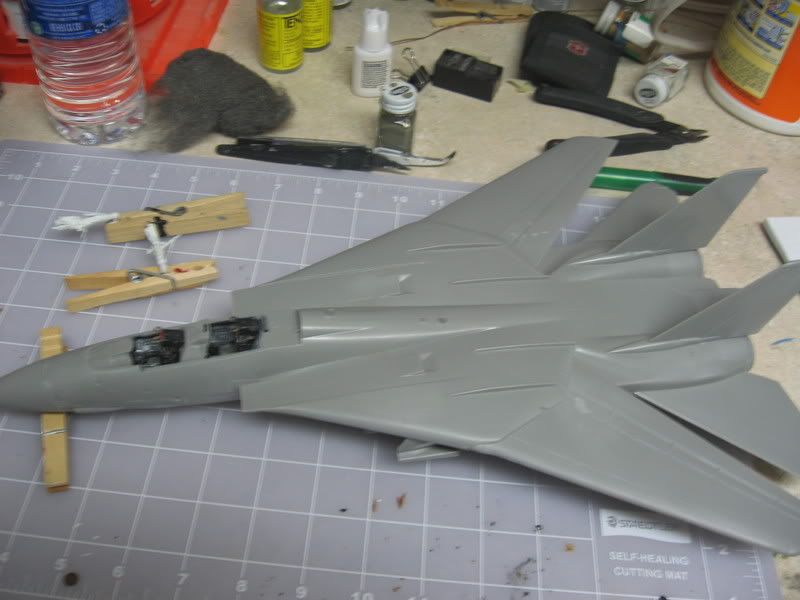
Also started a while ago, but it has some paint on it.


I have a couple more builds that need to be finished, but I won't be able to finish them before the deadline and I really want to concentrate on finishing these because all I have to do is some final assembly and that time consuming and hassling painting stage....so what do you guys say, want some more company?

-Josiah

  • Member since
    September 2007
  • From: galt, ca.
Posted by dirtball on Tuesday, June 23, 2009 9:55 PM

  Thanks . Not a sub guy, but it looks awsome! I like the weathering effect. I use skewers about 6" long. They are just jammed into the hole in the nose for the fuse. Not majic. I have them painted now..............Harv

 100_1201.jpg picture by dirtball_photo

"I once shot an elephant in my pajamas. How he got in my pajamas, I`ll never know!"
  • Member since
    April 2005
  • From: Australia
Posted by taxtp on Wednesday, June 24, 2009 2:52 AM

Hey Leopardman,

You are on fire ! You're knocking these off really quick. Nice Sub by the way.

I can report absolutely no progress on my Komet, and I don't have an excuse within reach.

Cheers

Tony

I'm just taking it one GB at a time.

  • Member since
    January 2006
  • From: Nevada, IA
Posted by LeopardMan on Wednesday, June 24, 2009 8:36 AM

Thx dirtball and tax. Unfortunately not having a job right now helps in that matter. I sure it will change eventually.

Dirtball: I like the way the bombs turned out

Never believe a statistic you haven't done yourself - Winston Churchill Member IMPS Pastic-Surgeons, West Des Moines, IA
  • Member since
    July 2004
  • From: Canberra, Australia
Posted by Aussie747 on Wednesday, June 24, 2009 10:42 PM

Can I join?

I will be conservative with what I can finish in the time left!

So put me down for a 1/144 Revell KC-10 and a 1/72 Lindberg Kingfisher. Pictures in current condition to follow shortly.

Ray

  • Member since
    October 2007
  • From: Inland Northwest
Posted by Summit on Wednesday, June 24, 2009 10:53 PM

Ray - Welcome aboard , Wow a 1/144 KC-10 Smile [:)] and one of my favorites a Kingfisher Approve [^]Thumbs Up [tup].Our Fearless leader is on R&R somewhere cooking Bratwurst and Brewing Homemade Beer. Dinner [dinner]Make a Toast [#toast]

He wanted me to tell everyone Fantastic Jobs on the completions and keep completing those "Shelf Sallies"  Look to see him back posting in the near future. 

Sean "I've reached nearly fifty years of age with my system." Weekend GB 2008
  • Member since
    January 2006
  • From: Nevada, IA
Posted by LeopardMan on Wednesday, June 24, 2009 11:06 PM

ygmodeler: I guess I take the chance and welcome you aboard too since it appears you got overlooked. I want to see that Fitter done. BTW what color are you intending on using?

 Ray: Welcome aboard

Summit: Forgive me if I overstepped my responsibilities. But I thought the more, the merrier.

Never believe a statistic you haven't done yourself - Winston Churchill Member IMPS Pastic-Surgeons, West Des Moines, IA
  • Member since
    October 2007
  • From: Inland Northwest
Posted by Summit on Wednesday, June 24, 2009 11:44 PM

LeopardMan -  I have been backreading post as I had missed several when I popped back up on the main grid.  Some Fantastic work  you have submitted, I need to spend more time at the bench and get caught up on my shelf sallies also... Thanks for being on the welcoming committee - I feel you are due for a promotion but in true to this GB Procrastination I will submit the paperwork to Roy when I get around to it Whistling [:-^]

ygmodeler - Bummer to hear about your shoulder. Glad to see you aboard and looking forward to your progress.

Harv -  Nice to see your work being posted again, when do we get to see them on the racks ? Give my Best to Bev Thumbs Up [tup]

Sean "I've reached nearly fifty years of age with my system." Weekend GB 2008
  • Member since
    October 2004
  • From: Northern Virginia
Posted by ygmodeler4 on Wednesday, June 24, 2009 11:48 PM
 LeopardMan wrote:

ygmodeler: I guess I take the chance and welcome you aboard too since it appears you got overlooked. I want to see that Fitter done. BTW what color are you intending on using?


Thanks, I forgot what the name is, some Model Master Acryl paint, the base coat is already on it, I gotta add a bunch of smaller parts and paint stoage items, attach stoage items, finish up the crane, put decals on it, and then weather it...doesn't sound like much, but I'm starting up physical therapy so I won't have TOO much time on my hands, and i'm a slow worker :\

Josiah

-Josiah

  • Member since
    January 2006
  • From: Nevada, IA
Posted by LeopardMan on Thursday, June 25, 2009 12:02 AM
Summit, thanks. And as far as the promotion is concerned, dont worry about it I am contemplating to promote myself with a possible GB I am thinking about to to start.
Never believe a statistic you haven't done yourself - Winston Churchill Member IMPS Pastic-Surgeons, West Des Moines, IA
  • Member since
    July 2004
  • From: Canberra, Australia
Posted by Aussie747 on Thursday, June 25, 2009 6:02 AM

OK,  here is where I am at with my entries.

The Kingfisher is so close to completition, I just need to mask the canopies to get on with painting

The KC-10 is in a similar state though I have been having trouble with getting a base coat on it. Did you know that Tamiya spray pack paint does not like going over Revell paints, well I do now! I have also knocked the engines off their mounts a few times so the alignment is not the best anymore. I might try and fix them up again.

So off to the bench....

Ray

  • Member since
    September 2007
  • From: galt, ca.
Posted by dirtball on Thursday, June 25, 2009 10:07 PM
 Summit wrote:


Harv -  Nice to see your work being posted again, when do we get to see them on the racks ? Give my Best to Bev Thumbs Up [tup]

  Hey My friend, how ya doing?? Saw your "mowing" outfit. NNIIICCCCEEEE!! Thanks for the look in. On the RACK? You mean finished? Lets just say I`m shooting for years end

 No updates as of today. Maybe this weekend. Suppose to be 105 this weekend!.....Harv

"I once shot an elephant in my pajamas. How he got in my pajamas, I`ll never know!"
  • Member since
    September 2006
  • From: Dripping Springs, TX, USA
Posted by RBaer on Wednesday, July 1, 2009 11:15 AM

I'm soooo sloooow......

But, here's a wee bit of progress on the Merk, I think......

I had a road wheel on one side that I removed the rubber tire for a beat-up look, and didn't like it, so I changed it up, and added a little more dirt overall. I'm down to that darn ball-and-chain stuff, and no progress there.... and I need to do it before I add stowage in the turret basket and a fig. I may end up just passing on it, much as I hate to do that. Anyway, a pic or two, with a new (to us) camera. Woo hoo!

I think need to correct the area at the right front where the fender is missing. It should be "open", according to the pics I have.

Apprentice rivet counter.

  • Member since
    January 2006
  • From: Nevada, IA
Posted by LeopardMan on Wednesday, July 1, 2009 11:43 AM

RBear, its looking good. I love it. One question though, what color did you use?

Joe

Never believe a statistic you haven't done yourself - Winston Churchill Member IMPS Pastic-Surgeons, West Des Moines, IA
JOIN OUR COMMUNITY!

Our community is FREE to join. To participate you must either login or register for an account.

SEARCH FORUMS
FREE NEWSLETTER
By signing up you may also receive reader surveys and occasional special offers. We do not sell, rent or trade our email lists. View our Privacy Policy.