SEARCH FINESCALE.COM

Enter keywords or a search phrase below:

Official Natural Metal Finish Group Build

144526 views
1007 replies
1 rating 2 rating 3 rating 4 rating 5 rating
  • Member since
    November 2012
Posted by dioramator on Tuesday, August 18, 2009 9:43 PM


Here it is

I foiled what I could before final assembly, because it is easier to handle the kit that way.

It is now ready to join the fuslage halves, so I can foil around the top and bottom.

(I put a paint bottle in to give some idea of the size of the kit).


  • Member since
    July 2008
  • From: USA California
Posted by vetteman42 on Tuesday, August 18, 2009 10:48 PM
Dioramator WOW thats a bigun, how many rolls of foil did you have to use ? A great start I must say, cant wait to see this one finished !!!

Randy So many to build.......So little time

  • Member since
    November 2012
Posted by dioramator on Tuesday, August 18, 2009 11:41 PM

 vetteman42 wrote:
Dioramator WOW thats a bigun, how many rolls of foil did you have to use ? A great start I must say, cant wait to see this one finished !!!

I started with a 10 meter roll of foil ($0.99 at the supermarket) and still have most of it left. I'm using my paper guilotine to cut it, and am not wasting very much.

I'm joining the fuselage thisafternoon, I can honostly say I've put kits together that fit a hell of a lot better than this one, clamps and tape everywhere. So finally it is starting to look like a plane.

Brett


  • Member since
    July 2008
  • From: USA California
Posted by vetteman42 on Friday, August 21, 2009 12:24 PM

Dioramator Thanks for the heads up on the fit issues I have the bit kits I have the Revell 1/32 P-51B I am waiting to start on. Hope you have more pictures soon.

I have been making progress on the P-38 I should have used paint instead of foil on this build, but being a stuborne type I had to finish with the foil. I just have to finish the tails and will be ready for the canopy and final details. I will try and get some pictures posted this evening.


Randy So many to build.......So little time

  • Member since
    June 2009
  • From: Netherlands
Posted by kermit on Friday, August 21, 2009 4:55 PM

Dioramator,

Looking very good mate. You seem to have the foil method in your fingersWink [;)] I might have read over it, but what brand of stang are you doing? Looking forward to your final assembly results.

On the side: Been away from the group for a few days (bit of an armor phase: /forums/1174760/ShowPost.aspx) and all of the sudden half the community is doing foilworkSmile,Wink, & Grin [swg]. Are you guys doing stuff behind my back here??Big Smile [:D]

Might have to do a flak panzer to slow you guys down...Whistling [:-^]

I haven't forgotten the aircraft department but i have done so many AC models lately i wanted to do something else to keep "fresh". Learning lots of stuff and plan to get back on here to apply learned techniques and improve with every new model. Ofcourse i will keep you guys postedWink [;)]

Richard

"Success is the ability to go from one failure to another with no loss of enthusiasm." - Sir Winston Churchill

  • Member since
    November 2012
Posted by dioramator on Friday, August 21, 2009 8:13 PM

Hi Guys

vetteman, the fit issues are mainly confined to the fuslage halves, (which will look very obvious if not addressed) I had to put it together on join at a time, luckily I was able to get clamps and bolsters to most of the joins. the really bad one was between the cockpit and the tail. so I got it looking pretty good, but it was at the expense of a couple of rivets.

Kermit. the model is the Airfix 1/24 North American Mustang. I have some photos of one that visited our local airport, that I am using for reference for the build. (that is an Australian built Mustang, built in Fishermans Bend in Melbourne)


Brett


  • Member since
    April 2005
Posted by Thunderbolt379 on Friday, August 21, 2009 8:50 PM

Hi Brett -- Wow, Eclat! I photographed her several times at Avalon Airshow. She was (still is?) the personal mount of "Traps," the one-time leader of the RAAF Roulettes. Excellent reference, we do have some beautiful Mustangs Down Under.

Mike

http://worldinminiature.blogspot.com/

  • Member since
    July 2008
  • From: USA California
Posted by vetteman42 on Friday, August 21, 2009 9:50 PM

Dioramator Thanks for posting the picture of the RAAF Mustang, I am ashamed to admit I havent before now seen a picture of one of them. I did know they were built there though. Now I am chompin at the bit to see your build of a very nice looking pony.


Randy So many to build.......So little time

  • Member since
    November 2012
Posted by dioramator on Friday, August 21, 2009 10:22 PM


Hi Mike

wow, I didn't realise there was another Aussie in the group.

That's the plane, "Eclat". the photo posted above was one I picked up off the net. the photos that I am using (for reference) were taken by my wife at the Jamestown Fly-in in October 2000, but using a film camera, so I have just scanned a few of them in (so excuse the quality).

they let my brother-inlaw park his mustang on the tarmac to take some photos of the two Mustangs together.

how is your project coming along?


Brett


  • Member since
    April 2005
Posted by Thunderbolt379 on Friday, August 21, 2009 10:35 PM

Hi Brett -- yes indeed, I'm over in Adelaide.

Nice shots! I must get to the next Avalon and update my photo archives with digital stuff, I have five Avalon shoots all on film, plus video from the '03 event.

I do approve of the Boss 351! There's one just like it in an auto-detailers' shop here (even the same colour!). My fav is the Pontiac Trans Am, my fiance drives an '82. I've always said I wanted to take a photo like this of my prefered means of transport, a '79 Trans Am and a '45 Mustang!

You know, this makes me feel like dashing out another Stang, maybe in obscure Latin American markings, I have a great Guatemalan scheme of NMF and Mayan gods... Will need to rustle up a spare Tamiya D.

Cheers,

Mike

http://worldinminiature.blogspot.com/

  • Member since
    July 2008
  • From: USA California
Posted by vetteman42 on Friday, August 21, 2009 11:08 PM
Brett Now those are pictures of  two fine Mustangs Big Smile [:D] Thanks for sharing them. Way back when I had a 66 pony, loved that car. My little sister has a 69 being restored now.

Randy So many to build.......So little time

  • Member since
    April 2005
Posted by Thunderbolt379 on Saturday, August 22, 2009 12:58 AM

Quick progress report on the Tamiya 1:72 Thunderjet -

Interior painting is coming along nicely, I'm about half done the cockpit, the seat is done but for the harness decals, the tailpipe is done, and the gear bays are all sprayed chromate yellow. The intake is being put into NMF and the nose weights are installed, two above the gear bay, two superglued inside the fuselage under the level of the cockpit floor. The wings and auxilliary tanks are assembled, but the seams are not yet dressed.

This lil kit just about clicks together, it should be excellent. I've ordered up the Express Masks for the canopy, and will be using kit decals, a scheme from 1956 (thus a grey interior, not green, as the AF changed in 1953). I tried a quick squirt of the Talon Acrylics on some scrap plastic and at this point I'm not sure if I'll be using them, I might go with enamels and leave the Talons for experimental spraying at a later date. We'll see when I get closer to the job, though.

Cheers, photos before long,

Mike

EDIT: I managed some spraying thisafternoon, the rest of the interior gray and satin black. Unmasking, touchups as needed, drybrush the controls and apply the instrument and harness decals, and this one will be nearly ready to close up the fuselage.

http://worldinminiature.blogspot.com/

  • Member since
    July 2004
  • From: Sonora Desert
Posted by stikpusher on Saturday, August 22, 2009 12:25 PM
After weeks and weeks of peeking in the box at my kit, this morning I finally began construction. I built the cockpit, wings, nose gear/intake splitter area. I must say I am impressed with the level of detail Revell has in this kit, especially the wheel weels and cockpit. While I cant quite say this kit is building itself, it is very very nice to build. I have a feeling this kit will move along quickly as there do not look like there are many areas where a snag can happen... I will try to post some initial pics by the end of the weekend here.


F is for FIRE, That burns down the whole town!

U is for URANIUM... BOMBS!

N is for NO SURVIVORS...

       - Plankton

LSM


  • Member since
    July 2004
  • From: Sonora Desert
Posted by stikpusher on Saturday, August 22, 2009 2:53 PM
I went back to work on my Thunderjet after a mid morning breakfast and completed all building for this kit that I can without painting.... I have not built this much of a kit this quicky or easily in any time that I can remember.


F is for FIRE, That burns down the whole town!

U is for URANIUM... BOMBS!

N is for NO SURVIVORS...

       - Plankton

LSM


  • Member since
    June 2009
  • From: Netherlands
Posted by kermit on Saturday, August 22, 2009 3:03 PM

After years of ships i have found out the same thing about both aircraft and armor. You can get a long way just cleaning and gluing parts (after the pit colouring ofcourse) before you have to take out the (air)brush. Great for a casual evening of modeling imhoSmile [:)].

Looking forward to your progress pics stickWink [;)]

Richard

"Success is the ability to go from one failure to another with no loss of enthusiasm." - Sir Winston Churchill

  • Member since
    April 2005
Posted by Thunderbolt379 on Monday, August 24, 2009 8:03 AM

You're right there, Kermit -- there are times you don't want to be bothered with the infernal spraying gear, you just want to trim and glue plastic! Some types of models demand to be painted first, motorcycles, for instance, and I believe Formula 1 cars must be put into colour 100% before assembly. Tanks are good, many of them you can assemble almost completely before getting to the paint, and, as you say, but for the visible interior, planes are the same.

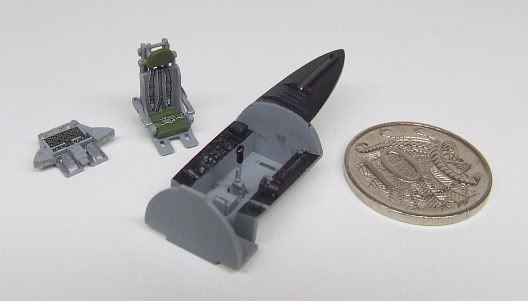
Here's some progress on the Thunderjet. First the cockpit subassemblies, the three-part seat, two-part panel and the tub, sprayed up and drybrushed in acrylics, with the harness and instrument decals applied, and an Aussie 10c piece for scale:

Photobucket" border="0" />

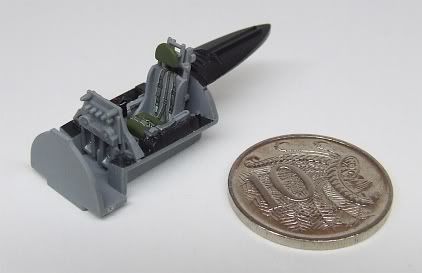
Next, the cockpit assembled:

Photobucket" border="0" />

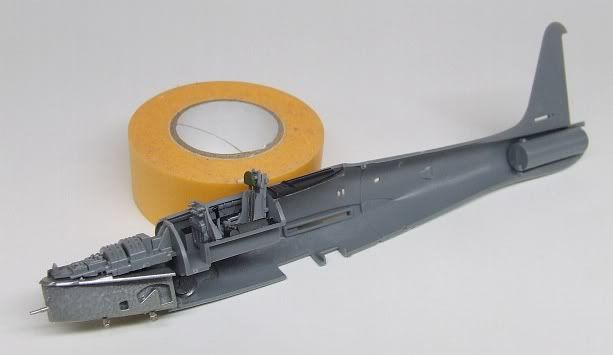
And the cockpit, intake/nose gear bay assembly and jetpipe assembly installed in the right fuselage half (note the crushed lead slug visible under the cockpit floor):

Photobucket" border="0" />

My next job is to close up the fuselage. One sprue attachment point did not cut cleanly, and the plastic 'laminated away' on the surface. I've sealed it down with cya again and will file and polish it out after joining the halves. The wings are assembled and it looks at this point as if Tamiya have tooled the junctures with several degrees too much dihedral (odd sort of error for them to make!). I may try shimming the wingroots at the top with .010" stock to push the angle down, and close the joint up with putty.

Cheers,

Mike

http://worldinminiature.blogspot.com/

  • Member since
    July 2008
  • From: USA California
Posted by vetteman42 on Monday, August 24, 2009 10:50 PM

Thunderbolt379 Your Thunderjet is looking good so far, but I gotta ask how do you work so well on such a small scale that looks like a 1/72. The 1/48 make me crosseyed at times.


Randy So many to build.......So little time

  • Member since
    April 2005
Posted by Thunderbolt379 on Monday, August 24, 2009 10:58 PM

Hi Randy -- Thanks! Yep, it's my first time going down to 72 for a while, and the detail really is fiddly-small! It's good to know my eyes can still handle it, though I must agree I prefer 48. The good things about 72, they cost less and they take up less shelf space.

The scale difference is an interesting question -- my magnifying specs are the same power, my brushes and tweezers the same size, but the object is smaller. The procedures are very much alike but it feels like doing microsurgery without a microscope...

I have a blog essay on this topic, I must post it one of these days!

I'll be closing the fuselage today, and doing some jointline dressing,

Cheers,

Mike

http://worldinminiature.blogspot.com/

  • Member since
    July 2008
  • From: USA California
Posted by vetteman42 on Tuesday, August 25, 2009 12:18 AM

Thunderbolt379 Would you please let me know when you post it ? My 1/48s have been taking up a lot of room in fact I have had to give 2 of them away to make room for new ones. Maybe then I would have the nerve to try one and see if I can build in 1/72.


Randy So many to build.......So little time

  • Member since
    April 2005
Posted by Thunderbolt379 on Tuesday, August 25, 2009 12:25 AM

Randy -- by all means. My blog is a due a new post any day now, I'll see if I can rustle up some photos and get that essay up next. It's not very technique-heavy, more a discussion of the merits of different scales, but interesting all the same.

Cheers,

Mike

http://worldinminiature.blogspot.com/

  • Member since
    March 2007
  • From: Carmel, CA
Posted by bondoman on Wednesday, August 26, 2009 6:24 PM
Vette- can I enter with a Boeing 307. Kitbash 1/72 Maquette fuselage with Academy B-17C wings, tails, motors etc. I'm thinking Alclad Chrome.
  • Member since
    July 2008
  • From: USA California
Posted by vetteman42 on Wednesday, August 26, 2009 7:01 PM

Bondoman I dont see why you cant enter that build Big Smile [:D] Welcome to the shiney group. Sounds like an interesting build, althou I just cant picture what that would look like. Heck I'm not even too sure how to list it on the roster. I am looking forward to seeing it and following your build.

Thunderbolt379 I have been keeping an eye on your blog some interesting stuff you have been writing there. Been learning a thing or two also Big Smile [:D]

EDIT Your build is on the roster Bondoman

Randy So many to build.......So little time

  • Member since
    March 2007
  • From: Carmel, CA
Posted by bondoman on Thursday, August 27, 2009 12:53 AM

Wonderful! I picked up the B-17C "Colin Kelley" today and am choppin' sprue. Here's the prototype. I'll build the B 307 as delivered to PAA, the one in the Smithsonian.

Here's the kit:

It's going to take a while, but you guys have already posted so much info it'll help a lot.

  • Member since
    November 2012
Posted by dioramator on Thursday, August 27, 2009 7:50 AM


Hi bondoman, welcome to the group.

I was thinking that model would look spectacular in foil finish. although you would certainly have your work cut out.

my current build is my first attempt at foiling, and (unfortunately) I am hooked, definately won't be my last.

will post some more WIP update pics shortly.... just a few more panels to go

Brett


  • Member since
    April 2005
Posted by Thunderbolt379 on Thursday, August 27, 2009 8:36 PM

Randy -- that blog post just went up. I think it's a bit more tongue-in-cheek than the technical aspect you were hoping for, so I think I'll write a technique piece on working small as well!

Thanks for the kind words, BTW -- always glad to have my posts be useful!

I'm dressing joints on the F-84 at this point, fit of the fuselage is either endemic to the scale or Tamiya trapped rather a lot of stuff between those halves. No matter, I'll have the wings and tail on shortly. The wing joints are superb, that's a major plus.

Cheers,

Mike

http://worldinminiature.blogspot.com/

  • Member since
    July 2008
  • From: USA California
Posted by vetteman42 on Thursday, August 27, 2009 10:36 PM

Thunderbolt379 Thanks I did enjoy reading your blog, and I have had simular thoughts to what you wrote. I did get my hands on a 1/32 scale Revell P-51B with the thought of hey I can see this one and can go detail crazy, Was giddy as a school girl over the idea. Then came the reality check, after opening the box of course. Am I skilled enough to take this project on and do it justice ?? Not at this point in time, so it sits in my model closet awaiting the day I say ok I am ready.

I have made some headway on the P-38, its ready for the canopy at long last. After that a bit more foil work and shes ready for finishing up, painting, decals and fiddely stuff. I did try something new on this one and used foil from two differant manufactures. I got some cheapo stuff from the dollar store and noticed a slightly differant color so I spotted some of that on and do like the effect althou it is somewhat suttle, I hope is will show up in pictures. After the canopy is on and the foil is finished I will post some WIP pictures.

Oh I picked up a Highflight burner can for my F-104 build for 3 bucks on ebay, another problem solved Big Smile [:D]

Randy So many to build.......So little time

  • Member since
    April 2005
Posted by Thunderbolt379 on Thursday, August 27, 2009 11:23 PM

Randy, glad you enjoyed it. I have that same Revell P-51B in my stash, picked it up about ten years ago. I looked at all the rivets and the displayable engine and figured I had a long way to go before I could do justice to it. I'm thinking that sanding back the rivets may be the best way to go, a scribing job, and really work the engine access panels carefully to get the closest fit, because almost universally, openable panels only look good open -- closed they just simply don't fit to the tolerances of the real thing.

It's all a learning experience, and I think I'll still be learning the day I build my last one! (May that be a couple fo hundred years from now -- it better be if I'm gonna get value out of this stash!)

Cheers,

Mike

http://worldinminiature.blogspot.com/

  • Member since
    September 2007
  • From: Crystal Lake, IL
Posted by firesmacker on Friday, August 28, 2009 4:02 PM

Got more done. I will never, use kit supplied invasion stripes again. Too much of a headache. I'll just take the time and spray them on in the future.

The landing gear and clear parts are done as well. After the paint dries, I will get to work on the prop. I hope to wrap this on up by the end of this weekend.

Thanks for looking. As always, an comments or suggestions are welcome.

Regards,

Jeff

  • Member since
    June 2009
  • From: Netherlands
Posted by kermit on Friday, August 28, 2009 5:15 PM

You did the best you could firesmacker and it looks good from here. The yellow nose makes your model very interesting to see, as does the nose art text.

I take it you did not use any decal softeners to make the decals follow the curves of the wing roots? If not, i would suggest you carefully puncture your decals at those places with a fine needle and apply a generous amount of microsol or smt similar, possibly multiple coats untill your decals follow the curves smoothly.

Nevertheless, great build!Wink [;)] Who doesn't like to see a stang...

A question on the side:

Did your painting instructions tell you to use that anthracite/ flat black colour as antiglare coat? Oh.... and are you planning to weather your kit? (exhaust marks and such?)

Richard

"Success is the ability to go from one failure to another with no loss of enthusiasm." - Sir Winston Churchill

  • Member since
    July 2008
  • From: USA California
Posted by vetteman42 on Friday, August 28, 2009 8:17 PM
Firesmacker I like it, well done, I havent seen too many yellow noses. From my passed attempts yellow is quite difficult to spray or brush on, at least for me it is. You pulled it off beautifully. The aluminum came out well too I like the color variances. I tried invasion decals once and all I can say about that is, it wasnt a pretty sight, still havent worked up the nerve to try painting them. All in all well done and wanna see more.  

Randy So many to build.......So little time

JOIN OUR COMMUNITY!

Our community is FREE to join. To participate you must either login or register for an account.

SEARCH FORUMS
FREE NEWSLETTER
By signing up you may also receive reader surveys and occasional special offers. We do not sell, rent or trade our email lists. View our Privacy Policy.