SEARCH FINESCALE.COM

Enter keywords or a search phrase below:

Official Natural Metal Finish Group Build

144179 views
1007 replies
1 rating 2 rating 3 rating 4 rating 5 rating
  • Member since
    December 2005
  • From: back seat of your car with duct tape streched out
Posted by soulcrusher on Saturday, July 25, 2009 8:13 PM

The Mustang is looking good Guy.  I have read in the reviews that it is a bit of a PIA to clean up the wing area around the guns. I have the same kit boxed as the Aces of the 8th Airforce. On reviewer strongly suggested the Quickboost resin insert that takes the place of the panel with the guns in it to improve the look of the gun area.

                                                                               SoulcrusherPirate [oX)]


  • Member since
    February 2007
  • From: Bournemouth UK
Posted by Luftwoller on Sunday, July 26, 2009 4:45 AM

With Hindsight (Always a great thing to have) I would havea I will do, should i say, as i intend to build more of these splendid kits. When some great sage said, about kits, 'It built itself' i think he may have been talking about this one! Its definately a stunner.

I checked the black gloss coat 1st thing and its still a tad on the soft side so i think ill leave it today before i attempt to polish any marks out of the surface. Anyhoo, im off to play football shortly (Real football, where your not allowed to pick it up, and the only protection you wear are shin gaurds Big Smile [:D]) when i get back, ill set about the U/C legs. Then i think thats all there is left to assemble. Geez this kit seems to have gone quickly.

...Guy

..'Your an embarrassment to the human genus, makes me ashamed to call myself Homo'.
  • Member since
    February 2007
  • From: Bournemouth UK
Posted by Luftwoller on Sunday, July 26, 2009 11:47 AM

LOL, thx Vetteman, theyre the easy bits. Im a bit concerned about this gloss enamel paint im using. I felt it just now and it still feels like it could do with hardening up a touch. Theres also a few grainy bits in it. I may have to lightly wetsand it and then polish the thing. This bleedin NMF is hard work. I think next time (and there will be a next time) Ill use Tamiya Gloss Black (X-1)?

...Guy

..'Your an embarrassment to the human genus, makes me ashamed to call myself Homo'.
  • Member since
    June 2009
  • From: Netherlands
Posted by kermit on Sunday, July 26, 2009 12:02 PM

Vetteman: I can only agree with all the rest that has been said here. This group build is fun fun fun!Big Smile [:D] The thunderbolt was my own choice ofcourse but your reactions and continuous invitations to join the group have made me "aluminum crazy" in a wayWink [;)]

Luftwoller: Probably way out of line to say since i have not nearly the skills you guys do but from the dutch forums overhere i have learned that some of the builders who do natural metal finishes using more "professional" paints like Alclad leave their base coat of black gloss for days before they continue with the actual application of aluminum colours. Just my fifty (euro)cents...Blush [:I]

----

My checkertail is now completely finished, decalled and weathered. The final coat of satin gloss has been sprayed on just now and i will ofcourse post the end results as soon as i dare handle the model in a few hours. Stay tunedWink [;)]

"Success is the ability to go from one failure to another with no loss of enthusiasm." - Sir Winston Churchill

  • Member since
    June 2009
  • From: Netherlands
Posted by kermit on Sunday, July 26, 2009 2:48 PM

As promised here are the final pictures of the p51:

As you can see in that closer up picture the canopy is all glazed up and speckled... Just when you think you have built a pretty nice model (for my standards) something like that happens...Sign - Dots [#dots]. I think somehow some aluminum paint must have accumulated on the inside. The outside is just fine. Ofcourse you only notice this when the last varnish layer has dried and you take off the canopy masking...Bummer...

This kit came (don't ask me why) with two canopies and so i will consider replacing it but ofcourse that will mean i loose the little decals on it... Will think that one over.

And ofcourse, as i have done with all my builds sofar, i picked one of the pictures and ran it through photoshop to produce a sepia "artist impression". Think i might call that "the Kermit touch"...Whistling [:-^]Angel [angel]

As you can see there are tons of things that could have been better: The canopy i mentioned... checkered decals have a few wrinkles and don't exactly line up perfectly just as i feared, to name but a few.

Nevertheless i regard this as a good model as i have learned from it, avoided mistakes i made with the thunderbolt (and made some all new ones in the processBig Smile [:D]) and generally had heaps of fun with this very nice hasegawa kit. Luckily, the carpet monster seemed to be on holiday for this build.

Also i am becoming more and more proficient with both my airbrush and the tamiya weathering set imho.

Your thoughts? Critics? Feedback? Be gentle to this rookie...Blush [:I]

"Success is the ability to go from one failure to another with no loss of enthusiasm." - Sir Winston Churchill

  • Member since
    July 2008
  • From: USA California
Posted by vetteman42 on Sunday, July 26, 2009 10:57 PM

Luftwoller For me the props give me all kindsa trouble, I have a hard time getting them to look right, so when I see a nice one I have to comment on it. Just a small quirk I have I guess.

Kermit Nicely done !! I have to tell you I see a huge improvement in each one of your builds. If I may, I only see one thing you need to work a bit harder on is hiding the seams a bit better I too have lots of trouble in this area. The wing roots look great but the seam on the spine behind the canopy kind of stands out a bit, not too badly though. Hope you dont take offence to my comment. Your canopy now, I dont think I would call that a bad boo boo at all, in fact I think it makes the canopy look like it has had a long rough life. I think the paint got in under the rear of the canopy frame if you notice there is a small gap between the frame and the back of the plane, most bubble top canopys have that gap. I got bit by that one a while back.


Randy So many to build.......So little time

  • Member since
    June 2009
  • From: Netherlands
Posted by kermit on Monday, July 27, 2009 12:17 AM
Thanks Vetteman! Like i said, i learn from every new kit and this one is no exception. The p47 teached me to always use a primer and this one teached me to always do some putty work, even if the fit looks really greatWink [;)] It is noted and will be applied on my next model.Angel [angel]

"Success is the ability to go from one failure to another with no loss of enthusiasm." - Sir Winston Churchill

  • Member since
    February 2007
  • From: Bournemouth UK
Posted by Luftwoller on Monday, July 27, 2009 4:32 AM

Great work Kermit, she looks a build to be proud of. Perhaps you could pry the canopy off and give the inside a polish? If not, dont fret it, just say you had lazy ground crew.

...Guy

..'Your an embarrassment to the human genus, makes me ashamed to call myself Homo'.
  • Member since
    June 2006
  • From: Sunny Califorina
Posted by Sherman1111 on Monday, July 27, 2009 7:19 AM

Kermit

Outstanding job on the P-51

The T-4 is ready for the paint shop

She does kinda look like the SST, I was impressed with the landing gear, Of all the Amodel kits I have built this has been the best. Hit her with primer today and then Alclad Tue.

JD

  • Member since
    February 2007
  • From: Bournemouth UK
Posted by Luftwoller on Monday, July 27, 2009 11:57 AM

Geez JD, thats a monster. Have you bought Alclad by the Ltr? Ive found that these kits of ours drink the stuff like an English Rugby club on tour, drinks real ale!!!

Ive been busy today and have tales of joy and of woe. Ive been waiting for this enamel gloss coat to go off now for 3 days (3 hrs it says on the can). I finally thought id hit it with the alclad. 1st i thought id buff it up to real shineyness. I used some plastic prep first with no joy. Then i tried some stuff for shining canopies, still no joy. Then i tried some T-cut (smooth car polishing compound) this stuff doesnt like enamel gloss coat and ate into it without mercy, right down to the bare plastic. There were a few choice cuss words, i can tell you. So, i decided to strip the lot. I used enamel thinners and wiped the rest of the black gloss off. It did take a while. Through something someone on here said i decided my new black undercoat would be Tamiya Black. To make this a little more shiney and harder i mixed it in the cup 60/40 with Tamiay clear. This stuff is great, gives a good shine and is bullet proof in 15mins. I went down and had some grub while this was going off, went up afterwards and sprayed the Alclad. All up an hour between Tamiya black and te Alclad. To think i waited 3 days for the other stuff. Aah well you live and learn.

Heres how she looks so far, next up the bits of colour here and there,

...Guy

..'Your an embarrassment to the human genus, makes me ashamed to call myself Homo'.
  • Member since
    July 2008
  • From: USA California
Posted by vetteman42 on Monday, July 27, 2009 3:12 PM

Sherman1111 must own Alclad stocks Big Smile [:D]

Two fine Builds gentleman !!!!!!!

Luftwoller A great save there !!! sorry you had that trouble I will have to remember "NOT" to use Plasticoat paint when I try Alclad paints.

Randy So many to build.......So little time

  • Member since
    June 2009
  • From: Netherlands
Posted by kermit on Monday, July 27, 2009 5:23 PM

@ Sherman & Luftwoller:

VERY interesting discussion there about using a gloss black coat prior to applying the aluminum. Makes me seriously considering jumping in with the big boys and try my hands at using these "holy grail of metal paints" called AlcladBig Smile [:D]. Still have a few days to decide...

Luftwoller: GREAT aluminum coating there! I could almost see myself way overhere in Holland!Cool [8D]

Sherman: Really funny looking model and something i haven't seen before. Really makes it interesting to see how the finished model will look like. I will follow your outstanding work with interestWink [;)]

"Success is the ability to go from one failure to another with no loss of enthusiasm." - Sir Winston Churchill

  • Member since
    June 2009
  • From: Netherlands
Posted by kermit on Monday, July 27, 2009 5:52 PM

Just thought i might keep my comments on the various build separate from what i came here to do in the first place: announcing my first full build for the NMF group. This will be the 6th overall aircraft model i am going to attempt and i am intending to make it my best one yet. Bold statement but i am really planning on trying the very best i have to offer on this one.

This evening i have spent on decalling the final model i have on my bench which is a russian I-16 fighter. Tomorrow the weathering and finishing up and then there will be nothing left to hold me from the actual build i am going to attempt:

Yes, a F86 Sabre! Normally i am all into WW2 planes but this one is a nice exception to my taste, being the last true gun/ dogfighter.

I've been introduced to these beauties by playing the game "Mig Alley" a few years back. Apart from that i think their lines and overall appearance are very attractive to look at with the yellow band on the fuselage and sometimes even a shark mouth.

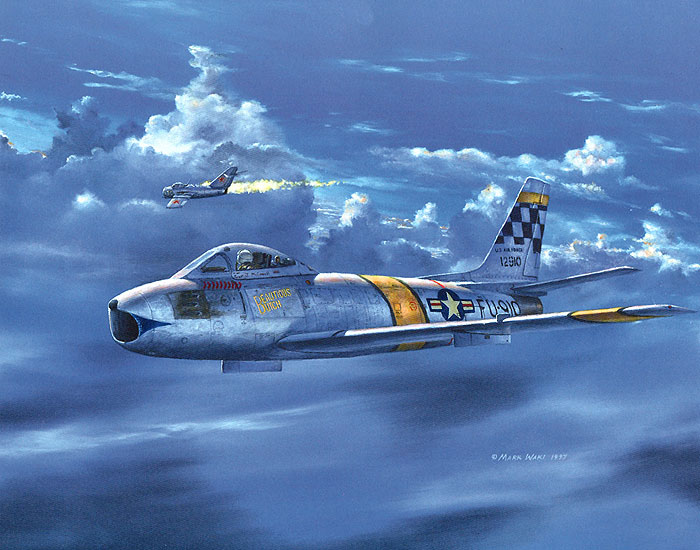
The model i will try is the famous "Beautious Butch" flown by the Korean War top scoring ace Capt. McConnell with 16 credited (mig) kills. Reading about his life was great fun while researching this build and for those with an interest in these matters i will include a URL to a short bio of the man along with a picture:

http://en.wikipedia.org/wiki/Joseph_C._McConnell

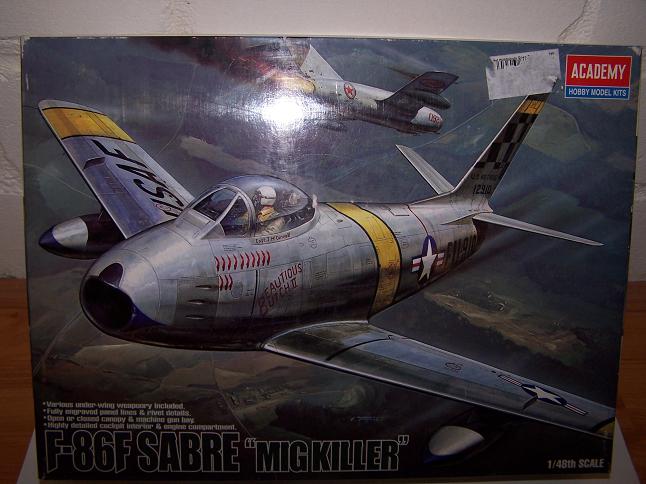
The kit itself is the academy 1:48 F86F Sabre "Mig Killer" as shown on the boxart just now.

Contents of the box:

(note the ballpoint there for scale. This will be the biggest model i have built yet)

Decals:

Painting instructions for the model i am doing:

And finally, i have found a nice painting on the www of my model as it is supposed to turn out (hopefully):

I am very enthousiastic about this one and can't wait to make a start. Hope you guys like my choice and my presentation sofarSmile [:)]

Richard

"Success is the ability to go from one failure to another with no loss of enthusiasm." - Sir Winston Churchill

  • Member since
    June 2006
  • From: Sunny Califorina
Posted by Sherman1111 on Monday, July 27, 2009 5:52 PM

The Tamiya X-1 is the only way Ill use Alclad now. I haven't had any lifting problems and it cures fairly fast. I sprayed the T4 today and want to put the decals on before I take any more pictures. I did get my surgery date of Aug 3rd so this will be the last build for a while. I wish I had stock in Alclad, but the guy knows me at the hobbyshop and all I have to do is call and useually they will have it for me the next day. The T4 took 1 1/2 bottles of steel. I really like how it came out.

jd

  • Member since
    July 2008
  • From: USA California
Posted by vetteman42 on Monday, July 27, 2009 6:30 PM

Kermit Your next build is listed on the front page. I too like the Sabre's lines maybe one day I will try my hand at building one. Looking forward to yours.

Sherman1111 I am really chompin at the bit waiting to see your T4. We will miss you here on the forums and I think I can safely say we all do wish you a speedy and full recovery. Hey JD with the subjects you choose maybe you could talk your hobby shop guy into getting Alclad in a quart size jar for you ?????? Whistling [:-^]Big Smile [:D]

Randy So many to build.......So little time

  • Member since
    February 2007
  • From: Bournemouth UK
Posted by Luftwoller on Tuesday, July 28, 2009 12:45 PM

Well mine has its decals on but im thinking its way too shiney. I have some Xtracrylics Gloss coat that ill squirt the beast with once the decals have had some time to go off. Hopefully that will eliminate all signs of any carrier film.

...Guy

..'Your an embarrassment to the human genus, makes me ashamed to call myself Homo'.
  • Member since
    January 2009
  • From: hamburg michigan
Posted by fermis on Tuesday, July 28, 2009 1:33 PM

 Kermit- Very nice, like the subtle weatering. A couple tips I can offer, if I may. The edges around the tail(that the decal didn't cover) can be touched up with a brush.(mine didn't line up either) no matter how hard you try, they'll never really line up, but a little touch up will at least cover up the shiny line down the middle. Also the wheels and gear bay look pretty shiny. I usually just brush the bay with flat color after the main color is done(larger scales, as with 32nd, I'll prepaint the bay flat, then mask it off). I add all the extras(antennas, landing gear, doors ect.) after final gloss coat. Anyways, a very nice looking 'stang. Now all you need as a "lady" to accompany this one!!!

    Looking forward to the 86. I did the same one about 9 yrs ago(it's due for replacement) If I remember correctly, there were no issues with it at all.

 Luftwoller- She's a beaut. can't wait to see the final.


                         FERMIS

  • Member since
    June 2009
  • From: Netherlands
Posted by kermit on Tuesday, July 28, 2009 2:01 PM
 fermis wrote:

 Kermit- Very nice, like the subtle weatering. A couple tips I can offer, if I may. The edges around the tail(that the decal didn't cover) can be touched up with a brush.(mine didn't line up either) no matter how hard you try, they'll never really line up, but a little touch up will at least cover up the shiny line down the middle. Also the wheels and gear bay look pretty shiny. I usually just brush the bay with flat color after the main color is done(larger scales, as with 32nd, I'll prepaint the bay flat, then mask it off). I add all the extras(antennas, landing gear, doors ect.) after final gloss coat. Anyways, a very nice looking 'stang. Now all you need as a "lady" to accompany this one!!!

    Looking forward to the 86. I did the same one about 9 yrs ago(it's due for replacement) If I remember correctly, there were no issues with it at all.

Thank you Fermis. But i dont think i will let my own lady sit on that wing like yours does. She's a cute little thing but slightly out of scaleWink [;)] Oh and don't let her read this please... Sensitive issue, you know the drill Whistling [:-^]

As i have used future for the inbetween coats and a single layer of satin gloss varnish as finish i agree the landing gear area may be a bit too shiny, especially ofcourse the wheels themselves. Nothing a coat of matte won't cure...? Could also try a sludge wash on the legs...

And those pesky decals... I do consider it the biggest flaw of this build myself as i feared from the start. Next time i will attempt such a complex shape myself[;0]

"Success is the ability to go from one failure to another with no loss of enthusiasm." - Sir Winston Churchill

  • Member since
    June 2006
  • From: Sunny Califorina
Posted by Sherman1111 on Tuesday, July 28, 2009 3:11 PM

Hi all

The T-4 is done

I used Alclad 2 Steel, as the real plane was made of steel, Interesting looking bird. Kinda a cross of the XB-70 and the Concorde, and She fit in my model cabinet.

  • Member since
    February 2007
  • From: Bournemouth UK
Posted by Luftwoller on Tuesday, July 28, 2009 3:47 PM

Nice work Sherman. Im loving the steel look. That is definately a concord copy or what we copied to make it. Very nice indeed.

Well my Mustang is done, i think. I say i think as im not sure if i want to weather it at all. I love the shiney look but i'll probably get bored with it and want to see it all grubby. Anyhoo, here she is, my 1st succesfull NMF, thanks to your help guys. I found a gloss coat that doesnt take any of the shine off the NMF. Its extracrylics Gloss varnish. Dries in 10 minutes as well. Cant be bad. Heres the pics. The figure is only my 2nd figure ive ever done as well, so its 1sts and 2nds all round lol,


..'Your an embarrassment to the human genus, makes me ashamed to call myself Homo'.
  • Member since
    June 2005
  • From: San Tan Valley,AZ
Posted by smokinguns3 on Tuesday, July 28, 2009 4:08 PM
sharp lookin buillds guys.
Rob I think i can I think i can
  • Member since
    June 2009
  • From: Netherlands
Posted by kermit on Tuesday, July 28, 2009 4:12 PM

 Luftwoller wrote:
Well my Mustang is done, i think. I say i think as im not sure if i want to weather it at all. I love the shiney look but i'll probably get bored with it and want to see it all grubby. Anyhoo, here she is, my 1st succesfull NMF, thanks to your help guys. I found a gloss coat that doesnt take any of the shine off the NMF. Its extracrylics Gloss varnish. Dries in 10 minutes as well. Cant be bad. Heres the pics. The figure is only my 2nd figure ive ever done as well, so its 1sts and 2nds all round lol,

Cant wait to take a look at the pics! My sabre came with two figures as well. I am actually trying out my first one as we speak Wink [;)]. Apart from that i have started work on the pit. Pictures coming soon.

@ Sherman:

OUTSTANDING work! Love the finish although it is a bit spartan (for my personal taste that is) concerning decals and such. Nevertheless i enjoyed seeing the pictures. It was a plane i have never heard of or seen before.

Looking forward to your next build when you will be again able to start again after your stay in hospital. 

"Success is the ability to go from one failure to another with no loss of enthusiasm." - Sir Winston Churchill

  • Member since
    June 2006
  • From: Sunny Califorina
Posted by Sherman1111 on Tuesday, July 28, 2009 5:04 PM
Thats all the decals the plane came with, the picture of the Aircraft I looked at didnt have that many markings on it. This line of aircraft never went into production.  The kit did come with drop tanks, but I choose not to use them. My next build is going to be a 1/35  SA-4 "Ganef" Missle launcher. after I get back home.
  • Member since
    July 2008
  • From: USA California
Posted by vetteman42 on Tuesday, July 28, 2009 11:07 PM

Sherman 1111 I must say what an interesting subject your T4 is, another build well done my friend. Hummmm an all steel jet ? Must have been quite heavy for it size. I do like the finish, that alclad steel looks really good.

Hey do you realize Sherman that is 4 builds you have done for the group ?

An awesome job !!!! Can you say FAST BUILDER ??

Randy So many to build.......So little time

  • Member since
    June 2006
  • From: Sunny Califorina
Posted by Sherman1111 on Wednesday, July 29, 2009 4:33 AM

Vetteman42

You picked an interesting subject for a GB. It has been fun, and we have seen a lot of talented builders come out . Cant wait to see that front page filled, and mabey we will have inspired other modelers to try this finish.

jd

  • Member since
    January 2009
  • From: hamburg michigan
Posted by fermis on Wednesday, July 29, 2009 8:17 AM

 WOW Sherman, I really like the steel look. You keep this pace up, and you'll be out of space to keep em before this GB is over!!!

Luftwoller, ya big tease....."here's the pics".......I got excited, and then...no pics.

  • Member since
    February 2007
  • From: Bournemouth UK
Posted by Luftwoller on Wednesday, July 29, 2009 10:02 AM

Im so sorry all. PC's eh? Mine was running so slow and ended up crashing while the photos were trying to upload to photobucket. Anyhoo, theyre in now and here they are,

Sorry for all the pics, i sort of got carried away.

Thanks everyone for the help and advice.

...Guy

..'Your an embarrassment to the human genus, makes me ashamed to call myself Homo'.
  • Member since
    January 2009
  • From: hamburg michigan
Posted by fermis on Wednesday, July 29, 2009 10:56 AM
 She 's a purdy one Luftwoller. Are the exaust stacks AM or drilled out?(nice touch either way) I'm gonna have to find a good deal or two on them Tamiya 'stangs. I've got 2 Hasi's, and 2 Otaki's stashed, Tam. has the best one I think.

  • Member since
    June 2009
  • From: Netherlands
Posted by kermit on Wednesday, July 29, 2009 11:09 AM

Bow [bow]Amazing work! Your NMF came out so clean and crisp... a delightful sight to seeBow [bow]

Are you planning on any weathering? I would say it would almost be a shame to see it dirty..Wink [;)] But then again, i have no idea how tidy of a guy Homer really isSmile,Wink, & Grin [swg]

Great example picture by the way of your "studio" setup. Very educational.

Richard

"Success is the ability to go from one failure to another with no loss of enthusiasm." - Sir Winston Churchill

  • Member since
    June 2006
  • From: Sunny Califorina
Posted by Sherman1111 on Wednesday, July 29, 2009 11:20 AM
Ok thats not fair useing a real P-51.... Great job
JOIN OUR COMMUNITY!

Our community is FREE to join. To participate you must either login or register for an account.

SEARCH FORUMS
FREE NEWSLETTER
By signing up you may also receive reader surveys and occasional special offers. We do not sell, rent or trade our email lists. View our Privacy Policy.