SEARCH FINESCALE.COM

Enter keywords or a search phrase below:

OFFICAL NO AFTERMARKET Group Build

112013 views
870 replies
1 rating 2 rating 3 rating 4 rating 5 rating
  • Member since
    March 2007
  • From: Atlanta, Ga.
Posted by MrSquid2U on Thursday, November 18, 2010 8:44 PM

Starting on the A-arms.


  • Member since
    September 2007
  • From: Truro Nova Scotia, Canada
Posted by SuppressionFire on Thursday, November 18, 2010 5:22 AM

Casper the Chihuahua,

Thanks for taking my suggestion as such and not critique, besides its fun to customize and such. The 'Pledge with Future' is more a acrylic clear gloss that someone thought of using on floors, really a amazing, self leveling product. For canopies I completely submerse them and set on a lint free towel to wick way the excess, perfect results every time!

The dot filtering technique looks great, that is one I have yet to try (or brave enough to do so)

Jason

http://i6.photobucket.com/albums/y211/razordws/GB%20Badges/WMIIIGBsmall.jpg


  • Member since
    March 2007
  • From: Atlanta, Ga.
Posted by MrSquid2U on Thursday, November 18, 2010 5:08 AM

Gents,

 I had heard this a while back but went to the makers website to verify it. Due to a merger, "Pledge with Furture shine" is supposed to be the new name of the same formula, Future. I don't use t myself, but that's what they say?

Fron Johnson and Johnson's site:

http://www.scjohnson.com/en/products/asked-and-answered/ask-question-comment.aspx?title=Where-is-Future-Floor-Finish


Veterman- thanks, now let me come up with a name for it???


  • Member since
    April 2005
  • From: Australia
Posted by taxtp on Thursday, November 18, 2010 4:12 AM

Hi Casper and Vetteman,

I have a bottle of Johnson's Super Shine, which was claimed to be close to Future. I believe Pledge One-Go is quite similar to it. I've been able to get serviceable results by brush painting, but I think they may have discontinued it.

I do have a bottle of genuine Future, which I bought at a Swap meet in Melbourne. I'm sure I heard that one of the model shops/mail houses here is carrying it.

I'll try to find out and let you know.

Cheers

Tony

I'm just taking it one GB at a time.

  • Member since
    July 2008
  • From: USA California
Posted by vetteman42 on Thursday, November 18, 2010 12:00 AM

MrSquid2U wow I am impressed with your scratch work indeed, would take me a year to get as far as you did in a few days. I want to list your build on the front page but ummm well Embarrassed I am a bit confused and dont know what its called. If you can help me out with that I will get it listed ASAP.

Supressionfire shhhhhhhhhhhh I just got my little bench lathe back from storage and am lookin for an excuse to play with it Big Smile I have some needles too but they are hard to get here even from a vet or Doctor that I have known for years.  I never thought of annealing them though, that's a great idea and they are 304 stainless that does turn a perfect shade of blue and dark purple. That weekend madness was wild wasn't it, I can understand why one would need to decompress a bit after that. Just watching it had my head spinConfusednin.

Casper I read somewhere that future is in Australia but its under a different name and  its not Pledge, something like Mop N Shine I think it was. I read that a month or so ago somewhere, I will see if I can find it again and let you know. Your 262 just keeps looking better and better each time I see it YesYes

Randy So many to build.......So little time

  • Member since
    October 2010
  • From: Hobart, Australia
Posted by Casper the Chihuahua on Wednesday, November 17, 2010 7:20 PM

Hi Suppression,

      I thought about that but here in Australia we cannot get Future. I have found Pledge but I do not think it is quite the same product and have certainly never gotten the results other modellers have shown with Future. As I mentioned with the bullet strafing, I know it's not really accurate but it was a fun way for me to turn around an accident.

So I thought I would try out the 'dot' technique I have read so much about;

This was my practice run and I was quite happy with the effct

Needs a bit of finesse but I went onto the whole model. There are some areas I am still touching up but once I have a flatter look to the highlights I will let the oils dry for 48 hours and apply the dull cote to flatten the look.


On the bench: A-4F 1/32 Hasegawa

Just deployed: F6F-5N Hellcat Nightfighter 1/48 Eduard

Up next: A6-E Intruder 1/48 Revell

  • Member since
    September 2007
  • From: Truro Nova Scotia, Canada
Posted by SuppressionFire on Wednesday, November 17, 2010 6:25 PM

Casper the Chihuahua,

Future may have filled the crack and returned the clarity to your Me 262's rear window Casper.

The reason more modelers do not do battle damage on aircraft is the aluminum panels are very thin so they need to be thinned accordingly from behind in the pre assembly stage.

I would dab a bit of black in the 'bullet holes leaving a fine halo of silver around each one.

Jason


http://i6.photobucket.com/albums/y211/razordws/GB%20Badges/WMIIIGBsmall.jpg


  • Member since
    October 2010
  • From: Hobart, Australia
Posted by Casper the Chihuahua on Wednesday, November 17, 2010 5:22 PM

I finally applied the oil wash after chipping away at the paint with some silver. I wanted to weather the aircraft for a plane that had seen some intense combat and was a little dirty.

Then imagine my disappointment when I removed the canopy masks to find that the rear canopy section had cracked under the mask.

Well I thought I may be able to blend this in with my combat scenario so I grabbed a round headed pin and a candle and simulated bullet holes strafed across the fuselage and piercing the rear canopy. I also added one on the tail to help disguise a swastika stencil that had not quite gone according to plan. After all the front of the box for this kit shows the ME 262 being pursed by more than one B-17G

This may not be entirely historically or technically accurate but it has allowed me to turn a disaster (canopies can often make or break the final product) into an active, fun display!

Cheers

On the bench: A-4F 1/32 Hasegawa

Just deployed: F6F-5N Hellcat Nightfighter 1/48 Eduard

Up next: A6-E Intruder 1/48 Revell

  • Member since
    March 2007
  • From: Atlanta, Ga.
Posted by MrSquid2U on Wednesday, November 17, 2010 5:20 PM

Thanks "SF"! Now that I realize the folly of thinking I was going to do a simplified version over one weekend I have slowed down and will throw some more at it.Wink


Needing attachment points for the lower control arms came up with a platform that fits the backbone already in place. Added some weld beads since this is where the detailing will start coming out. No pre-planning here, just winging it!


  • Member since
    September 2007
  • From: Truro Nova Scotia, Canada
Posted by SuppressionFire on Wednesday, November 17, 2010 5:42 AM

MrSquid2U,

I can see how your scratch built project will require more than a weekend to complete, excellent work thus far and looking forward to the finish line for your lunar buggy!

Kermit,

Another project? P47's are a good subject to add scratch built modifications, first off the gun barrels can be swapped for hypodermic needles.

ruddrat,

Your biplane is looking good, excellent scratch built rigging fasteners.

Casper the Chihualualua,

The Me 262 is turning out great, for many decal time is a relaxing way to wrap up a good build.

Last but not least:

vetteman42,

I will follow your build as in the stash is Edwards FW 190A in 1/48 scale. It was signed up for Daywalker's GB but Chwat and time issues (work, life) never gave it a chance to materialize on the bench on time.

Turned barrels? I like to have a assortment of hypodermic needles for gun barrels, I never paint them just anneal them with a lighter until red hot. This gives them a good color (blueish gunmetal) Pharmacies have smaller sizes, veterinarians carry larger ones. The good thing is they do not sell them as such so more than likely (if you explain the use) you will get a bunch for free or next to nothing. I paid 1.60$ CDN for about 20 last time at the vet.  

Took a few days to debrief from Weekend Madness, looking forward to continuing (finishing) Chwat. Next off is better skirt armor hangars out of aluminum. Currently Chwat is suntanning on the kitchen window ledge. (Trying a natural way to fade paint)

Jason


http://i6.photobucket.com/albums/y211/razordws/GB%20Badges/WMIIIGBsmall.jpg


  • Member since
    October 2010
  • From: Hobart, Australia
Posted by Casper the Chihuahua on Tuesday, November 16, 2010 3:27 PM

Ah Vetteman, I was just following orders!! Captain

I tried to match the paint scheme in the instructions but by the time I matched about 80% of the wings camo I gave up and improvised my own over the fuselage.

When I finish this coffee it's time break out the solvaset, scissors and decals.

Cheers

On the bench: A-4F 1/32 Hasegawa

Just deployed: F6F-5N Hellcat Nightfighter 1/48 Eduard

Up next: A6-E Intruder 1/48 Revell

  • Member since
    March 2007
  • From: Atlanta, Ga.
Posted by MrSquid2U on Tuesday, November 16, 2010 1:12 PM

 Hello all!

 I just perused this thread/GB and gotta say there is some fine craftsmanship and ingenuity on display! I started a project this past Friday so I'll catch you up on my progress so far.


 It's from the Ma.K. genre and is based upon a sketch by the creator of Ma.K., Kow  Yokayama, which AFAIK has never been fleshed into a model yet?

 A quick rumage through my stash identified some victims, um donor kits.
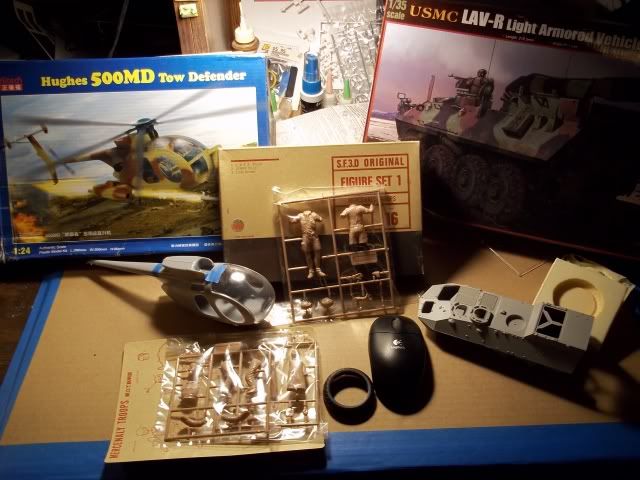
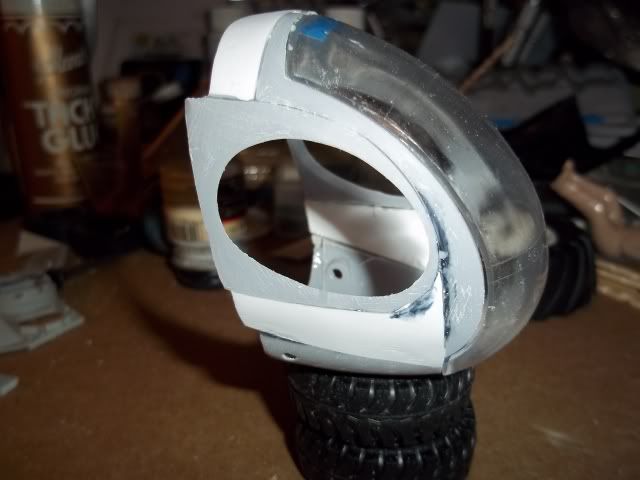
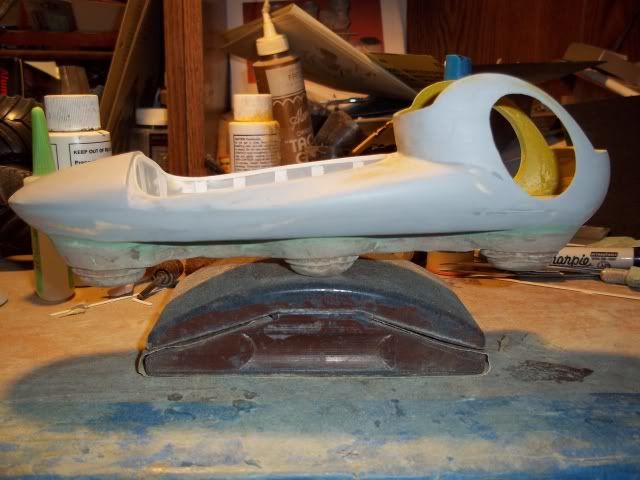
 Started by chopping up the copter and reorienting the side windows while closing the gaps in the cab structure that resulted from the removal of the fuselgae/airframe.
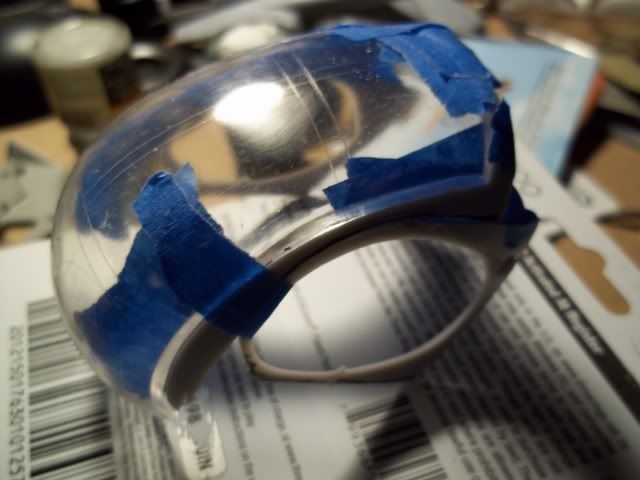
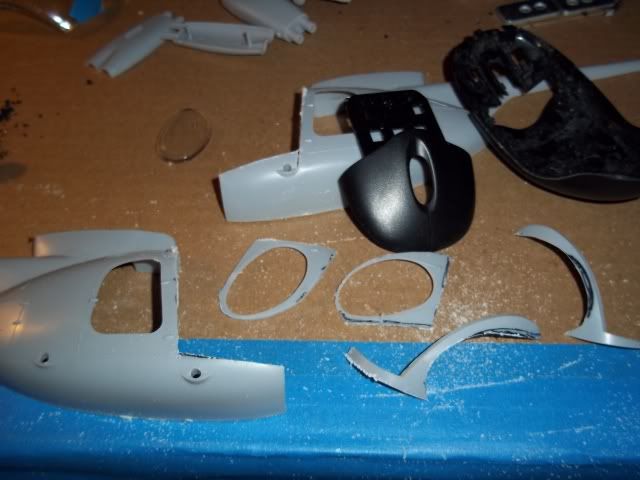
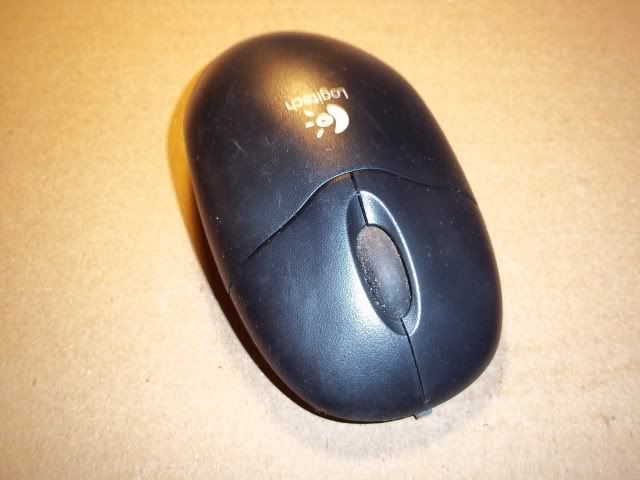
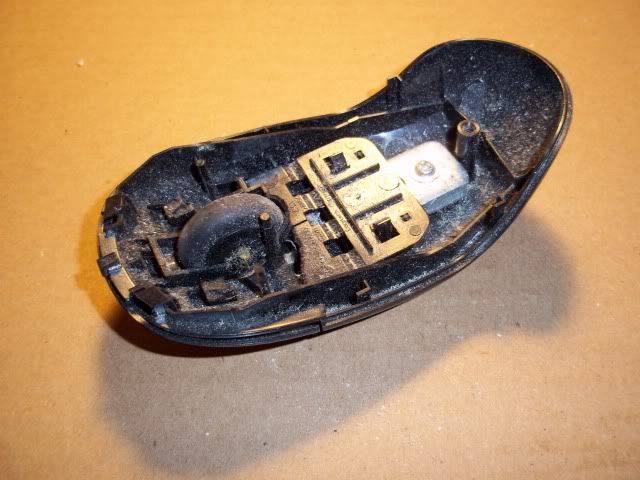
A mouse came within my reach and fell victim- okay, became a donor.
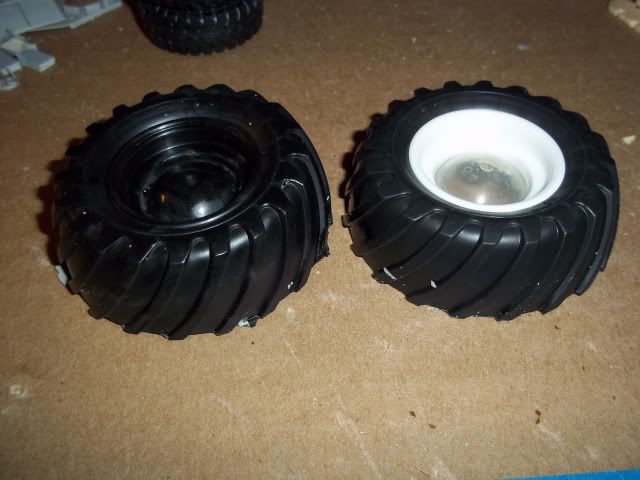
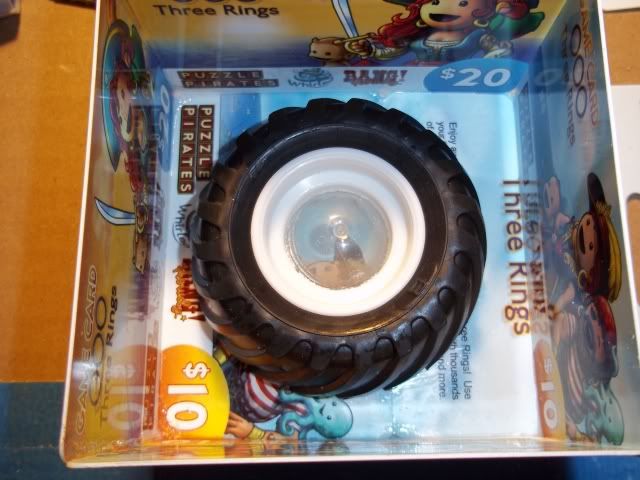
Some tires/wheels will be needed so were cast.
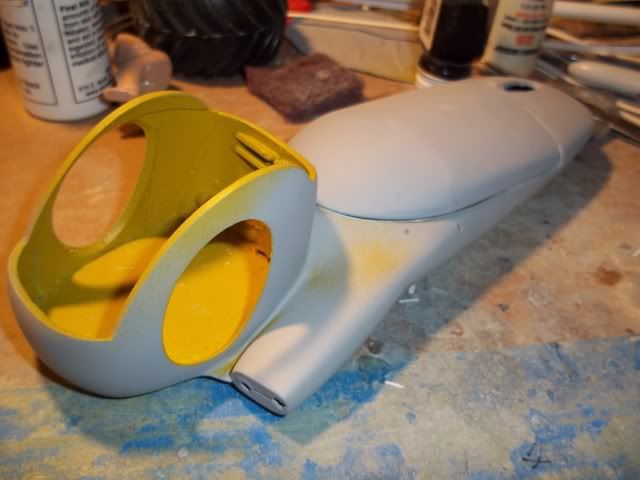
The base structure was fashioned from wood which was skinned with resin. Very little wood was left after whittling it into shape and then sinking the recovery bed into it, There's about as much resin/styrene as there is woodt.
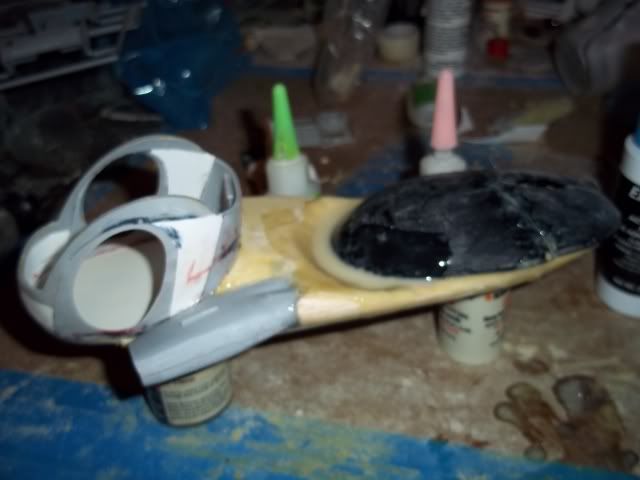
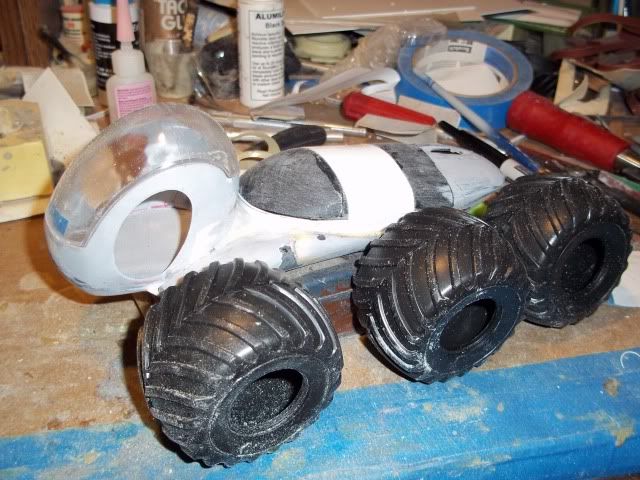
A backbone to hang suspension off of was sculpted with Sculpey C;ay which bakes hard.
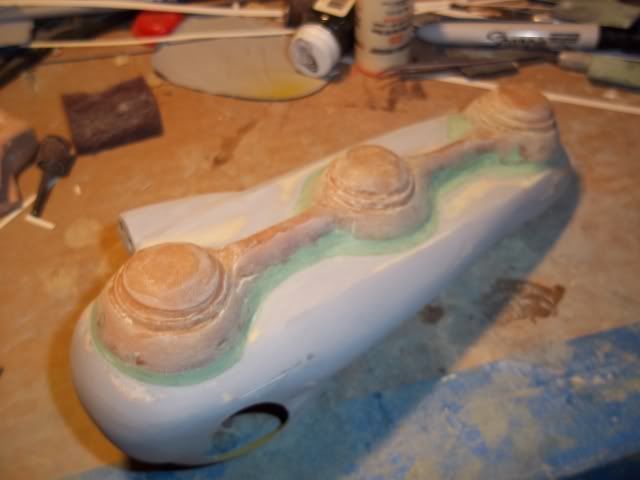
Knowing that a trademark of Ma.K. is mechanical representation even when it doesn't make engineering sense I'm setting about to have some on the suspension/drivetrain since the body is unusually devoid of such.
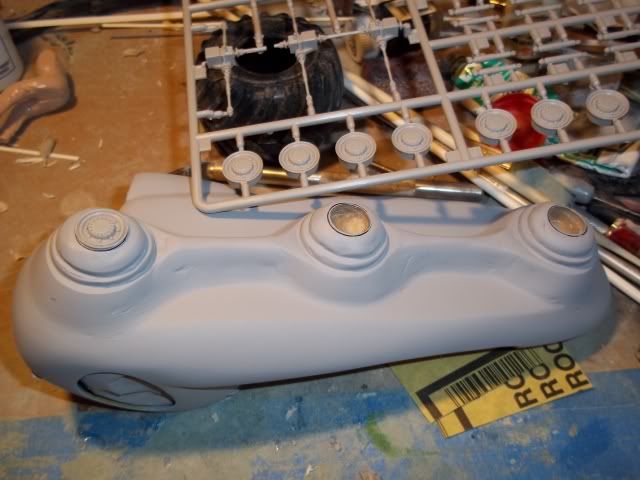
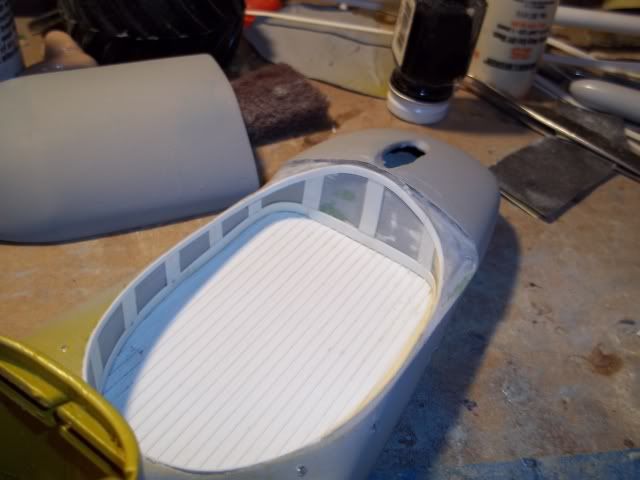
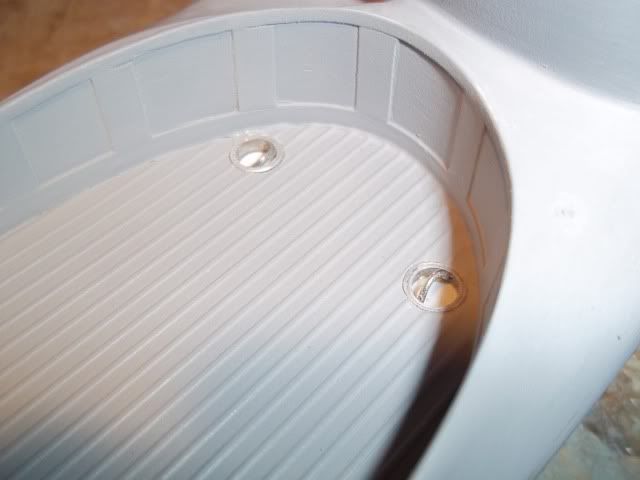
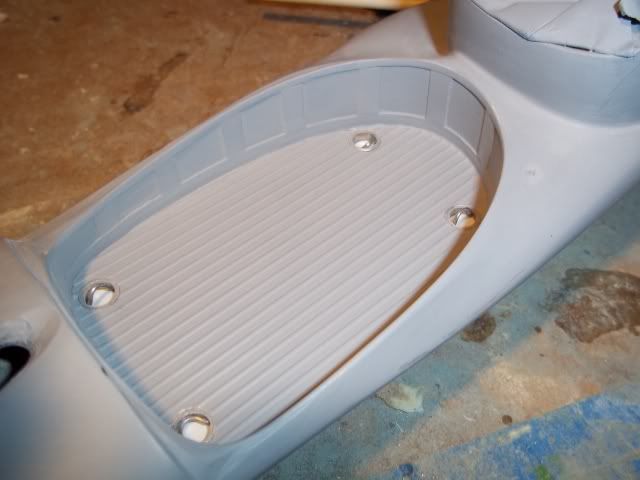
The cargo bed needs some tie-downs. Could have just been like 'grab handles' but I wanted them recessed into the floor. Set about to make such. Needed an upper lip too so they could sit more flush.
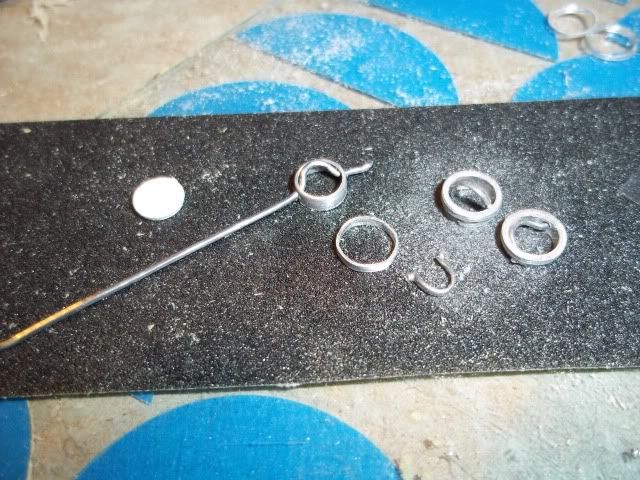
And that's where I am.  I have a "body" sorted so now I can get to the fun of filling the cab and making the suspension and such.

 Great to be a part of this GB and I look forward to some fun!


EDIT

And here are the four tie downs sunk into the bed and still operable.


  • Member since
    July 2008
  • From: USA California
Posted by vetteman42 on Tuesday, November 16, 2010 12:25 PM

Kermit now now young man the PE set cant be used Super Angry However the homemade decals work very well in this group. Wait a sec here, you are gonna take your time ?? Did I hear that errrr read right ? Clown

Cant wait to see what you come up with Richard.

To all

Micro-Mark offers a kit for homemade photo-etch that would work here, but I don't know of anyone who has used it, it is quite pricey if I remember correctly. Another trick I saw, you can check out Lancairs B-17 build in the aircraft section he used a 3D printer to make some detail parts, some really cool stuff, wing rib structures and such things.

Ok time for me to jump in ( finally) with a build, a 1/48 Tamiya FW190 F8. Here is the camo scheme I am going to use, or at least try to use.

The IP cant see it once its in the plane, I am very pleased with the way this one came out it is all hand painted.

I made a jig to bend the seatbelt buckles, the jig worked great but I think they are a bit on the big side, Maybe finer wire, this wire is .013 dia. and a smaller jig would work better.

I dont like the wing guns and I have my little bench lathe back again so I may cut these out and make some better barrels with brass rod.


Randy So many to build.......So little time

  • Member since
    June 2009
  • From: Netherlands
Posted by kermit on Tuesday, November 16, 2010 11:12 AM

Randy,

No i havent even started yet LOL. Ive been taking a look inside the box and the detail OOB is actually quite good. Not much that i see that simply HAS to be scratched... Maybe some fuselage ribbing...seatbelts...

However, i do own an eduard PE set meant for the revell 1:72 german submarine with lots of interesting goodies on it. I also own decal paper for making custom decals so i was thinking along those lines.... Theres bound to be a knob or two i can scavenge from that set and i also own that pinup collection a certain modeller sent me (*wink wink*)

Contrary to the latest comments about my modelling i intend to take my time here and think up a plan of attackWink

IF you allow me to use these prepurchased aftermarket things that is....

Richard

"Success is the ability to go from one failure to another with no loss of enthusiasm." - Sir Winston Churchill

  • Member since
    July 2008
  • From: USA California
Posted by vetteman42 on Tuesday, November 16, 2010 10:49 AM

Ruddratt those are some gook looking turn buckles and a great idea for making them. I will have to remember the trick for a Sopwith Camel I have on the shelf. Well done sir.

Casper man I gotta say I wasnt too sure about that camo job on your 262 but now that I see it in the latest pictures I love it !!!!!!!!!!! Very nice work painting the crosses too, I have tried that and it is not an easy thing to do.

Kermit is that P-47 almost finished yet ?????????Eats

Randy So many to build.......So little time

  • Member since
    October 2010
  • From: Hobart, Australia
Posted by Casper the Chihuahua on Tuesday, November 16, 2010 1:14 AM

All the painting and stencils done, next come the decals!

Cheers


On the bench: A-4F 1/32 Hasegawa

Just deployed: F6F-5N Hellcat Nightfighter 1/48 Eduard

Up next: A6-E Intruder 1/48 Revell

  • Member since
    March 2010
  • From: Brisbane
Posted by Julez72 on Monday, November 15, 2010 5:00 AM

ruddratt

As promised guys, here's some turnbuckles....

http://img.photobucket.com/albums/v201/rudd_ratt/DV031.jpg

Made 'em using 0.5mm brass tubing cut to 5mm lengths and single strands of wire stripped from a computer ribbon cable. Clamped both ends of the wire into an exacto handle with a 4-jaw chuck, looped it over the shank of a #72 bit in a pin vise, and just started twisting until nice & tight. Then slipped 'em through the tubing. A drop of CA and voila! Now I have to make about 50 more!!! *Gulp!!!*

50 more!!! your gonna have big bulging bug eyes after that....


  • Member since
    February 2006
  • From: Smithers, BC, Canada
Posted by ruddratt on Sunday, November 14, 2010 10:03 AM

As promised guys, here's some turnbuckles....

Made 'em using 0.5mm brass tubing cut to 5mm lengths and single strands of wire stripped from a computer ribbon cable. Clamped both ends of the wire into an exacto handle with a 4-jaw chuck, looped it over the shank of a #72 bit in a pin vise, and just started twisting until nice & tight. Then slipped 'em through the tubing. A drop of CA and voila! Now I have to make about 50 more!!! *Gulp!!!*

Mike

 "We have our own ammunition. It's filled with paint. When we fire it, it makes pretty pictures....scares the hell outta people."


  • Member since
    April 2005
  • From: Australia
Posted by taxtp on Sunday, November 14, 2010 1:55 AM

Thanks for the response Vetteman, I was actually leaning in the same direction, so no problem. I'll see what else I can dream up.

Cheers

Tony

I'm just taking it one GB at a time.

  • Member since
    July 2008
  • From: USA California
Posted by vetteman42 on Sunday, November 14, 2010 12:24 AM

Joeviz and Kermit the front page is updated with your builds Toast

Kermit I love the last line in your signature LOL " too fast to update " Hummm there might be a nic in there Devil

Ruddratt wow the Albatros is really coming along now, thats some very very nice work you have done on the machine guns the heat shields look spot on. Cant wait to see how you make the turn buckles.

Randy So many to build.......So little time

  • Member since
    February 2006
  • From: Smithers, BC, Canada
Posted by ruddratt on Saturday, November 13, 2010 11:43 PM

Excellent work on display here, gents! Man, this is an awesome GB!!

Got a bit more progress to report on the Albatros (OK, more than a bit!). She's very near the painting stage. Fuselage is all buttoned up, and everything that needs to be attached, is, with the exception of the upper wing (shown dry-fit to the struts). I've come across very few kits engineered as well as these WnW subjects - fit and alignment are near perfect.

....and here's the guns, all ready for painting.

Of course, there is still the task at hand to scratchbuild all those tiny turnbuckles (I'm guessing 50-60 in all). May get started on those before painting commences - we'll see.

Mike

 "We have our own ammunition. It's filled with paint. When we fire it, it makes pretty pictures....scares the hell outta people."


  • Member since
    June 2009
  • From: Netherlands
Posted by kermit on Saturday, November 13, 2010 11:22 PM

Hey randy,

How about letting me in here once more with a new kit? I promise i'll be good........honestlyWhistling

I was thinking Academy P47D in 1/48 scale... There's bound to be stuff on that one that needs scratching or could use some home  made additionsSmile

Richard

"Success is the ability to go from one failure to another with no loss of enthusiasm." - Sir Winston Churchill

  • Member since
    October 2010
  • From: Hobart, Australia
Posted by Casper the Chihuahua on Saturday, November 13, 2010 10:45 PM

Aw Vetteman, you'll make me blush! Confused

I am feeling pretty good about this build, this is only the 3rd model I have worked on since starting modelling again May this year. If only I had had this online resource when I was a kid building Matchbox kits 30 years ago.

I was going to do the stencils this afternoon but I realised I only have gloss white acrylic at home and they should really be done with flat. The stores are all closed so I will get some Gunze H11 before Uni in the morning.

Cheers

On the bench: A-4F 1/32 Hasegawa

Just deployed: F6F-5N Hellcat Nightfighter 1/48 Eduard

Up next: A6-E Intruder 1/48 Revell

  • Member since
    July 2008
  • From: USA California
Posted by vetteman42 on Saturday, November 13, 2010 10:16 PM

Supressionfire yup i like your homemade scratch built periscopes much better than the kit offerings. I gotta remember that paper trick too, it really worked out well for ya. Man I am glad your lil tank didn't get damaged much trying to do an imitation of a winged thingy. My eyes almost started leakin as I read of the fall geeze.

Taxtp your build sounds like an interesting one, but staying in the scope of the group I can't allow AM decals. If they come from another kit, or maybe you can make some homemade decals it would work. I am sorry.

Joeviz Oh yes we have another boat !! Your build is in Toast Looks like you have your work cut out for you from the pictures. It also looks like the plastic is bending to your will, I am looking forward to see your progress.

Casper man you are really goin to town on this build, some beautiful scratch building, and a very interesting camo paint job to boot. I feel the need to comment on that engine too.........SUWEEET !!!!!!!!!! I really like the detail and the wing mounts you came up with. Keep up the good work and the pictures coming.

I will be finally starting my F-16 soon and hope I can keep up with the quality of the builds here, beautiful stuff guys

Randy So many to build.......So little time

  • Member since
    July 2010
  • From: Tornado Alley
Posted by Echo139er on Saturday, November 13, 2010 9:20 PM

This model has been nothing but problems.  I've done dry-fittings all day.  I've sanded and tested the fit over and over.  I found this kit in a garage sale and now I know why.  NOTHING fits!  After many attempts I finally got it to a manageable state (both the hull and deck parts).

Here is a gap i can live with.  This will easily be taken care of once the hull halves are permanently glued together.  I took a before picture but it came out too blurry to post.

All the major pieces of the kit are in place.  I few more smaller pieces and off to the paint both for some primer it goes.

I still have several small gaps to address... my fingers are raw!  Must.... keep... going...

  • Member since
    October 2010
  • From: Hobart, Australia
Posted by Casper the Chihuahua on Saturday, November 13, 2010 8:57 PM

I think I worked out how to attach the 'naked' engine without the nacelle;

In anything I could find reference wise I noticed to supporting pipes from the top of the engine, I scratched these from some unused supports from my right-side gun bay which I am keeping partially closed;

I also noticed small brackets with holes in them, figuring they are some sort of clip to attach the nacelle panels. I added a guide rail to attach the engine to something and provide the correct horizontal alignment with the other nacelled engine.These were all scratched from some square plastic tubing.

As far as my eye can tell I have this to about half a millimeter accuracy. Of course I have been doing all of this upside down! :) Just need to give these a dirty steel look to complete the efffect.

Cheers

On the bench: A-4F 1/32 Hasegawa

Just deployed: F6F-5N Hellcat Nightfighter 1/48 Eduard

Up next: A6-E Intruder 1/48 Revell

  • Member since
    October 2010
  • From: Hobart, Australia
Posted by Casper the Chihuahua on Saturday, November 13, 2010 7:46 PM

After masking all the wings and painting the insides of the stabilsers with RLM02 Gray and then attaching all the stabilsers,

I am ready to begin decals and stencils. I have decided to stencil on all of the Nazi swastikas and crosses as they should fill the details more realistically.

Cheers

On the bench: A-4F 1/32 Hasegawa

Just deployed: F6F-5N Hellcat Nightfighter 1/48 Eduard

Up next: A6-E Intruder 1/48 Revell

  • Member since
    October 2010
  • From: Hobart, Australia
Posted by Casper the Chihuahua on Saturday, November 13, 2010 1:13 AM

Ok, chopped the beef, onions, garlic browned it all and into the curry. While that's simmering it's time to finish the right-side engine.

A very thinned oil wash of dark brown and black to get a greasy oily look. This was thinned so much that is splashed off the brush and slooshed into all the nooks and crannies and gathered round the rivets and piping.

I'm pretty happy with the result but now I need to work out how to attach this underside the wing and have it hang at exactly the same level as the left-side inside the nacelle panels. It's these panels that attach to the wing, the engine just sits inside with the Trumpeter model. I may need to make some brackets out of square plastic tube...

Cheers

On the bench: A-4F 1/32 Hasegawa

Just deployed: F6F-5N Hellcat Nightfighter 1/48 Eduard

Up next: A6-E Intruder 1/48 Revell

  • Member since
    October 2010
  • From: Hobart, Australia
Posted by Casper the Chihuahua on Saturday, November 13, 2010 12:42 AM

After a brief break taking the dogs for a walk along the beach, it's 'scratch' time!

I made some hydraulic lines for the landing gear out of large paper clips and thin, tightly wrapped Tamiya masking tape. I was quite happy with the result.

Tomorrow is more RLM02 Gray inside the wing stabilisers after masking.

Cheers

On the bench: A-4F 1/32 Hasegawa

Just deployed: F6F-5N Hellcat Nightfighter 1/48 Eduard

Up next: A6-E Intruder 1/48 Revell

  • Member since
    July 2010
  • From: Tornado Alley
Posted by Echo139er on Friday, November 12, 2010 11:14 PM

I will give this a shot.  I have never done a group build.  This will be my first.

I am currently working on a Glencoe 1/48 US Coast Guard Rescue Boat. 

I am only about 20% done.  That is I prepped the hull, drilled port holes, and dry-fitted the deck.

This kit has very little detail and will need some modifications to get it close to the original.

JOIN OUR COMMUNITY!

Our community is FREE to join. To participate you must either login or register for an account.

SEARCH FORUMS
FREE NEWSLETTER
By signing up you may also receive reader surveys and occasional special offers. We do not sell, rent or trade our email lists. View our Privacy Policy.