SEARCH FINESCALE.COM

Enter keywords or a search phrase below:

OFFICAL NO AFTERMARKET Group Build

112013 views
870 replies
1 rating 2 rating 3 rating 4 rating 5 rating
  • Member since
    October 2008
Posted by eatthis on Tuesday, September 14, 2010 12:26 PM

vetteman42

Eatthis is this the TSR you started earlier that you were gonna load up with lots of iron ?


yeh im waiting for it too arrive

i was originally going to be a pheonix armed interceptor but i couldnt find the decals so i changed it to a more conventional role (iv ordered a 1/48 to do as the interceptor)


snow + 4wd + escessive hp = :)  http://www.youtube.com/watch?v=x7egUIS70YM

  • Member since
    October 2008
Posted by eatthis on Wednesday, September 15, 2010 1:49 AM

some wip pics


snow + 4wd + escessive hp = :)  http://www.youtube.com/watch?v=x7egUIS70YM

  • Member since
    October 2008
Posted by eatthis on Wednesday, September 15, 2010 1:12 PM

ready for decals :)


snow + 4wd + escessive hp = :)  http://www.youtube.com/watch?v=x7egUIS70YM

  • Member since
    March 2010
  • From: Brisbane
Posted by Julez72 on Thursday, September 16, 2010 5:21 AM

Eatthis, great progress on the TSR-2, looking very nice indeedYes

Ruddrat, Yeah this will be my first WW1 kit (probably should have chosen the DR-1 or D-7) Looks like i'll have to jump over the fence into the paddock and steal some more horse mane hair for rigging...I've heard a lot of good things about Wingnut Wings kits...Unfortunatly i'm stuck in 48 scale, old habits die hard i guess...

Randy, thats great news, i was hopeing i wouldn't have to scratch a gunsight... I'll kitbash with the brass set i have for an old Polish fighter which name escapes me, i hated the model and gave it to my boy to play with but i kept the brass set...


  • Member since
    October 2008
Posted by eatthis on Thursday, September 16, 2010 12:25 PM

ready for weathering :)


i may delete the outboard hardpoints im not sure yet


snow + 4wd + escessive hp = :)  http://www.youtube.com/watch?v=x7egUIS70YM

  • Member since
    July 2008
  • From: USA California
Posted by vetteman42 on Thursday, September 16, 2010 12:48 PM

Eatthis lookin good there bud YesYes Cant wait to see it all loaded up should look mean and menacing asl all get out. Nice work on the camo too.

Randy So many to build.......So little time

  • Member since
    October 2008
Posted by eatthis on Thursday, September 16, 2010 1:07 PM

asl all get out?


snow + 4wd + escessive hp = :)  http://www.youtube.com/watch?v=x7egUIS70YM

  • Member since
    July 2008
  • From: USA California
Posted by vetteman42 on Thursday, September 16, 2010 1:42 PM

eatthis

asl all get out?

asl lol my bad typing  should be " as all get out " = mean and nasty as he!l Big Smile

Randy So many to build.......So little time

  • Member since
    October 2008
Posted by eatthis on Thursday, September 16, 2010 1:46 PM

ah ok my bad i couldnt work it out


snow + 4wd + escessive hp = :)  http://www.youtube.com/watch?v=x7egUIS70YM

  • Member since
    July 2008
  • From: Florida
Posted by Railfan 233 on Thursday, September 16, 2010 3:53 PM

Looking good eatthis.

I can't wait to see the wethering.


http://i6.photobucket.com/albums/y211/razordws/GB%20Badges/WMIIIGBsmall.jpgRed, White, and YOU! group build of 2010

  • Member since
    September 2007
  • From: Truro Nova Scotia, Canada
Posted by SuppressionFire on Friday, September 17, 2010 6:01 AM

400!

Post on this thread that is...

Eatthis,

Great job, I really like that build and must ask are you planning to have the landing gear up? I think not enough models are done 'in flight' as less that 10% are modeled this way at contests I have attended.

Rain today may mean I get some much needed bench time tonight! Been busy catching up on side jobs I took on before I became employed full time. Chwat has been calling for some TLC to finish up. Hopefully I can get some WIP's up tonight or tomorrow. Been adding the hull roof details like hatch lids, periscope guards & scratch built  a new muffler. It sounds like a lot yet accomplished all that in a few short sessions.

http://i6.photobucket.com/albums/y211/razordws/GB%20Badges/WMIIIGBsmall.jpg


  • Member since
    October 2008
Posted by eatthis on Friday, September 17, 2010 8:58 AM

SuppressionFire

400!

Post on this thread that is...

Eatthis,

Great job, I really like that build and must ask are you planning to have the landing gear up? I think not enough models are done 'in flight' as less that 10% are modeled this way at contests I have attended.

Rain today may mean I get some much needed bench time tonight! Been busy catching up on side jobs I took on before I became employed full time. Chwat has been calling for some TLC to finish up. Hopefully I can get some WIP's up tonight or tomorrow. Been adding the hull roof details like hatch lids, periscope guards & scratch built  a new muffler. It sounds like a lot yet accomplished all that in a few short sessions.


yeh gears gonna be up even though the doors are a right mess

do you think iv gone too dirty with the weathering?


snow + 4wd + escessive hp = :)  http://www.youtube.com/watch?v=x7egUIS70YM

  • Member since
    July 2008
  • From: Florida
Posted by Railfan 233 on Friday, September 17, 2010 1:52 PM

eatthis

do you think iv gone too dirty with the weathering? 

Well, I'm not too sure.

From a distance (like in the seccond photo) it still looks shiny and new.

In Photo 1, it looked like it was wethered too extreme, but I realized it was acually the shadows from the windowOops

I think it looks fine. (Definately better than my wethering attempts, all of which turned the route of the Rust Buckets)


http://i6.photobucket.com/albums/y211/razordws/GB%20Badges/WMIIIGBsmall.jpgRed, White, and YOU! group build of 2010

  • Member since
    October 2008
Posted by eatthis on Friday, September 17, 2010 2:46 PM

decals and weathering are done just gotta fit the pitot tube and hang the iron off it (wont get here for another week or so)im not taking the masking off till im absolutely certain its done


snow + 4wd + escessive hp = :)  http://www.youtube.com/watch?v=x7egUIS70YM

  • Member since
    March 2010
  • From: Brisbane
Posted by Julez72 on Friday, September 17, 2010 7:06 PM

Looking pretty good Eat, nice camo job, i like the lines of that model, looks fast]Y]


  • Member since
    October 2007
  • From: Rhode Island
Posted by jmabx on Friday, September 17, 2010 7:40 PM

Nice work eat! I don't think that the weathering is overdone at all. I really like the camo and Jag style missiles. Yes

Jeremy    Propeller


  • Member since
    February 2006
  • From: Smithers, BC, Canada
Posted by ruddratt on Saturday, September 18, 2010 10:15 AM

eat, I have to agree with the others - the weathering does not look overdone at all. Your build is really coming along nicely! Yes

I'd have had pics of my Albatros engine posted days ago if I'd thinned the artist oil wash with mineral spirits like I usually do instead of turpenoid. I applied it last sunday and as of today it's still not nearly cured. I would have stripped the whole thing down and started over if I hadn't already applied the data plate decals to the engine block. Oh well, live & learn I suppose.

Mike

 "We have our own ammunition. It's filled with paint. When we fire it, it makes pretty pictures....scares the hell outta people."


  • Member since
    October 2008
Posted by eatthis on Saturday, September 18, 2010 10:16 AM

ruddratt

eat, I have to agree with the others - the weathering does not look overdone at all. Your build is really coming along nicely! Yes

I'd have had pics of my Albatros engine posted days ago if I'd thinned the artist oil wash with mineral spirits like I usually do instead of turpenoid. I applied it last sunday and as of today it's still not nearly cured. I would have stripped the whole thing down and started over if I hadn't already applied the data plate decals to the engine block. Oh well, live & learn I suppose.


hairdryer?


snow + 4wd + escessive hp = :)  http://www.youtube.com/watch?v=x7egUIS70YM

  • Member since
    July 2008
  • From: USA California
Posted by vetteman42 on Saturday, September 18, 2010 11:16 AM

Eatthis nope not over done on the weathering at all in my opinion, looks really good in fact. Makes me think of that old Clint Eastwood movie, Firefox I think it was, because of the shape of the wing.

Ruddratt bummer man, I have been wanting to see the pictures of your engine, I hope it cures soon.

Randy So many to build.......So little time

  • Member since
    September 2007
  • From: Truro Nova Scotia, Canada
Posted by SuppressionFire on Sunday, September 19, 2010 8:27 AM

Firefox...

Now how come there isn't a limited production release of that aircraft?

The last years of the cold war always portrayed the Russian pilots as ice cold professionals behind tinted face masks. I think 'Top Gun' based the Val Kilmer's character 'Ice Man' on this stereotype.

I know I am easily sidetracked... speaking of which Chwat' is Pigeon toed! the tracks are 2mm wider at the front. Oh well too far along to correct that disaster. Besides the skirt armor & fenders should hide the horror.

WIP's to follow! Upper hull very close to paint, give me 10 minutes and 'BAM! they will be posted...

...10 minutes later....

Here is a evolution of the MG 34. Tried to drill out the plastic kit barrel with little success. Broke out the Pb foil for a bit better luck, shown on the drill bit is the almost acceptable barrel cooling jacket. Also shown is a scratch built muffler in white styrene vrs. the kit one.

Upper hull with the muffler on but not glued. The brown stubs are for the spare track brackets, they are Tichy Train Group rivets glued up side down. The 1/2 round green plastic is the periscope guards. Shown also is the scratch built detail on the loaders & commanders hatches.

Lower hull with removable handle for painting & handling. The tracks will need to be brush painted, washed & dry brushed to complete. The stubs are spare track brackets like on the top hull. 


http://i6.photobucket.com/albums/y211/razordws/GB%20Badges/WMIIIGBsmall.jpg


  • Member since
    September 2007
  • From: Truro Nova Scotia, Canada
Posted by SuppressionFire on Thursday, September 23, 2010 5:37 AM

'Double post'

Well its allowed as time has passed sense my last post.

Krylon flows smooth as butter and flatter than a pancake! (Puns intended)

Chwat is looking like a butter sculpture... actually a base coat of Krylon 'Buttercup' Being anxious for progress I skipped or forgot to 'pre-shade' with a flat black enamel wash... Doh!

Glare in next photograph was intentional, look close to see ridges of green that are from the masking. They will be wet sanded before continuing to the 'color correcting' brown wash / thin paint. Masking was done with fresh blue poster tack.

*Upper hull is not attached as there is a bit more interior decorating to do. Its been a long road getting this tan chunk of plastic to this point, hopefully it turns out to some sort of high standard.


http://i6.photobucket.com/albums/y211/razordws/GB%20Badges/WMIIIGBsmall.jpg


  • Member since
    July 2008
  • From: Florida
Posted by Railfan 233 on Thursday, September 23, 2010 2:45 PM

It looks good SF.

It will be a high-quality model, that's for sure.


http://i6.photobucket.com/albums/y211/razordws/GB%20Badges/WMIIIGBsmall.jpgRed, White, and YOU! group build of 2010

  • Member since
    February 2006
  • From: Smithers, BC, Canada
Posted by ruddratt on Thursday, September 23, 2010 8:37 PM

Your hard work is really paying off, SF. I can't wait to see it when it's weathered. All that added detail will really pop! Yes

Well gents, I was finally able to make some major headway on my Albatros. The engine is finally complete. Lots of wiring added, the tricky ones being the bundles that attach to the distributor caps. Had to use some very fine wire to pull that off, as the rods that house the wiring are quite skinny and drilling into each end was a challenge. The molded on rocker springs were removed and replaced with real ones salvaged from damaged electrical plunger-type contacts. Model Master enamels, Alclad II lacquers, Pollyscale acrylics and pastels finished her off. Hope you like it so far.

Mike

 "We have our own ammunition. It's filled with paint. When we fire it, it makes pretty pictures....scares the hell outta people."


  • Member since
    September 2007
  • From: Truro Nova Scotia, Canada
Posted by SuppressionFire on Friday, September 24, 2010 5:19 AM

ruddratt,

Great looking inline 6 aircraft motor! If not for the giant clips in the picture one might mistake it for a real one.

Brushed on a coat of Future befor the color tinting wash. Thinking it will be a good time to catch up on some interior work and better yet to paint a 'test' sheet of plastic to experiment a bit. I have 'Raw Sienna' oil paint which should work, the problem is I have never used oil paint on a model and figure experimentation is the best angle before hitting Chwat'

http://i6.photobucket.com/albums/y211/razordws/GB%20Badges/WMIIIGBsmall.jpg


  • Member since
    March 2010
  • From: Brisbane
Posted by Julez72 on Friday, September 24, 2010 5:50 AM

Jason, fantastic work, i can't beleive you have crammed so much into a 1/72 HetzerYes

Ruddratt, very nice work, like SF said if not for the clip it would look real.. love the wiring and weatheringYes


  • Member since
    October 2008
Posted by eatthis on Friday, September 24, 2010 6:40 PM

tooled up tsr 2


looks angry :)


i may change the outer dumb bombs for another pair of the smaller gbu what do you think?


snow + 4wd + escessive hp = :)  http://www.youtube.com/watch?v=x7egUIS70YM

  • Member since
    March 2010
  • From: Brisbane
Posted by Julez72 on Friday, September 24, 2010 8:48 PM

Very nice Eat, i dunno about the weapons, both would look coolYes


  • Member since
    June 2008
  • From: Iowa
Posted by Hans von Hammer on Saturday, September 25, 2010 7:30 AM

After alll the crap that happeded to me & my War Room, I'm happy to say that I've kicked off finally.  Not much so sar, but at least something.. Even if it's 28 pages into the thread, lol...

Fujimi 1/48th D3A "Va;" Diver Bomber

I did some interior work here with stretched prue and styrene strip to make the the stringers and formers, as well as adding a few interesting bit, just some strip that I drilled hole into to make it look "Aviaition".  Howerver, I did scratchbuild the throttle quadrant from strip and sprue for the throttle, prop, and mixture levers.
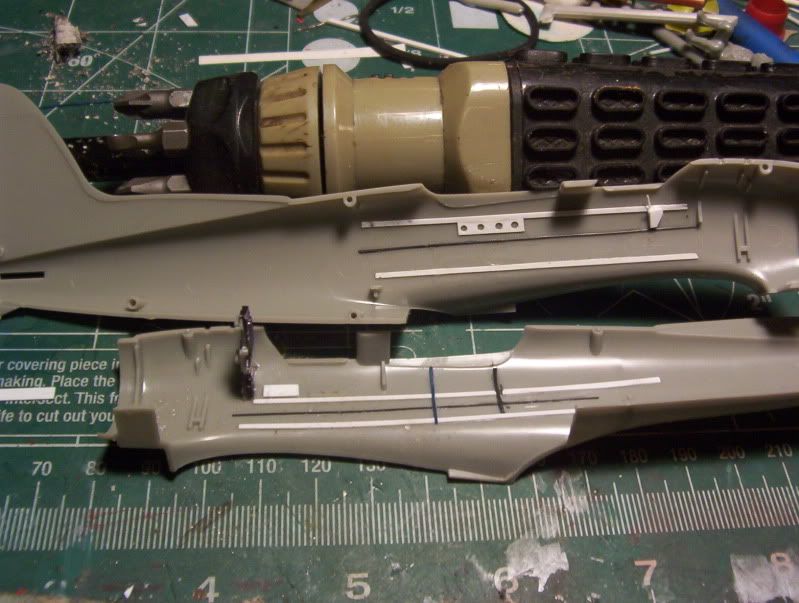
The panel was painted white, then I used a black Sharpie to paint it, then gave it some light swipes with an alcohol-dampened swab to bring out the underlying white.

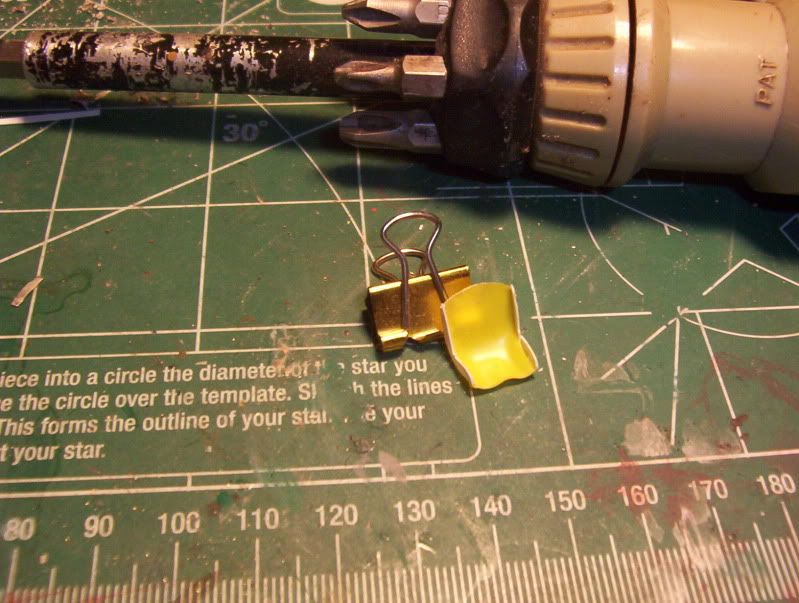
I lost the kit pilot seat, so I built this one with a piece of sheet that I thermo-formed by cutting a piece about an inch long and half-inch wide, then holdong it in a tweezers, passed it over a candle flame to soften it, then formed it into shape with my fingers. After that, I added some strip to the sides and sanded to shape. 
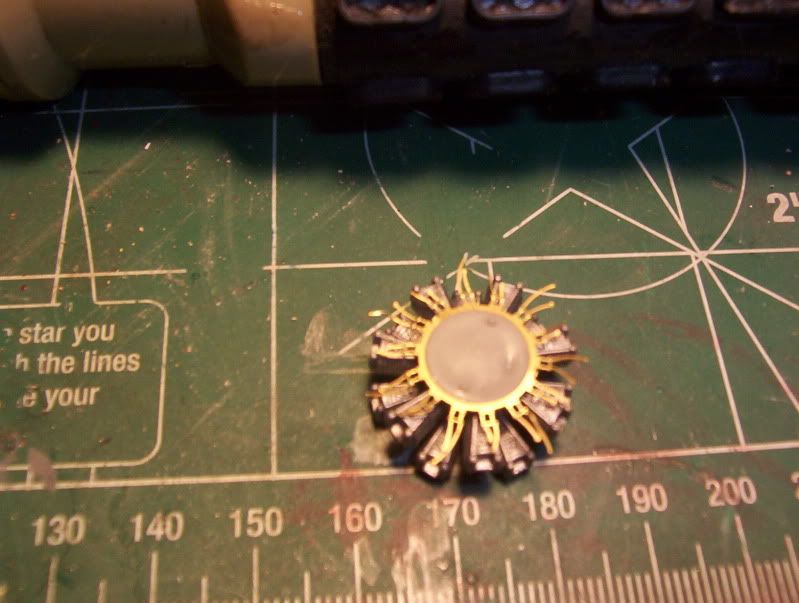
The ignition wiring harnes is not an actual "after-market", but robbed from a 1/48th Monogram Pro-Modeler B24D, making it a kitbashed engine...  It fit on the Fujimi engine like it was made for it, although the dual wires aren't quite  where I want them, it looks fine inside the cowl...
 I'm hoping that I've recovered most all the pieces to this kit, as I don't know how easy it will be to find a replacement for anything major (Haven't found the canopy yet, but it's gotta be in here somewhere, right? Hopefully, I won't find it immediately after hearing a *Crunch* under my wheelchair, lol).  Fiddly bits are easy to fabricate though, and so far that's the only area in which I've noticed a missing part or two. 


  • Member since
    October 2008
Posted by eatthis on Saturday, September 25, 2010 10:05 AM

right this ones done :)

its a tsr 2 what if assuming it entered service with the raf


iv got to make a stand for it


snow + 4wd + escessive hp = :)  http://www.youtube.com/watch?v=x7egUIS70YM

  • Member since
    September 2007
  • From: Truro Nova Scotia, Canada
Posted by SuppressionFire on Sunday, September 26, 2010 3:42 PM

Eat,

Looking good! That is a lot of ordinance for you plane, keep us posted!

Hammer,

Excellent scratch built details on your Val, Japanese aircraft make excellent platforms for extreme weathering.

Chwat update*

The Good,

Painted a experimental panel for the oil wash, it turned out acceptable as seen below:

the Bad,

Hand painted the reddish hue around the green camouflage, overall everything is too dark and will try and correct in the weathering.

& the Ugly.

Like said before the tracks are pigeon toed! Oh well to major of a error to fix now. Also the scratch built gun interior is a tad over scale, had to sand 2mm off the front to move the assembly forward.

Comments & critique are welcome!


http://i6.photobucket.com/albums/y211/razordws/GB%20Badges/WMIIIGBsmall.jpg


JOIN OUR COMMUNITY!

Our community is FREE to join. To participate you must either login or register for an account.

SEARCH FORUMS
FREE NEWSLETTER
By signing up you may also receive reader surveys and occasional special offers. We do not sell, rent or trade our email lists. View our Privacy Policy.