SEARCH FINESCALE.COM

Enter keywords or a search phrase below:

Weekend Madness III - COMPLETED see pg1 for pics

39581 views
446 replies
1 rating 2 rating 3 rating 4 rating 5 rating
  • Member since
    March 2007
  • From: Carmel, CA
Posted by bondoman on Monday, November 15, 2010 12:22 AM

kermit

Razordws, Lewbud,

What?? You mean theres people starting next weekend too? If so, and if our gracious host would let me i must say i had so much fun with it that i am eager to have another go at itStick out tongueStick out tongueStick out tongue

My mig turned out ok but it was kinda too complex a kit to do well in such short notice and i know i can do better. If i am allowed i will do another build just for fun and giggles.

Can i can i can i can i can i?????

Richard

I'd enjoy the company.

  • Member since
    July 2003
  • From: Huntington, WV
Posted by Kugai on Monday, November 15, 2010 12:16 AM

It's been great to see everyone's builds coming along!  It's amazing what can be done in 48 hours.

OK, here's pretty much the end product of my efforts.  I added the last bit of Dullcote with minutes to spare, so I hope the drying time delaying the pics and the bits of mask around the canopy that'll have to wait til morning to be removed won't be held against me.

All in all, a fun build and the time limit was a good challenge.  Can't wait to see how all the entries turn out.

Thanks for the fun weekend project idea and I hope we can do it again next year!


http://i712.photobucket.com/albums/ww122/randysmodels/No%20After%20Market%20Build%20Group/Group%20Badge/GBbadge2.jpghttp://i6.photobucket.com/albums/y211/razordws/GB%20Badges/WMIIIGBsmall.jpg

  • Member since
    September 2004
  • From: Vernon, BC, Canada
Posted by razordws on Monday, November 15, 2010 12:10 AM

Bill:  Welcome back and I'll be looking forward to your build.

Buddy & Richard:  If you really really want too by all means go ahead!  PropellerPropellerPropeller

Half an hour to go and I'm calling it done.  Would like to do some more weathering and a flat clear coat but that can be done another day.  For now it's in the display case.

Oh yeah, and I broke both rear idler wheels off trying to get the tracks on.  Ended up putting some CA glue on the bottom of the road wheels and stretching the tracks over them as the glue set to get the slack that I needed and then CA'ed the Idler wheels back on too to make the deadline.  Whew!

Dave

  • Member since
    June 2009
  • From: Netherlands
Posted by kermit on Sunday, November 14, 2010 11:53 PM

Razordws, Lewbud,

What?? You mean theres people starting next weekend too? If so, and if our gracious host would let me i must say i had so much fun with it that i am eager to have another go at itStick out tongueStick out tongueStick out tongue

My mig turned out ok but it was kinda too complex a kit to do well in such short notice and i know i can do better. If i am allowed i will do another build just for fun and giggles.

Can i can i can i can i can i?????

Richard

"Success is the ability to go from one failure to another with no loss of enthusiasm." - Sir Winston Churchill

  • Member since
    June 2008
Posted by lewbud on Sunday, November 14, 2010 11:39 PM

Well, due to poor time management skills, I failed in my attempt to build a Mach 2 kit in 48 hours.  However, all that's left is the bare metal paint job and decals.  I may be able to salvage the launch platform after a swim in the purple lake.  Here's where I finished, a X-13 on a stick.


Dave, since there will be some building going on next weekend is it ok if I try it again?

Buddy- Those who say there are no stupid questions have never worked in customer service.

  • Member since
    March 2007
  • From: Carmel, CA
Posted by bondoman on Sunday, November 14, 2010 9:17 PM

Looks great, guys...just came home tonight. looks like I'll start this Friday night then. Can;t wait to go back through the thread.

  • Member since
    September 2004
  • From: Vernon, BC, Canada
Posted by razordws on Sunday, November 14, 2010 8:43 PM

Guys, there is some outstanding work here and when I get  chance I'll comment on everyone's builds but for now I'm still working on my own build and will catch up on all the updates and finished builds when I'm done. 

I've got my decals on and the tracks painted.  Just a few final touches with the paint and some weathering if I have time.  

Dave

  • Member since
    February 2003
  • From: Northern Virginia
Posted by hutchdh on Sunday, November 14, 2010 7:19 PM

dioramator

So here is the final product

http://i625.photobucket.com/albums/tt333/dioramator/2010%20weekend%20group%20build/PB154336.jpg

http://i625.photobucket.com/albums/tt333/dioramator/2010%20weekend%20group%20build/PB154340.jpg


Brett, I watched the progress of your build with much interest and admiration.  I really liked that technique and will try it sometime whenever I get the gumption to get back into armor.  Great job!!!


Hutch

 On the Bench: 1:48 HobbyBoss Ta152-C; 1:48 & 1:72 Hasegawa F-104G NATO Bavaria

In queue: 1:48 Academy F-4B & a TBD Eric Hartmann bird

Recently completed: 1:32 Trumpeter P-51B

  • Member since
    April 2005
  • From: Australia
Posted by taxtp on Sunday, November 14, 2010 7:00 PM

Great work on the finished builds guys.  Without mentioning an individual build, the quality is quite outstanding given the time constraint.

Brett - I considered doing a 1/48 tank, but it would have been a more simple scheme than you chose, but decided  I wouldn't be able to get it done. Sterling effort !

Jason - your little 38T looks like it should belong in a larger scale.

Jeff - I can't believe you chose a bare metal scheme for your P-51, given the time contraint. Hats off to you for picking it, and getting it done so well.

RIchard - the same goes for your Mig. Another great job.

Railfan - that is a very realistic looking flat car.

Stikpusher - nice job on the KV, I take your point on the tension in the tracks, but they do look and I think you can justify them from an accuracy perspective.

Apologies if I've missed anyone, I'm sneaking a peek from the office !

Keep going with the unfinished ones guys, it's amazing how it can all come together at once, even if you miss the deadline, you've still entered into the spirit of this GB, and I would love to see your finished models.

Cheers

Tony

I'm just taking it one GB at a time.

  • Member since
    July 2004
  • From: Sonora Desert
Posted by stikpusher on Sunday, November 14, 2010 6:44 PM

For the purposes of this GB I am calling my KV done... of course I reserve the right to go back and muddy it up... Devil after all a clean WWII Soviet tank just does not look right...Geeked I replaced the kit tracks with some spare rubber band style ones from a Trumpet KV. That was a proverbial double edge sword- the detail is better, especially as the kit tracks have no inner side detail... but they would not hold together very well, at least using the heated screwdriver method. Liquid glue did not work at all, they came apart during painting, so I ended up using the good old fashioned staples.And they are a tad tighter than I would prefer. I have pics of well tensioned KVs, but I would prefer a bit more slack...

anyways I completed her about 30 minutes shy of 48 hours,,, with lots of downtime in thereWink

this was fun!Yes


F is for FIRE, That burns down the whole town!

U is for URANIUM... BOMBS!

N is for NO SURVIVORS...

       - Plankton

LSM


  • Member since
    January 2007
  • From: Cherry valley il.
Posted by invertman on Sunday, November 14, 2010 6:29 PM

awsome builds guys,

well i have the marder painted.

when i went to work on the tracks i discovered that they DONT FIT!!!

the drive sprockets or the rear idlers. the drive holes in the tracks dont fit the drive teeth.,

and the idlers are too narrow for the guide teeth on the tracks.

needless to say i have been working on them for the last 3 hrs and managed to break off one of the rear idlers. i"m at my witts end with this one...lol.

i probably won't be making the deadline,but i will keep at it.

jason.

  if you want permission for a test flight.... the answer is "no".

  • Member since
    November 2012
Posted by dioramator on Sunday, November 14, 2010 6:13 PM

So here is the final product


That turned out quite well considering the time constraints, I would ususlly do more layered coulours, and in my eyes looks quite bland without chips and scratches. Maybe if I had only done 2 colour paint job,  I would have had time to do that as well. However I'm still quite happy with the outcome, and will put it in the (technically judged section of the) model expo next year, and see what the judges think.

...........

Thanks Dave for hosting yet another highly successful group build. Pencil me in as a participant for next year.

Suppressionfire: That little tank is a classic, what a great build and interesting subject and scale.

Tony: The Williams turned out great, a difficult paintjob to rush.

Huch: Thet Focke looks fantastic. excellent work. (The preshading makes a big difference to the final appearance)

Jeff: excellent work, especially considering it was done in only half the time.

Mr Sqid: most unfrotunate about the putty, It only takes one big issue like that to totally blow out the time shcedule. Am looking forward to seeing the finished product though.

I'll not mention everyone (or I will be here for hours), but thank you all for your participation, It has been fun watching all the various build take shape, (and some coming to fruition). I am totally impressed at the effrot made by all those involved. Bow Down Wow

And the guys that are still going.. Keep at it, I'm looking forward to seeing the final results.

Cheers Toast Beer

Brett

  • Member since
    July 2003
  • From: Huntington, WV
Posted by Kugai on Sunday, November 14, 2010 5:48 PM

Okay, touch-ups done, belly sludged up, and now waiting for the gloss over the touch-ups to dry, so time for some progress pics.

After I primered the whole thing in gray, I planned to spray the gear bays in white and touch-up with Tamiya white acrylic as needed ( I never had much luck with white going in well with a brush, so I spray it as much as possible ).  Here's the masked belly in preparation for that.

After that was done, here's the base coat of Gunship gray.

After a few hours for a second coat of Gunship Gray, I added the black around the edges.  The colors used for the exhaust vents were Tamiya Bronze and Gunmetal; Maybe not the most accurate, but they dry quickly ( a major plus on a 48-hour build ) and seemed likely to work pretty well at looking like metal that had been heated repeatedly, especially with a layer of Tamiya clear Smoke and ( if I have time ) some weathering powders for added effect.

Final update in a few hours.

http://i712.photobucket.com/albums/ww122/randysmodels/No%20After%20Market%20Build%20Group/Group%20Badge/GBbadge2.jpghttp://i6.photobucket.com/albums/y211/razordws/GB%20Badges/WMIIIGBsmall.jpg

  • Member since
    July 2008
  • From: Florida
Posted by Railfan 233 on Sunday, November 14, 2010 5:05 PM

SuppressionFire

Seriously though it was awesome to be under the time limit, I really needed this to break free of bad  the habit of taking a ridiculous amount of time on a single build! Tanks again!Toast

Jason

I agree there, Jason.

I have the opposite bad habit of taking too long on a build (and most of mine get done, 5 or 6 years after I buy the kit)  It's amazing how much you can get done when you have a deadline comming


http://i6.photobucket.com/albums/y211/razordws/GB%20Badges/WMIIIGBsmall.jpgRed, White, and YOU! group build of 2010

  • Member since
    July 2003
  • From: Huntington, WV
Posted by Kugai on Sunday, November 14, 2010 4:51 PM

Arrrgh!  Overslept and only 6 hours left!

The good news is I only have a small touch up of paint, decals and dullcote left to go.  Pics to come while something's drying.

http://i712.photobucket.com/albums/ww122/randysmodels/No%20After%20Market%20Build%20Group/Group%20Badge/GBbadge2.jpghttp://i6.photobucket.com/albums/y211/razordws/GB%20Badges/WMIIIGBsmall.jpg

  • Member since
    September 2007
  • From: Truro Nova Scotia, Canada
Posted by SuppressionFire on Sunday, November 14, 2010 4:51 PM

hutchdh

Jason,

That little thing is awesome!!!!! 

Hutch

Tanks buddy, I hope to get a few more 1/144 scale kits finished before I need prescription glasses.

The decals are tribute to this GB! (48) Borrowed spares from the Panzer IV that came with the 38(t). It was a '804" that had to be cut very carefully as the white in between each number touched. Also figured the tank needed a little color as the kit called for white or black decals.

http://i6.photobucket.com/albums/y211/razordws/GB%20Badges/WMIIIGBsmall.jpg


  • Member since
    February 2003
  • From: Northern Virginia
Posted by hutchdh on Sunday, November 14, 2010 4:42 PM

SuppressionFire


 hutchdh:


Okay, as of 1645, I am officially done with 15 minutes to spare.  This was a very fun build and I am enjoying the progress on the diversity of what you guys are doing...thanks to the host!!!

http://i924.photobucket.com/albums/ad87/Hutchtheman/Weekend%20Build/Weekendbuilddone002.jpg

http://i924.photobucket.com/albums/ad87/Hutchtheman/Weekend%20Build/Weekendbuilddone001.jpg


Hutch your Fw 190 is absolutely stunning considering the time restraints. Bow Down

If we had to vote for the best completed model this weekend you have mine.

Jason


Thanks, man...nice compliment.....I must have sent my comment relative to yours just as you just sent this one.  BTW, I admire you for working on such a small subject...my eyes would not be able to take it...the detail is great.

Hutch

 On the Bench: 1:48 HobbyBoss Ta152-C; 1:48 & 1:72 Hasegawa F-104G NATO Bavaria

In queue: 1:48 Academy F-4B & a TBD Eric Hartmann bird

Recently completed: 1:32 Trumpeter P-51B

  • Member since
    February 2003
  • From: Northern Virginia
Posted by hutchdh on Sunday, November 14, 2010 4:40 PM

Jason,

That little thing is awesome!!!!! 

Hutch

Hutch

 On the Bench: 1:48 HobbyBoss Ta152-C; 1:48 & 1:72 Hasegawa F-104G NATO Bavaria

In queue: 1:48 Academy F-4B & a TBD Eric Hartmann bird

Recently completed: 1:32 Trumpeter P-51B

  • Member since
    September 2007
  • From: Truro Nova Scotia, Canada
Posted by SuppressionFire on Sunday, November 14, 2010 4:40 PM

hutchdh

Okay, as of 1645, I am officially done with 15 minutes to spare.  This was a very fun build and I am enjoying the progress on the diversity of what you guys are doing...thanks to the host!!!

http://i924.photobucket.com/albums/ad87/Hutchtheman/Weekend%20Build/Weekendbuilddone002.jpg

http://i924.photobucket.com/albums/ad87/Hutchtheman/Weekend%20Build/Weekendbuilddone001.jpg

Hutch your Fw 190 is absolutely stunning considering the time restraints. Bow Down

If we had to vote for the best completed model this weekend you have mine.

Jason


http://i6.photobucket.com/albums/y211/razordws/GB%20Badges/WMIIIGBsmall.jpg


  • Member since
    January 2003
  • From: Hancock, Me USA
Posted by p38jl on Sunday, November 14, 2010 4:33 PM

ok.,. 3.5 hrs to go... aah!! 

[View:/themes/fsm/utility/Photobucket:550:0]


[View:/themes/fsm/utility/Photobucket:550:0]

this is the cockpit before..

[View:/themes/fsm/utility/Photobucket:550:0]


my misssing supercharger,, now cast in resin..

[View:/themes/fsm/utility/Photobucket:550:0]


more soon....

[Photobucket]

  • Member since
    September 2007
  • From: Truro Nova Scotia, Canada
Posted by SuppressionFire on Sunday, November 14, 2010 4:30 PM

dioramator,

Excellent finish on the Panther! Most (me included) opted for a one color camouflage scheme.

38(t)

Finished up today about 3:30 pm. 3 hours before my deadline. Made a simple display base which will be modified further to show at local spring contests.

All time building was approximately 18 hours +/-. It was good therapy to get something finished as the last one was back in may +/-.

What a weekend! Bought the family a new puppy (Lab-a-doodle) changed oil in the Mrs. truck today and basically modeled for 18 hours! Good as it gets and to top it off excellent roast beef dinner tonight & a few cold Coors lights!Beer

The finishing touches was a whirl wind of modeling fury that I would not be able to repeat nor dare to!

The good

Borrowed a couple of 1/32 scale .50 rounds to represent 37mm ones in 1/144 scale. It actually works out to .25mm, which these were awful close and fit in the gun barrel perfectly!

the bad...

Never addressed the gap under the fenders, it shows here...

& the ugly

Was informed if I was to do another 'Weekend madness' it would be in a bachelor pad!

Seriously though it was awesome to be under the time limit, I really needed this to break free of bad  the habit of taking a ridiculous amount of time on a single build! Tanks again!Toast

Well I feel the badge was well earned and let the contest judges have the final say as to the quality!

Jason


http://i6.photobucket.com/albums/y211/razordws/GB%20Badges/WMIIIGBsmall.jpg


  • Member since
    January 2003
  • From: Hancock, Me USA
Posted by p38jl on Sunday, November 14, 2010 4:14 PM

ok,, I started last night.. worked till 1:30am EST,,,

my ebay scored was missing some other pieces, luckily some were scavenged from a cieling crash of the same kit from a few years ago..the Gun bay wall,, and the yoke, I was missing one super charger, and the crashed one lost both.. so I had to cast a replacement from resin..

here are the pics so far..[View:/themes/fsm/utility/Photobucket:550:0]


doing this one as a P-38M night fighter....

[View:/themes/fsm/utility/Photobucket:550:0]


Rear RO cockpit piggy back has been grafted on..

[View:/themes/fsm/utility/Photobucket:550:0]


[View:/themes/fsm/utility/Photobucket:550:0]


[View:/themes/fsm/utility/Photobucket:550:0]

[Photobucket]

  • Member since
    November 2012
Posted by dioramator on Sunday, November 14, 2010 4:06 PM

Stop the clock, at 46 hours, 52 minutes and 44 seconds.
I'm calling this one done.


I will be back with a few better pictures, and a de-brief once I get my lad off to school.

Brett

  • Member since
    March 2007
  • From: Atlanta, Ga.
Posted by MrSquid2U on Sunday, November 14, 2010 4:05 PM

I'm still plugging away!

 Working on the body work and decided since I'm late anyways I would add the 'recovery bed' rather than just represent it with lid on as first planned. One shot has tires dummied in place just give an idea of where it's headed..


For those not familiar with Ma.K.-

The creator of the genre, "Kow" (not cow) was a heckuva kitbasher. But when done his equipment/vehicles were often not symetrical and had what I call 'organic' lines- lotsa blending, humps and curves. That's why most of this vehicle appears off-center!


  • Member since
    July 2003
  • From: Bicester, England
Posted by KJ200 on Sunday, November 14, 2010 4:00 PM

Stunning work guys.

Tony, the Williams looks spot on.Yes

Jules, the pre-shade on your staff car looks awesome.

Jason, does the t in 38t stand for tiny?

Absolutely stunning, especially the SPG.Bow Down

Brett, that Panther looks suitably evil.

Jeff, that is a stunning build in any timescale, let alone a little over a day.

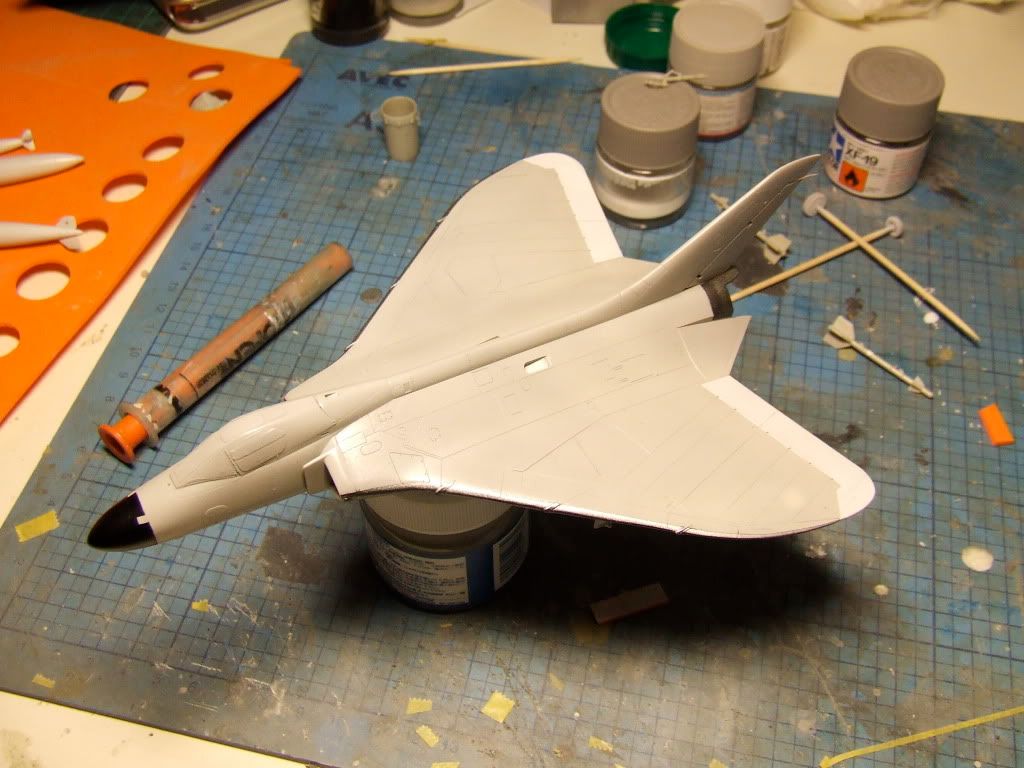
Well this is where I was at just after midnight last night...

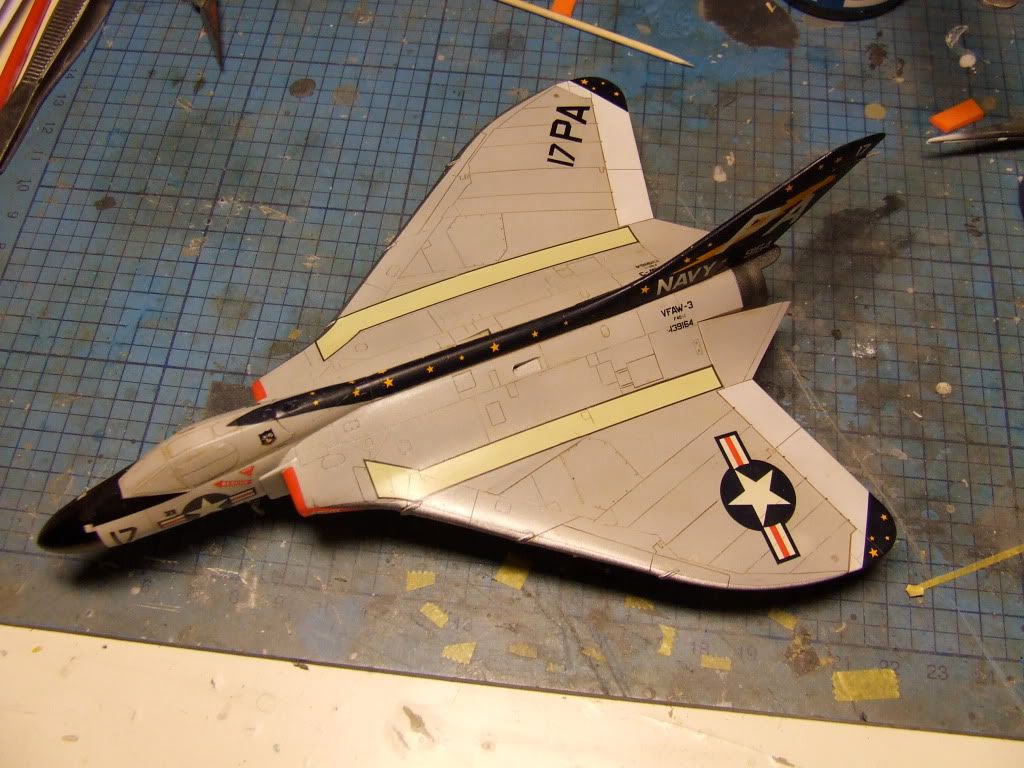
...which meant starting the decals this afternoon, once I'd finished walking dogs etc.

Naturally I chose the most difficult scheme, rather than doing one of the Marines machines, I went for the more complex Navy paint job.

As a result by 20.00 tonight I hadn't managed to finish the build, but I'm well pleased at how far I managed to get in 48 hours, as each of my last few builds has taken over 3 months, and still aren't finished!

So here is where I was at 20.00....

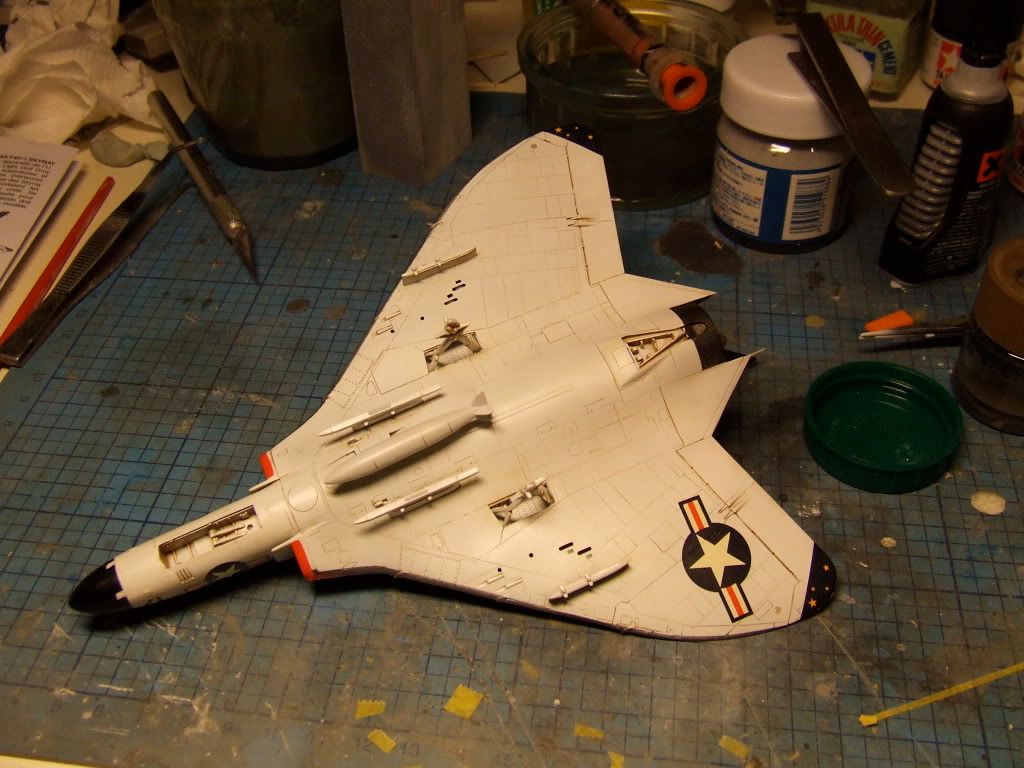
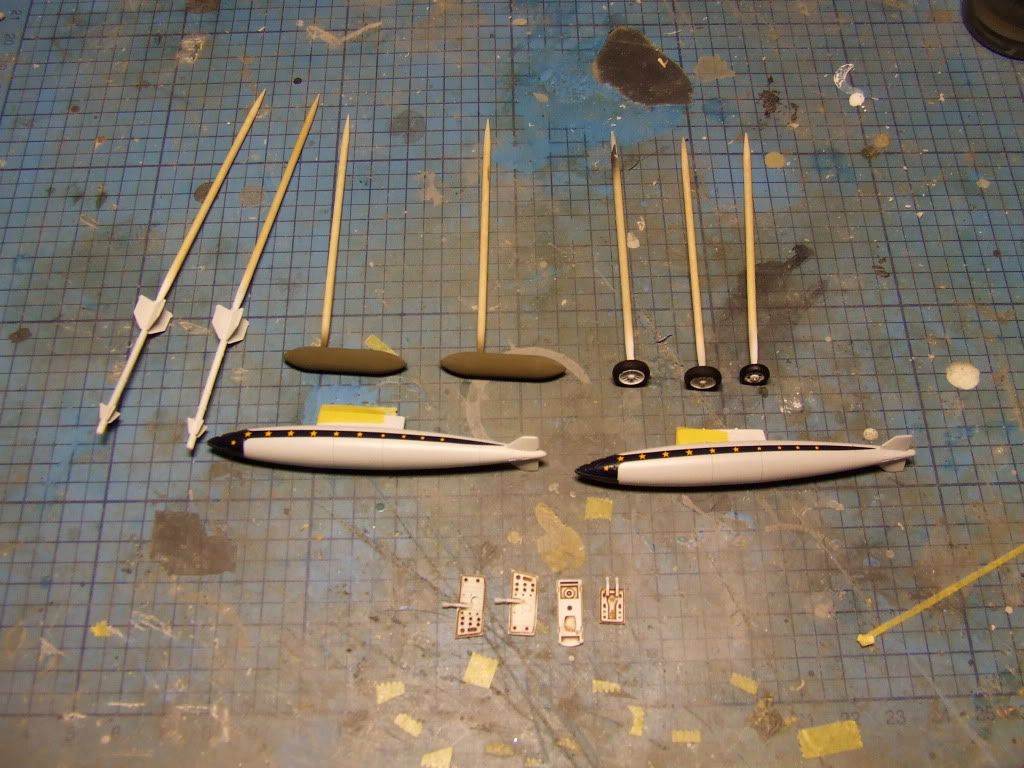
Probably no more than an hour or two extra would have seen this build finished, but for now I'm calling it quits, and will finish off tomorrow night.

I'll post some pics when I'm done.

Dave, it's been a pleasure as always, ans you can put me down for next year's right now.

Next year I'll be doing something very small & simple, like a UAV, and I know just the kit.

Karl


Currently on the bench: AZ Models 1/72 Mig 17PF

  • Member since
    February 2003
  • From: Northern Virginia
Posted by hutchdh on Sunday, November 14, 2010 3:54 PM

Okay, as of 1645, I am officially done with 15 minutes to spare.  This was a very fun build and I am enjoying the progress on the diversity of what you guys are doing...thanks to the host!!!

Hutch

 On the Bench: 1:48 HobbyBoss Ta152-C; 1:48 & 1:72 Hasegawa F-104G NATO Bavaria

In queue: 1:48 Academy F-4B & a TBD Eric Hartmann bird

Recently completed: 1:32 Trumpeter P-51B

  • Member since
    September 2004
  • From: Vernon, BC, Canada
Posted by razordws on Sunday, November 14, 2010 3:32 PM

Railfan:  Congratulations on finishing your build!  Cool 

Jeff:  I have built the Tamiya warbird kits before and they are indeed awesome as your build plainly shows.

Just having some lunch and then I'm back to the bench.

Dave

  • Member since
    September 2007
  • From: Crystal Lake, IL
Posted by firesmacker on Sunday, November 14, 2010 3:20 PM

OK, I'm calling this one done. Started yesterday at 0930 CST and finished today at about 1500 CST so 31-ish hours total.

This was really a fun little kit to build. If you haven't built any of the Tamiya Warbrid series kits, I highly recommend them.

I'm a little bummed this is over for me already. This and the Secret Santa GB are the high points of my modeling yearSad

I'm going to keep on looking at everyone's work in here. I can't say enough how impressed I am.

Thanks for looking. As always, any comments or suggestions are welcome.

Regards,

Jeff

  • Member since
    September 2007
  • From: Crystal Lake, IL
Posted by firesmacker on Sunday, November 14, 2010 2:23 PM

Heh, yeah, Scott, we typically show the un-started kit right at the beginning. MOstly to say " I swear guys, nothing is started, I only sniffed it"Whistling  No big deal if you didn't.

This one is fast approaching the finish line. I have a little touch up and the last few fiddly bits to attach when a few things dry. Should be all wrapped up in the next few hours:

Keep banging away fellas.

Regards,

Jeff

  • Member since
    August 2006
  • From: Amherst, MA
Posted by M1 A1 A2 Tanker on Sunday, November 14, 2010 2:05 PM

Quick Update:

Hey, Everyone. Just noticed the must post pic of unbuilt model at the start. Well, oops. But I promise this was what I got done in the last 18 hours or so. Started at 5:30pm MTN last night. Got the underside pretty much done which is through step 3 in the instructions. (There are 12 steps total not including painting.) Going to save steps 4 and 5 (The wheels) for once prelim. paint is done.

Anyway, here's the pic. You'll notice a model builders best friends in the background. At least they are when your building fast! LOL!!!


See ya

Scott


“Computers are like Old Testament gods; lots of rules and no mercy.”  ~ Joseph Campbell


JOIN OUR COMMUNITY!

Our community is FREE to join. To participate you must either login or register for an account.

SEARCH FORUMS
FREE NEWSLETTER
By signing up you may also receive reader surveys and occasional special offers. We do not sell, rent or trade our email lists. View our Privacy Policy.