SEARCH FINESCALE.COM

Enter keywords or a search phrase below:

The Official F-4 Phantom II Group Build 2011

618418 views
2992 replies
1 rating 2 rating 3 rating 4 rating 5 rating
  • Member since
    August 2009
  • From: Toledo Area OH
Posted by Sparrowhyperion on Thursday, April 28, 2011 8:53 AM

Your build is coming along great.   The modification to the shark decal is not really noticeable unless you really know it's there when you look.  Nice Camo as well.

I hit a snag with one of my Birds.  The portside (left) tailfin on my Monogram 1/48 F4C has gone missing and I can't find it anywhere so I am concentrating on the FGR2 until I can find it.  If I can't find it it's an email to Ravell or see if I can juryrig something using the tailfins from an old testors F4D I have in the closed that still has it's fins.

The FGR2 is another matter entirely.  I have the body roughly back together after the great landing gear bay fiasco, but the wing assembly is not lining up right  with the new intakes.  Unfortunately there was no way to dry fit this until they were on and the fuselage assembled so I think I am going to be having more fun with putty.  I did order new fuselage halves from Hasegawa as well...  Just in case I can't get them to line up.  Although dis-assembly would not be easy if it got to that point.


jimbot58

Some ups and downs here: My 'Geasel' is acquiring a fierceness!

http://img811.imageshack.us/img811/2982/0428110104.jpg

But not without a struggle: the sharkmouth was a bit of a pain as the Italeri decal was a bit thick and took time and lots of nursing it down with many applications of Micro-sol. Finally got it all settled down, but I also had to trim it as it didn't quite fit between the radome and the small inlet behind it. The other data decals are freshly applied and may still look a bit milky, but that will go away.

I also had a bit of a mishap with it: A miscue on my part sent it tumbling to the floor, where it landed tail first, snapping off the fuel dump! I searched for the broken piece but all I got was a crunch and a burp from the carpet monster! The part is nowhere to be found! I still have that old Italeri kit I robbed gear doors and decals from and the part looks usable, but will no doubt be a PITA to re-attach. I'm going to wait to do that as I still have lots of decals to do, metal finishes around the exhaust areas and so on, so lots of handling still to go with plenty of time for me to break it or something else off!

In the Hangar: 1/48 Hobby Boss F/A-18D RAAF Hornet,

On the Tarmac:  F4U-1D RNZAF Corsair 1/48 Scale.

  • Member since
    November 2010
  • From: Lafayette, Indiana
Posted by Son Of Medicine Man on Thursday, April 28, 2011 11:24 AM

Ish47guy

Those pitot tubes, man...  No matter how careful I am...   Another thing I hate about Hasegawa 48th F-4s are the stab mounting dimples.  Those little-a** dimples are way to small, with very little area for the glue to hold.  It seems those things will break if too much dust settle on the model while its sitting on the shelf.

Anyway, I finished both trunnion covers on the wings, & got the halves glued together.  Just need to fill & sand.  Also finished & painted the certerline tank.  I finally got the technique down where you use liquid glue on the seams, & use the squeeze out as filler.  Absolutely no visible seams after painting.

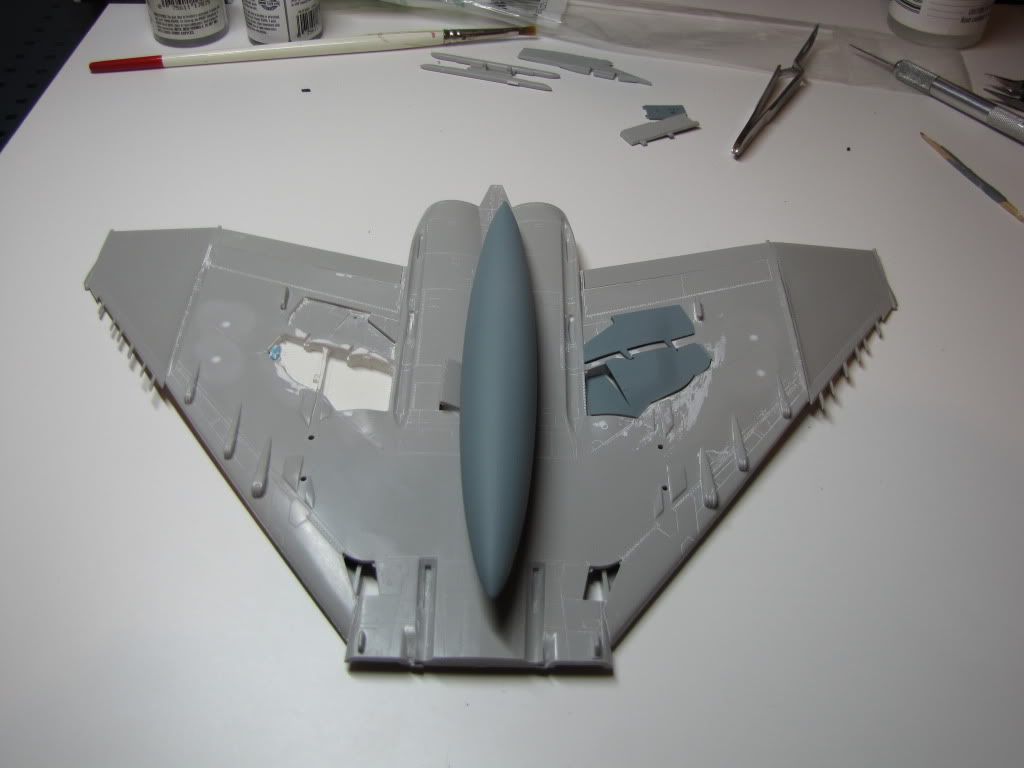
The scheme that I'm doing has colors that I've never used, either on an F-4, or at all, so I just put the parts on to get an idea what it going to look like.

I'm not going to use the 370 outbd tanks, so I filled in the holes with Evegreen .080" (2 mm for our metric friends) rod, which fit perfectly.  Dab liquid glue to soften the plastic to fill in the gaps, sand & done.

http://img.photobucket.com/albums/v26/ishthe47guy/Model%20Pics/VF-202%20F-4S/IMG_2995.jpg


Hi Chris,

Nice job, just like you said, the seam is invisible.  I have yet to try my hand at blending the seams together.  I hope I can do as good of a job as yours!

Ken

  • Member since
    November 2010
  • From: Lafayette, Indiana
Posted by Son Of Medicine Man on Thursday, April 28, 2011 11:31 AM

Sparrowhyperion

I hit a snag with one of my Birds.  The portside (left) tailfin on my Monogram 1/48 F4C has gone missing and I can't find it anywhere so I am concentrating on the FGR2 until I can find it.  If I can't find it it's an email to Ravell or see if I can juryrig something using the tailfins from an old testors F4D I have in the closed that still has it's fins.

The FGR2 is another matter entirely.  I have the body roughly back together after the great landing gear bay fiasco, but the wing assembly is not lining up right  with the new intakes.  Unfortunately there was no way to dry fit this until they were on and the fuselage assembled so I think I am going to be having more fun with putty.  I did order new fuselage halves from Hasegawa as well...  Just in case I can't get them to line up.  Although dis-assembly would not be easy if it got to that point.


Hi Rich,

Sorry to hear about the missing tailfin, hopefully it will turn up.  And I sympathize with you about the wings not lining up right with those new intakes.  You did such a nice job on the intakes, I hope you are able to correct it without much effort.

Ken

  • Member since
    February 2003
  • From: Panama City, Florida, Hurricane Alley
Posted by berny13 on Thursday, April 28, 2011 11:55 AM

Sparrowhyperion

I hit a snag with one of my Birds.  The portside (left) tailfin on my Monogram 1/48 F4C has gone missing and I can't find it anywhere so I am concentrating on the FGR2 until I can find it.  If I can't find it it's an email to Ravell or see if I can juryrig something using the tailfins from an old testors F4D I have in the closed that still has it's fins.


Let me know if you can't find the Horz Stab.  I have a set I can send you.

Berny

 Phormer Phantom Phixer

On the bench

TF-102A Delta Dagger, 32nd FIS, 54-1370, 1/48 scale. Monogram Pro Modeler with C&H conversion.  

Revell F-4E Phantom II 33rd TFW, 58th TFS, 69-260, 1/32 scale. 

Tamiya F-4D Phantom II, 13th TFS, 66-8711, 1/32 scale.  F-4 Phantom Group Build. 


  • Member since
    August 2009
  • From: Toledo Area OH
Posted by Sparrowhyperion on Thursday, April 28, 2011 12:47 PM

I hope so too.  The inner wall of the intakes are so thin where they meet the fuselage, that I know if I try to remove them, they will be ruined so I have to make it work somehow.


Son Of Medicine Man


 Sparrowhyperion:


I hit a snag with one of my Birds.  The portside (left) tailfin on my Monogram 1/48 F4C has gone missing and I can't find it anywhere so I am concentrating on the FGR2 until I can find it.  If I can't find it it's an email to Ravell or see if I can juryrig something using the tailfins from an old testors F4D I have in the closed that still has it's fins.

The FGR2 is another matter entirely.  I have the body roughly back together after the great landing gear bay fiasco, but the wing assembly is not lining up right  with the new intakes.  Unfortunately there was no way to dry fit this until they were on and the fuselage assembled so I think I am going to be having more fun with putty.  I did order new fuselage halves from Hasegawa as well...  Just in case I can't get them to line up.  Although dis-assembly would not be easy if it got to that point.


Hi Rich,

Sorry to hear about the missing tailfin, hopefully it will turn up.  And I sympathize with you about the wings not lining up right with those new intakes.  You did such a nice job on the intakes, I hope you are able to correct it without much effort.

Ken

In the Hangar: 1/48 Hobby Boss F/A-18D RAAF Hornet,

On the Tarmac:  F4U-1D RNZAF Corsair 1/48 Scale.

  • Member since
    August 2009
  • From: Toledo Area OH
Posted by Sparrowhyperion on Thursday, April 28, 2011 12:53 PM

I just found it about 20 minutes ago.  The hard way (crunch).  Somehow it got under the edge of the rug and... well the rest is predictable.  I'm going to find out which of our idiot cats batted it under there and shave it bald, then tattoo "Moron" on it's forehead... I'd really appreciate that set.  Thanks Berny.

Rich


berny13


 Sparrowhyperion:


I hit a snag with one of my Birds.  The portside (left) tailfin on my Monogram 1/48 F4C has gone missing and I can't find it anywhere so I am concentrating on the FGR2 until I can find it.  If I can't find it it's an email to Ravell or see if I can juryrig something using the tailfins from an old testors F4D I have in the closed that still has it's fins.


Let me know if you can't find the Horz Stab.  I have a set I can send you.

In the Hangar: 1/48 Hobby Boss F/A-18D RAAF Hornet,

On the Tarmac:  F4U-1D RNZAF Corsair 1/48 Scale.

  • Member since
    August 2009
  • From: Toledo Area OH
Posted by Sparrowhyperion on Thursday, April 28, 2011 6:49 PM

Well, I managed to save the fuselage.  It took a ton of sanding, but I have a semi decent basic fit between the fuselage and the wings now.  I should be able to finish it off with detail sanding and some putty and Zap a Gap.  Here are a few photos before I do the finish sanding and detailing.

Here is the trickiest section, the three way joint between the fuselage halves and the wing section.  The fuselage halves are actually joined up closely but I had to use CA to fill a large gap so you can't see the flush surface here between the fuselage halves.  I will be using more CA and Putty to close up the large seam at the front wing section joint.

Here is the other end before finish sanding and detail.  The side joins and the center frame mating.

Here is the starboard wing join which still needs filling and smoothing. (Pardon the fuzzy image)

Here is the cockpit section before I put in the new ejection loop handles and do some touch up.

And lastly here is the Port wing joint on top which is also awaiting filling and sanding.

Well.  That's it for now.  I'll post more as progress moves along.  I am starting to work on the landing gear now. So here we go...  Almost to the home stretch on assembly.

Rich

In the Hangar: 1/48 Hobby Boss F/A-18D RAAF Hornet,

On the Tarmac:  F4U-1D RNZAF Corsair 1/48 Scale.

  • Member since
    April 2011
  • From: Upstate New York
Posted by Warthog Wrencher on Thursday, April 28, 2011 9:02 PM

Is it too late to join this build?  I'm new to the forums and new to building aircraft but am an avid F-4 enthusiast.

Just curious as to whether this build is still open to new builders or if it's closed for this year.


Check Six!!!

Brian

  • Member since
    April 2005
Posted by Thunderbolt379 on Friday, April 29, 2011 12:08 AM

Hi Brian,

It's never too late to join! I'd be happy for new entries at any time up to December so long as there's a reasonable chance of completion. Just let me have the details of which kit in what scale and any other details (OOB or AMs, etc) and I'll update page 1.

Welcome aboard!

Cheers, M/TB379

http://worldinminiature.blogspot.com/

  • Member since
    June 2009
Posted by jimbot58 on Friday, April 29, 2011 3:22 AM

Sparrow, I'm glad you found that part. I hope it wasn't damaged too bad.

I appreciate all your comments on my bird. I couldn't build a SEA Phantom without the shark mouth. It would be like Sunday morning pancakes with no syrup! I didn't realize the decal was a bit too long until I had wet it and went to set it down on the plane. I don't know if the Hasegawa nose is too short, or the Italeri kit nose is too long. Perhaps the decal was incorrect, I don't know. It took some time to work it down, and here it is a good thing that the decal is a bit thick as it was easier work it into the curves without tearing. Eventually I got the front edge worked down to a point where it was flat and I could lay a fresh razor blade against the edge of the radome to trim the decal. I'm working up the nerve to do the other side....

As far as those broken parts on this kit alone: I have had to replace blade antennas, both pitot tubes, and now the fuel dump. The pitot tubes are now made of brass rods with tips filed down to a smaller diameter. Usually I break 3 or 4 of those before I get one I can use. The stabs broke those little pins off years ago when I originally assembled this kit and I had to drill out the edges of the stabs to accept a length of brass rod. This would have the potential to make them movable, but I can't as there is some glue damage from where they were attached before.

I would also mention the missing gear doors and their actuator arms that I am having to sub from the Italeri kit. They are a bit small so I would never be able to pose it in flight! I can get away with it on the ground as it is impossible to tell with the doors open

I so want to finish this kit that has been 20 years in the making!

*******

On my workbench now:

It's all about classic cars now!

Why can't I find the "Any" key on my keyboard?


  • Member since
    August 2009
  • From: Toledo Area OH
Posted by Sparrowhyperion on Friday, April 29, 2011 9:45 AM

Unfortunately the Stabilizer is irreparable.  It broke into three pieces and twisted so much in the process that I can't get them to line up again.  I'm glad Berny has that extra set or I would be waiting for a month for a replacement from Revell/Monogram.  I took a look at the Testors stabs and they won't work.  They are noticeably thinner and would be very noticeable.  I normally keep them in the box until they are assembled but I had to take that one out t fill a small mold deformity, and it was drying on my desk in front of the small fan I use to dry things a bit more quickly.  Either the tape I used to tape in place let go or one of our cats got bored and thought it would be fun to play with.  Possibly both.

Rich

jimbot58

Sparrow, I'm glad you found that part. I hope it wasn't damaged too bad.

I appreciate all your comments on my bird. I couldn't build a SEA Phantom without the shark mouth. It would be like Sunday morning pancakes with no syrup! I didn't realize the decal was a bit too long until I had wet it and went to set it down on the plane. I don't know if the Hasegawa nose is too short, or the Italeri kit nose is too long. Perhaps the decal was incorrect, I don't know. It took some time to work it down, and here it is a good thing that the decal is a bit thick as it was easier work it into the curves without tearing. Eventually I got the front edge worked down to a point where it was flat and I could lay a fresh razor blade against the edge of the radome to trim the decal. I'm working up the nerve to do the other side....

As far as those broken parts on this kit alone: I have had to replace blade antennas, both pitot tubes, and now the fuel dump. The pitot tubes are now made of brass rods with tips filed down to a smaller diameter. Usually I break 3 or 4 of those before I get one I can use. The stabs broke those little pins off years ago when I originally assembled this kit and I had to drill out the edges of the stabs to accept a length of brass rod. This would have the potential to make them movable, but I can't as there is some glue damage from where they were attached before.

I would also mention the missing gear doors and their actuator arms that I am having to sub from the Italeri kit. They are a bit small so I would never be able to pose it in flight! I can get away with it on the ground as it is impossible to tell with the doors open

I so want to finish this kit that has been 20 years in the making!

In the Hangar: 1/48 Hobby Boss F/A-18D RAAF Hornet,

On the Tarmac:  F4U-1D RNZAF Corsair 1/48 Scale.

  • Member since
    August 2007
  • From: n/w indiana
Posted by some assembly required on Friday, April 29, 2011 11:11 AM

sparrowhyperion - thats some work  ahead of you. i couldnt possibly pull off the work you do Yes . i do have a small tip that might help in your endeavors with the seams near the burner cans. i use a two part epoxy called pc-7 from ace hardware. i read about it here in the forums and it works great for hiding seams. put it on like normal putty then use q-tips and saliva to remove w/out damaging any detail Propeller im usuing it for an f-86 in NMF for the korean war GB and it works great.

                            good luck with your f-4

                                                S.A.R. 


  • Member since
    August 2009
  • From: Toledo Area OH
Posted by Sparrowhyperion on Friday, April 29, 2011 11:18 AM

Thanks for the idea.  I'll give it a try.  The trickiest I think is going to be getting the depressions for the missiles to line up again.  Argh... lol


some assembly required

sparrowhyperion - thats some work  ahead of you. i couldnt possibly pull off the work you do Yes . i do have a small tip that might help in your endeavors with the seams near the burner cans. i use a two part epoxy called pc-7 from ace hardware. i read about it here in the forums and it works great for hiding seams. put it on like normal putty then use q-tips and saliva to remove w/out damaging any detail Propeller im usuing it for an f-86 in NMF for the korean war GB and it works great.

                            good luck with your f-4

                                                S.A.R. 


In the Hangar: 1/48 Hobby Boss F/A-18D RAAF Hornet,

On the Tarmac:  F4U-1D RNZAF Corsair 1/48 Scale.

  • Member since
    November 2010
  • From: Lafayette, Indiana
Posted by Son Of Medicine Man on Friday, April 29, 2011 12:22 PM

Hi Everyone,

Well the third cockpit from Sprue Brothers arrived today but with dissappointment.  It is not Sprue Brothers fault however, but Aires.  As I have shown before, the original cockpit I purchased did not have the correct detail for an F-4E.  The cockpit that arrived today matches the original cockpit as shown below:


Here is a picture with the correct detail:

The problem with the second cockpit was a gash in the side wall of the front cockpit shown below:

This cockpit that arrived today is the third attempt by Sprue Brothers to produce a cockpit that was not damaged.  But like I already said, the one that arrived today is not Sprue Brothers fault, but Aires.  Since this has been dragging out for so long, I decided to make an attempt to repairing the cockpit with the gash.  I was very pleased with the result.  I took Squadron White Putty and thinned it with acetone to make it fluid enough to press into the gash.  Then with an X-Acto knife blade, I pushed it into the gash and smoothed flush with the cockpit wall.  Here is a few pictures of the result:


Here is another picture with a dime to give a perspective of the scale:


I will paint the "plate" that the gash was in with some gloss enamel grey.  I know I won't be able to match the color grey of the cockpit, put I have seen many pictures of the F-4 cockpit where these panels were a different shade of grey from obvious re-painting after the original cockpit was painted.  So I feel it will still be authentic.  When the putty has dried I will paint it and post some pictures of the result.

Ken

  • Member since
    April 2011
  • From: Upstate New York
Posted by Warthog Wrencher on Friday, April 29, 2011 12:31 PM

I'll join in on this build but have yet to decide which kit to use.  I have a few F-4's in both 1/48th and 1/72nd scale. I have Hasegawa's F-4G, my favorite variant, as well as the F-4c with Arkansas ANG markings, a Fujimi F-4E with 30 year commemorative markings. I am not sure which of these I'll tackle or maybe I'll pick one up from E-Bay...

Check Six!!!

Brian

  • Member since
    November 2010
  • From: Lafayette, Indiana
Posted by Son Of Medicine Man on Friday, April 29, 2011 3:20 PM

Well here it is.  I think I came really close to matching the color.  I am very happy with the results.


Ken

  • Member since
    February 2010
  • From: Ontario, Canada
Posted by Bockscar on Friday, April 29, 2011 5:41 PM

Son Of Medicine Man

Well here it is.  I think I came really close to matching the color.  I am very happy with the results.

http://i1143.photobucket.com/albums/n625/Fooser_Ken/100_4408.jpg


Ken

Hey Ken great work covering that gash! The boot for the joystick reminds of my old Chevy 4-speed, almost as fast as an F4 from 0-60Devil

  • Member since
    February 2010
  • From: Ontario, Canada
Posted by Bockscar on Friday, April 29, 2011 5:42 PM

I found this at Alan's website:

Great artwork!

  • Member since
    February 2010
  • From: Ontario, Canada
Posted by Bockscar on Friday, April 29, 2011 5:46 PM

jimbot58

Some ups and downs here: My 'Geasel' is acquiring a fierceness!

http://img811.imageshack.us/img811/2982/0428110104.jpg

But not without a struggle: the sharkmouth was a bit of a pain as the Italeri decal was a bit thick and took time and lots of nursing it down with many applications of Micro-sol. Finally got it all settled down, but I also had to trim it as it didn't quite fit between the radome and the small inlet behind it. The other data decals are freshly applied and may still look a bit milky, but that will go away.

I also had a bit of a mishap with it: A miscue on my part sent it tumbling to the floor, where it landed tail first, snapping off the fuel dump! I searched for the broken piece but all I got was a crunch and a burp from the carpet monster! The part is nowhere to be found! I still have that old Italeri kit I robbed gear doors and decals from and the part looks usable, but will no doubt be a PITA to re-attach. I'm going to wait to do that as I still have lots of decals to do, metal finishes around the exhaust areas and so on, so lots of handling still to go with plenty of time for me to break it or something else off!

It was worth the effort Jimbot, that looks fantastic, and as nasty as it should. Man I am dying to see the paint come off that canopy!Stick out tongue

  • Member since
    February 2010
  • From: Ontario, Canada
Posted by Bockscar on Friday, April 29, 2011 5:53 PM

Rich; let me guess, Snakes n' Ladders is one of your old favourites! I think I have an old electric shaver around here if you get serious about that cat!

I'm glad you stuck to that intake project, it's shaping up real nice. Lol...Those clamps look like a giant robot is grabbing your F4!

  • Member since
    November 2010
  • From: Lafayette, Indiana
Posted by Son Of Medicine Man on Friday, April 29, 2011 6:10 PM

Bockscar

 Hey Ken great work covering that gash! The boot for the joystick reminds of my old Chevy 4-speed, almost as fast as an F4 from 0-60Devil

Thanks Dominic!  That is funny, that boot reminded me of my 1969 Ford Mustang 4-speed!  Those were the days.  Fast cars and fast women!

Ken

  • Member since
    February 2010
  • From: Ontario, Canada
Posted by Bockscar on Friday, April 29, 2011 6:17 PM

Son Of Medicine Man


 Bockscar:


 Hey Ken great work covering that gash! The boot for the joystick reminds of my old Chevy 4-speed, almost as fast as an F4 from 0-60Devil


Thanks Dominic!  That is funny, that boot reminded me of my 1969 Ford Mustang 4-speed!  Those were the days.  Fast cars and fast women!

Ken

427, Rochester Quadra Jet....still has my ears ringing....I remember the day I miss shifted and blew the Muncie to pieces.....Oops

  • Member since
    November 2010
  • From: Lafayette, Indiana
Posted by Son Of Medicine Man on Friday, April 29, 2011 6:31 PM

Bockscar

 Son Of Medicine Man:


 Bockscar:


 Hey Ken great work covering that gash! The boot for the joystick reminds of my old Chevy 4-speed, almost as fast as an F4 from 0-60Devil


Thanks Dominic!  That is funny, that boot reminded me of my 1969 Ford Mustang 4-speed!  Those were the days.  Fast cars and fast women!

Ken


427, Rochester Quadra Jet....still has my ears ringing....I remember the day I miss shifted and blew the Muncie to pieces.....Oops

Very cool!  I had a 351 Cleveland, dual 4-barrel Holleys, tunnel ram intake, big cam, etc.  It would do the quarter mile in 12 seconds and it didn't hook up until I shifted into 2nd gear with 12 inch wide wrinkle wall slicks.  Had a set of ladder bars to put on it when my finances dried up.  Would have been nice to see how fast it would have been with those on it.

Ken

  • Member since
    February 2010
  • From: Ontario, Canada
Posted by Bockscar on Friday, April 29, 2011 6:40 PM

Son Of Medicine Man


 Bockscar:


 Son Of Medicine Man:


 Bockscar:


 Hey Ken great work covering that gash! The boot for the joystick reminds of my old Chevy 4-speed, almost as fast as an F4 from 0-60Devil


Thanks Dominic!  That is funny, that boot reminded me of my 1969 Ford Mustang 4-speed!  Those were the days.  Fast cars and fast women!

Ken


427, Rochester Quadra Jet....still has my ears ringing....I remember the day I miss shifted and blew the Muncie to pieces.....Oops


Very cool!  I had a 351 Cleveland, dual 4-barrel Holleys, tunnel ram intake, big cam, etc.  It would do the quarter mile in 12 seconds and it didn't hook up until I shifted into 2nd gear with 12 inch wide wrinkle wall slicks.  Had a set of ladder bars to put on it when my finances dried up.  Would have been nice to see how fast it would have been with those on it.

Ken

That woulda' blown my doors off, but then, mine was a Biscayne wagon, kinda like a Nomad on steroids.

Uh, women like the really, really big back seat, Whistling

  • Member since
    February 2010
  • From: Ontario, Canada
Posted by Bockscar on Friday, April 29, 2011 6:46 PM

Hey, this guy's flying a bit close to the ground:

That's an expensive way to bust tanks!

  • Member since
    November 2010
  • From: Lafayette, Indiana
Posted by Son Of Medicine Man on Friday, April 29, 2011 6:49 PM

Bockscar

 Son Of Medicine Man:


 Bockscar:


 Son Of Medicine Man:


 Bockscar:


 Hey Ken great work covering that gash! The boot for the joystick reminds of my old Chevy 4-speed, almost as fast as an F4 from 0-60Devil


Thanks Dominic!  That is funny, that boot reminded me of my 1969 Ford Mustang 4-speed!  Those were the days.  Fast cars and fast women!

Ken


427, Rochester Quadra Jet....still has my ears ringing....I remember the day I miss shifted and blew the Muncie to pieces.....Oops


Very cool!  I had a 351 Cleveland, dual 4-barrel Holleys, tunnel ram intake, big cam, etc.  It would do the quarter mile in 12 seconds and it didn't hook up until I shifted into 2nd gear with 12 inch wide wrinkle wall slicks.  Had a set of ladder bars to put on it when my finances dried up.  Would have been nice to see how fast it would have been with those on it.

Ken


That woulda' blown my doors off, but then, mine was a Biscayne wagon, kinda like a Nomad on steroids.

Uh, women like the really, really big back seat, Whistling

Yes, you got me beat there.  It was possible in the Mustang, but that was back when I was skinny and flexible!

Ken

  • Member since
    February 2010
  • From: Ontario, Canada
Posted by Bockscar on Friday, April 29, 2011 6:57 PM

"Thank gosh Ivanka was snoozing on the proximity fuse assembly line again....":

  • Member since
    February 2010
  • From: Ontario, Canada
Posted by Bockscar on Friday, April 29, 2011 7:03 PM

Son Of Medicine Man


 Bockscar:


 Son Of Medicine Man:


 Bockscar:


 Son Of Medicine Man:


 Bockscar:


 Hey Ken great work covering that gash! The boot for the joystick reminds of my old Chevy 4-speed, almost as fast as an F4 from 0-60Devil


Thanks Dominic!  That is funny, that boot reminded me of my 1969 Ford Mustang 4-speed!  Those were the days.  Fast cars and fast women!

Ken


427, Rochester Quadra Jet....still has my ears ringing....I remember the day I miss shifted and blew the Muncie to pieces.....Oops


Very cool!  I had a 351 Cleveland, dual 4-barrel Holleys, tunnel ram intake, big cam, etc.  It would do the quarter mile in 12 seconds and it didn't hook up until I shifted into 2nd gear with 12 inch wide wrinkle wall slicks.  Had a set of ladder bars to put on it when my finances dried up.  Would have been nice to see how fast it would have been with those on it.

Ken


That woulda' blown my doors off, but then, mine was a Biscayne wagon, kinda like a Nomad on steroids.

Uh, women like the really, really big back seat, Whistling


Yes, you got me beat there.  It was possible in the Mustang, but that was back when I was skinny and flexible!

Ken

Lol...you forgot "...and a perfect gentleman..."....yeah, the thought of being in that situation in my current condition, save me the time, just call an ambulance!


  • Member since
    August 2009
  • From: Toledo Area OH
Posted by Sparrowhyperion on Friday, April 29, 2011 7:03 PM

Whichever cat did it better feel really lucky that I can't find a single one to blame it on.  Otherwise, I'd have to change one of their names to "CueBall"...

Yeh.  Hasegawa sent me a set of replacement fuselage halves that arrived today.  Actually they sent me the entire sprue.  I'm not sure if I will need it now but at least I have a couple of other spare parts as well in case someone needs anything on that sprue.  The intakes are coming out well though. I'm almost to the mask and paint section of the project.  I don't put on the engine cans or the landing gear until I have the rest painted.  It saves a LOT of masking.

The other F4 is also coming along reasonably well except for the tail stabilizer that's missing.  I am continuing to work on the rest of it for now.  Marissa has had a lot of homework this week so she plans on catching up with me this weekend.  It's turning into a sort of contest to see who's comes out best, with my Wife as the judge.  I am starting to get worried that I am going to owe her a lot of ice cream...  And another kit....


Bockscar

Rich; let me guess, Snakes n' Ladders is one of your old favourites! I think I have an old electric shaver around here if you get serious about that cat!

I'm glad you stuck to that intake project, it's shaping up real nice. Lol...Those clamps look like a giant robot is grabbing your F4!

In the Hangar: 1/48 Hobby Boss F/A-18D RAAF Hornet,

On the Tarmac:  F4U-1D RNZAF Corsair 1/48 Scale.

JOIN OUR COMMUNITY!

Our community is FREE to join. To participate you must either login or register for an account.

SEARCH FORUMS
FREE NEWSLETTER
By signing up you may also receive reader surveys and occasional special offers. We do not sell, rent or trade our email lists. View our Privacy Policy.