SEARCH FINESCALE.COM

Enter keywords or a search phrase below:

Panzerjager GB (March 1st - June 30th, 2011)

62076 views
1090 replies
1 rating 2 rating 3 rating 4 rating 5 rating
  • Member since
    March 2003
  • From: Rain USA, Vancouver WA
Posted by tigerman on Monday, April 11, 2011 11:10 AM

I hear you Dupes. That was a brilliant Masters. Maybe one of the best ever, next to Jack's fantastic finish in 86.

Nate the Marder is really looking good. I'll PM you.

   http://i7.photobucket.com/albums/y269/wing_nut_5o/PANZERJAGERGB.jpg

 Eric 

  • Member since
    March 2006
  • From: Right Side of a Left State
Posted by Shellback on Monday, April 11, 2011 4:57 PM

tigerman


Great name isn't it? LOL There used to be 4-5 Eric's that were constantly involved in the armor forums. Maybe 3 now?

Well, I whimped out. The weather got icky and my motivation sunk with it. Anyone know how many links per side on the Jagdtiger? The directions really don't say. Angry

LOL ,That many Erics could get confussing ............Stick out tongue

About the tracks ................... I built an old issue Tamiya Jagdtiger and replaced the vinyle tracks with a new Tamiya indy link set . I just kept putting them together till the run fit around  everything and i had the proper sag . That method can have its problems though .

Marder is looking good Nate.

  • Member since
    March 2003
  • From: Rain USA, Vancouver WA
Posted by tigerman on Monday, April 11, 2011 5:20 PM

90 plus links comes to mind.

Thanks Carl, that might be the way I have to do it, by trial and error.

   http://i7.photobucket.com/albums/y269/wing_nut_5o/PANZERJAGERGB.jpg

 Eric 

  • Member since
    March 2011
  • From: Ohio
Posted by Taps88 on Tuesday, April 12, 2011 3:01 PM

Time to get some rust & dirt, added to the hull of my Emil.

Step 1: I use Mr Surfacer, to get some lifted areas and bulk. A lot easier than trying to get this effect with just chalk, at the end.

Note, I painted the primary color first, to get a "pull-away" rusted effect. I will lightly respray then shade, when the Surfacer is dry - 24hrs:


Eric / Formally known as Erock68

On the Bench:

Academy: 1/72 B17 Memphis Bell

Tamiya: 1/35 Panther G

Dragon: 1/35 Platformwagen SSy


  • Member since
    March 2011
  • From: Ohio
Posted by Taps88 on Tuesday, April 12, 2011 3:17 PM

Here's a picture...20 minutes later. You can see the surfacing effects and it's starting to dry. Not so white & pasty:


Eric / Formally known as Erock68

On the Bench:

Academy: 1/72 B17 Memphis Bell

Tamiya: 1/35 Panther G

Dragon: 1/35 Platformwagen SSy


  • Member since
    March 2003
  • From: Rain USA, Vancouver WA
Posted by tigerman on Tuesday, April 12, 2011 4:00 PM

Nice effects Eric.

   http://i7.photobucket.com/albums/y269/wing_nut_5o/PANZERJAGERGB.jpg

 Eric 

  • Member since
    March 2006
  • From: Right Side of a Left State
Posted by Shellback on Tuesday, April 12, 2011 9:32 PM

Good idea Eric , i have a bottle of Mr Surfacer and was thinking of this technique . Yes

  • Member since
    March 2006
  • From: Right Side of a Left State
Posted by Shellback on Tuesday, April 12, 2011 10:12 PM

tigerman

90 plus links comes to mind.

Thanks Carl, that might be the way I have to do it, by trial and error.

Eric i pulled out the vinyle tracks from my Tamiya Jagdtiger .Looks like 6 links to an inch and its 15 inches long . Looks like 90 .

  • Member since
    March 2011
  • From: Ohio
Posted by Taps88 on Wednesday, April 13, 2011 3:09 PM

Should be tomorrow, that I have some more pics up. Waiting on some Tamiya flat white, that I ordered earlier, to arrive.

I have to "tone down" Tamiya's German Grey, with a few light coats, then do an oil wash on it.

Eric / Formally known as Erock68

On the Bench:

Academy: 1/72 B17 Memphis Bell

Tamiya: 1/35 Panther G

Dragon: 1/35 Platformwagen SSy


  • Member since
    November 2003
  • From: Nashville, TN area
Posted by bobbaily on Wednesday, April 13, 2011 7:04 PM

Nate, Eric & Carl-you guys are doing a great job.  I'm picking up some good tips & inspiration watching your builds.

Sorry I haven't commented sooner-been awol-my son has travel soccer on weekends and for some reason I've been too tired after work to work on the Jadgpanzer.

I took a risk and split the one piece schurzen-it just looked 'too perfect' as a one piece unit.  I'm happy with the results and I can remove an individual section if I want.  Hull is primed.  I need to put the road wheels on some toothpicks or such and prime them....maybe tomorrow.  My goal is to have the yellow on by close of business Friday.

I made a vain attempt to put the two sets of casting numbers on the mantlet-one out of two made it.  I decided to cut my losses and move on.  No one here at the house will ever know......


Bob


  • Member since
    March 2006
  • From: Right Side of a Left State
Posted by Shellback on Wednesday, April 13, 2011 7:31 PM

Bob , good idea making the schurzen individual pieces ............looks much more realistic .

Did you mix your own red primer with Tamiya paints ?

Oh , the lego paint stand .......kewl idea ! i could use that .

  • Member since
    November 2003
  • From: Nashville, TN area
Posted by bobbaily on Wednesday, April 13, 2011 8:01 PM

Thanks Shellback.

The red primer is Krylon spray can.  Cheap & easy.

Actually, they aren't Legos-they are Megablocks-cheap knock-offs.  Terrible fit.  I need to 'borrow' some of my son's real Legos and build some fixtures......Angel

Bob


  • Member since
    March 2003
  • From: Rain USA, Vancouver WA
Posted by tigerman on Wednesday, April 13, 2011 8:07 PM

Bob, that does look very nice. I agree that single schurzen is more convincing.

Carl, thanks again. I do hate the fact that there are two different track links involved.

   http://i7.photobucket.com/albums/y269/wing_nut_5o/PANZERJAGERGB.jpg

 Eric 

  • Member since
    April 2005
  • From: Piscataway, NJ!
Posted by wing_nut on Thursday, April 14, 2011 6:54 AM

You know what sucks about finishing 1st... I get involved in other stuff and forget to come back see how the old crew is doing.  By the the looks of the work you all are doping it's obvious to see you don't miss me at allCrying  Nice work from every one.

If anyone has a broken King Tiger with some extra ones, I'd be most obliged. 

Eric, do you a pic of the part or a part number so I can see what you are referring to.  I'll check by my rather sparse spares (say that 5 ties fast Tongue Tied box.

Marc  

  • Member since
    August 2003
  • From: Connecticut, USA
Posted by Nachtflieger on Thursday, April 14, 2011 3:11 PM

Bob, that is looking really good. Looking forward to seeing it painted up.

Nate


  • Member since
    March 2011
  • From: Ohio
Posted by Taps88 on Thursday, April 14, 2011 3:14 PM

Looking good there Bob,

I too, would have done the same with the schurzen. The one piecers look too pristine and  " factory new"


Well, my Tamiya Flat White arrived at work today so, I'll be doing some airbrusing this evening.


Eric / Formally known as Erock68

On the Bench:

Academy: 1/72 B17 Memphis Bell

Tamiya: 1/35 Panther G

Dragon: 1/35 Platformwagen SSy


  • Member since
    March 2011
  • From: Ohio
Posted by Taps88 on Thursday, April 14, 2011 5:10 PM

The first steps of airbrush shading are under way. I am pleased  the way the hull turned out, after the Mr Surfacer. Not too overdone and saves time trying to get this effect later on.

Any comments on something, I have missed thus far, let me know:


Eric / Formally known as Erock68

On the Bench:

Academy: 1/72 B17 Memphis Bell

Tamiya: 1/35 Panther G

Dragon: 1/35 Platformwagen SSy


  • Member since
    March 2003
  • From: Rain USA, Vancouver WA
Posted by tigerman on Thursday, April 14, 2011 8:26 PM

wing_nut

You know what sucks about finishing 1st... I get involved in other stuff and forget to come back see how the old crew is doing.  By the the looks of the work you all are doping it's obvious to see you don't miss me at allCrying  Nice work from every one.

If anyone has a broken King Tiger with some extra ones, I'd be most obliged. 

Eric, do you a pic of the part or a part number so I can see what you are referring to.  I'll check by my rather sparse spares (say that 5 ties fast Tongue Tied box.

Thanks Marc. It's the piece with the cleaning rods that go on each side of the tank and holds the towing cables. I'm going to "cheat" one way or another. Every picture I've checked in gallery's show the cables omitted for the most part. That is one way to do it, or ....I could cut the wire into pieces and glue (somehow) to each part that is in question. Confused? So am I. LOL

   http://i7.photobucket.com/albums/y269/wing_nut_5o/PANZERJAGERGB.jpg

 Eric 

  • Member since
    March 2006
  • From: Right Side of a Left State
Posted by Shellback on Thursday, April 14, 2011 11:14 PM

bobbaily

Thanks Shellback.

The red primer is Krylon spray can.  Cheap & easy.

Actually, they aren't Legos-they are Megablocks-cheap knock-offs.  Terrible fit.  I need to 'borrow' some of my son's real Legos and build some fixtures......Angel

Thanks Bob , i'll pick some up .so maybe i should use lego's then if they work better.

  • Member since
    March 2006
  • From: Right Side of a Left State
Posted by Shellback on Thursday, April 14, 2011 11:17 PM

tigerman

Bob, that does look very nice. I agree that single schurzen is more convincing.

Carl, thanks again. I do hate the fact that there are two different track links involved.

That what i was confused about , do those 2 different links add up to one full link ? Anyway , problem solved .

  • Member since
    March 2003
  • From: Rain USA, Vancouver WA
Posted by tigerman on Friday, April 15, 2011 1:20 AM

The tracks are going to have to end up with even links to connect end-to-end, i.e 90, 92, etc. Could create sag issues, maybe not.

   http://i7.photobucket.com/albums/y269/wing_nut_5o/PANZERJAGERGB.jpg

 Eric 

  • Member since
    November 2003
  • From: Nashville, TN area
Posted by bobbaily on Friday, April 15, 2011 6:04 AM

Thanks all.  Hopefully I'll be able to get some paint on the Jagdpanzer today-going to burn a sick day....cough...cough...

Eric-I'm enjoying watching your build.  I especially like the lower hull treatment with the putty.  Looks very realistic.

Bob


  • Member since
    March 2003
  • From: Rain USA, Vancouver WA
Posted by tigerman on Friday, April 15, 2011 9:40 AM

Bob, I like your thinking. Wink I'd do the same, except I took last week off. I don't want to be TOO obvious. LOL

   http://i7.photobucket.com/albums/y269/wing_nut_5o/PANZERJAGERGB.jpg

 Eric 

  • Member since
    March 2011
  • From: Ohio
Posted by Taps88 on Friday, April 15, 2011 2:59 PM

Thanks Bob, I appreciate it.

This weekend, I will get the tracks going and I will start working, on the interior, of the Emil.

Lots o' little parts to be painted. Tongue Tied


Eric / Formally known as Erock68

On the Bench:

Academy: 1/72 B17 Memphis Bell

Tamiya: 1/35 Panther G

Dragon: 1/35 Platformwagen SSy


  • Member since
    October 2009
Posted by PANZERWAFFE on Friday, April 15, 2011 6:23 PM

Hey all,

THOM - Long wait for an answer but here it is, The instument panel was first painted with the base coat, a wash of of Grumbacher Artists watercolor "Raw Umber Hue" was applied, dials were then painted black after dry a drybrushing of white followed, finally used a 18/0 brush to pick out any remaining fine details.

MARC - Excellent demonstration on weathering the lower hull, will try that out.  The Stug looks great!  

NATE - The Marder looks good with the base coat on.  Look forward to the whitewash.

TERRY - Great work on the tools, nice weathering/chipping.  one would thing it is larger than 1/48.  Dont think I would do whitewash on this one.

BOB - The schurzen looks great, individual pieces was the way to go!  Love the lego stand, thats a good idea.

BEN  - Nice solid construction, sweet radio!

SHELLBACK - Nice work on the breech / gun.

TAPS88 - Great progress.  The gray looks outstanding!  How do you do it, after applying the Mr. Surface?

ERIC - I have a few spare parts for a King Tiger I could send you.  If you havent already found what you need let me know what it is and I'll send it your way.

Sorry it has been so long checking in here.  Has not been a good month for me and family.  Many health, work and location problems.  Will be moving again in the next month or two.  Decided to get back to the bench and turned on the compressor... nothing, did not work!  Spent a day taking it apart and found that the piston/pump unit was done for.  New part $55, could almost buy a new compressor for that so that is what I did.  Spent the next day hooking up the new compressor and getting use to it.  Like it much better than the old one, this one is VERY QUIET, small and seams to work well.

After all of that have managed to get some work done. 

Tracks

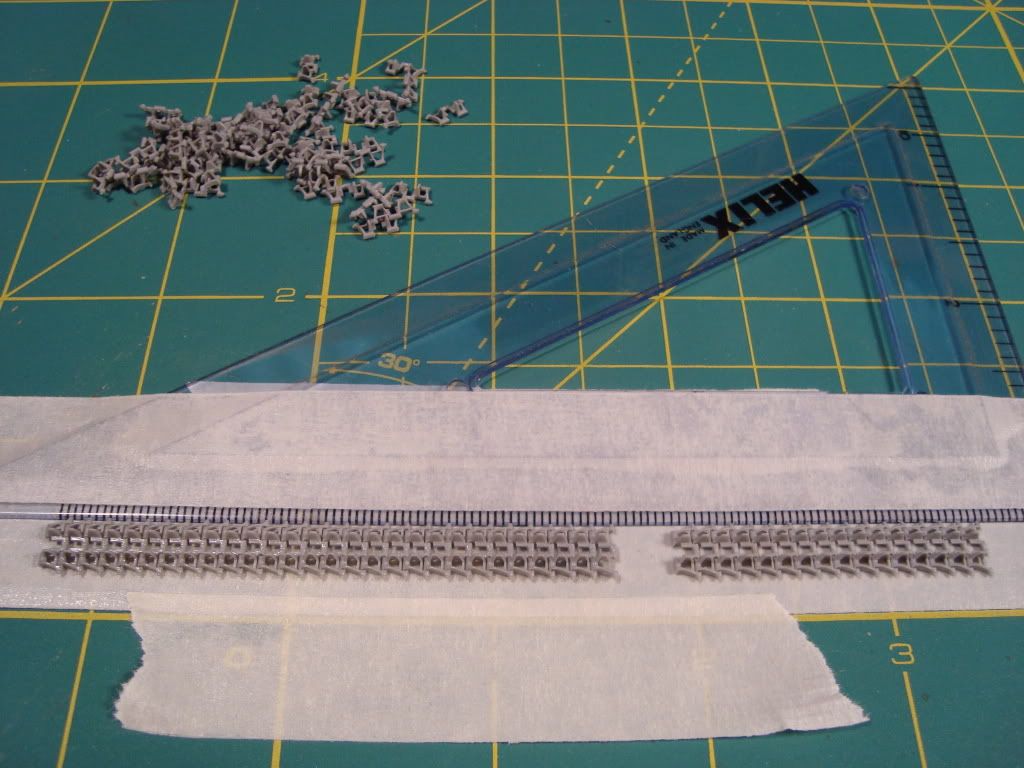
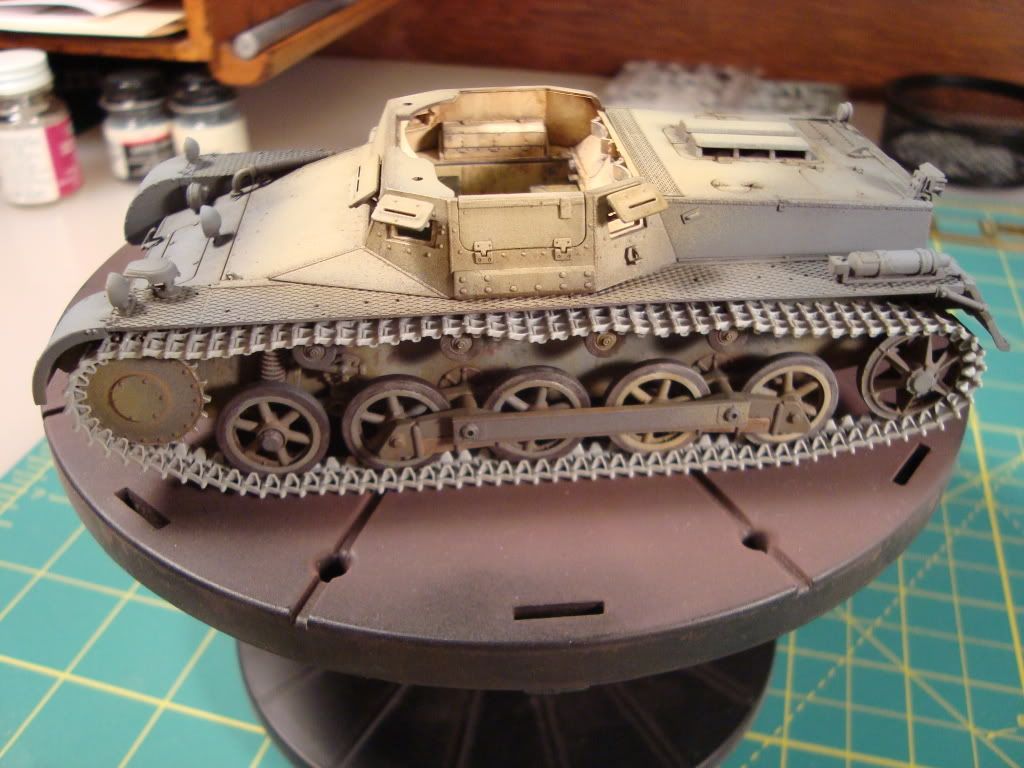
With the tracks drying decided did not like the amount of sand color I had used.  Painted more gray on but doing so covered some of the pre-shading.  That can be fixed later.  Here is how she came out.

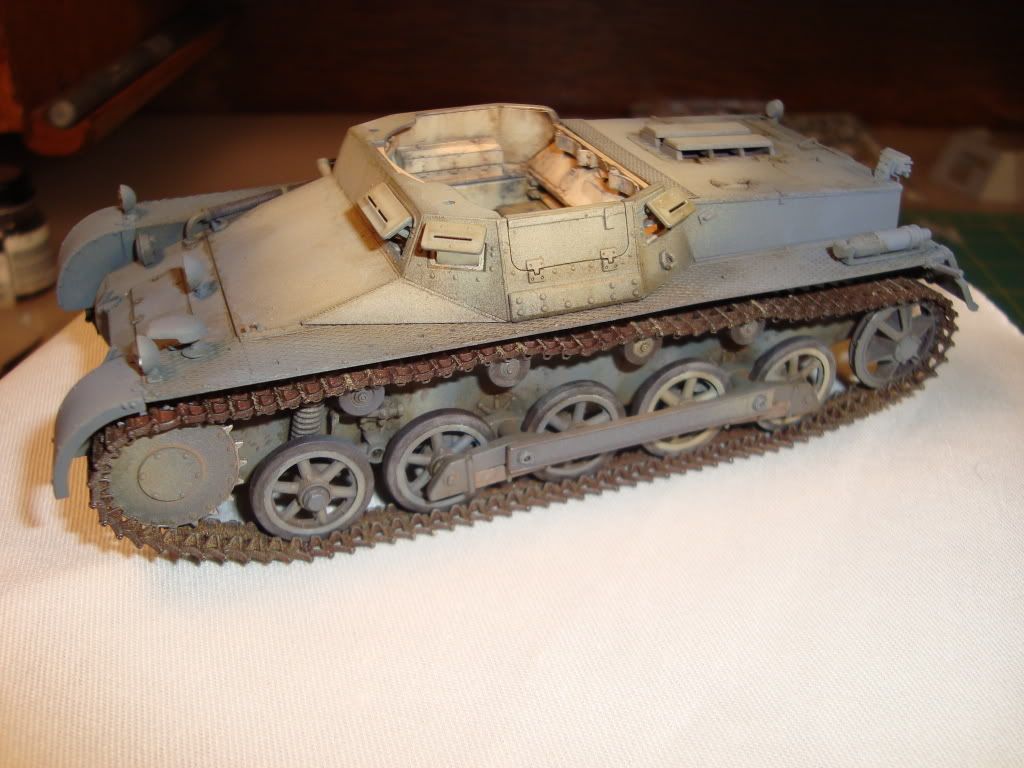
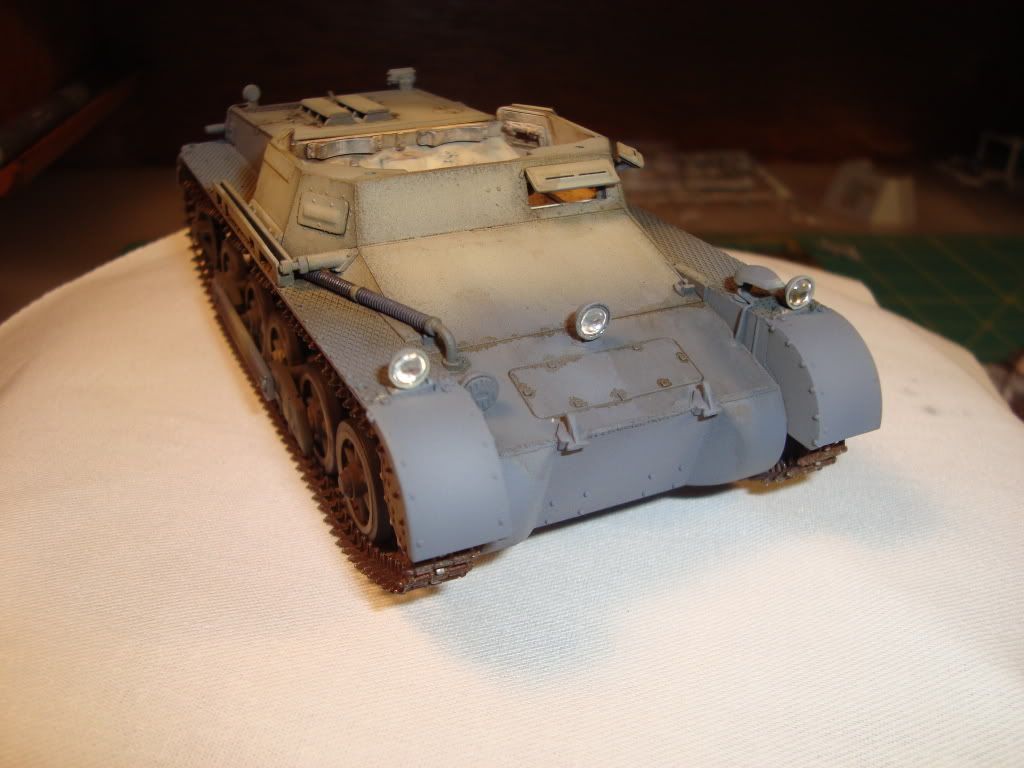
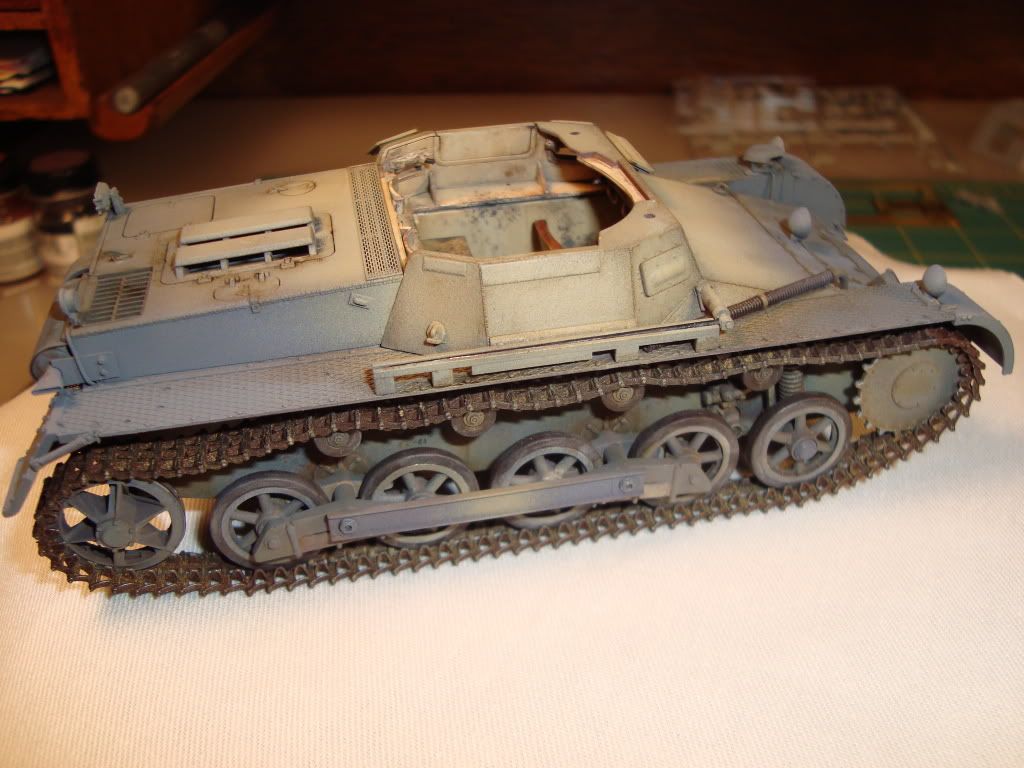
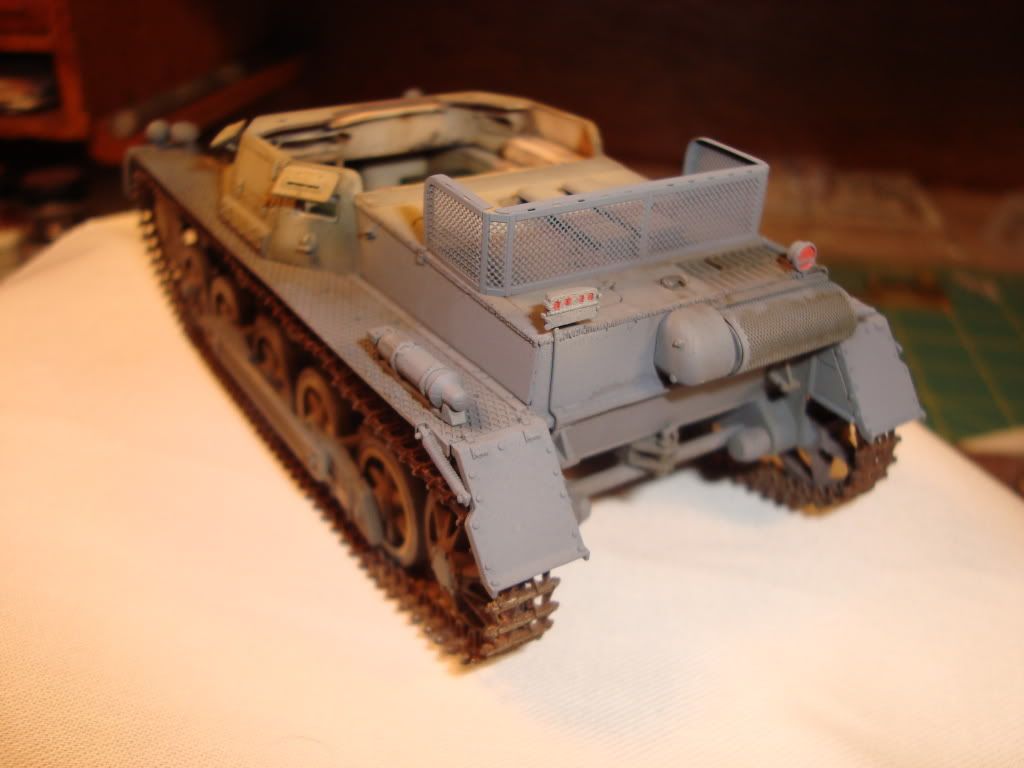
From here will start work on the tools and all remaining mics. gear and put on lower hull.  Do some light weathering on the hull but will save the final weathering for when the whole thing is togther.  After that will start work on the gun. 

Hope not too be so absent for the rest of this build.  Everyone keep up the great work.


Rob

  • Member since
    March 2011
  • From: Ohio
Posted by Taps88 on Friday, April 15, 2011 8:04 PM

Thanks Rob,

I used regular Tamiya German Grey airbrushed, then, applied the Mr Surfacer. Let it dry and then, lightened the German Grey with Tamiya Flat White. I think using the Grey straight, is way to dark. Seems like at the end, the oil washes don't show up as well.


For tonight..... I started the first oil wash on the lower hull...drying as we speak. Also,

Time to get those plastic tracks, looking like metal. Round #1:


Eric / Formally known as Erock68

On the Bench:

Academy: 1/72 B17 Memphis Bell

Tamiya: 1/35 Panther G

Dragon: 1/35 Platformwagen SSy


  • Member since
    March 2006
  • From: Right Side of a Left State
Posted by Shellback on Friday, April 15, 2011 8:23 PM

Great looking paint job Rob. The different colors and shades look kewl . Tracks came out super .

Eric , nice run of tracks . 


  • Member since
    March 2006
  • From: Right Side of a Left State
Posted by Shellback on Friday, April 15, 2011 8:29 PM

tigerman

The tracks are going to have to end up with even links to connect end-to-end, i.e 90, 92, etc. Could create sag issues, maybe not.

Yup , you'll just have to build them see how it turns out  . Dont know if you can get away with putting in a spacer like i did on the Panther II .

  • Member since
    March 2011
  • From: Ohio
Posted by Taps88 on Friday, April 15, 2011 8:49 PM

Here's how the first rust weathering is turning out. I start with Burnt Sienna, to simulate rust, under the lifted parts of the Surfacer.


When dry, I will do lighter highlights (it's still somewhat wet, so some parts are still shiny)


Eric / Formally known as Erock68

On the Bench:

Academy: 1/72 B17 Memphis Bell

Tamiya: 1/35 Panther G

Dragon: 1/35 Platformwagen SSy


  • Member since
    March 2003
  • From: Rain USA, Vancouver WA
Posted by tigerman on Friday, April 15, 2011 10:27 PM

Eric, your kit is really coming together and nice to see the tracks "come alive".

Rob, digging the Panzerjager I. Tracks look great. I could be wrong, but weren't the lenses on the left rear light another color like green or blue?

Rob, if you have spare cleaning rod parts D34-35 in my Jagdtiger kit, that could be cool. I'm close to ad-libbing it. I can't believe the had pin marks on the front side of them no less, in the rods.

   http://i7.photobucket.com/albums/y269/wing_nut_5o/PANZERJAGERGB.jpg

 Eric 

JOIN OUR COMMUNITY!

Our community is FREE to join. To participate you must either login or register for an account.

SEARCH FORUMS
FREE NEWSLETTER
By signing up you may also receive reader surveys and occasional special offers. We do not sell, rent or trade our email lists. View our Privacy Policy.