SEARCH FINESCALE.COM

Enter keywords or a search phrase below:

The OFFICIAL Panzer III and Its Variants GB

298266 views
2308 replies
1 rating 2 rating 3 rating 4 rating 5 rating
  • Member since
    June 2010
  • From: Austin, TX
Posted by DoogsATX on Friday, September 2, 2011 12:11 PM

satch - looking mighty fine, even if drought-ridden Texas is a poor stand-in for the USSR! I'll definitely be looking forward to checking it out in person. Might bring my Vorp if I finish it up in time (I'd like to bring at least one armor, just not sure which yet).

Andy - first day on the new job is Wednesday. No way I'll have things wrapped by then, but the Mustang's on hold AGAIN (protip: dark dirt wash looks like crap brown wash when applied over blue) while I await a bottle of Flory black wash. So tonight - at least Tuesday is pretty much open to the Panzer and maybe the P-47N if it can sneak in some attention...

On the Bench: 1/32 Trumpeter P-47 | 1/32 Hasegawa Bf 109G | 1/144 Eduard MiG-21MF x2

On Deck:  1/350 HMS Dreadnought

Blog/Completed Builds: doogsmodels.com


  • Member since
    February 2003
  • From: Allentown, PA
Posted by BaBill212 on Friday, September 2, 2011 12:26 PM

Andy,,   have fun, enjoy!                 I've used the Archer transfers but have not tried them over zim.... 

satch,,  the build is looking very nice.    And, even with a few bad pics, that Iphone takes pretty good photos,,, I'm impressed.


Bill

Enjoy the ride!


  • Member since
    March 2003
  • From: Rain USA, Vancouver WA
Posted by tigerman on Friday, September 2, 2011 1:19 PM

Hey Satch, nice looking Pz III there. I'm not sure, but wasn't the jack-block more of a red-brown color?

   http://i7.photobucket.com/albums/y269/wing_nut_5o/PANZERJAGERGB.jpg

 Eric 

  • Member since
    September 2009
  • From: Spring Branch, TX
Posted by satch_ip on Friday, September 2, 2011 1:53 PM

tigerman

Hey Satch, nice looking Pz III there. I'm not sure, but wasn't the jack-block more of a red-brown color?


IDK.  Instructions called for "natural steel".  I used Vallejo Steel but it was too bright, so I toned it down with some pastels.  Are you saying it was painted in the red brown primer?


  • Member since
    April 2009
  • From: Carmel, IN
Posted by deafpanzer on Friday, September 2, 2011 2:11 PM

Satch- I think Eric was talking about the wood block on left side of your Panzer.  Often they are made of darker brown wood.  I would add thinned raw umber if it is easier...

Hope this helps... again still good looking Pz III you got. 

Andy

  • Member since
    October 2009
Posted by PANZERWAFFE on Saturday, September 3, 2011 11:36 AM

SATCH - Looks good Yes  Look forward to the figures, think figs add tremendously to a build!  Do you get a badge now or when the figures are complet?  Where's Andy, is he out playing again!

DOOGS - Nice looking tracks!  Like how you put the back sections of the wheels on then the track and assume the front to follow.  Have not done that but what a great way to build, acheive track sag and have ease of assembly.  Is this how most work with Friuls?  I will be working on a set soon and do not have much experience with them.  Was planning on completing the suspension then try to feed the completed tracks on.  The problem with that would be connecting the two sides togther, thats what had me scratching my head.  Your method seems to eliminate that problem.

Have not posted a picture in awhile so here it is:

Still plenty of small stuff to do and will also be applying some washes.  Been looking at it all day and think have decided not to make it to dirty.  Do not have many clean builds and like the look of this one clean.  What do all of you think?

Rob

  • Member since
    March 2006
  • From: Right Side of a Left State
Posted by Shellback on Saturday, September 3, 2011 11:44 AM

Rob , she looks great ! I think she looks great clean  but you could always add some weathering later if you felt it necessary .Did you apply some weathering on the drive sprocket and the tracks ? Looks like it . More pics would be nice !

  • Member since
    February 2003
  • From: Allentown, PA
Posted by BaBill212 on Saturday, September 3, 2011 11:55 AM

I agree with Carl,,,  more pics Rob, more pics!                   It is looking great too...  Personally I like a little dirt and grime here and there....  am thinking a some mild weathering would still hold most of your fabulous detail work.     Whatchathink?

Enjoy the ride!


  • Member since
    June 2010
  • From: Austin, TX
Posted by DoogsATX on Saturday, September 3, 2011 12:05 PM

PANZERWAFFE

DOOGS - Nice looking tracks!  Like how you put the back sections of the wheels on then the track and assume the front to follow.  Have not done that but what a great way to build, acheive track sag and have ease of assembly.  Is this how most work with Friuls?  I will be working on a set soon and do not have much experience with them.  Was planning on completing the suspension then try to feed the completed tracks on.  The problem with that would be connecting the two sides togther, thats what had me scratching my head.  Your method seems to eliminate that problem.

Well, this is only my second set, so I'm far from an expert. And my first set was on a Pz.IV, so same basic idea, only with two extra road wheels and an extra return roller. I imagine the process would be significantly different on, say, a Sherman, but on something like a Panzer with central guide horns, this definitely seems to be the way to go.

One thing about feeding them on...the tracks are metal, and exceptionally good at chipping paint! Also, the way Friuls work (or the way I make them work, lol) makes them tough to connect on the tank. Basically, two links go together, then get pinned with a small length of metal wire (I've seen rod recommended and tried it, but IMO it's too rigid and can give these types of tracks in particular a warp). When assembled, the "open" side faces in, so finding a way to hold the links and get the wire in there while its on the tank is not easy. 

Speaking of friuls, got the other side finished up last night. About 90 links per side.

On the Bench: 1/32 Trumpeter P-47 | 1/32 Hasegawa Bf 109G | 1/144 Eduard MiG-21MF x2

On Deck:  1/350 HMS Dreadnought

Blog/Completed Builds: doogsmodels.com


  • Member since
    October 2009
Posted by PANZERWAFFE on Saturday, September 3, 2011 12:18 PM

Thanks Carl.  The sprockets and tracks were done by normal painting method.  Wheels - spray primer, spray base color with little primer showing in spots, add worn metal color to sprocket teeth,etc., pin wash with Raw Umber, filter / wash with acrilic artist Raw umber and burnt sienna then dry brush with light shade of base coat.  Tracks first spray with Burnt Sienna for a base coat, lightly spray Burunt Iron (Metalizer) over letting some of the Sienna show through, at this stage weather with pigment / chalk/ etc. did not do this on this one, finally dry brush steel on track contact points.

Thinking about possibly making dio at train station and using the STUG and guard shack as defensive position, possibly giving reason the STUG could be clean .  The train cars and Pz III on train was what I was thinking about doing for my second entry for this GB.  Not promising anything though.

Will get some more done today then post more pics tonight. Stick out tongue

Rob

  • Member since
    February 2003
  • From: Allentown, PA
Posted by BaBill212 on Saturday, September 3, 2011 12:34 PM

Ok,, here I am telling Rob more pics..  guess I should post a few too

I am finishing up the last remnants of the construction phase -


I tried a few ways to replicate the rear turret ports...  none of which worked out the way I was hoping. So I punched out a couple of discs and glued in place.

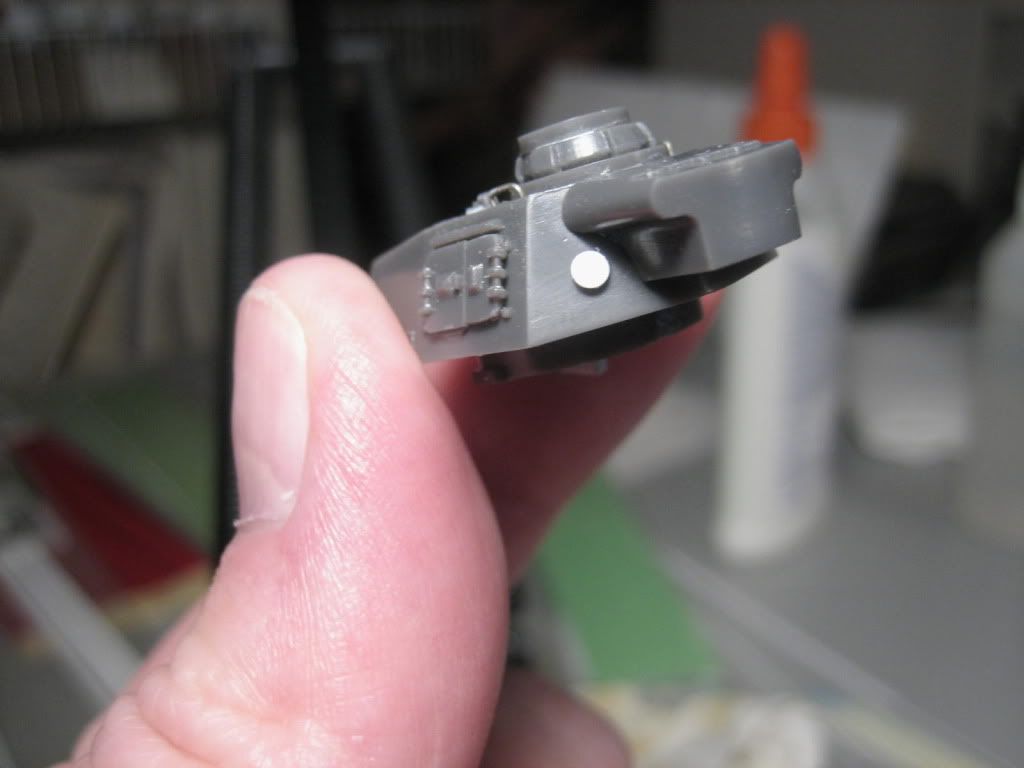
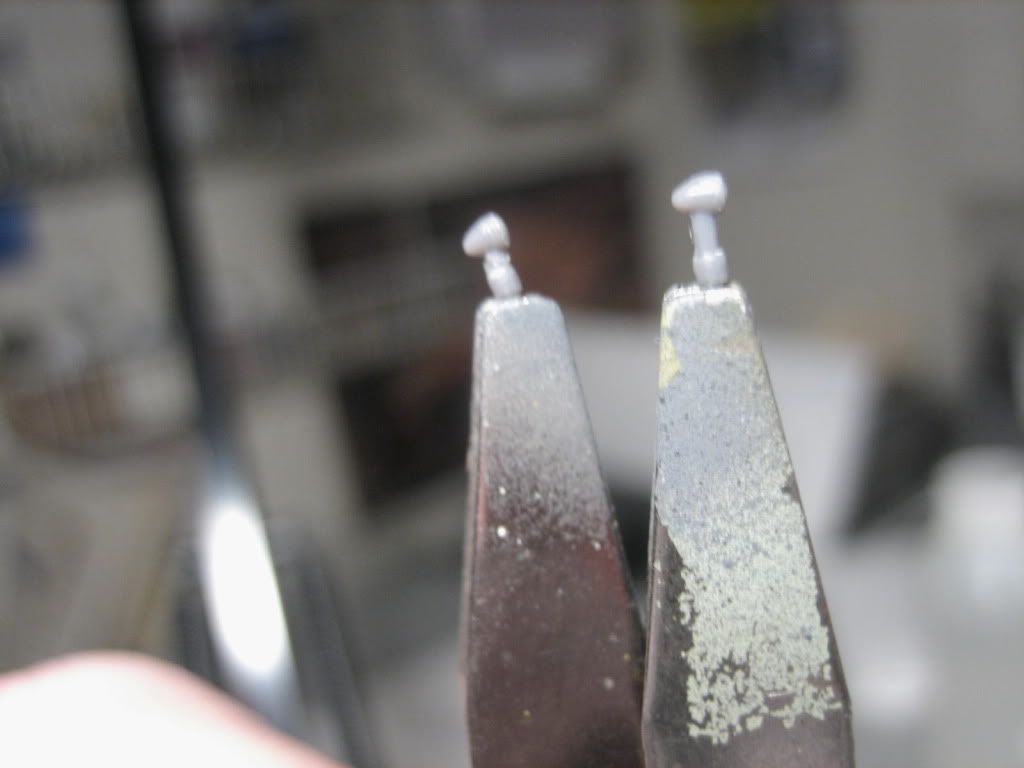
It is very hard to see in the next photo, but I needed more than just a punched out disc....  I used white glue and dabbed the disc to give a bit of depth...  while they are not quite "cone-like" they will pass as a reasonable facimile when completed.


Next were the smoke launchers. I was leery going into this part of assembly. NOT too thrilled with the way they looked even after filing down two edges (in hopes of making them look a bit more realistic) cleaning them up and drilling them out.

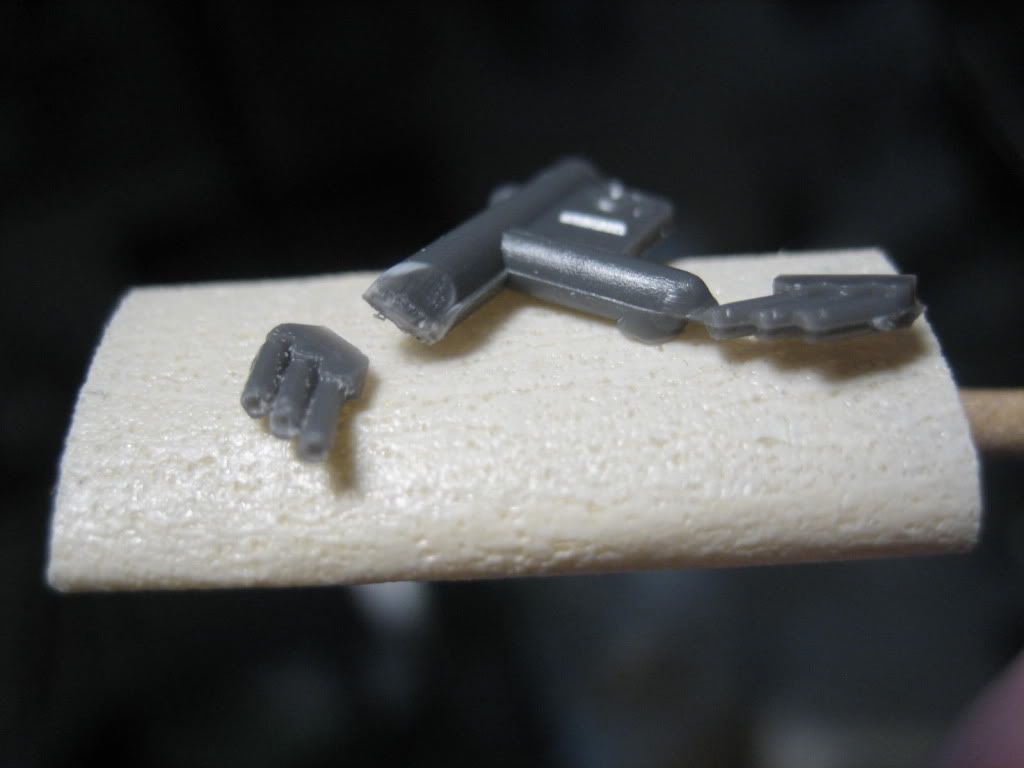
In any event,,,,     I glued one on anyway, just to see how it looked....          and,,, I wasn't happy. Angles are all wrong, etc. etc.      and the more I looked, the less I liked.....  

So,,  OFF WITH THEIR HEADS!,,,,   kindly remove from the turret please....   but now, what to do?     I thought about scratchbuilding them,,  even started gathering pics, info and in-house materials I would need.         I then came to my senses and decided against it...  

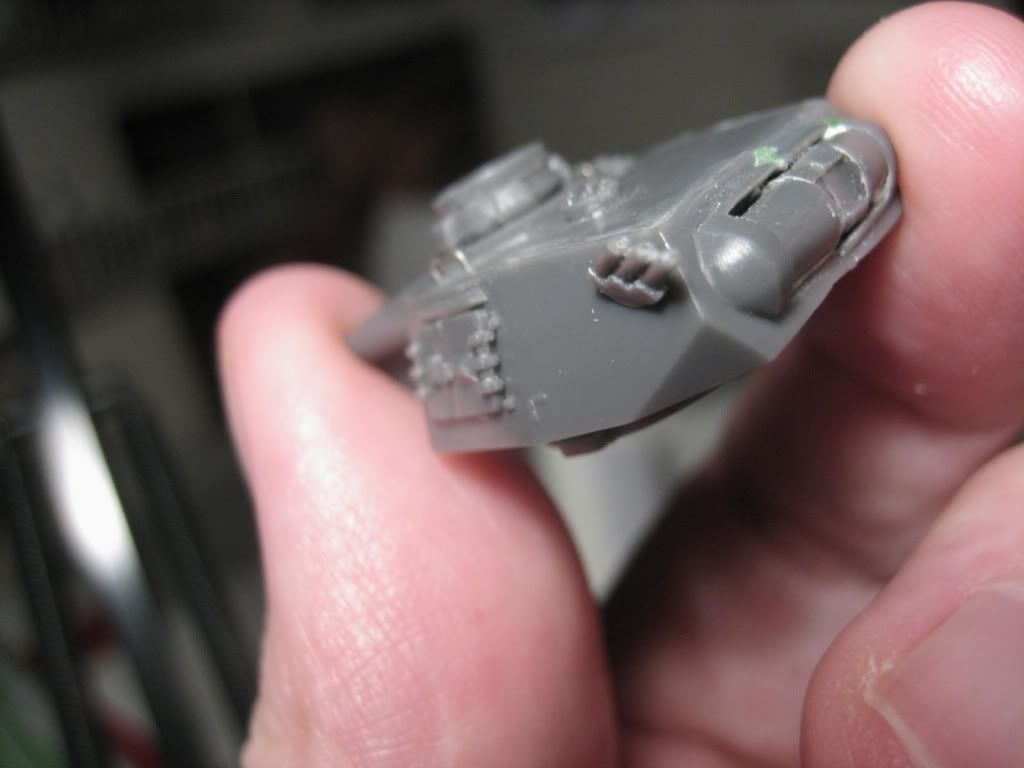
I added very rudimentary lifting hooks to the turret corners. This photo, which is crappy, is the first application of (again) white glue....  I subsequently added a few more smaller dabs over the first....  for what they are worth, they don't look all that bad (didn't take any finished pics of them). After painting they will show up much better, I hope.


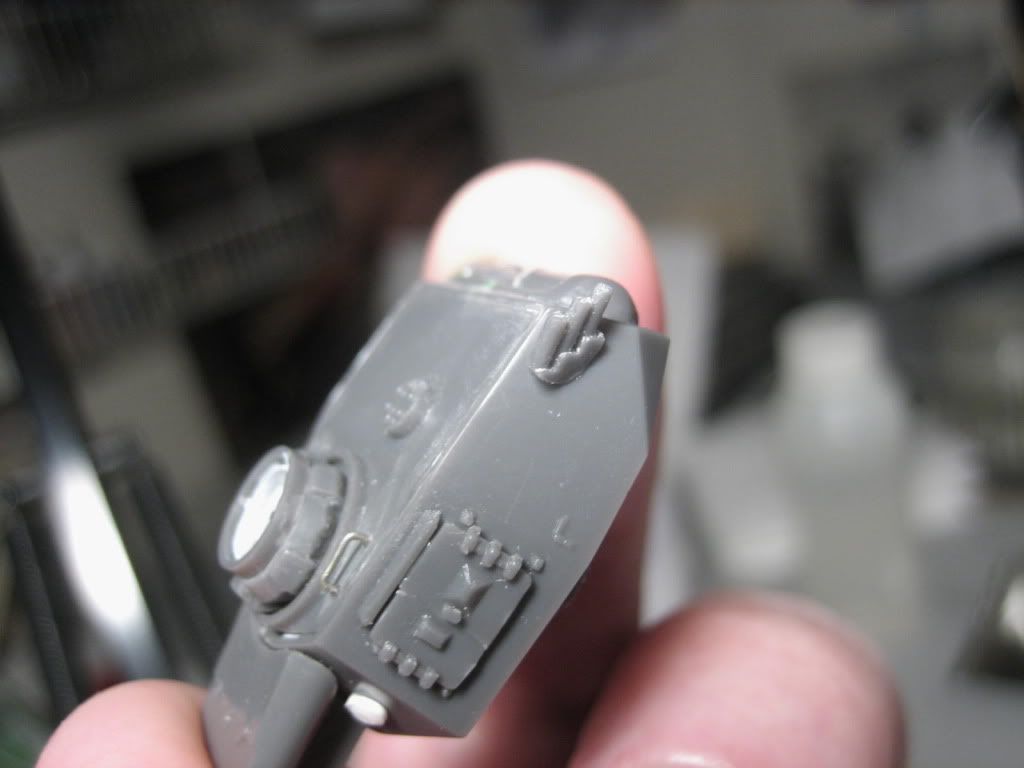
And one last little thing for today (hell, they are all little things with this build).... the headlights were way too tall,, among other things. I dry fitted and knew I had to do something.            So, I lopped off a section of the stem and re-glued the two pieces which will be cleaned up a bit.

Well, that's it for now.....  

Hope you enjoy and    all comments welcome..........   OH, have a nice holiday weekend too (cannot believe summer is coming to a close).

Bill

Enjoy the ride!


  • Member since
    October 2009
Posted by PANZERWAFFE on Saturday, September 3, 2011 12:36 PM

Looks as if everyone replyed at same time.

BILL - Will propably add a little, just lightly though. Sounds like I'm like you, most builds I like'em dirty just like.... never mind. Thats why I found myself wanting a clean one, something different for me. Stange. May just stay light weather and when the dio comes along see how everything fits in togther.  Pics tonight

DOOGS - Thanks again for the explanation Beer  Belive thats how will tackel mine.  Other side looks Yes

Rob

  • Member since
    February 2003
  • From: Allentown, PA
Posted by BaBill212 on Saturday, September 3, 2011 12:38 PM

Doogs,,,   the friuls look great!

Enjoy the ride!


  • Member since
    September 2009
  • From: Rugby, England
Posted by Hinksy on Saturday, September 3, 2011 12:41 PM

Hi guys,

Nice work going on here chaps - keep it up Yes

Here's my update for the day:

As you know I wanted to make some sort of racking on the rear deck for Jerry cans and other stowage but having messed about with my various different mediums (Brass sheet/rod and Styrene sheet/rod I was struggling to get anything to work well. My Brass was either too thick and my little tin snips wouldn't cut it (I need a bigger pair) and the Styrene wasn't quite 'right' - but I wanted to do it so decided on making a brass rod 'framework' reinforced with wooden panels made from Styrene. I wanted to give it the look of a quick field installation job - nothing fancy (I'm not that good yet anyway).

First off I finished the basic build and completed the turret assembly.

I then put in 5 'upright' support rods in a bigger diameter held in place with CA then used smaller diameter rods to make a framework. I was going to just use CA but it wasn't holding the metal joints 100% so I got the soldering Iron out (I didn't even know we had one tbh)!

Now then, I haven't used a Soldering Iron since High School (probably 15 years ago so no micky taking on the messy soldering - I'll file it all down so it looks ok but it worked so Cool I want to do more brass work now and want a better soldering iron with a very pointy tip - my Dads Soldering Iron is huge and very old! 

I cut to size the wooden pieces which tomorrow I'll grain up and paint. I assembled 6 Jerry Cans and a 200 litre barrel with tap fitment. I'm going to add some bed rolls, one of my wooden crates, a rifle and helmet or something and a stowage box made by myself.

Jerry Can Colour Question: This a winter'42' - 43 Russian Winter Panzer III. Would yellow Jerry cans have been around by then? I can't recall. How does the colouring work btw? 

When the tank is painted I'll paint the brass a different colour so it looks like a field addition.

Here she is so far - I'm working from home tomorrow so time may be limited if I'm busy!

My framework and an 'attempt' at soldering - no laughing at the back:

Primed and ready to go:


'Wooden' boards test fitted:

Stowage test fitting:


Well that's it for today guys Yes

I reckon when that messy solder is tidied and the wood panels are sorted that rack will look pretty darn good! 

Please pass on any comments/critiques - update tomorrow!

Thanks chaps,

Ben Toast

On the Bench - Dragon Pz. IV Ausf. G (L.A.H.) Yes

Your image is loading...


  • Member since
    February 2003
  • From: Allentown, PA
Posted by BaBill212 on Saturday, September 3, 2011 12:47 PM

Rob,,   agreed, a little bit of weathering might just do the trick

Ben,,, that rack is great...  exactly what I have been contemplating for my micro build... my problem is I have no real stores to add to the deck.       Your soldering turned out very nice!          And, I believe you would be ok with the yellow jerry cans.

Enjoy the ride!


  • Member since
    September 2009
  • From: Rugby, England
Posted by Hinksy on Saturday, September 3, 2011 1:03 PM

BaBill212

Ben,,, that rack is great...  exactly what I have been contemplating for my micro build... my problem is I have no real stores to add to the deck.       Your soldering turned out very nice!          And, I believe you would be ok with the yellow jerry cans.

Thanks Bill,

I'll get the Dremel tool on the solder blobs and grind them right down but I'm pretty pleased with this - I haven't used a Soldering Iron in over a decade so I'm a bit, erm, 'rusty' Embarrassed

I've got a few methods of trying to 'grain' the Styrene like running a razor saw blade over it or trying oils over paint to make a grain impression. We'll see - I might paint it a daft colour and use the hairspray method so it looks like the crew have ransacked a house for wood!

It's not easy this soldering lark but I'm glad I tried it. I'll be doing more!

Re the Jerry Cans: I know they are painted Grey, Yellow after a certain year and a white stripe means water.

What does the yellow mean or is that just a colour used by the DAK? 

Many thanks,

Ben Toast

On the Bench - Dragon Pz. IV Ausf. G (L.A.H.) Yes

Your image is loading...


  • Member since
    February 2003
  • From: Allentown, PA
Posted by BaBill212 on Saturday, September 3, 2011 1:52 PM

Yes Ben,,  DAK yellow

Enjoy the ride!


  • Member since
    August 2006
  • From: Cygnus X-1
Posted by ogrejohn on Saturday, September 3, 2011 6:27 PM

Satch, that is some nice looking work!

Rob, that looks pretty dang good as is but I think some more washes would make it much better. No need to beat the crap out of it or wallow it in mud.

Doogs, good to see the Friuls on the other side. I used .016 brass wire on mine.

Ben, nice looking stowage rack!

Bill, down right amazing work!

  • Member since
    March 2006
  • From: Right Side of a Left State
Posted by Shellback on Saturday, September 3, 2011 7:56 PM

Ben , mighty fine micro scratch building there ! Yes

Bill , nice idea with the stowage racks .Yes

  • Member since
    March 2006
  • From: Right Side of a Left State
Posted by Shellback on Saturday, September 3, 2011 8:02 PM

PANZERWAFFE

Thanks Carl.  The sprockets and tracks were done by normal painting method.  Wheels - spray primer, spray base color with little primer showing in spots, add worn metal color to sprocket teeth,etc., pin wash with Raw Umber, filter / wash with acrilic artist Raw umber and burnt sienna then dry brush with light shade of base coat.  Tracks first spray with Burnt Sienna for a base coat, lightly spray Burunt Iron (Metalizer) over letting some of the Sienna show through, at this stage weather with pigment / chalk/ etc. did not do this on this one, finally dry brush steel on track contact points.

Thinking about possibly making dio at train station and using the STUG and guard shack as defensive position, possibly giving reason the STUG could be clean .  The train cars and Pz III on train was what I was thinking about doing for my second entry for this GB.  Not promising anything though.

Will get some more done today then post more pics tonight. Stick out tongue

Cool ! Ilike the idea of letting the red primer show through slightly . I did that also . I like your formula of weathering on the running gear and tracks . Yes


  • Member since
    January 2011
  • From: The Great North Woods, Maine
Posted by Chazzer on Sunday, September 4, 2011 10:47 AM

Hey Guys, It's been a while since the storm..that *** Irene! First of all we are unhurt, just a broken finger for me. We just got power back this morning, after 8 days! We were one of the hardest hit areas. The amount of damage is beyond words. 25 homes were washed into Long Island sound. I spent the first few days trying to come to grips with the aftermath. My home took a direct hit from my biggest tree, witch was a 50 year old maple. The strongest branches went through the roof and into the dining area. My  furnace chimney was partially damaged with the bricks landing 25 feet away! We have a 10 ton crane coming here tomorrow or Tuesday to lift the tree off the house to further assess the damage. Because of the weight and the amount of large branches it is prudent to lift it off to spare the house further damage. The insurance adjuster hasn't been here yet even though the Allstate disaster team is here and said it would only be 3-5 days. Were now on day 8. I took lots of pictures and will post them when I'm able and can get a grip.. As for the Stug III, I haven't touched it since the storm hit. God I missed building it and need it to relax and forget for a bit, but since the humidity was so high it was too uncomfortable to make any effort. Now that the A/C is on I will start up again soon. Baby steps!

Thanks to all who sent kind words. Shell back: there are lost of pictures of my area and my home. A full report to follow. LOL. Doogs, the kind words and suggestions were very thoughtful and appreciated. I will follow your advice and I think it will help greatly. Andy, Thanks.


ChazzerBlack Eye

  • Member since
    October 2009
Posted by PANZERWAFFE on Sunday, September 4, 2011 12:13 PM

CHAZZER - Very good to hear you and your family are alright, thats the iportant thing!  Everything else can wait just do what you need to do.  We will be here.

Have to make this short, power has been in and out since last night.  Will comment when the winds die down, latter, I hope.  Nice work to everyone though.  Will also try to post those pictures I said would put up last night.  Later!

Rob

  • Member since
    March 2003
  • From: Rain USA, Vancouver WA
Posted by tigerman on Sunday, September 4, 2011 12:45 PM

deafpanzer

Satch- I think Eric was talking about the wood block on left side of your Panzer.  Often they are made of darker brown wood.  I would add thinned raw umber if it is easier...

http://www.steeldragons.net/Jack_Block_King_Tiger.jpg

Hope this helps... again still good looking Pz III you got. 

Correct. Is it supposed to be brown? Well, all my others are wrong then. Crying Bang Head

   http://i7.photobucket.com/albums/y269/wing_nut_5o/PANZERJAGERGB.jpg

 Eric 

  • Member since
    March 2006
  • From: Right Side of a Left State
Posted by Shellback on Sunday, September 4, 2011 8:51 PM

tigerman

 deafpanzer:

Satch- I think Eric was talking about the wood block on left side of your Panzer.  Often they are made of darker brown wood.  I would add thinned raw umber if it is easier...

http://www.steeldragons.net/Jack_Block_King_Tiger.jpg

Hope this helps... again still good looking Pz III you got. 


Correct. Is it supposed to be brown? Well, all my others are wrong then. Crying Bang Head

Me too Eric .........................................

  • Member since
    October 2009
Posted by PANZERWAFFE on Sunday, September 4, 2011 11:43 PM

Yep, big wood block.

CHAZZ - How you doing?

BILL - Excellent job!  I sometimes get fustrated with 1/35, you are the man Yes

BIN - Really like the lay out with the gear and the idea of the rack is awesome.  The rack should look fine once you grind down those areas.  Look forward to see how she comes out.

Ok, I'm calling her done with exception of the antenas.  Tried several different backgrounds and settings on the camera and still can not get a good picture Bang Head  The blue background makes the STUG look yellow and the other backgrounds (had several) Make it look pale / white.  Anyway here they are:

Really am disapointed with these pics!  The color is somewhere between what it looks like in the pictures.  Did quite a bit off washing and pin washing and it does not hardly show.  Really like what it looks like here in front of me though.

Do not think will be able to build the dio I had intended, not for a nother year anyway.  With three train cars, two tanks, station / buildings, guard shack and figures it will be kind of BIG.  Will still build all components and wait until my last move (less than a year) then build the dio.  My last move!!!  Have many things planned wating for this!

P.S. thers a lot of pics Stick out tongue

Rob

  • Member since
    October 2009
Posted by PANZERWAFFE on Sunday, September 4, 2011 11:57 PM

Between power on and off had started on the track sections for the Panzer Express.  Will use this to show how I do the wood.

Base still needing several more washes and dry brushing but its a start.

First a primer / base coat of MM Chestnut was applied and then a coat of MM Wood.  After leaving the Wood to dry overnight today sprayed a few coats of Dullcoat.  Will leave to sit until tomorrow.

Rob

  • Member since
    March 2003
  • From: Rain USA, Vancouver WA
Posted by tigerman on Monday, September 5, 2011 12:24 AM

Another fine job Rob. That pre-zimmed waffle zim looks very nice. I like the weathering, more along my style of washes and less on the chipping. I understand about the pics. I can never quite figure my stupid camera out either.

   http://i7.photobucket.com/albums/y269/wing_nut_5o/PANZERJAGERGB.jpg

 Eric 

  • Member since
    October 2009
Posted by PANZERWAFFE on Monday, September 5, 2011 1:20 AM

Thanks Eric.  The zim was nice and was impressed with the quality of it.  Did pose a problem when trying to apply washes.  I'm about ready to throw this camera out and use the wifes.  Her's is older but thing it takes better pictures.  With this guy out of the way will be able to go full time in the Blitz Stick out tongue 

Dont worry though ANDY, this GB being so long will still have time to work on the Panzer III Express for my second entry.  Was thinking doing one of these two.  Would they qualify?

The first one should be safe because theres a PZ III sitting on there but what about the second one?  It has a Pz III turret on it Huh?

Rob

  • Member since
    February 2003
  • From: Allentown, PA
Posted by BaBill212 on Monday, September 5, 2011 4:32 AM

Rob,,   That is one FINE build - - -    Superb!

Even if some of the pics are off-colored a bit,   can still see all the detail...   excellent work.

Enjoy the ride!


  • Member since
    September 2009
  • From: Rugby, England
Posted by Hinksy on Monday, September 5, 2011 5:05 AM

Hey Rob,

Lovely build - i'd have another crack at them photos if I were you as I wanna see it in all it's glory. That Zim looks superb and the interior? WOW!

Thanks for the Yes on my little rack! It took some doing as scratchbuilding is totally new to me and like I said I haven't really soldered since the last year of High School so that's about 15 years ago! Our soldering iron has a tip like a Cold Chisel so intricate stuff is nigh on impossible - I'll buy a new one come pay day.

The plan is to try and make the long 'wooden' piece at the back look like an old door and put some supports across it and mark it so it loos like planking. Not sure about the sides yet.

I'll paint the rack a different colour so it looks like a field fitting. There'll be 6 or 7 Jerry Cans, the 200 litre water Drum and a few crates - I found my balsa crates and made one it looks good, I'll make another two crates up and a milliput sack maybe? 

What colour should the drum be and if anyone can help in turning three plastic squares into convincing grained wood I'd be very greatful! Do I slice the lines with my scalpel where the planks would join then scribe the grain or is there a better way? Should I cheat and use Balsa?

Here we are now - a new crate assembled and note the tap for the water drum/bowser.


I'm not going to start painting until I get my Friuls done (I'll paint the wheels/tools/stowage etc) so in the meantime I'll concentrate on the stowage and paint that up nice and make that 'wood' around the racking.

Thanks guys, 

Ben Toast

On the Bench - Dragon Pz. IV Ausf. G (L.A.H.) Yes

Your image is loading...


JOIN OUR COMMUNITY!

Our community is FREE to join. To participate you must either login or register for an account.

SEARCH FORUMS
FREE NEWSLETTER
By signing up you may also receive reader surveys and occasional special offers. We do not sell, rent or trade our email lists. View our Privacy Policy.