SEARCH FINESCALE.COM

Enter keywords or a search phrase below:

AIRCRAFT - USMC Group Build (ends 7/30/04)

28310 views
523 replies
1 rating 2 rating 3 rating 4 rating 5 rating
  • Member since
    December 2002
  • From: Harrisburg, PA
Posted by Lufbery on Friday, April 30, 2004 7:56 AM
Cool stuff, guys. I'm glad to read that everyone is doing okay. My modeling has slowed down a bit too. I spent most of the past month studying for the GRE test so I can get into grad school. Luckily things went very well with the test and I'm on track to start school in the fall.

Regards,

-Drew

Build what you like; like what you build.

  • Member since
    December 2002
  • From: Winsted CT
Posted by jimz66 on Friday, April 30, 2004 5:23 AM
I haven't been able to work on mine in over a month. I hope to get the Hornets ready to paint this weekend. Cheers I hope all is well. Sorry guys. but things have been tough lately.
Phantoms rule the skies!!!
  • Member since
    November 2005
Posted by Anonymous on Thursday, April 29, 2004 9:36 PM
I'm just taking the filling slowly, and cautiously, as this is the point where I usually lose interest. I was able to successfully mask off the cockpit with a cotton ball, and spray the glare shield flat black, so I'm getting a bit more confidence in masking. This weekend I am picking up some light primer. Also there's an airshow this weekend I'm going to be attending on Sat. I promise I haven't lost interest.....just lack of time!!! LOL
  • Member since
    February 2003
  • From: Saratoga Springs, NY
Posted by Jeeves on Wednesday, April 28, 2004 7:33 AM
canopy masking and painting in progress Sad [:(]

Then it's on to decals and small pieces like antenna and such....I am almost done which is why I haven't posted any pics lately....figured you all could wait until July Wink [;)]
Mike
  • Member since
    January 2004
  • From: The Netherlands
Posted by stoomfluit on Tuesday, April 27, 2004 3:18 PM
Mmmm, let's see. The Phantom is finished, and I'm not too happy with it. I've lost some of the decals while removing some masking tape. I thought they were secured by some Future, but this wasn't good enough. Luckily it were some stencils and just one roundel, which I was able too replace. The Wildcat will be painted next weekend, I've had some trouble finding the right color for the upper surfaces, but I think that I will go with Testors/MM 1720. Also nearing completion is a tiny 1/144 F-5e and last week I started with the OA-4m.

Can't wait to see everyone's projects on July 30Smile [:)]
  • Member since
    December 2002
  • From: Harrisburg, PA
Posted by Lufbery on Tuesday, April 27, 2004 12:41 PM
Hi all,

It's really quiet here. How are you doing on your builds? Let's hear from some of the folks who haven't posted for a while.

Regards,

-Drew

Build what you like; like what you build.

  • Member since
    March 2003
  • From: Brooklyn
Posted by wibhi2 on Thursday, April 22, 2004 8:32 AM
Naw wasn't really hard, but time consuming. Really a matter of cutting off the scissors,
wheel and the section of the oleo (chrome part) - drilling a hole in the wheel base and strut. Nice thing about aluminum tube is that it can be cut with an x-acto knife and it dosen't have to be painted.
3d modelling is an option a true mental excercise in frusrtation
  • Member since
    December 2002
  • From: Harrisburg, PA
Posted by Lufbery on Thursday, April 22, 2004 8:10 AM
QUOTE: Originally posted by wibhi2

hey drew,
Do I sence 2 different greens or is it my failing eyes? Just a hint: mix up an OD slightly darker than your base (like add a touch of dark blue to the OD) thin it a bit like a medium wash and lay that into the folds and creases of the clothing. It'll add more depth. Other than that looks good.


Yup, there are two greens there. I was trying to drybrush the second green to highlight the straps and wrinkles, and I think I was partially sucessful, but it's hard to do when the whole figure is only 1 inch tall.

I thought of doing a wash, but I've never done one before, so I decided not to push my luck.

QUOTE:
Ended up opening the oleo scissors and replacing the oleo's with 1/16" aluminum tubing then bending the scissors to fit - Just think I get to do this at least 4 more times - boy, I can't wait.


That's a pretty cool solution. I don't know anything about the parts breakdown; was replacing the oleos with aluminum tubing tough to do ?

Regards,

-Drew

Build what you like; like what you build.

  • Member since
    March 2003
  • From: Brooklyn
Posted by wibhi2 on Wednesday, April 21, 2004 11:16 PM
hey drew,
Do I sence 2 different greens or is it my failing eyes? Just a hint: mix up an OD slightly darker than your base (like add a touch of dark blue to the OD) thin it a bit like a medium wash and lay that into the folds and creases of the clothing. It'll add more depth. Other than that looks good.

Ended up opening the oleo scissors and replacing the oleo's with 1/16" aluminum tubing then bending the scissors to fit - Just think I get to do this at least 4 more times - boy, I can't wait.
3d modelling is an option a true mental excercise in frusrtation
  • Member since
    December 2002
  • From: Harrisburg, PA
Posted by Lufbery on Wednesday, April 21, 2004 8:34 PM
Wighi2,

I hope your landing gear mishap was easy to fix. I do a ton of dry fitting and still end up with things like that happening to me.

All,

Here's the pilot figure all painted up. I don't think he looks too bad for my first figure:
.

.
I need to touch up his boots. I glued him to a penny for easier handling, and the white glue covered part of his footwear.

The next step is doing the base for the plane.

Regards,

-Drew

Build what you like; like what you build.

  • Member since
    March 2003
  • From: Brooklyn
Posted by wibhi2 on Tuesday, April 20, 2004 8:26 AM
got one of the RM B models together last night, only to find I set the rear wheels to high and with the outriggers on, the rear wheels sit 3/32" off the desk. AAARRRGHHHH....... modifing the outrigger wheels and oleos to sit lower - should have just cut it out of the outrigger strut.
3d modelling is an option a true mental excercise in frusrtation
  • Member since
    November 2005
Posted by Anonymous on Monday, April 19, 2004 11:06 AM
Mike aka Jeeves,

Use Bare Metal Foil. That stuff is GREAT for masking anything. The only downside is the sticky residue that it leaves when you're done. I find that if you wait until you've applied your final clear coat (flat or gloss), then peel off the foil, you can safely remove the residue with alcohol or WD-40. The final clear coat helps prevent the alcohol or WD-40 (or any other residue remover) from attacking the paint. Good Luck!!!
  • Member since
    February 2003
  • From: Saratoga Springs, NY
Posted by Jeeves on Monday, April 19, 2004 10:45 AM
Had last week off...but so did the wife-- so there were many things on the honey-do list, so no room for modeling Sad [:(]

I'm back to the SBD this week-- although another reason why work has stopped is I am at the dreaded canopy masking stage....yuck!
Mike
  • Member since
    December 2002
  • From: Harrisburg, PA
Posted by Lufbery on Monday, April 19, 2004 9:17 AM
Things are a bit quiet in this build right now. I hope everyone's builds are going okay.

Jeff, I think it's really cool that your wife is building with you. Smile [:)]

I've been working on painting the figure to go with my plane and it's going pretty well. It's funny to be painting with a toothpick.

I'll see about getting a scan up soon.

Regards,

-Drew

Build what you like; like what you build.

  • Member since
    May 2015
Posted by willuride on Saturday, April 17, 2004 4:02 PM
ok, ok, We are making progress. Our cockpits are done, not accurately to the T, but none the less they are done. Our pilots are done too. I tried to take some pictures, but we have a crappy digital camera, so I took some with the regular camera. When it gets developed and if I can figure it out, then we will post them. Tonight we are going to start working on the landing gear doors, these will be in flight models so they will be closed. I will post some pics as we go along. I am really enjoying this build with my wife, and hers (the first a/c) model she has ever done is turning out great. You all be nice to her but you can hammer me.Big Smile [:D]. I'm used to it.Tongue [:P]. Thanks and we will be done by the due date.

On the bench Knoxville, TN:

1/48 Monogram F-4 Phantom "Black Bunny"  I wanted to relive the past....Never again

On the Bench Manchester, TN:

1/48 Revell F-18E 


  • Member since
    December 2002
  • From: Harrisburg, PA
Posted by Lufbery on Wednesday, April 14, 2004 8:51 AM
QUOTE: Originally posted by kik36
Thanks Drew, I'm still reeling over how fast you built that thing!!!


HA! I started it in May of last year. I was about half-way done with it when this build started, so I had a head start. I had to take a couple of months off from building anything at the end of last year due to a move, but this group build motivated me to get going again.

QUOTE:
I can't believe it's 1/72 scale!!! I sure hope mine looks that good when it's done. Though, you're teaser pics are driving all of us crazy!! I know I can't wait to see more details!!


Thanks. Blush [:I]

Regards,

-Drew

Build what you like; like what you build.

  • Member since
    November 2005
Posted by Anonymous on Wednesday, April 14, 2004 12:16 AM
Thanks Drew, I'm still reeling over how fast you built that thing!!! I can't believe it's 1/72 scale!!! I sure hope mine looks that good when it's done. Though, you're teaser pics are driving all of us crazy!! I know I can't wait to see more details!!
  • Member since
    December 2002
  • From: Harrisburg, PA
Posted by Lufbery on Tuesday, April 13, 2004 9:01 AM
By the way, Heath, your Corsair looks awesome!

-Drew

Build what you like; like what you build.

  • Member since
    December 2002
  • From: Harrisburg, PA
Posted by Lufbery on Tuesday, April 13, 2004 9:00 AM
Thanks for the kind words. More and larger pictures will be posted when the build ends. Wink [;)]

I'll be putting the plane on a tarmac base. It should look pretty good. I'd like to do a flight deck, but that's a little bit beyond me right now. One of the other models I have has a nice looking tarmac image printed on the inside of its box cover. I'm going to scan that and shrink it to 1/72 scale. Then I'll print it and past it to a base of some sort.

We'll see how it goes.

Regards,

-Drew

Build what you like; like what you build.

  • Member since
    March 2003
  • From: Brooklyn
Posted by wibhi2 on Monday, April 12, 2004 11:56 PM
k.
Now, I want more and larger.
It'll look great on a catapult or whatever base you put it on.
3d modelling is an option a true mental excercise in frusrtation
  • Member since
    December 2002
  • From: Harrisburg, PA
Posted by Lufbery on Monday, April 12, 2004 6:54 PM
Hi all,

I thought I'd post a quick tease:
.

.
Click for a larger picture.

I'm working on the pilot figure tonight, then I need to construct a base for both. I really wish I had a second 1/72 scale pilot figure, but I only have the one.

Regards,

-Drew

Build what you like; like what you build.

  • Member since
    November 2005
Posted by Anonymous on Sunday, April 11, 2004 3:43 PM
Yeah right, I wish!!! LOL No, the NSX hasn't been treating me too well lately. It was my first time decaling, and I learned a lot. Unfortunately, I generally learn by screwing things up royally. There's a couple of wrinkles here and there. This weekend, when I futured over the decals, a couple of them bubbled up a bit. Disapprove [V] I'm going to get my feet wet, and see how they judge the models and such. I'm hoping that a 10 year old comes out and spanks my model in the dirt, I think that would make me a helluva lot more proud than if I won anything. The NSX will be my very first completed model since I started up again last year. It will be #2 in my whole life. I still have #1, and will share pics of both next week sometime in the Auto section. Thanks for your kind comments about my build, makes me want to go out and pick up that Hellcat........hmmm one day.
  • Member since
    March 2003
  • From: Brooklyn
Posted by wibhi2 on Sunday, April 11, 2004 10:36 AM
Don't thank me, Heath. I think that was one of Paul Boyer's tricks that I read somewhere. I used to painstakingly mask the interior of the canopy and paint the inside.

You're going to tamiya con? Good luck. I expect to see your picture on the back of the FSM cover, you lucky dog.Big Smile [:D]
3d modelling is an option a true mental excercise in frusrtation
  • Member since
    November 2005
Posted by Anonymous on Sunday, April 11, 2004 2:12 AM
I just go by what everyone on the forums taught me!! First of all, it is the eduards photoetch panel painted flat black, then I dry brushed it lightly with silver. Then I touched a couple of knobs with a toothpick dipped in red or yellow, depending on my reference. Then it gets glued to a plastic instrument film, I glued those two together first to make sure they lined up with the testors clear canopy glue. Then I glued that whole assembly to the panel that I painted flat white with the same canopy glue. When it was dry, I put a few drops of future in each instrument. It sounds like a lot, but the longest part was letting it all dry. BTW Wibhi, that sounds like a fantastic trick. That way, you can see the bottom color through the canopy!! Dude, you're a genius!!! Cool. I was going to spray this weekend, but I have to put her aside and do a mad rush on the NSX for Tamiya Con next weekend. The only thing I'll be doing between then and now, is a bit of filling (though I don't have much to do) Wait 'till you guys see the base I have designed for this baby, you're going to Censored [censored] yourselves!!! My girlfriend thinks I'm nuts, but....well, no, I am!!!!Tongue [:P]Wink [;)]
  • Member since
    November 2005
Posted by Anonymous on Saturday, April 10, 2004 11:53 PM
Yeah, kik36, how the h-e-double-hockey-sticks did you get that instrument panel looking so good, especially if this is your "first" aircraft model? I would love to know that!!!! Great-looking Corsair, by the way!!!
  • Member since
    March 2003
  • From: Brooklyn
Posted by wibhi2 on Saturday, April 10, 2004 11:42 PM
Gary: It was my pleasure.

Kik36: That looks great. I love the cockpit and am wondering how you did the IP (mine always come out looking halfassed). As for masking the cockpit, I always tac on the canopy with weak white glue - mask it leaving the frame exposed (done before tacing in place) - spray frame interior color , after that dries I then spray the exterior color. Makes life
alot easier IMHO
3d modelling is an option a true mental excercise in frusrtation
  • Member since
    November 2005
Posted by Anonymous on Saturday, April 10, 2004 4:15 PM
Here's my update boys and girls:
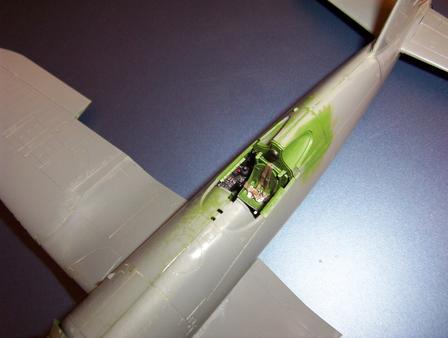
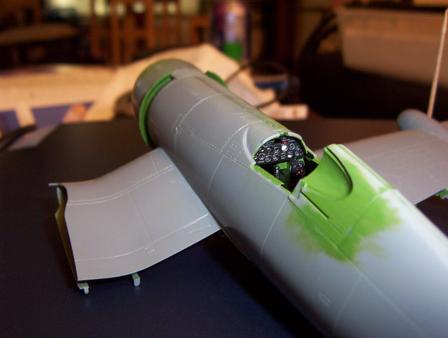
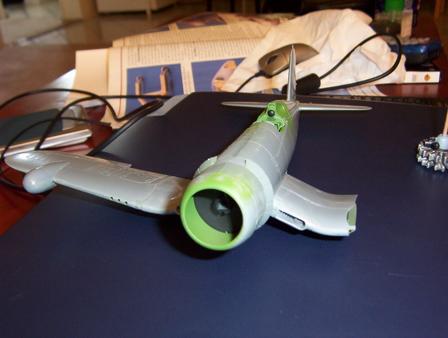
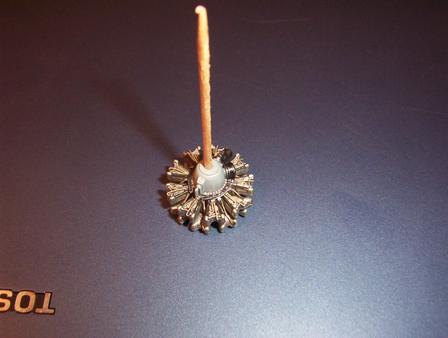


theres a couple more here: http://kiksbench.50megs.com/photo.html I didn't want to overload the post.

Anyways, I'm really, really, really pleased with how everything has been turning out. A copule of minor errors here and there, but I have been enjoying it thoroughly. I did want to think everyone for twisting my arm and "making" me dirty up the engine. It was well worth it. As you can imagine, I was a bit nervous about doing the weathering on any of the pieces, since this is I hope to be my first finished A/C model, and everything looked so well. But again, thanks for persuading me to go through with it. I will definately weather the rest of the plane with much gusto. The cowling is going to be held in temporarily while I paint. Since there aren't going to be seems, I decided rather than fighting masking the engine, I would assemble it later. Also I asked around, and got this idea to tack on the Canopy, spray the model, remove the canopy and strip it completely. I think it will be the best way to mask the cockpit (I'm not all that great at masking yet). The left wing is going to be folded, and flaps are going to be down. I am going to paint the flaps, Left wing, and the gear doors seperately, and assemble them later. Only one problem I have, is that on the left fuselage half, where the rudder meets the vertical stab, it was open....ummm how to put it. There was no plastic, like it was cut, at the top of the rudder where the line is supposed to be. When glued together, you can't tell other than it is deeper than the other side. Any idea on how to fix this and make it look even?? Thanks
  • Member since
    November 2005
Posted by Anonymous on Saturday, April 10, 2004 8:51 AM
wibhi2,

Love the logo. Thanks!!
  • Member since
    March 2003
  • From: Brooklyn
Posted by wibhi2 on Thursday, April 8, 2004 11:28 PM
I wish!Tongue [:P]

my freehand abilities ain't what it used to be before I found CAD and 3d apps.
I swear that the computer has destroyed what ever autistic...ehh, artistic abilities I had wth a pencil.
found that one doing a "harrier" google searchBig Smile [:D]
3d modelling is an option a true mental excercise in frusrtation
  • Member since
    November 2005
Posted by Anonymous on Thursday, April 8, 2004 11:07 PM
Go to town!! Let's see what crazy ideas you put to it. I really like your Harrier charicature (spelling) did you draw that too?
JOIN OUR COMMUNITY!

Our community is FREE to join. To participate you must either login or register for an account.

SEARCH FORUMS
FREE NEWSLETTER
By signing up you may also receive reader surveys and occasional special offers. We do not sell, rent or trade our email lists. View our Privacy Policy.