SEARCH FINESCALE.COM

Enter keywords or a search phrase below:

Fw 190 Butcher Bird 2013 (extended to June 2014) Group Build

564937 views
5865 replies
1 rating 2 rating 3 rating 4 rating 5 rating
  • Member since
    March 2012
  • From: Corpus Christi, Tx
Posted by mustang1989 on Saturday, January 4, 2014 10:58 PM

That was good for a laugh! Hahaha!


 Forum | Modelers Social Club Forum (proboards.com) 

  • Member since
    June 2008
Posted by jugjunkie on Sunday, January 5, 2014 4:45 AM

I'm about 2 hours from done but I really wanted to off those G FACTOR brass oleos....

  • Member since
    March 2012
  • From: Corpus Christi, Tx
Posted by mustang1989 on Sunday, January 5, 2014 5:55 AM

This looks great JJ! I hope my landing gear turns out this good. I still have that bridge to cross as I have built up the Eduard A-8  struts and doors and so far the fit is good but I still have to get the gear angles right. Good job here!


 Forum | Modelers Social Club Forum (proboards.com) 

  • Member since
    March 2012
  • From: Corpus Christi, Tx
Posted by mustang1989 on Sunday, January 5, 2014 7:00 AM

Well fellas now that the wings are together it's time for that last test fit of the engine/ nose module into the fuselage and the fuselage to wing fit before committing to adhere the wings to the fuselage.

all looks good here. A slight upwards angle due to everything sitting on the foam but it all fits like it was made to be there. This has to be the best fit I've ever had from a resin upgrade kit!

Onto gluing the parts together. No turning back now!!!!

and then another test fit after everything has dried. I almost did flips guys! It actually all fit like a dream!


 Forum | Modelers Social Club Forum (proboards.com) 

  • Member since
    October 2008
  • From: Georgia
Posted by Rigidrider on Sunday, January 5, 2014 7:35 AM

Joe... What can I say man ...Other then ,"Top Notch!" Everty thing is just masterfully done.

Monty, again... All that and a 72nd to boot... WOW!

Good to have you back Clemens. Will be seeing more of you soon as my goodies arrive for the first Corsair. Are you near paint yet on your Staffel! LOL... All 9 of them at once? LOL...This will be a great viewing!

Isnt it funny how we've grown to need and depend on our computers BlackDog? I'm not complaining, But Mine went down (minor issue) a month ago, and I felt TOTALLY isolated from the rest of the world! It was almost scarry!!! Get em back up ASAP so we can watch your progress!

Take care aii!

Doug

When Life Hands You A Bucket Of Lemons...

Make Lemonade!

Then Sell It Back At $2 Bucks A Glass...

  • Member since
    March 2010
  • From: MN
Posted by Nathan T on Sunday, January 5, 2014 5:04 PM

Geez Joe, it doesn't get any better than that! Your moving along pretty good.

JJ- Nice legs on that 190.


  • Member since
    August 2009
  • From: MOAB, UTAH
Posted by JOE RIX on Sunday, January 5, 2014 5:34 PM

J.J.: That landing gear looks great. nice work on them.

Joe: Magnificent work. You've got that D-9 looking awesome. Must feel good to have everything fit together nicely after wrestling with that A-8.

"Not only do I not know what's going on, I wouldn't know what to do about it if I did". George Carlin

  • Member since
    June 2008
Posted by jugjunkie on Monday, January 6, 2014 1:30 AM

Done....

  • Member since
    March 2012
  • From: Corpus Christi, Tx
Posted by mustang1989 on Monday, January 6, 2014 4:07 AM

JJ let me be the first to tell you that your painting skills and the job in which you used those skills on this bird came together nicely. That sir is a well laid out and executed paint job. I really like the weathering on the landing gear.Thank you for being a part of this GB and as I do with all the mighty fine participants I've had in here, I'd like to encourage you to hang around and if not build another then continue to offer input and conversation. Thanks again buddy, Joe

P.S. I'll get these pics up soon.


 Forum | Modelers Social Club Forum (proboards.com) 

  • Member since
    March 2012
  • From: Corpus Christi, Tx
Posted by mustang1989 on Monday, January 6, 2014 4:28 AM

Gotcha posted there JJ! Awesome work!


 Forum | Modelers Social Club Forum (proboards.com) 

  • Member since
    June 2008
Posted by jugjunkie on Monday, January 6, 2014 5:41 AM

Thank you for very kind words indeed Joe - much appreciated, yup you can expect another from me - this one....

  • Member since
    March 2012
  • From: Corpus Christi, Tx
Posted by mustang1989 on Monday, January 6, 2014 5:47 AM

I'm just about out the door for work but will get this bad boy posted in the intro post! Refer back to page 286 and print the precautions off (there are two separate ones ) that will surely help you with this build. There is also some commentary about the cockpit flooring on the last few pages to help you out as well. I'm looking forward to this one JJ. Glad your back in!!


 Forum | Modelers Social Club Forum (proboards.com) 

  • Member since
    April 2013
Posted by SchattenSpartan on Monday, January 6, 2014 5:54 AM

JJ: That's one ace looking 190 there! Great work!

Joe: Looking really good so far! Keep 'em updates coming, mate!

  • Member since
    April 2013
Posted by SchattenSpartan on Monday, January 6, 2014 6:01 AM

Just a short summary of the areas that need special attention on those Eduard 190s (feel free to correct me if I get something wrong):

The MG bulkhead pieces have to be aligned at a 93° angle. otherwise the bulkhead won't fit properly (this should be noted in the Dora instructions already though)

There might be a small gap at the rear of the wing roots. Don't fill anything here, just insert a spacer bar right behind the cockpit tub.

The cockpit floor is 1-2mm too wide at the very front. Just remove a bit of the platic on both sides to make the cockpit and the bulkhead fit at the same time.

That should be all of the important stuff...

  • Member since
    August 2009
  • From: MOAB, UTAH
Posted by JOE RIX on Monday, January 6, 2014 7:00 AM

J.J. : That is magnificent! You have really done a sweet build there. The camo looks fantastic and the weathering and detailing are an excellent compliment. Really glad to hear that you are to hang in there with us. I'm sure that the D-11 will be well served by your fine skills.

"Not only do I not know what's going on, I wouldn't know what to do about it if I did". George Carlin

  • Member since
    October 2008
  • From: Georgia
Posted by Rigidrider on Monday, January 6, 2014 7:02 AM

JJ... beautifully done! Fantastic paint wort you can do allthe resin and PE you want, but if the paint isnt right it was all done in vane. Again, well done sir!

Doug

When Life Hands You A Bucket Of Lemons...

Make Lemonade!

Then Sell It Back At $2 Bucks A Glass...

  • Member since
    June 2008
Posted by jugjunkie on Monday, January 6, 2014 8:51 AM

Thank you all for kind comments - it is appreciated and thank you guys for the heads up on the Ed kit, all duly noted and filed as I get her underway. CHEERS

  • Member since
    March 2012
  • From: Corpus Christi, Tx
Posted by mustang1989 on Tuesday, January 7, 2014 4:25 AM

Ok you all. Time for another photo shot session. Here we are all together:

Then masked off......

and then finally primed and ready to go.


 Forum | Modelers Social Club Forum (proboards.com) 

  • Member since
    July 2011
  • From: minnesota
Posted by handiabled on Tuesday, January 7, 2014 5:24 AM

Great looking work everyone!  The bar here is set very high,,, and just keeps getting higher!

  • Member since
    March 2012
  • From: Corpus Christi, Tx
Posted by mustang1989 on Tuesday, January 7, 2014 5:27 AM

Thanks handi! Can't wait to see your upcoming build. The high bar will just keep going!


 Forum | Modelers Social Club Forum (proboards.com) 

  • Member since
    March 2012
  • From: Corpus Christi, Tx
Posted by mustang1989 on Tuesday, January 7, 2014 5:35 AM

Hey JJ. I've got your Eduard entered in on the build roster.


 Forum | Modelers Social Club Forum (proboards.com) 

  • Member since
    September 2011
  • From: Milaca, Minnesota
Posted by falconmod on Tuesday, January 7, 2014 7:19 AM

Made some progress since I've been confined to the basement because of the -25 below zero outside.

got most of the painting done on the Airfix 1/72 fw190 just the mottling left and of course weathering.  the Dragon 190 I got the cowling attached, I forgot what a pain the Dragon cowling was to put on,  no real alignment pins or tabs or anything.  now the filling and sanding can begin.  Here's another shot of the Airfix model.

On the Bench: 1/72 Ki-67, 1/48 T-38

1/144 AC-130, 1/72 AV-8A Harrier

  • Member since
    September 2011
  • From: Milaca, Minnesota
Posted by falconmod on Tuesday, January 7, 2014 9:45 AM

I have a question for any Eduard FW190 experts out there.  I again opened up my eduard 190 last night and as usual it scared me to death.  Question, are all the eduard 190's pretty much the same molds?  or are some of them different?  ie:(less parts)

John

On the Bench: 1/72 Ki-67, 1/48 T-38

1/144 AC-130, 1/72 AV-8A Harrier

  • Member since
    April 2013
Posted by SchattenSpartan on Tuesday, January 7, 2014 10:34 AM

The Doras have a few less parts, because there is no Engine included in the kit, but all of them have a very high parts count...

  • Member since
    September 2011
  • From: Milaca, Minnesota
Posted by falconmod on Tuesday, January 7, 2014 10:38 AM

Crying  Thanks for the info Clemens

John

On the Bench: 1/72 Ki-67, 1/48 T-38

1/144 AC-130, 1/72 AV-8A Harrier

  • Member since
    August 2009
  • From: MOAB, UTAH
Posted by JOE RIX on Tuesday, January 7, 2014 12:24 PM

Hey There John, Good to see you making some stout progress. Things are coming along quite nicely it appears. Great work indeed.

"Not only do I not know what's going on, I wouldn't know what to do about it if I did". George Carlin

  • Member since
    March 2010
  • From: MN
Posted by Nathan T on Tuesday, January 7, 2014 12:47 PM

falconmod

I have a question for any Eduard FW190 experts out there.  I again opened up my eduard 190 last night and as usual it scared me to death.  Question, are all the eduard 190's pretty much the same molds?  or are some of them different?  ie:(less parts)

John

Same plastic and PE, with a few parts either added or omitted per model number. If you're asking does one kit build better than another, the answer is no, they all build the same. 


  • Member since
    May 2013
  • From: Indiana, USA
Posted by Greg on Tuesday, January 7, 2014 4:14 PM

JJ, that is fine work there! Just awesome. Glad you posted that 'just before done' shot to show off the struts, they are very cool.

Glad you're starting another!

Joe, you are really moving along. Looking great, mate.

John, good to see you moving right along, looking good....

Clemens, where was your tip #3 'before' I joined my fuselage halves?? Big Smile Good to see you back.

  • Member since
    April 2013
Posted by SchattenSpartan on Tuesday, January 7, 2014 4:30 PM

It's great to hear from you, buddy!

I just found out about the floor being to wide myself after Eric gave us all the hint about it looking too wide... I did some dry-fitting after i read it and the  cockpit floor on all my 190s is too large... My first 190 (A-8/R2) has the same problem yours has. Fortunately I'm going to display that one closed up, so it doesn't really matter in my case...

  • Member since
    April 2013
Posted by SchattenSpartan on Tuesday, January 7, 2014 5:04 PM

Since I'm talking about my R2 already, i have a very minor update regarding that model:

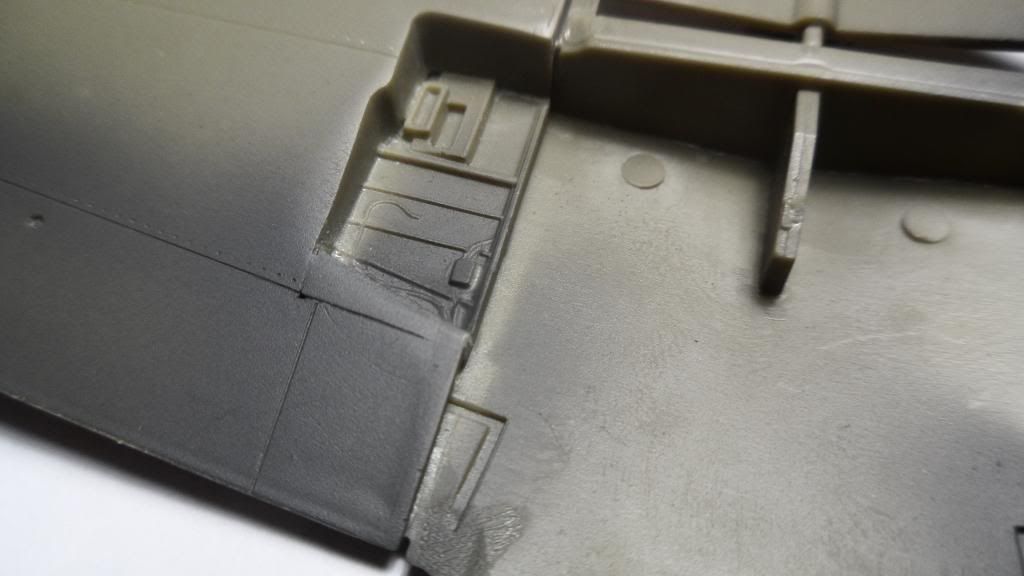
It's actually a step back in construction. Some of you might remember that I had some problems with the gun bays at the wing roots. I wanted to display one of them opened up and the other one closed. After spraying a bit of left-over RLM 66 on those areas, I noticed that the closed gun bay looked horrible (I removed too much of the hatch when I tried to get it to fit and had tu fill a quite big gap - it didn't work out as expected) the other side looks ok, but it's not that great either. I decided to close both of them now and replace the damaged hatch:
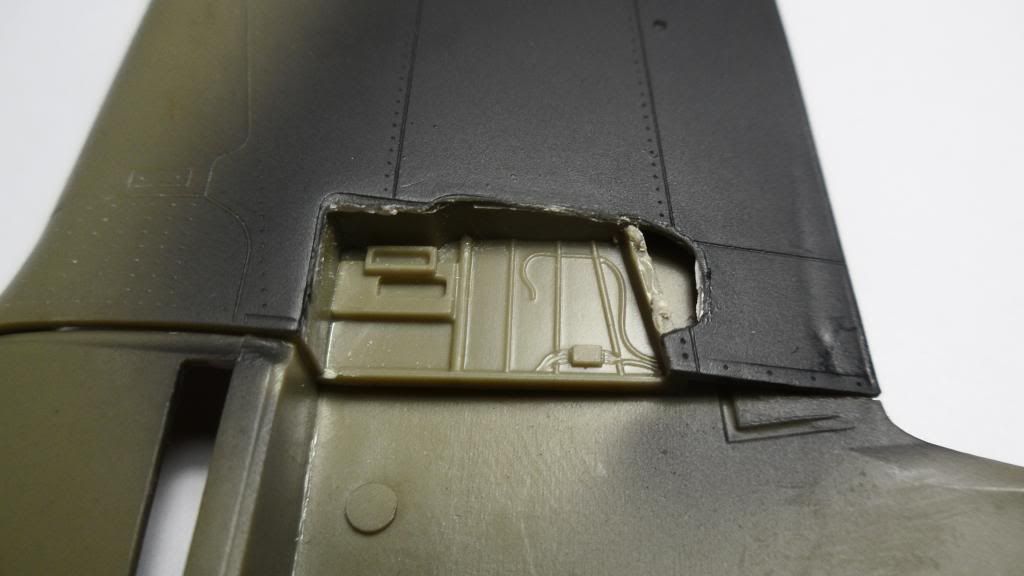
I simply ripped the hatch off (there wasn't a huge area it was glued to anyway) and I'll remove the putty residue (light, rough edges) to prepare the area for one of these beauties:

http://www.hannants.co.uk/product/QB48107

They are simple drop-fit replacements of the kit parts that don't involve surgery on the wings themselves. I chose to use them because I need a replacement for the damaged hatch and I can't really cut out the opening in the left wing required to use the kit parts now.
I'm also thinking of buying one of Qickboosts cowling while I'm at it. I'm curious on how they fit and they don't cost that much:

http://www.hannants.co.uk/product/QB48117

I didn't make any progress (If you can call this "update" progress) otherwise. I wanted to continue with my 190s last week, but I had no time...

Cheers, Clemens


JOIN OUR COMMUNITY!

Our community is FREE to join. To participate you must either login or register for an account.

SEARCH FORUMS
FREE NEWSLETTER
By signing up you may also receive reader surveys and occasional special offers. We do not sell, rent or trade our email lists. View our Privacy Policy.