SEARCH FINESCALE.COM

Enter keywords or a search phrase below:

Fw 190 Butcher Bird 2013 (extended to June 2014) Group Build

564935 views
5865 replies
1 rating 2 rating 3 rating 4 rating 5 rating
  • Member since
    August 2009
  • From: MOAB, UTAH
Posted by JOE RIX on Wednesday, January 22, 2014 12:48 PM

Allen, I greatly appreciate your kind words. Thank You. There is no doubt that this hobby can test your patience. Trust me, I was close to tossing in the towel, sort of. I had purchased another kit just like this one and was on the verge of gutting the cockpit out of the old one and starting over. But. after I had stepped away and taken a "time out",I simply began to formulate options for repairing it and to just give it a try. After the second go around though my pride came into play as I was not going to be deterred. I was bound and determined to give it my best effort There is an old adage that I often apply to my life, " It's not about the mistake but, rather it's all in the recovery". Although it was very costly time wise I can honestly say that, although not exceptional, I am very proud of the work I put into it and the resulting outcome. In the whole process I came away having learned some new skills and techniques. There is nearly always a solution as long as I apply myself to acting on it.

"Not only do I not know what's going on, I wouldn't know what to do about it if I did". George Carlin

  • Member since
    December 2006
  • From: N. Georgia
Posted by Jester75 on Wednesday, January 22, 2014 1:07 PM

Props to you Joe! Like has been said, your perseverance on this build has to be commended. That finish looks better and better every time you post new pics! I am not sure whether I would have been able to resist introducing it to Mr. Mayhem had it been mine and that paint lifted like it did.

Eric


  • Member since
    April 2013
Posted by SchattenSpartan on Wednesday, January 22, 2014 4:33 PM

Ok guys, a short update. I started messing around with the PE seatbelts. The seatbelts for only two 190s took me 4 hours (and a lot of swearing), but I think they look OK.
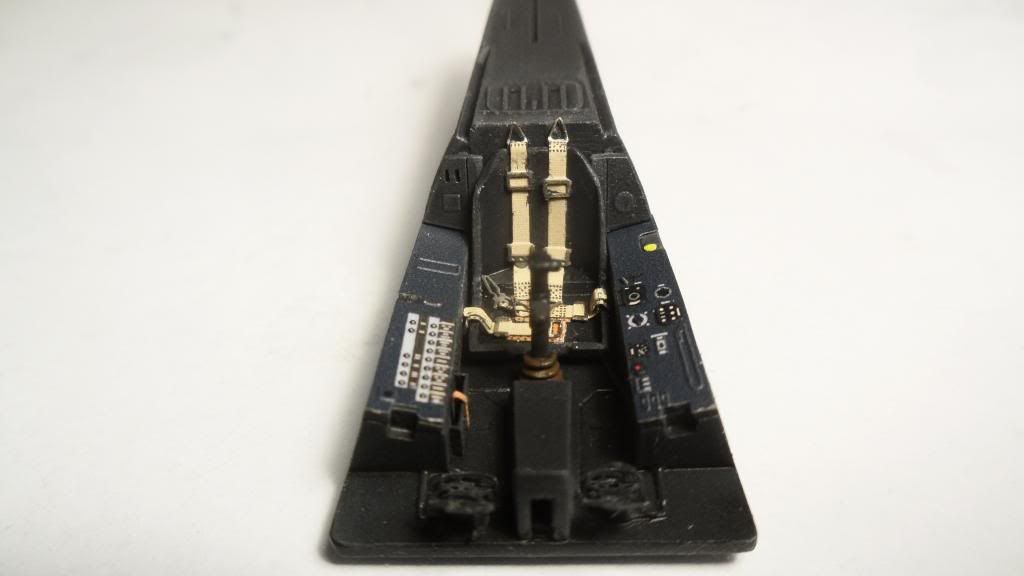
I had to do a lot of touch-up work on the seat after finally getting them to settle down without looking too awkward.

My second attempt looks a bit better, but tested my patience almost as much as the first one:
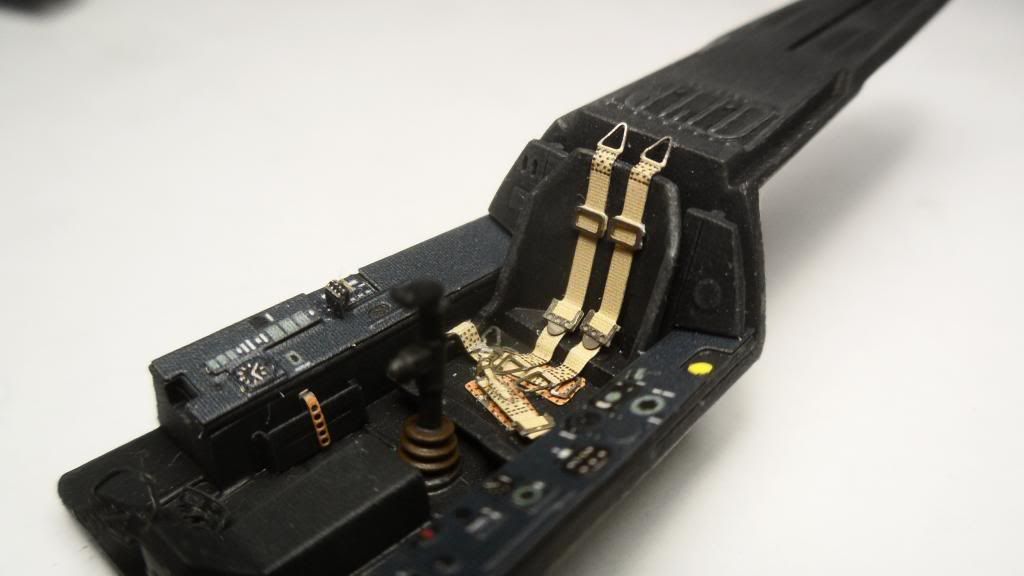
After that frustrating experience, I decided to try assembling the HGW belts and I'm having a blast so far. Since I know HGW's seatbelts, I'm starting to hate PE belts. Let's compare my thoughts about them (I'm referring to complicated belt designs like those on the 190 here):

HGW:

  • They assemble like the real deal, so they look like the real ones
  • The material used lays down on the contours of the seat without any problems
  • a small dab of superglue on each end is enough to hold the belts in place

Eduard PE:

  • They lack a bit of detail in some areas (but still look good nonetheless)
  • Getting the belts to lay down on the seat is a royal pain (that's what took me almost 3 hours today)

From now on it's only HGW belts for me. I really like working with PE, but seatbelts are just not compatible with PE if you ask me...

Cheers, Clemens

  • Member since
    August 2009
  • From: MOAB, UTAH
Posted by JOE RIX on Wednesday, January 22, 2014 7:49 PM

Clemens: Despite your struggles with the PE belts you did a fine job of making them look quite nice. I agree that PE seatbelts can be unwieldy to install. I find that I have gravitated away from them myself. I now prefer resin seats with the seat harnesses molded on. But, I have a couple of sets of HGW seatbelts in 1/48 that I have yet to use and I am definitely looking forward to putting them to use.

"Not only do I not know what's going on, I wouldn't know what to do about it if I did". George Carlin

  • Member since
    March 2012
  • From: Corpus Christi, Tx
Posted by mustang1989 on Thursday, January 23, 2014 4:41 AM

I'll echo what Joe said on the seat belts there Clemens. That's a really good job on those things. How folks can make them lay naturally is pure talent. I'm looking forward to trying a fabric set from Eduard in my future builds to help out with that.


 Forum | Modelers Social Club Forum (proboards.com) 

  • Member since
    April 2013
Posted by SchattenSpartan on Thursday, January 23, 2014 5:53 AM

Thanks a lot guys! There's still 2 more sets of PE belts to install, but then I'm off to the HGW belts Stick out tongue

I'm so glad I decided to use extra thin superglue for those belts. It just makes it way easier to "remove" the glue visble on the seat by applying some paint with a fine brush. It doesn't look perfect, but I guess it's good enough...

  • Member since
    September 2011
  • From: Milaca, Minnesota
Posted by falconmod on Thursday, January 23, 2014 7:06 AM

Where can you get HGW seat belts?

John

On the Bench: 1/72 Ki-67, 1/48 T-38

1/144 AC-130, 1/72 AV-8A Harrier

  • Member since
    April 2013
Posted by SchattenSpartan on Thursday, January 23, 2014 7:10 AM

I don't know where exactly in the states, but they have an evilbay shop and I get mine at Hannants (I throw in a set with every kit I order)...

  • Member since
    September 2011
  • From: Milaca, Minnesota
Posted by falconmod on Thursday, January 23, 2014 7:20 AM

Thanks, I'll look around, maybe I can even order them from my LHS.   I am not a fan of the PE ones,Bang Head  put a set in one of the last 190's I did and really didn't like it,  to much bending to try to get it to fit nicely in the seat.  

Almost done with my 1/72 snake head 190,  so I will be pulling out it's bigger brother snake head this weekend to continue working on it.

Clemen's, I think your a bad influence, Surprise I think I'm going to pick up a Hasegawa combo FW190 set  in 1/72 scale!!

Never can have to many 190'sBig Smile

John

On the Bench: 1/72 Ki-67, 1/48 T-38

1/144 AC-130, 1/72 AV-8A Harrier

  • Member since
    August 2009
  • From: MOAB, UTAH
Posted by JOE RIX on Thursday, January 23, 2014 7:27 AM

Hey John, I am lovin' on your snake 190. Fantastic work.

Here is a link to Victory Models who carries HGW seat belts amongst alot of other great AM stuff. They are based here in the U.S.:

http://www.victorymodels.com/

"Not only do I not know what's going on, I wouldn't know what to do about it if I did". George Carlin

  • Member since
    April 2013
Posted by SchattenSpartan on Thursday, January 23, 2014 8:00 AM

Some more progress on the belts, this time the Tamiya kit with the PE seatbelts robbed from a 190 profipack I'm not building ATM:


  • Member since
    April 2013
Posted by SchattenSpartan on Thursday, January 23, 2014 8:08 AM

John: Bending those damn belts is a frustrating task indeed...

Your snake 190 looks awesome! I love that color scheme...

Bad influence? I don't know what you're talking about... Angel

My latest additions:

1/32:

1/48:

I love the Hagelkorn bomb included with the last kit (and the black lower surfaces look great as well) 

  • Member since
    September 2011
  • From: Milaca, Minnesota
Posted by falconmod on Thursday, January 23, 2014 8:18 AM

I approve of your latest editions,Yes  I was just looking at the 1/32 one Tuesday at my LHS,  I have no desire to do 1/32 scale but it is a nice looking kit.  the other 2 I would love to do as well.  really like those big bombs underneath.Big Smile  Right now I'm just going to concentrate on the 2 snake head 190's I'm doing,Bang Head then look in the stash to see what one to build next,  maybe the blk/wht striped one, can't remember off hand what squadron it's from.

John

On the Bench: 1/72 Ki-67, 1/48 T-38

1/144 AC-130, 1/72 AV-8A Harrier

  • Member since
    December 2006
  • From: N. Georgia
Posted by Jester75 on Thursday, January 23, 2014 8:22 AM

John, your snake motiff is looking really nice. Will this bird have the rocket tubes underneath? Seems like I read they were very common with this group?

Clemens, those belts and pits look great! I agree those PE belts can be a pain to bend especially the pre-painted stuff as the paint can flake off. I am going to have to get a set of those HGW belts for a 32nd 109 I am working on.

Eric


  • Member since
    April 2013
Posted by SchattenSpartan on Thursday, January 23, 2014 8:30 AM

The F-8 isn't in my collection because of the bomb. I found a decal set for a NMF (I'm not kidding) 190 and this requires a kit that goes together without many problems, so Hasegawa is my best bet.

The upper surfaces on the wings and fuselage are painted in standard camo, but the rest of the aircraft is left in bare metal... Looks sexy, doesn't she? Stick out tongue

  • Member since
    April 2013
Posted by SchattenSpartan on Thursday, January 23, 2014 10:07 AM

Another two cockpits finished. This is starting to get really annoying Confused

I really need a short break from working with seatbelts now. The HGW belts have to wait untill tomorrow...

Eduard A-8:

Eduard A-8/R2:

Cheers, Clemens

  • Member since
    March 2010
  • From: MN
Posted by Nathan T on Thursday, January 23, 2014 10:10 AM

Nice work there Clemens. You must have nerves of steel to do so many at once. I'm with Joe Rix- I really like resin replacement seats with a molded on harness. Just buy a good quality small paintbrush.  But they do cost more...


  • Member since
    April 2013
Posted by SchattenSpartan on Thursday, January 23, 2014 10:14 AM

Thanks for the nice words, Nathan! How much is one of those seats on average?

  • Member since
    August 2009
  • From: MOAB, UTAH
Posted by JOE RIX on Thursday, January 23, 2014 10:44 AM

I'll step in on that one Clemens. First I am a huge fan of all things Ultracast. They just mold some really dynamite stuff, from wheels to seats. So, depending where you get them from they'll run you roughly $15.00, give or take a few bucks. But note, you get 2 seats per package on average. Here is a link to the Ultracast site for their 1/48 FW 190 seats.

www.ultracast.ca/.../default.htm

"Not only do I not know what's going on, I wouldn't know what to do about it if I did". George Carlin

  • Member since
    April 2013
Posted by SchattenSpartan on Thursday, January 23, 2014 10:57 AM

Thanks for the link! Those seats look really nice and cost about as much as the HGW belts. I think I have to order me some of them!

  • Member since
    March 2010
  • From: MN
Posted by Nathan T on Thursday, January 23, 2014 11:14 AM

Both True Details and Cutting edge make 190 resin seats as well. True details can be found on squadron or Sprue brothers, the cutting edge stuff is rare, so you'll have to look on ebay. Its just that Eduard provides the pe belts already in the kit, so I usually end up using them.


  • Member since
    March 2012
  • From: Corpus Christi, Tx
Posted by mustang1989 on Friday, January 24, 2014 5:53 AM

Thats a good looking set of belts you've got there Clemens! You've got your hands full with all of those builds pal.

Note to all who are considering an Aires interior set or the whole shabang update kit. Do NOT use the resing seat in that kit! That thing looks all wrong due to the fact that the seat back comes almost straight up and leaves about 3/16" gap between the top of the seat back and the rear bulkhead of the cockpit. I stuck with the Tamiya offering in mine as the alternative.


 Forum | Modelers Social Club Forum (proboards.com) 

  • Member since
    April 2013
Posted by SchattenSpartan on Friday, January 24, 2014 6:56 AM

Thanks a lot, Joe!

Thats some interesting info on that Aires set. I was in fact planning on buying it together with one of the Tamiya Doras, so this will bi vrey helpful when I get to building it.

  • Member since
    March 2012
  • From: Corpus Christi, Tx
Posted by mustang1989 on Friday, January 24, 2014 6:56 AM

Ok guys its update time. This build is now broken up into two sections: Section 1) The main airframe to include fuselage and wings from the engine firewall back and Section 2) which is the nose module from the firewall forward. Updates through the week have been in the form of painting the canopy frame and prepping the landing gear (painting and installing gear actuators) with what time I had. This morning saw the completion of the landing gear build up and other touch up to include painting the trim tabs red. Here's where I'm at right now with section 1:

and for those of you who don't remember or need a refresher this is section 2:


 Forum | Modelers Social Club Forum (proboards.com) 

  • Member since
    August 2009
  • From: MOAB, UTAH
Posted by JOE RIX on Friday, January 24, 2014 7:49 AM

Hot Diggity Joe, It's looking nothing short of fantastic. Now quit dinking around and get those two halves together so we can revel in all it's glory.

"Not only do I not know what's going on, I wouldn't know what to do about it if I did". George Carlin

  • Member since
    December 2006
  • From: N. Georgia
Posted by Jester75 on Friday, January 24, 2014 8:17 AM

Do it Do it Do Do it! Go Joe, mate them two suckers together!!!

Eric


  • Member since
    April 2013
Posted by SchattenSpartan on Friday, January 24, 2014 9:08 AM

A agree ith the others, stick those damn subassemblies together!

  • Member since
    March 2012
  • From: Corpus Christi, Tx
Posted by mustang1989 on Friday, January 24, 2014 9:30 AM

Thank you Joe, Eric and Clemens! I still have some more to go before that happens. I have to finish up the final touches because theres still alot of rolling the plane over on its back and handling it and I don't want to risk screwing all that I've done to it so far. Thank you all for your enthusiasm and comments so far. I should have this thing wrapped up within the next week or so at this point if everything goes ok.


 Forum | Modelers Social Club Forum (proboards.com) 

  • Member since
    October 2008
  • From: Georgia
Posted by Rigidrider on Friday, January 24, 2014 11:23 AM

Clemens....damn nice work on those pits! Very impressive! Bravo... cant say any more then that... (grin)

Joe, marvelous. ! Simply marvelous!  You know, I agree with you that you know when you can assy, You know that JJ puts antena on before paint!  Couldnt do it... But... if hes used to doing it that way, more power to him! heck... the last part I usually inst is that @#*:;* pitot tube. If I put it on any earlier I would knock it off at least 3 or 4 times before the end! LOL...

When Life Hands You A Bucket Of Lemons...

Make Lemonade!

Then Sell It Back At $2 Bucks A Glass...

  • Member since
    September 2003
  • From: Northern hemisphere - most of the time-
Posted by blkhwkmatt on Friday, January 24, 2014 4:34 PM

Mustang - your 190 is looking VERY nice,  can't wait to see the completed product!!  This group build has been amazing.  Chock full of great information and wonderful tips/techniques and it seems to never stop!!  Keep up the great work everyone.

Quidquid latine dictum sit, altum videtur!!! - Anything said in Latin sounds profound!


JOIN OUR COMMUNITY!

Our community is FREE to join. To participate you must either login or register for an account.

SEARCH FORUMS
FREE NEWSLETTER
By signing up you may also receive reader surveys and occasional special offers. We do not sell, rent or trade our email lists. View our Privacy Policy.